1
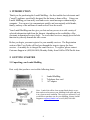
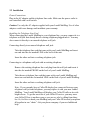
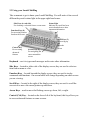
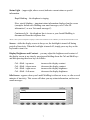
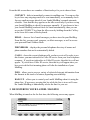
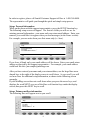
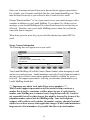
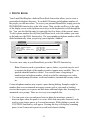
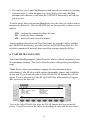
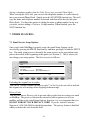
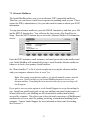
MailBug User Guide Welcome to your new email service. To begin, plug in your MailBug and contact Customer Support. A representative will help you select an email address and set up your account. For questions after your initial registration, you can get support quickly and conveniently right through your MailBug by sending questions or comments by email to Customer Support using the email address below. Please look inside this guide on page 4 for Getting Started and more details. Customer Support by phone: 408-360-0490 Customer Support by email: [email protected] 2 TABLE OF CONTENTS 1 2 3 4 5 6 7 8 9 10 11 12 13 14 15 INTRODUCTION GETTING STARTED 2.1 Unpacking your Landel MailBug 2.2 Installation 2.3 Using your Landel MailBug REGISTERING YOUR LANDEL MAILBUG EMAIL SERVICE 4.1 Mailbox 4.2 Reading a message 4.3 Composing and sending a message 4.4 Deleting a message 4.5 Email Address Book 4.6 Printing Email PHONE BOOK CALLER ID CALLS LIST OTHER FEATURES 7.1 Email Service Setup Options 7.2 Alternate Mailboxes 7.3 Calls List Setup Options 7.4 Voice Message Waiting Indication 7.5 International Characters and Symbols USING YOUR MAILBUG TO ACCESS ONLINE INFORMATION USING MAILBUG SERVICE IN COMBINATION WITH A PC 9.1 Using a computer to access your mailbug.com email 9.2 Forwarding mailbug.com email to another email address for computer access LIMITED WARRANTY FCC INFORMATION IMPORTANT SAFETY INSTRUCTIONS ACCEPTABLE USE AND PRIVACY POLICY INTERNATIONAL CHARACTERS SUMMARY FUNCTION KEYS SUMMARY 3 4 4 4 5 6 8 12 12 13 15 18 18 20 23 24 26 26 27 28 28 29 29 31 31 33 33 34 36 37 38 39 1. INTRODUCTION Thank you for purchasing the Landel MailBug – the first and the best electronic mail ("email") appliance specifically designed for the home or home office. Using your Landel MailBug you can easily send and receive email messages without using a computer. You can use it to communicate quickly and conveniently with friends, family, and any of the millions of email users all over the world. Your Landel MailBug can also give you fast and easy access to a wide variety of selected information right from the Internet, depending on the availability of the electronic information services (Info). To access these services, simply press the Info function key directly beneath the idle screen. Before you begin, you must register for your monthly services. The Registration section of this User Guide will lead you through the steps to sign up for these services. A monthly fee is charged for email services. To register, please contact Customer Support at (408)360-0490, Monday-Friday from 9AM to 5PM Pacific time. 2. GETTING STARTED 2.1 Unpacking your Landel MailBug First verify that you have received the following items: 1. 2. 3. Landel MailBug Telephone line cord AC adapter Note: Landel also offers clear custom-fitted plastic covers that can be used to protect your MailBug from spills and keep it in a clean-as-new condition. The covers are optional. If you would like to purchase one for your MailBug, contact Landel Support at [email protected] or call (408) 360-0490. 4 2.2 Installation Power Connections Plug in the AC adapter and the telephone line cords. Make sure the power outlet is not controlled with a wall switch. Caution: Use only the AC adapter supplied with your Landel MailBug. Use of other adapters could cause damage and invalidate your warranty. Installing the Telephone Line Cord When connecting the Landel MailBug to your telephone line, you may connect it to a telephone wall jack that already has an existing telephone plugged into it. You may also connect it directly to an unused telephone wall jack. Connecting directly to an unused telephone wall jack: Take the telephone line cord that came with your Landel MailBug and insert one end into the slot marked LINE at the back of the unit. Insert the other end into a working telephone jack. Connecting to a telephone wall jack with an existing telephone: Remove the existing telephone line cord plug from the wall jack and insert it into the slot marked PHONE on the back of your Landel MailBug. Take the new telephone line cord that came with your Landel MailBug and insert one end into the slot marked LINE on the back of your Landel MailBug. Insert the other end into a working telephone wall jack. Note: If you currently have a Caller ID display box connected between your telephone wall jack and telephone, you may replace it with your new Landel MailBug. Your Landel MailBug will display your Caller ID calls on its wide bright screen. To get the most out of your Caller ID service, you may move your Caller ID box to another room so you can see who’s calling from there, too. Or, feel free to hook your MailBug and your Caller ID box and your phone all together in one “chain.” Ask your phone company if you need additional help. 5 2.3 Using your Landel MailBug Take a moment to get to know your Landel MailBug. You will notice it has several different keys and a status light in the upper right hand corner. Side Keys (6 each side) For choosing a selection from a screen menu Function Keys (8) For accessing features listed on the screen Control Key For accessing advanced features Status Light Indicates new mail has been received and alerts to other important information Scroll Keys (2) For moving up and down the screen Arrow Keys (4) For navigating the cursor around the screen Keyboard – use it to type email messages and to enter other information. Side Keys – located to either side of the display screen, they are used to select an item from a menu or a list. Function Keys – located beneath the display screen, they are used to invoke commands and functions. On-screen labels will change depending on which screen you are viewing. Scroll Keys – located to the right of the display screen, they are used to scroll the screen text or move the cursor/pointer up and down. Arrow Keys – used to move the flashing cursor up, down, left, or right. Control (Ctrl) Key – located on the lower left of the keyboard, this key allows you to access advanced features on some screens. 6 Status Light – (upper right, above screen) indicates current status or special information. Rapid blinking – the telephone is ringing. Slow, steady blinking – important status information displayed on the screen (examples include new Mailbug.com email messages, new Caller ID information*, or new Voicemail messages*). Continuously lit – the telephone line is in use or your Landel MailBug is disconnected from the telephone line. *Please contact your local telephone company to obtain more information on the availability of Caller ID and Voicemail services. Screen – while the display screen is always on, the backlight is turned off during periods of inactivity. When the backlight is turned off, simply press any key on the keyboard to turn it on. Display Brightness and Contrast – you may adjust the brightness and contrast of the display screen at any time by pressing and holding down the Ctrl and Shift keys and then pressing the arrow keys as follows: Ctrl + Shift + up-arrow Ctrl + Shift + down-arrow Ctrl + Shift + right-arrow Ctrl + Shift + left-arrow increases the display contrast decreases the display contrast increases the display brightness decreases the display brightness Idle Screen – appears when your Landel MailBug is either not in use, or after several minutes of inactivity. This screen will show you any status information, such as new email messages MailBug You have new email. Connect Email Phonebook Calls Info 7 Hang Up From the idle screen there are a number of function keys for you to choose from: CONNECT – dials to immediately connect to mailbug.com. You can use this key to force any outgoing email to be sent immediately, or to manually check for new email messages ahead of your Landel MailBug’s normal automatic schedule. Note that this key appears on the idle screen only if you have set up your Landel MailBug to check for messages manually. If you choose to have your Landel MailBug send and check for email automatically, then you can access the CONNECT key from the idle screen by holding down the Ctrl key in the lower left corner of the keyboard. EMAIL – shows a list of email messages you have stored in your MailBug. From this list, you may read, compose, or delete messages, as well as access your personal Email Address Book. PHONEBOOK – displays the personal telephone directory of names and phone numbers that can be automatically dialed. CALLS – shows the recent telephone calls you have received. In order to use this feature, you must subscribe to Caller ID service from your local telephone company. If you do not subscriber to Caller ID service, then this key will not appear. If you do have Caller ID service, then this key will appear once you have received the first incoming phone call after the installation of your MailBug. INFO – allows you to access a variety of selected electronic information from the Internet at the touch of a button, depending on availability. HANG UP – allows you to control your Landel MailBug when it is using the phone line. If necessary, pressing this key while the line is in use will cause the Landel MailBug to immediately release the line for your use. 3. REGISTERING YOUR LANDEL MAILBUG When MailBug is turned on for the first time, the following screen may appear: MailBug Before your MailBug can be used, you must set it up. Please refer to your user’s manual for more information. Setup 8 In order to register, please call Landel Customer Support toll free at 1-408-360-0490. The representative will guide you through the quick and simple setup process. Setup: Personal information While on the phone with the support representative, press the SETUP function key. The following setup screen will appear. The first two fields you will see are for entering personal information: your name and your return email address: Enter your name as you would like it to appear when you send messages (in the From: section). For example, you can write down your first name only (i.e. Jane). Setup Personal Information Your Name : Your Email Return Address : Save Next If you leave it blank, only your email address will be shown. Enter your email return address as directed by the support representative. For example, your email address could look like this: [email protected]. After you have entered your name and your return address, use the large blue arrow shaped keys to the right of the display screen to scroll down. As you scroll, you will see more lines for additional setup information, as shown in the following screen examples. If your MailBug screen does not scroll down when you press the arrow keys, and displays the word NEXT over one of the blue oval function keys under the display screen, then press this NEXT key to scroll. Setup: Primary mailbox information The following lines will appear next as you scroll: Setup Primary Mailbox Information Username : Password : Shared mailbox ?: No Save Next 9 Enter your Username and your Password as directed by the support representative. For example, your Username could look like this: [email protected]. These must be entered correctly or you will not be able to send or receive email. Change "Shared mailbox?” to Yes if you want to access your email messages with a computer in addition to your Landel MailBug. If you choose No, all the received messages to your Landel MailBug will be erased from the mail server after they are delivered. Therefore, once your Landel MailBug retrieves them, they will not be retrievable from a computer. When done, press the arrow keys or press the blue function key under NEXT to scroll. Setup: Connect Information The following lines will appear next as you scroll: Setup Connect Information Connect Phone Number : Auto-connect to check for and deliver mail? : Yes Your Time Zone : Save Next Your Landel MailBug will call the Connect Phone Number when attempting to send and receive email messages. Landel maintains a network of local telephone numbers and one or more of these connect phone numbers should be available for you as a local call. The support representative will help you determine which number your Landel MailBug should dial. *** Important note about local and toll-free access numbers: *** While Landel support representatives will be careful to help you choose a number that is local to your home or office, please be sure to verify that the number your MailBug uses to connect is not a long distance toll call. Landel is not responsible for toll or other charges that might be incurred by the use of the telephone number entered into the MailBug setup. Your local telephone company will be able to verify whether the number you have chosen is local and whether or not there are any other applicable charges. While Landel maintains a large network of local numbers, it is possible that there is no local number 10 available for you. In these cases, Landel will make a toll-free number available to you for a nominal additional charge. In addition, because MailBug calls frequently to look for new email, you may wish to consider using this toll-free number in place of a local number if you have per call measured service. In a few instances, the nominal toll-free charge is less than the measured per call local fees. ******************************************************************* Your Landel MailBug is able to send and receive email messages automatically without your intervention. It will check frequently during the day for new messages, depending on your email usage. If you want your Landel MailBug to automatically receive and deliver email, set the Auto-connect to check for and deliver mail to: Yes. This is recommended. It is still possible to manually check for and send messages even if you set this option to: Yes. If you only want to check for or send messages manually, however, then set this option to: No. Enter your time zone as directed by the support representative. Enter: If you live in: Atlantic the Atlantic timezone Eastern the Eastern timezone Indiana Indiana, USA Central the Central timezone Mountain the Mountain timezone Arizona Arizona, USA Pacific the Pacific timezone Alaska Alaska, USA Hawaii Hawaii, USA When all the information is entered, press the SAVE function key. Your Landel MailBug is now registered and ready to send and receive email! Setup: Connecting to set the time and date Once you have saved your initial setup information, the following screen will appear. MailBug Press ‘Connect’ to set the current time and date. Connect Email Phonebook 11 After your conversation with the support representative, hang up the phone and press the blue button under the word CONNECT. By pressing this key, your Landel MailBug will automatically set the time and date appropriately. Your MailBug will automatically reset its clock often so that you can always depend on it for the correct time and date, and it will automatically update itself for changes in daylight savings time. 4. EMAIL SERVICE The email service allows you to receive, read, reply, forward and compose email messages right on your Landel MailBug, without the need for a computer. To access the email service, press the EMAIL function key on the idle screen. You will see your Mailbox screen, with a list of all email messages stored in your Landel MailBug memory. 4.1 Mailbox Your MailBug stores email messages in its memory. This internal memory is called your electronic "mailbox." For each email message, it shows the following information: • The date and time the message was created or received • Whom the message is To: or From: • The subject line of the message Email 21 of 23 Feb Apr Jul Nov Dec 15 03 22 11 30 4:57pm 9:34pm 8:31am 6:17pm 5:25pm Compose Read date To: To: From: From: Saved: [email protected] [email protected] [email protected] cbsmarketwatch [email protected] Delete Address Please check something I finished our taxes Come over for dinner After the Bell Report Soccer game postponed Done When the subject of an email extends beyond the edge of the screen, you will see an arrowhead in the last column. Use the left and right arrow keys to scroll horizontally in order to see the remaining portion of the line. 12 From this screen, you can: • • • • • READ – an email message COMPOSE – a new email message DELETE – an email message ADDRESS – opens your personal email address book DONE – returns to the idle screen Advanced functions are visible when the Ctrl key is pressed, including: MARK – an email message so that it will be spared when deleting “all” messages. A round dot (z) will appear next to the message. Pressing this key again will “un-mark” the message and remove the dot. SAVEADDR – saves the sender’s or recipient’s address in your personal Email Address Book 4.2 Reading a message From your Mailbox, select a specific email message by moving the cursor on the left side of the screen up or down until it points to the message you want. Do this by using the up and down arrow keys on the keyboard, or the large up/down scroll keys to the right of the display screen. Then press the function key labeled READ, or simply press the Enter key on the keyboard. As a shortcut, you can also simply press the small round side key directly next to the message you want to select. Tip: New email messages display a diamond () symbol next to the From: label. Once an email message has been opened, the diamond will disappear, indicating that this message has been read. Similarly, outgoing email messages (sent but not delivered) are also shown in your Mailbox and marked with a diamond next to the To: label. Once these outgoing messages have been delivered, the diamonds will no longer appear. Once you have opened an email message, you can scroll up and down through the message by using the up and down scroll keys to the right of the display, or the up and down arrow keys on the keyboard. Note: Your Landel MailBug will deliver and receive messages as large as 16,000 characters (about the same as four typewritten 8 1/2 x 11 pages). If there are more characters, the email message will be shortened to fit, and a message from the Landel MailBug will indicate that the message has been truncated. 13 Note: Attachments cannot be read or forwarded from your Landel MailBug, except for text and PDF files (.txt or .pdf). However, it does identify if an email included an attachment. If you also access your email from a computer, then you may send or receive attachments using webmail. See the section on using a computer to access your email for more information. While reading the message, the function keys at the bottom of the screen give you several options to choose from: REPLY – to the sender of a received message to automatically create a new message that’s addressed to the sender. Tip: You can include the text of the original message in your reply. For more information about this option, please refer to “Email Setup Options” section. FORWARD – a copy of the message to another person. You may replace the subject line with your own words, add your own preface to the forwarded message, and/or edit the content of the message. DELETE – an email message from your Mailbox. This can be done either while reading the email message or directly from your Mailbox. NEXT – allows you to move to the next message in your Mailbox and open it for viewing. PREVIOUS – allows you to move to the previous message in your Mailbox and opens it for viewing. DONE – returns you to the Mailbox screen. Advanced functions are visible when the Ctrl key is pressed, including: SAVEADDR – saves the sender’s or recipient’s address directly into your personal Email Address Book REPLYALL – allows you to send your reply to all of those addresses shown on the To: and From: lines of the original message. You can add or delete additional addresses. Tip: You may want to delete your own address from the To: line 14 MARK – an email message so that it will be spared when deleting “all” messages. A round dot (z) will appear next to the message. Pressing this key again will “un-mark” the message and remove the dot. UNWRAP / WRAP – allows you to temporarily un-wrap/wrap the lines of text. This is useful if the message contains large tables or lists that use more than 79 characters per line. This un-wrapped mode of viewing will only apply to this viewing session, and will automatically terminate when you leave this screen. To view the longer lines of text, use the left and right arrows on the keyboard to scroll the display horizontally. While in the un-wrapped viewing mode, the function key changes to WRAP to allow you to revert to the other viewing mode. The email message itself is not changed in any way by use of this feature. 4.3 Composing and sending an email message To compose an email message, press the COMPOSE function key. You will see the blank To: line, where you will be asked to enter the email address(es) of those who will receive your message. Your message can be sent to more than one person by separating each address with a comma (,) or a semicolon (;), and a space. You can type in the email addresses one by one, or use the ADDRESS function key to select names from your personal Email Address Book. Example: To: [email protected], [email protected] When John and Jane get their email, they will both see that it was sent to both of them. A common practice is to send a “carbon copy” (cc:), or a “blind carbon copy” (bcc:) of your email message. This is done by typing either cc: or bcc: in front of the desired address (you need to type the colon (:), too!). A bcc: is similar to the cc: except that no one but the bcc: recipient knows that he or she has gotten the message. Example: If you want to send email to John and Jane, without John knowing about it, then use the “blind carbon copy” feature. If you were to type this, John would only see that the message was sent to him. But Jane would know that it was sent to John and to her. To: [email protected], bcc:[email protected] 15 When you have finished entering all addresses, press Enter on the keyboard or press DONE. Next, you will be asked to enter the subject line. When finished with the subject line, press Enter, or press DONE. Now, you can compose your message. The diamond () in the composing email screen indicates the end of the message text. The cursor won’t move past the diamond. To add to the message, move the cursor to the diamond and continue typing. While composing messages, the function keys at the bottom of the screen give you several options to choose from: SEND – places your message in the queue to send the next time your Landel MailBug connects to the server. ADDRESS – opens your Email Address Book to select one or more names to be placed in the To:, cc: or bcc: lines. CANCEL – disregards any changes made to the current email message. Advanced functions are visible when the Ctrl key is pressed. These are helpful keys for saving and editing your message text. These functions are: SAVE – your message without sending it, so that you can continue composing the message at a later time. If you save a message, you can finish it later by selecting it for viewing and pressing CHANGE to edit it. Once your editing is complete, you can SAVE it again or choose SEND to send it. DELLINE – deletes the entire line where the cursor is positioned. This is very useful when forwarding messages that have many lines full of other email addresses – it can be used to quickly clean up a message with only a few keystrokes. DELEOL – deletes all characters from the cursor to the end of the current line. 16 DELEOM – deletes all characters from the cursor to the end of the message. This is a useful tip when forwarding or replying to a message without including the entire original message. There are also other time-saving editing commands that will make composing your message even easier. Use the Ctrl key on the keyboard to invoke these commands: Ctrl + left-arrow Moves cursor one word to the left Ctrl + right-arrow Moves cursor one word to the right Ctrl + up-arrow Moves cursor to the previous page (one screen up) Ctrl + down-arrow Moves cursor to the next page (one screen down) If the cursor is on the To: or Subject: line, you can also move the position of the cursor very quickly using the side keys: Left side key Right side key Moves cursor to start of line Moves cursor to end of line Once you have finished composing your email message, press the SEND function key. You will be returned to your Mailbox screen, where you’ll see a diamond () symbol next to the To: line of the message you just composed. This indicates that the message is queued for delivery. If the Auto-Connect option is on, your Landel MailBug is programmed to detect periods of inactivity. When it recognizes that you are not using the MailBug, it will assume that you are finished with your email activities and will automatically dial in to the server to transmit your outgoing messages. If the telephone line is in use, or if the called number is busy, your Landel MailBug will wait until the line is available, or until the number it is calling is no longer busy, and then re-dial to make the connection. It will keep trying until the connection is made and the message(s) are delivered. Once the outgoing messages are delivered, the diamond next to those messages in your Mailbox will disappear. This means that you can simply press the SEND function key when you finish composing a message, and then walk away – your Landel MailBug will make sure it gets sent! If the Auto-Connect option is disabled, you will be prompted to press the blue button under the word CONNECT to deliver your outgoing messages. 17 4.4 Deleting a message Your Landel MailBug has a large capacity for storing email messages – the exact number of messages depends on the length of each message. Unless you periodically delete messages, its memory will eventually become full and your Landel MailBug will be unable to send or receive new messages. In order to make room for new messages, you should delete messages when you no longer need them. Email messages can be deleted in several ways: from the Mailbox directly or when the message is being read. To delete an email message from your Mailbox, use the up/down arrow keys on the keyboard or the large scroll keys to move the pointer to the message you wish to delete, and then press the DELETE function key, or the Del (delete) key on the keyboard. Once the DELETE key has been pressed, you have several options: YES – confirms the command to delete the message NO – cancels the delete command ALL – deletes all messages stored in memory except for those messages that are unread, undelivered, or have been “marked” (z). OLDER – deletes all messages older than the selected message If you accidentally delete a message, you may “un-delete” it provided you have not left the email screen. This only applies to the most recently deleted message – you cannot retrieve messages previously deleted. Un-deleting a message must be done from the Mailbox screen, and cannot be done when reading an opened message. The UNDELETE command will not work when you delete messages using the ALL or OLDER keys. To reverse the function of a delete command, first make sure you are in your Mailbox screen. Then press and hold down the Ctrl key. Use the UNDELETE function key to retrieve your deleted message which will now appear at the bottom of the Mailbox. 4.5 Email Address Book The Email Address Book is a personalized directory that can store up to 100 different names and email addresses of your email correspondents. You can access the email Address Book by pressing the ADDRESS function key from your Mailbox screen. 18 Email Address Book 21 of 100 Joey Landel customer support Mary at Work Nancy and Bob Pat in Florida To: Create Change date [email protected] [email protected] [email protected] [email protected] [email protected] Delete Done You can create new entries, edit existing ones, or remove old entries. All entries are sorted alphabetically by name. When composing or forwarding an email message, you can select addresses from those already in your email Address Book instead of typing the email addresses explicitly. This will save you time and reduce typing errors in addressing your email messages. You may add entries to your email Address Book from your Mailbox or while reading an email message. For example, if you receive an email message from someone and you wish to add that person’s email address to your Address Book, simply hold down the Ctrl key and press the SAVEADDR function key. While viewing your email Address Book, you have the following options: TO: – places the selected entry on the “To:” line of a new message. CREATE – a new entry in the Email Address Book. When finished typing the new entry, press the SAVE function key. CHANGE – an existing Address Book entry. DELETE – entries from the Address Book. Note: You can un-delete the most recently deleted Address Book entry by pressing Ctrl and then the UNDELETE function key, provided you have not left the Address Book screen. DONE – returns to your Mailbox. 19 4.6 Printing Email If you use a MailBug in addition to a computer, then you can print email using your computer and access to webmail or by forwarding your email to other email accounts. But if you use only your MailBug, and you don’t use a computer, you can still print your email. But because MailBug is not a computer, it does doesn’t print directly to a computer printer. Instead, MailBug prints to fax machines. It’s as easy as sending email. There are no cables or ports to worry about, no printer drivers, nothing complicated. To print an email to a fax, or just to compose and send a fax by email, all you need to do is send an email to a special email address, and the MailBug system will fax it for you. Why printing to a fax machine is a better solution than a computer-printer Fax machines are as inexpensive today as computer printers, but they are easier and cheaper to operate than computer printers. In addition, MailBug doesn’t have a printer port -- there’s nowhere to plug in a computer printer. More important, MailBug customers typically keep MailBug in the kitchen or some other location where they have easy and quick access to it, and no one wants computer cables and a bulky printer cluttering up their kitchen counter. Because MailBug does not need to be directly cabled to the fax machine, you can keep your MailBug in the kitchen and install your fax in your home office or another room where it’s out of the way. MailBug can send your email to any fax destination. Send your email to your own fax machine to print it in the other room. Send it to the office fax to be printed there. Or, just use MailBug to compose and send quick and easy faxes of any sort to the office, or to a company, or to the kids, or to anywhere else. Printing to a fax is inexpensive As part of your MailBug email service, you can send two pages FREE each month to any fax number in the US or Canada. Then, each additional page sent to fax numbers within the US and Canada costs only 20 cents. (Keep in mind that short emails are generally a single page, and longer emails may require several pages.) Per-page fax charges will be billed semi-annually or whenever accumulated fax charges reach $5.00. Fax charges may be billed separately from normal MailBug email service charges. Sending email from MailBug to your own fax machine To print an email from your MailBug to your fax, just use your MailBug to send the email to your own fax number using the special email address below. That’s all you have to do. You can compose and send a new email message to your fax, or forward 20 a sent or received email to your fax. It’s that easy. But please keep in mind that this only works from your MailBug. Sending an email to this special address from a computer will not be successful. Using MailBug to send a fax to someone else’s fax machine You can also use your MailBug to send an email to a fax machine at another location. You can send it to the office, or to a friend’s house, or anywhere else in the US or Canada. In this sense, your MailBug has become a fax. Not only can it print email on your own fax, you can use MailBug as a mini-fax machine whenever you need one. If you need to fax something to someone, you can just type an email as you normally do right on your MailBug and send it as a fax using the special address below. Addressing email so that MailBug delivers it as a fax MailBug uses a new address format for faxing, in addition to the usual “cc” and “bcc” formats commonly used to send email. If you address your message as “cc:’ … it will be sent as a “carbon copy” to the recipient as email If you address your message as “bcc:” … it will be sent as a “blind carbon copy” to the recipient as email. If you address your message as “fax:” … it will be sent to the recipient as a fax. To send an email to a fax, simply specify a fax address on the Mailbug's To: line. A fax address looks like this: fax: name @ faxnumber The 'fax:' keyword identifies this as a fax address (similar to 'cc:' or 'bcc:'). Spaces are allowed after the fax: keyword. The name is optional, if provided it will appear on the fax exactly as entered. It may contain any combination of upper- or lowercase letters, numbers, '_', '-' or '.'. If the name is enclosed in quotes then it may contain any character, including space. The '@' is mandatory, and it separates the name of the recipient from the fax number of the recipient. The fax number following the '@' must contain exactly 10 digits. 21 Following are ways that you could correctly address an email in order to deliver it as a fax: fax:firstname.lastname@1015551212 (with no spaces or dashes) fax: firstname.lastname @ 101-555-1212 (with spaces and/or dashes) fax:@1015551212 (without a name) fax:"My MailBug is a fax machine!"@101-555-1212 (with a name in quotes) But the examples below are not properly addressed and can’t be delivered: firstname.lastnam@1015551212 (forgot the fax: keyword) fax: firstname.lastname@5551212 (not enough digits to be a fax number) fax: First Name @ 101-555-12123 (spaces in the name without quotes) fax:1015551212 (missing the '@' before the number) fax:"My MailBug is a fax machine! @ 408-360-0499 (forgot " after the name) The fax address can be used in conjunction with any other email or fax address on the Mailbug's To: line, for example: To: [email protected], fax: firstname.lastname@101-555-1212 The email recipient will not see the fax addresses, and the fax recipients will not see the email or other fax addresses. No additional phone line is required Keep in mind that you do not need an additional phone line for a fax machine. They can share your regular phone line just as MailBug does. There are many fax machines available today that also function as scanners and computer printers. Landel recommends a simple fax without those functions, because they are easier to operate, less expensive, and require no computer software. Simple faxes can often be found in the telephone and telephone accessory departments of your local store, rather than in the computer department. Confirmation and timing of delivery You will receive confirmation by email, right on your MailBug, telling you whether your fax was successfully delivered or not. From the time your MailBug transmits your message, it takes only a few minutes for the message to appear in the fax. Depending on system variables, it can be from 1 to 15 minutes or so. If the receiving fax is busy or unavailable, the system will wait and then re-try up to three times before giving up. The email confirmation will follow after the fax attempts are complete. To get more information or to see a list of frequently asked questions and answers, send an email to [email protected] and the information will be sent to you by return email. Or contact Landel at [email protected] 22 5 PHONE BOOK Your Landel MailBug has a built-in Phone Book feature that allows you to create a personalized telephone directory. It can hold 100 names and telephone numbers of the people you call most often. To access your personal PhoneBook, simply press the PHONEBOOK function key on the idle screen. Then, use the scroll keys to the right of the display screen or the up/down arrow keys on the keyboard to scroll through the list. You can also find the entry by typing the first few letters of the person’s name. To dial a phone number directly from your Phone book, select the number you want to dial and press the DIAL function key. The corresponding telephone number will be dialed automatically when you pick up your telephone’s handset. Phonebook 25 of 100 date Joey Landel customer support Mary at Work Pat in Florida (credit card) Voicemail Dial Create Change 555-5555 1-408-360-0490 (555) 555-1234 0-555-555-0005,,0000-0000-0000-0000 555-5555,,0000,1 Delete Done To create a new entry in your PhoneBook, press the CREATE function key. Note: Characters such as parentheses, spaces, dashes, or periods may be used to separate the digits of the number to make it appear more readable. They are ignored when the number is dialed. You can also enter a long string of numbers into each phone number, which is useful for entering access codes, voicemail prompt selections, credit card numbers, international country codes, etc. Certain telephone numbers may require a pause during dialing. Examples might be numbers that access automated answering systems such as voicemail or banking services that require you to pause and then enter additional digits after listening to an automated voice prompt. There are two ways to accomplish this: 1. You can create a two-second pause between digits by inserting a comma (,) between digits where the pause is to occur. More than one pause character can be used to create longer pauses in 2-second increments. While dialing is paused, the CONTINUE function key will appear. Pressing this key will skip any remaining pause (even if consecutive pauses are used) and return to dialing. 23 2. You can have your Landel MailBug pause until you tell it to continue by inserting a question mark (?) where the pause is to occur. When your Landel MailBug encounters this character, it will show the CONTINUE function key and wait for you to press it. To delete entries from your personal PhoneBook, select the entry you wish to remove and press the Delete key. Once the DELETE key has been pressed, you have several options: YES – confirms the command to delete the entry NO – cancels the delete command ALL – deletes all entries stored in memory You can undelete the most-recent Phone Book entry by using the Ctrl key and then the UNDELETE function key, provided you have not left the Phone Book list. The un-delete command will not work when you delete messages using the All key. 6. CALLER ID CALLS LIST Your Landel MailBug supports Caller ID service, which is offered separately by your local telephone company. This service identifies who is calling when your telephone rings*. *Note: Please contact your telephone company for more information about subscribing to Caller ID, the available options, the monthly charges, and availability in your area. If you do not subscribe to Caller ID, the CALLS function key will not appear. If you do subscribe to Caller ID, the CALLS key will automatically appear after you receive the first call. Calls 85 of 100 Joey Landel customer support Mary at Work Unavailable Pat in Florida Dial Dial 1+ date 555-5555 1-408-360-0490 555-555-1234 unavailable 1-555-555-0005 Done SavNum To view the Caller ID Calls List, press the CALLS function key seen on the idle screen. You will see a list of the callers in chronological order with the most recent 24 caller appearing at the bottom of the list. Each line is a record of a received call, showing the date and time of the call, along with the telephone number and name of the caller. If the number of the calling party has been “blocked” or is “unavailable” for any reason, then this information will appear in place of the caller’s number. If the telephone number of the caller matches an entry in your personal Phone Book, then that name will appear in the call record. The Calls List can hold up to 100 call records. Use the scroll keys to the right of the display screen or the up/down arrow keys on the keyboard to scroll through the list. New call records will be marked with a diamond () next to the telephone number. When you leave the Calls List screen, these diamonds will disappear since these calls will no longer be “new” the next time you see them. Dialing a telephone number from the list You may place a return call to any of the callers on the list (except for “blocked” or “unavailable”calls) by having your Landel MailBug automatically dial the number for you. To do this, use the scroll keys or the up/down arrow keys to select the call record you wish to dial, and then press the DIAL function key. The corresponding telephone number will be dialed automatically when you pick up your telephone’s handset. MailBug uses 7 digit dialing as a default setting. If your local area requires 10 digit or other options, press CTRL+ SETUP from the CALLS screen to select the proper dial option for your area. (See section 7.) Deleting telephone calls from the list When the list becomes full, the next call received will cause the oldest call record at the top of the list to automatically be deleted to make room for the new call record at the bottom of the list. To delete a specific call record, use the scroll keys or the up/down arrow keys to select the call record you wish to delete, and press the DELETE function key. Once the DELETE key has been pressed, you have several options: YES – confirms the command to delete the call record NO – cancels the delete command ALL – deletes all call records stored in memory OLDER – deletes all call records older than the selected record SAME – deletes all call records with the same number as the one in the selected record. This will also work for deleting all “Blocked” and “Unavailable” call records from the list. 25 Saving a telephone number from the Calls List to your personal Phone Book When viewing the Calls List, you can save the telephone number of a caller directly into your personal Phone Book. Simply press the SAVENUM function key. This will copy the name and telephone number associated with that caller directly into your Phone Book. You have the option of editing the name or phone number in any way you wish, such as adding a 1 before a 10-digit number. When finished, press the SAVE function key. 7 OTHER FEATURES 7.1 Email Service Setup Options Once your Landel MailBug is properly setup, the email Setup Options can be accessed by pressing the EMAIL function key and then, pressing Ctrl and the SETUP key. The email setup process is basically the same process as the registration setup process described at the beginning of this guide (see Section 3). This is where you can change your setup options. The first screen is as follows: Setup Personal Information Your Name : Jane Sample Your Email Return Address : [email protected] Save Next Excluding the original text in replies You can set “Include original message in reply?” to No if you do not wish to include the original text of a message when replying to that message. Privacy Code You can also enter a Privacy code to prevent other people from accessing your email on MailBug. The privacy code must be entered in order to gain access to your mailbox and thus to the email Setup Options, therefore, it is very important that you DO NOT FORGET YOUR PRIVACY CODE! If you do, contact Customer Support at 1-408-360-0490 for detailed instructions. The privacy feature is disabled when you delete the code from this field. 26 7.2 Alternate Mailboxes The Landel MailBug allows you to set up alternate POP3 compatible mailboxes. Therefore, you can retrieve email from a separate non-mailbug email account. Please contact the ISP(s) administrator(s) for your other email accounts to obtain your POP3 information. To setup your alternate mailboxes, press the EMAIL function key and then, press Ctrl and the SETUP function key. You will enter the first screen of the Email Service Setup. Press the NEXT function key to access the Alternate Mailbox #1 Information screen: Setup Alternate Mailbox #1 Information Hostname : pop.servername.com Username : jane.sample Password : Shared MailBox? Yes Save Enter the POP3 hostname, email username, and email password for that mailbox and your Landel MailBug will automatically retrieve email from the alternate mailboxes whenever it checks your primary Landel mailbox. Set “Shared mailbox?” to No if you do not plan on accessing the alternate mailbox with your computer, otherwise leave it set to Yes. Note: After setting up an alternate mailbox, you should manually connect from the idle screen. Watch carefully as your Landel MailBug attempts to access your alternate mailbox. If anything has been entered incorrectly, an error message will briefly appear. If you prefer, an even easier option is to ask Landel Support to set up forwarding for you. Landel can quickly and easily set up your mailbug.com email so that copies of all mail delivered to your MailBug are also forwarded to another email address accessed by computer. This allows you to have the total convenience of MailBug and simultaneous access to email for printing, archiving, or attachment handling from a computer. Contact Landel Support for more information about email forwarding. (See Section 9.) 27 7.3 Calls List Setup Options Note: The Calls function key is only accessible if you subscribe to Caller ID service. Please contact your local telephone company for information. Configuration options are available from the Caller ID Calls List screen, after your MailBug has displayed at least one incoming call record, and they are: The number of digits – used to dial local calls from the Calls list or the Phonebook. The default number of digits is 7. To change this setting, press the space bar on the keyboard to toggle between the following choices: 7 – if you dial only the 7-digit number 10 – if you must dial “area code + number” 11 – if you must dial “1 + area code + number” Blinking indicator light for new calls – The default option is: Yes. To change this setting, press the space bar on the keyboard to toggle between the following choices: Yes – the status light will blink whenever new calls have been received since the last time you looked at the Calls List. No – the status light will not blink in response to calls (it will only blink for new email and/or new voicemail messages). Remember blocked and unknown calls – The default option is: Yes. To change this setting, press the space bar on the keyboard to toggle between the following choices: Yes – the Calls List will display all blocked and unknown calls. No – the Calls List will not display blocked and unknown calls. When finished, press the SAVE function key. 7.4 Voice Message Waiting Indication (VMWI) Your Landel MailBug will also let you know when you have voicemail waiting in your network voice message box. If you have voicemail service from your telephone provider, the red light will blink and a message will appear on the idle screen to tell you when you have voicemail. Retrieving your voicemail will automatically clear 28 both the indicator light and the idle screen message. If you wish to clear it manually, you can do so by pressing the PHONEBOOK key. Voice Message Waiting Indication will work only if you subscribe to separate voicemail service with VMWI (FSK only). Please consult your local telephone company for availability, pricing and other details. 7.5 International Characters and Symbols Landel knows that email is a great way to keep in touch with friends and relatives around the world, and that you might wish to type email messages in Spanish or other languages. If you need to use certain foreign language characters or special symbols in your messages, your Landel MailBug allows you to type these characters by using the Alt key (and optionally the Shift key). By pressing and holding down the Alt key, and then pressing the appropriate keyboard key, you can enter many international or other special characters. Available characters are listed in the tables on the last pages of this manual. 8. USING YOUR LANDEL MAILBUG TO ACCESS ONLINE INFORMATION Depending on availability, your Landel MailBug may give you fast and easy access to a wide variety of online information directly from the Internet. To access these services, simply press the “Info” function key in the idle screen. Note: The Info function key will be visible on the idle screen only when the electronic information services (Info) are available. Check with your Landel support representative for more information on availability. Pressing this Services key, when available, will cause your MailBug to immediately “go online,” and it will stay online until you press “HangUp” or until it “times out.” Going online with your Landel MailBug is much easier and much faster than going online with a computer. With the push of a single button you will be online in about a half-minute and ready to view the information you want. Once you reach the online services, you will see a menu screen showing current information choices. The available categories are subject to change and Landel will add new ones from time to time. Each time you go online you will automatically see the most up to date choices available. Simply select what you wish to view using the twelve side keys to the left and right of the display screen. 29 MailBug.com – Online Services <- News/Sports/Stocks/More <- Frequently asked questions <- Local connection Numbers Welcome to Information Services from Landel Hang Up While you are online viewing information, you will see a “HangUp” function key. If you need to use your phone for any reason while you are online, pressing this key will cause your Landel MailBug to immediately release the line. You should also use this “HangUp” key to end your online session when you are finished viewing online information. Using the Info key, you can access up to date information directly from the World Wide Web, in categories such as: News Sports Stocks Weather Other -- top news, world news, sports news, entertainment news, and more -- current scores for your favorite teams -- get quotes fast -- forecasts for your town or where you might travel -- daily horoscopes and more! MailBug News Services Up-to-the-minute information Å Top News Å Sports Scores Å Weather Forecast Stock Quotes Horoscopes Æ Æ Hang Up In general, you will press the side key next to Top News to access Top News, or press the side key next to Horoscopes to access Horoscopes, etc. On some online pages, a diamond cursor will appear and a SELECT key will appear. In these instances, move the cursor to the selection you wish to view and then press SELECT. 30 9. USING MAILBUG SERVICE IN COMBINATION WITH A PC This section describes how the Landel MailBug and MailBug service can interact with your Personal Computer and the rest of the World Wide Web. 9.1 Using a Computer to Access Your mailbug.com Email If you have access to an Internet-enabled computer, you can use your computer to print your mailbug.com email. You can also use your computer to send and receive email attachments. If you wish to access your mailbug.com email from both your Landel MailBug and an Internet-enabled computer, you must set your MailBug to “share” your email account with your computer. From the Email Summary screen, press and hold the Ctrl key and simultaneously press the SETUP function key, in order to enter the setup menu. Scroll or press NEXT until you find the "Shared Mailbox" option. Press the space bar once or twice until the setting is YES, and then press SAVE. If your primary mailbox is shared, your Landel MailBug will retrieve your incoming email without deleting it from the server. A copy of each email message you receive on your Landel MailBug, complete with attachments, will remain accessible for you on the server through webmail. Webmail will generally retain up to 5 Megabytes of email. If you reach the capacity limit, you will receive notices by email that your “MailBox is almost full.” This refers to the MailBox at the Webmail server, it is not referring to your MailBug itself. If your webmail mailbox fills all the way up to capacity, you will have to delete some of the messages or download them to a computer before your MailBug will be able to receive new mail. You can use webmail to access your MailBug email from any Internet-enabled computer anywhere in the world. You can access it from home, while traveling, from a friend’s house, from work, even from the many public libraries and schools that have Internet-enabled computers. To access your mailbug.com email through webmail, use your computer and browser to go to http://mail.mailbug.com and select the webmail link. You will be asked to enter your user name and your password to access your email. Your user name is the first part of your email address. For example, your user name is “jane.sample” if your 31 email address is [email protected]. Your password is the same one you chose when you set up your Landel MailBug. Always remember your password. Once you have entered your user name and password, you will see your email along with options to: delete email file email for later use automatically delete or file incoming email print email to your local printer, and send new email (with or without attachments) To ensure that your webmail continues to work properly, always remember to log out of your webmail using the Log Out button before closing your browser. Webmail is useful for setting up filters, vacation auto-responders, and other tasks. You can also use webmail to change your email password. Please remember, however, that if you change your password in webmail, you must also change it in your MailBug setup or your MailBug will no longer be able to access your email. If you wish to use an email program to retrieve and store your email on your PC hard drive, use the following settings: POP (incoming mail) server : pop.mailbug.com SMTP (Outgoing email) server: mail.mailbug.com Username: [email protected] Password: yourmailbugpassword Please contact Landel Customer Support for more information about using a computer to access mailbug.com webmail, or contact your Internet service provider for more help on how to set your email software settings. If you plan to access your email only from your Landel MailBug, and do not wish to access your email from a computer, leave the primary mailbox setting on shared: NO. If you ever change your mind and wish to start accessing your email from a computer, you can easily change the setting at that time. 32 9.2 Forwarding mailbug.com email to another email address for computer access If you prefer to use your MailBug and a computer together, and prefer to use another existing email account with your computer, Landel Support can quickly and easily set up mail forwarding for you. With mail forwarding, copies of all mail delivered to your MailBug are also forwarded to another non-mailbug.com email address to be accessed by computer. This allows you to have the total convenience of MailBug, so that you never have to boot up your computer and log on just to see if you have mail, and also have simultaneous access to email for printing, archiving, or attachment handling from a computer. Contact Landel Support for more information about email forwarding. 10. LIMITED WARRANTY This warranty applies only to product purchased and used in the United States. What is covered: Any defects in material or workmanship are covered under warranty. For how long: The warranty lasts one year from date of purchase. What we will do: At our option we will repair or replace the product at no charge to you, if within the warranty period. If we choose to replace this product, we may replace it with a new or reconditioned product of the same or similar design. Replacement will be warranted for 90 days. Limitations: We will not pay for loss of time, inconvenience, loss of use of this product, or property damage caused by this product or its failure to work, or any other incidental or consequential damages. Landel cannot guarantee that the emails, phonebook, and callers list contents will be preserved. This data may be lost during the process of repairing your unit, and if we have to replace the unit with another one, then all saved data will be lost. For this reason, we suggest that you copy down all email addresses, phone numbers, and other important data saved in your MailBug before you return it to Landel for repair. Really important email messages may be forwarded to another email address, either yours or a friend's, for storage, or for purposes of printing them out on paper. Landel is not responsible for messages, addresses, or phone numbers on MailBugs sent in for repair. 33 What we ask you to do: Call the number on the manual for the address of an authorized service location and a return materials authorization number. You are responsible for paying all shipping and handling costs to return the product. We recommend you retain your original packing material in the event you need to ship the product. Please include your name, address, telephone number, proof of date of purchase, and a description of the operating problem. What this warranty does not cover: This warranty does not cover damages resulting from events outside of the manufacturer’s control including accidents, wear due to normal usage, misuse (including broken LCD), alterations, unauthorized repair, failure to follow instructions, fire, flood, Acts of God, and use outside of the United States. Nor do we warrant this product to be compatible with any particular telephone equipment or party line, key telephone systems, or more sophisticated customer premises switching systems. State Laws: Some states do not allow limitations on how long an implied warranty lasts or the exclusions or limitations of consequential damages, so the above limitations or exclusions might not apply to you. This warranty gives you specific legal rights. You might have other rights, which can vary from state to state. This warranty is valid only in the USA. If you have any questions about service or products, call Customer Support at: Landel Telecom 6830 Via Del Oro, Suite 260 San Jose, CA 95119 Customer Support by phone at: 1-408-360-0490 Email: [email protected] 11. FCC INFORMATION FCC Part 15 Information The Federal Communications Commission (FCC) established rules that permit this device to be directly connected to the telephone network. Standardized jacks are used for these connections. This equipment generates, uses, and can radiate radio frequency energy. If not installed and used in accordance with the provided instructions, the equipment might cause harmful interference to radio communications. However, there is no guarantee that interference will not occur in a particular installation. 34 If this equipment is found to cause harmful interference to radio or television reception, which can be determined by turning the equipment off and on, the user is encouraged to correct the interference by one or more of the following measures: 1. Re-orient or relocate the receiving antenna. 2. Increase the separation between the equipment and the receiver. 3. Connect the equipment to an outlet on a circuit different from that to which the receiver is connected. 4. Consult the dealer or an experienced radio/TV technician for help. FCC Part 68 Information This equipment complies with Part 68 of the FCC rules. The FCC Part 68 label is located on the bottom of the product. This label contains the device: • FCC Registration Number • Ringer Equivalence Number (REN) If the telephone company requests this information, you must give it to them. The REN is useful when trying to determine the maximum number of devices you can connect to your telephone line and still have those devices ring when called. In some, but not all areas, the sum of the RENs of all devices should not exceed five (5). To be certain of the number of devices that you can connect to your telephone line, as determined by the RENs, contact your local telephone company to determine the maximum RENs for you calling area. Only use standard modular telephone jacks to connect to the telephone network. The appropriate outlet or jack is a USOC RJ-11C or RJ-11W, which complies with Part 68 of the FCC rules. If this device causes harm to the telephone network, the telephone company will give you advance notice if you need to disconnect the device. But if advance notice is not practical, the telephone company will notify you as soon as possible. You will also be advised of your right to file a complaint with the FCC. The telephone company might make changes in its technical operations, facilities, equipment, or procedures which could affect the function or compatibility or your equipment. If they do, you will receive advance notice of the changes in order for you to make necessary changes to maintain uninterrupted service. This equipment should not be used on coin service telephones provided by the telephone company. Connecting to party lines is subject to state tariffs. Do not disassemble this device. There are no user-serviceable parts. If repair is required, please refer to the warranty information. 35 12. IMPORTANT SAFETY INSTRUCTIONS When using equipment that connects to a telephone line, basic safety precautions should always be followed to reduce the risk of fire, electric shock, and injury to persons. 1. Read and understand all instructions provided with this product. 2. Follow all safety warnings and instructions inscribed on this product. 3. Unplug this product from the wall outlet before cleaning. Do not use liquid or aerosol cleaners. Use a damp cloth for cleaning. 4. Do not use this product near water. For example, do not use near a bathtub, wash bowl, kitchen sink, laundry tub, near a swimming pool, or in a basement. 5. Do not place this product on an unstable cart, stand, or table as it could fall, causing serious damage to the product or degrading its operation. 6. Do not overload the wall outlets or extension cords as this action can result in the risk of fire or electrical shock. 7. Operate this unit using only the AC-to-DC power adapter supplied with the product and plugging it into 110 V or 120 VAC outlet. Do not attempt to substitute another power source. If you are unsure of the power supply in your home, contact your local power company. 8. Do not disassemble this product – it could cause an electrical shock. Opening or removing covers can expose you to dangerous voltages or other risks. Incorrect re-assembly can cause electrical shock during subsequent use. 9. Unplug this product from the wall outlet and refer servicing to qualified service personnel under the following conditions: • • • • • • • If the power supply or plug is frayed or damaged. If liquid is spilled into the product. If the product has been exposed to rain or water. If the product does not operate normally by following the operating instructions. If the product has been dropped or the casing is damaged. If the product exhibits a distinct change in performance. Avoid using this product during an electrical storm. There can be a slight risk of electrical shock from lightning. 36 13. APPROPRIATE USE AND PRIVACY POLICY Our Appropriate Use and Privacy Policy (AUPP) is designed to help protect our customers, and the Internet community, from irresponsible or illegal activities. Keeping customer information secure and using it only as our customers would want us to is a top priority. As good Internet citizens, we prohibit the impersonation of others, unsolicited commercial appeals, and any disruption of Internet services. Examples of such activities are given below: Email Commercial email: Sending unsolicited commercial email is prohibited. Using a mailbug.com email address (@mailbug.com) to collect responses from unsolicited commercial email is prohibited. Mail bombing: Sending large volumes of unsolicited email is prohibited. Harassment: Sending threatening or harassing email after being requested to stop is prohibited. Extremely threatening or harassing email is always prohibited. General Impersonation: Attempting to impersonate any person, using forged headers or other identifying information is prohibited. The use of anonymous remailers and nicknames does not constitute impersonation. Network unfriendly activity: Activities which adversely affect the ability of other people or systems to use Landel services or the Internet is prohibited. Privacy violations: Attempts, whether successful or not, to gain access to any computer system, or customer's data, without consent is prohibited. Financial Sharing accounts with anyone other than immediate family members, or re-selling service without express written consent from Landel is prohibited. Untimely payment of any and all amounts due may result in account cancellation. Excessive Utilization Mailbug.com accounts specify limits on mailbox utilization, and use in excess of those limits is not permitted. The total number of bytes required to store an account’s mail data determines mailbox utilization. In the event Landel determines that an account is exceeding the mailbox utilization, the account owner will be notified by email. If the excess use continues for more than 48 hours after such notification, the owner may be requested to upgrade the account's service agreement or to modify the activity creating the excess use. If excessive utilization is determined to adversely affect Landel’s ability to provide service, immediate action will be taken. The account owner will be notified by email as soon as practical. Privacy We will safeguard, according to strict standards of security and confidentiality, any information our customers share with us permitting only authorized employees, who are trained in the proper handling of customer information, to have access to that information. We will limit the collection and use of customer information to the minimum we require to deliver email service to our customers, which includes advising our customers about our products, services, and other opportunities. We may facilitate relevant offers from reputable companies. These companies are not permitted to retain Landel customer information unless the customer has specifically expressed interest in their products or services. Whenever we hire or enter into a business relationship with other organizations to provide support services, we will require them to conform wherever possible to our privacy standards and to allow us to audit them for compliance. Please note that free web services provided to Landel customers by 1stup.com are advertising supported and may require the collection of additional customer information. Customers choosing to use this service must review and accept the details of the offer carefully before downloading or installing the service. This is an optional and complimentary service, and Landel does not require its customers to enroll in or use this service. It may be necessary for Landel employees to examine system accounting logs and other records to resolve system problems. Landel reserves the right to access an account's mailbox to resolve system problems or mail system errors. We will not reveal customer information to any external organization unless we have previously informed the customer in disclosures or agreements, have been authorized by the customer, or are required by law. In addition, Landel will cooperate with the appropriate legal authorities in investigating claims of illegal activity, including but not limited to illegal transfer or use of copyrighted material, postings or email containing threats of violence, or other illegal activity. Landel makes no guarantee and assumes no liability for the security of any data on any server including "secure servers." Our customers are reminded that no email system should be considered safe from intrusion. Email may pass through many systems, and should not be considered a secure means of communication. Rationale This document provides a general understanding of the Landel policy on the Appropriate Use of services. Common sense and judgment are a necessary part of any system of rules, and this AUPP is no exception. Of course, flagrant or repeated violations of the Policy are viewed in a very different light than minor infractions. 37 Protection of our customers and our resources, the ability to provide quality service to our customers, conformance with existing law, and the protection of our reputation as a service provider are all contributing factors to decisions on AUPP violations. It is our intention to allow Landel customers access to everything our services offer with minimal or no interference. Our belief in Free Speech is a firm commitment to our customers. However, Free Speech does not include the right to shout "Fire" in a crowded theater. In an analogous manner, certain activities are considered inappropriate by the Internet community at large, and cannot be permitted under the guise of Free Speech. Landel does not monitor the activity of accounts except for measurements of system utilization and billing records. However, in our efforts to promote good citizenship within the Internet community, if we become aware of inappropriate use of MailBug service, we will respond. If a mailbug.com account is used to violate the AUPP, we reserve the right to terminate service without notice. Our preferred course of action would be to advise the account owner of the inappropriate behavior and take the necessary corrective action. However, flagrant violations of the AUPP will result in immediate termination of service. In the event that an account is temporarily inactivated as a result of any prohibited activities, the account may be subject to reactivation charges and/or deposit requirements to be determined by Landel. Maintenance Landel’s regularly scheduled maintenance is Saturday / Sunday, midnight to 3am. During this time, MailBugs may not be able to connect with our servers, however most users will not detect any interruption to their service. 14. International and Special Characters You can type email messages in Spanish or other languages. If you need to use foreign language characters or special symbols in your messages, your MailBug allows you to type these characters by using the Alt key or the Shift key and Alt key. By pressing and holding down the Alt key or Shift and Alt keys, and then pressing the appropriate keyboard key, you can enter any of the characters that are shown in the table below. Key Alt A B C D E F G H I J K L M N O P Q R S T U V W X Y Z á ï ç è é ë õ û í ù ì ò ö ñ ó ô ã ê â î ú ü å ä ý à 38 Shift-Alt Key Á Ï Ç È É Ë Õ Û Í Ù Ì Ò Ö Ñ Ó Ô Ã Ê Â Î Ú Ü Å Ä Ý À 1 2 3 4 5 6 7 8 9 0 . , = ` ; / \ [ ] Tab Alt ¹ ² ³ ¼ ½ ¾ ¥ ß ø ° ¯ · ¸ ¬ ´ µ ÷ ÿ þ æ κ Shift-Alt ¡ ¤ £ ¢ ª © ® × Ø º » « ± § ¨ ¿ ¦ Þ Æ κ 15. Landel MailBug Function Key Summary Address All BCC: Calls Cancel CC: Compose Connect Continue Create Delete DelEOL DelEOM DelLine Done Info Edit Email Forward Hang Up Mark Next No OK Older PhoneBook Previous Read Reply ReplyAll Same Save SaveAddr Send Setup System To: UnDelete UnWrap Wrap Yes Access your personal email Address Book When the Delete function key is pressed, delete all of the entries (personal Phone Book, personal email Address Book, etc.) or email messages from your MailBox Allow you to send a blind carbon copy (BCC) of the email message to a person Identifies telephone calls you received (to see this function key, you must subscribe to Caller ID) Disregard any changes or edits made to an entry (personal Phone Book, personal email Address Book, etc.) or an email message Allow you to send a carbon copy (CC) of the email message to a person Compose a new email message Allow you to set the time and date, send email messages, and check for new email messages Allow you to continue a process Create a new entry (personal email Address Book or Phone Book) Delete an entry (personal Phone Book, personal email Address Book, etc.) or an email message from your MailBox When entering text, delete all characters from the cursor to the end of the line (visible when you press the Ctrl key) When composing an email message, delete all characters from the cursor to the end of the message (visible when you press the Ctrl key) When entering text, delete the entire line where the cursor is positioned (visible when you press the Ctrl key) Return you to where you came from Allows online access to Electronic information services Allows you to modify / edit / change existing entries (personal Phone Book, personal email Address Book, etc.) or email message Access to your MailBox Forward a copy of the email message to another person Terminate the session Mark an email message to spare it when deleting “All” messages (visible when you press the Ctrl key) Allow you to move to the next email message When the Delete function key is pressed, cancel the command Confirm / Continue a function or a process When the Delete function key is pressed, delete all of the entries (personal Phone Book, personal email Address Book, etc.) or email messages older than the entry or the email message you have chosen Access to your personal Phone Book Allow you to move to the previous email message Read an email message Reply to the sender of a received email message Reply to all the senders of a received email message (visible when you press the Ctrl key) Allows you to delete calls from same number Save your email message without sending it so you can continue composing the message at a later time Save the sender’s or recipient’s address in your personal Email Address Book Send an email message Setup process for the device or for the email service Access special setup mode Recipient of an email message Allow you to undelete the items previously deleted (must be in the same screen) Allow you to temporarily un-wrap the lines of text (visible when you press the Ctrl key) Allow you to wrap the lines of text (visible when you press the Ctrl key) When the Delete function key is pressed, confirm the command 39 Landel Telecom 6830 Via Del Oro Suite 260 San Jose, CA 95119 Copyright© 2004 Landel Telecom. No part of this publication may be reproduced, transcribed, stored in a retrieval system, or translated into any language, in any form, by any means, without the express written permission of Landel Telecom. Patents Pending. Customer Support By Phone: 1-408-360-0490 By Email: [email protected] MailBug Order Inquiries: By Phone: 1-408-360-0490 By Email: [email protected] or [email protected] 00300 REV E 40