1
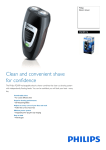
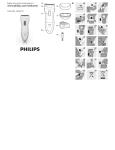
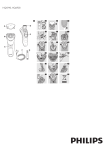
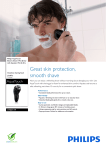
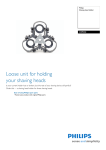
Always here to help you
Register your product and get support at
www.philips.com/welcome
HQ6900 series
User manual
1
Table of contents
HQ6900 series
ENGLISH 4
DANSK 10
DEUTSCH 16
ƁƇƇƃƉƅƆž 22
ESPAÑOL 29
SUOMI 35
FRANÇAIS 41
ITALIANO 47
NEDERLANDS 53
NORSK 59
PORTUGUÊS 65
SVENSKA 71
TÜRKÇE 77
4
ENGLISH
Introduction
Congratulations on your purchase and welcome to Philips! To fully
EHQHÀWIURPWKHVXSSRUWWKDW3KLOLSVRIIHUVUHJLVWHU\RXUSURGXFWDW
www.philips.com/welcome.
The Close Cut system ensures a close and easy shave every day. For the
EHVWUHVXOWPRYHWKHVKDYLQJKHDGVRYHU\RXUVNLQLQERWKVWUDLJKWDQG
circular movements.
What’s in the box
-
Shaver
Protection cap
Cleaning brush
Mains cord with plug
User manual
/RFDOJXDUDQWHHOHDÁHW
:RUOGZLGHJXDUDQWHHOHDÁHW
General description (Fig. 1)
1
2
3
4
5
8
Protection cap
Shaving unit
Shaver on/off slide
Mains cord with plug
Appliance plug
7ULPPHU+4+4RQO\
7ULPPHUVOLGH+4+4RQO\
Cleaning brush
Using the appliance
Shaving
1 Put the appliance plug in the shaver.
2 Put the mains plug in the wall socket.
3 Push the on/off slide upwards to switch on the shaver.
4 Move the shaving heads over your skin. Make both straight and
circular movements.
Shaving on a dry face gives the best results.
<RXUVNLQPD\QHHGRUZHHNVWRJHWDFFXVWRPHGWRWKH3KLOLSVVKDYLQJ
system.
5 Push the on/off slide downwards to switch off the shaver.
ENGLISH
5
6 Put the protection cap on the shaver every time you have used it,
to prevent damage.
Trimming (HQ6946/HQ6940 only)
You can use the trimmer to trim your sideburns and moustache.
1 Push the slide upwards to open the trimmer.
The trimmer can be activated while the motor is running.
Cleaning and maintenance
Regular cleaning guarantees better shaving performance.
This appliance is not washable. Never immerse the appliance in water,
nor rinse it under the tap.
Never use scouring pads, abrasive cleaning agents or aggressive liquids
such as petrol or acetone to clean the appliance.
- )RUHDV\DQGRSWLPDOFOHDQLQJ3KLOLSV6KDYLQJ+HDG&OHDQLQJ
6SUD\+4LVDYDLODEOH$VN\RXU3KLOLSVGHDOHUIRULQIRUPDWLRQ
Note: Philips Shaving Head Cleaning Spray may not be available in all
countries. Contact the Consumer Care Centre in your country about the
availability of this accessory.
You can also clean the shaver in the following way:
Every week: shaving unit and hair chamber
1 Switch off the shaver. Remove the mains plug from the wall socket
and pull the appliance plug out of the shaver.
2 &OHDQWKHWRSRIWKHDSSOLDQFHÀUVW8VHWKHFOHDQLQJEUXVKVXSSOLHG
6
ENGLISH
3 Press the release button (1) and remove the shaving unit (2).
4 Clean the inside of the shaving unit and the hair chamber with the
cleaning brush.
5 Put the shaving unit back onto the shaver.
Every two months: shaving heads
1 Switch off the shaver. Remove the mains plug from the wall socket
and pull the appliance plug out of the shaver.
2 Press the release button (1) and remove the shaving unit (2).
3 Turn the wheel anticlockwise (1) and remove the retaining frame (2).
ENGLISH
7
4 Remove the shaving heads (cutters and guards) one by one and clean
them with the cleaning brush supplied.
Note: Do not clean more than one cutter and guard at a time, since they are
all matching sets. If you accidentally mix up the cutters and guards, it may take
several weeks before optimal shaving performance is restored.
5 Clean the cutter with the short-bristled side of the cleaning brush.
Brush carefully in the direction of the arrow.
6 Brush the guard.
7 Put the shaving heads back into the shaving unit. Put the retaining
frame back into the shaving unit, push it down (1) and turn the wheel
clockwise (2).
8 Put the shaving unit back onto the shaver.
Extra-thorough cleaning
)RUH[WUDWKRURXJKFOHDQLQJSXWWKHVKDYLQJKHDGVLQDGHJUHDVLQJOLTXLG
HJDOFRKROHYHU\VL[PRQWKV7RUHPRYHWKHVKDYLQJKHDGVIROORZVWHSV
WRGHVFULEHGDERYH$IWHUFOHDQLQJOXEULFDWHWKHFHQWUDOSRLQWRQWKH
inside of the guards with a drop of sewing machine oil to prevent wear of
the shaving heads.
8
ENGLISH
Trimmer (HQ6946/HQ6940 only)
Clean the trimmer every time you have used it.
1 Switch off the shaver. Remove the mains plug from the wall socket
and pull the appliance plug out of the shaver.
2 Clean the trimmer with the cleaning brush supplied.
Tip: Lubricate the trimmer teeth with a drop of sewing machine oil every six
months.
Replacement
Replace the shaving heads every two years for optimal shaving results.
Replace damaged or worn shaving heads with HQ56 Philips Shaving Heads
only.
1 Switch off the shaver. Remove the mains plug from the wall socket
and pull the appliance plug out of the shaver.
2 Press the release button (1) and remove the shaving unit (2).
3 Turn the wheel anticlockwise (1) and remove the retaining frame (2).
ENGLISH
9
4 Remove the shaving heads and place new ones in the shaving unit.
5 Put the retaining frame back into the shaving unit, push it down (1)
and turn the wheel clockwise (2).
6 Put the shaving unit back onto the shaver.
Troubleshooting
This chapter summarises the most common problems you could
encounter with the appliance. If you are unable to solve the problem with
WKHLQIRUPDWLRQEHORZYLVLWwww.philips.com/support for a list of
IUHTXHQWO\DVNHGTXHVWLRQVRUFRQWDFWWKH&RQVXPHU&DUH&HQWUHLQ\RXU
country.
Problem
Possible cause
Solution
Reduced shaving
performance.
The shaving heads are dirty. You
have not cleaned the shaver
well enough or you have not
cleaned it for a long time.
Clean the shaver thoroughly before you
continue shaving. See chapter ‘Cleaning and
maintenance’.
Long hairs obstruct the shaving
heads.
Clean the cutters and guards with the cleaning
brush supplied. See chapter ‘Cleaning and
PDLQWHQDQFH·VHFWLRQ¶(YHU\WZRPRQWKV
shaving heads’.
The shaving heads are damaged
or worn.
Replace the shaving heads every 2 years
for optimal shaving results. See chapter
‘Replacement’.
The shaver does
QRWZRUNZKHQ
I push the on/off
slide upwards.
The shaver is not connected to
the mains.
3XWWKHPDLQVSOXJLQWKHZDOOVRFNHW
6NLQLUULWDWLRQ
<RXUVNLQQHHGVWLPHWRJHW
used to the Philips shaving
system.
6NLQLUULWDWLRQGXULQJWKHÀUVWZHHNVRIXVH
LVQRUPDO$IWHUWKLVSHULRGWKHVNLQLUULWDWLRQ
usually disappears.