1
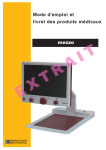
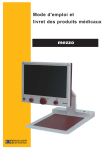
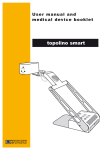
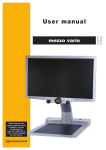
User manual and
medical device booklet
mezzo
Contents
General notice: . . . . . . . . . . . . . . . . . . . . . . . . . . . . . . . . . . . . . . . . . . . . . . . . . . . . . .5
1. Notes on the electromagnetic compatibility (EMV) . . . . . . . . . . . . . . . . . . . . . . . . .5
1.1 Combined use with other devices. . . . . . . . . . . . . . . . . . . . . . . . . . . . . . . . . . . . .5
1.2 Product description . . . . . . . . . . . . . . . . . . . . . . . . . . . . . . . . . . . . . . . . . . . . . . . .5
1.3 Purpose . . . . . . . . . . . . . . . . . . . . . . . . . . . . . . . . . . . . . . . . . . . . . . . . . . . . . . . . .5
1.4 Product life . . . . . . . . . . . . . . . . . . . . . . . . . . . . . . . . . . . . . . . . . . . . . . . . . . . . . .5
1.5 Security advice . . . . . . . . . . . . . . . . . . . . . . . . . . . . . . . . . . . . . . . . . . . . . . . . . . .6
1.6 Equipment cleaning . . . . . . . . . . . . . . . . . . . . . . . . . . . . . . . . . . . . . . . . . . . . . . . .6
1.7 Special advice for transport and storage . . . . . . . . . . . . . . . . . . . . . . . . . . . . . . .6
1.8 Dealing with faults . . . . . . . . . . . . . . . . . . . . . . . . . . . . . . . . . . . . . . . . . . . . . . . . .6
Security checks . . . . . . . . . . . . . . . . . . . . . . . . . . . . . . . . . . . . . . . . . . . . . . . . . . . . . .6
1.9 If problems arise . . . . . . . . . . . . . . . . . . . . . . . . . . . . . . . . . . . . . . . . . . . . . . . . . .6
1.10 Environmentally friendly disposal according to EC directive 2002/96/EG . . . . .7
1.11 Use in conjunction with medical products . . . . . . . . . . . . . . . . . . . . . . . . . . . . . .7
1.12 Storage/Safe-keeping of the operating instruction . . . . . . . . . . . . . . . . . . . . . . .7
2 mezzo set up . . . . . . . . . . . . . . . . . . . . . . . . . . . . . . . . . . . . . . . . . . . . . . . . . . . . . .8
Unit set up . . . . . . . . . . . . . . . . . . . . . . . . . . . . . . . . . . . . . . . . . . . . . . . . . . . . . . . . . .8
3 mezzo operating elements . . . . . . . . . . . . . . . . . . . . . . . . . . . . . . . . . . . . . . . . . . . .9
3.1 Control panel baseplate . . . . . . . . . . . . . . . . . . . . . . . . . . . . . . . . . . . . . . . . . . . .9
3.2 Control panel TFT-Front . . . . . . . . . . . . . . . . . . . . . . . . . . . . . . . . . . . . . . . . . . . .9
4 Description of the control elements . . . . . . . . . . . . . . . . . . . . . . . . . . . . . . . . . . . .10
4.1 Control panel baseplate . . . . . . . . . . . . . . . . . . . . . . . . . . . . . . . . . . . . . . . . . . .10
On/off (power switch) . . . . . . . . . . . . . . . . . . . . . . . . . . . . . . . . . . . . . . . . . . . . . . . .10
Lighting on/off . . . . . . . . . . . . . . . . . . . . . . . . . . . . . . . . . . . . . . . . . . . . . . . . . . . . . .10
4.2 Control panel TFT-Front . . . . . . . . . . . . . . . . . . . . . . . . . . . . . . . . . . . . . . . . . . .10
Autofocus (AF) . . . . . . . . . . . . . . . . . . . . . . . . . . . . . . . . . . . . . . . . . . . . . . . . . . . . .10
Colour selection . . . . . . . . . . . . . . . . . . . . . . . . . . . . . . . . . . . . . . . . . . . . . . . . . . . . .10
Adjustment of enlargement
. . . . . . . . . . . . . . . . . . . . . . . . . . . . . . . . . . . . . . . . . . .11
Automatic colour saturation . . . . . . . . . . . . . . . . . . . . . . . . . . . . . . . . . . . . . . . . . . . .11
Contrast / Brightness . . . . . . . . . . . . . . . . . . . . . . . . . . . . . . . . . . . . . . . . . . . . . . . . .11
Windowing and line marker . . . . . . . . . . . . . . . . . . . . . . . . . . . . . . . . . . . . . . . . . . . .11
5 Start- up mezzo . . . . . . . . . . . . . . . . . . . . . . . . . . . . . . . . . . . . . . . . . . . . . . . . . . .12
5.1 Activate . . . . . . . . . . . . . . . . . . . . . . . . . . . . . . . . . . . . . . . . . . . . . . . . . . . . . . . .12
5.2 Closing-down and switching off the device . . . . . . . . . . . . . . . . . . . . . . . . . . . . .12
5.3 Automatic save regulation for the device set-up . . . . . . . . . . . . . . . . . . . . . . . .12
5.4 Replacement of the lighting . . . . . . . . . . . . . . . . . . . . . . . . . . . . . . . . . . . . . . . . .12
Attention: information to the power supply which is included
in the scope of supply of the mezzo (Type: FW 7362M/12). . . . . . . . . . . . . . . . . . .12
6 Mobility package/Use of battery . . . . . . . . . . . . . . . . . . . . . . . . . . . . . . . . . . . . . .13
Checklist: In case problems occur . . . . . . . . . . . . . . . . . . . . . . . . . . . . . . . . . . . . . .14
Product Identity . . . . . . . . . . . . . . . . . . . . . . . . . . . . . . . . . . . . . . . . . . . . . . . . . . . . .15
Maintenance record . . . . . . . . . . . . . . . . . . . . . . . . . . . . . . . . . . . . . . . . . . . . . . . . .16
Malfunction or repeated error record . . . . . . . . . . . . . . . . . . . . . . . . . . . . . . . . . . . .16
Operating and using . . . . . . . . . . . . . . . . . . . . . . . . . . . . . . . . . . . . . . . . . . . . . . . . .18
Warranty Information(Valid only within the European Union) . . . . . . . . . . . . . . . . . .19
General notice:
Important note for the use of the electronic magnifier mezzo.
Read these notes carefully before initial operation.
1. Notes on the electromagnetic compatibility (EMV)
The electronic magnifier mezzo is suitable for use in all set-ups including buildings
that are connected directly to a public mains electricity supply.
The customer or user should ensure the use in the indicated environment.
Electronic devices are sensitive to electric discharge and to high-frequency electromagnetic fields.
The electronic magnifier uses only high frequency energy for its own function. When
operating the system simultaneously with other systems, however, the possibility of
disturbances of the system or other systems should not be neglected, although the
possibility of interference with other systems close by is rather unlikely.
1.1 Combined use with other devices.
Warning notice: it should be ensured that the electronic magnifier device is not
placed directly beside or on top of another system.
If the set-up of the electronic magnifier in the proximity of medical, analogical
measuring devices cannot be avoided, the operator of these devices has to be
informed that it is necessary to observe the performance of the system to guarantee
an intended use of the system.
A minimum distance of one meter is recommended in relation to mobile high
frequency-communication devices.
1.2 Product description
mezzo is a compact electronic magnifier for the opto-electronic enlargement of texts,
photographs and plastic articles. The system corresponds to the product group 25 of
the aid listing and fulfils the qualitative and functional requirements described therein.
1.3 Purpose
mezzo is a medical product of class I, which is intended to be used by visually
impaired people.
1.4 Product life
Seven years from the date of production, provided that the recommended
maintenance measures are carried out.
5
1.5 Security advice
The electronic magnifier is designed for installation in closed and dry rooms
exclusively. In medical environments the mezzo must not be operated on the same
electrical circuit as devices for purposes of maintaining life.
The mezzo should not be operated in explosion-endangered environments. This
electronic magnifier device should only be installed in conjunction with modern
electrical circuitry. It is a device of a protection class II.
1.6 Equipment cleaning
The mezzo has to be switched off and separated from the current power supply
before cleaning. No liquids may penetrate into the equipment whilst cleaning.
1.7 Special advice for transport and storage
The following conditions for storage and transport in a temperature range from -10°C
to + 50°C have to be respected. The relative humidity should be 30% to 80%, when
air pressure lies by 700-1000 hPa.
1.8 Dealing with faults
If technical problems do occur, the unit must be switched off immediately and the
mains plug disconnected. In this condition, the unit shall not be used! Refer directly
to your local dealer or to Reinecker headquarters.
1.9 If problems arise
If your mezzo does not appear to be working first, check if the unit is connected to
the electricity supply. If the unit appears to be working, but you believe there is a
fault, switch off the unit and disconnect it from the wall socket. Call your local dealer
for advice.
1.10 Environmentally friendly disposal according to EC
directive 2002/96/EG
The appliance contains electronic components. In order to avoid risks or dangers for
the environment through non-professional disposal, the disposal of the product,
including all accessories, has to correspond to the valid directives.
6
1.11 Use in conjunction with medical products
If the operator or user intends to run this electronic magnifier mezzo together with
other medical devices such as cardiac pacemakers, the written permission of
Reinecker Reha-Technik GmbH is required first.
1.12 Storage/Safe-keeping of the operating instruction
The manual and the device booklet, which proves that you are the legitimate owner
of the product, is part of the package of the mezzo. They have to be looked after. If
lost you can order a new manual and device booklet with an additional cost at
Reinecker Reha-Technik GmbH.
7
2 mezzo set up
delivery contents
• portable electronic magnifier mezzo
• plug- in power supply
• manual
mobility package (optional)
• carrier bag incl. strap
• rechargeable battery
Unit set up
The device has to be taken out of the package and placed on a stable surface. Then
attach and screw the mounting arm onto the joint angle. Now you can connect the
enclosed plug-in power supply lead to the mezzo and the electricity mains socket.
8
3 mezzo operating elements
3.1 Control panel baseplate
12 VDC
power supply socket
lighting on/off
indicator for
rechargeable battery
device on/off
when battery is installed
3.2 Control panel TFT-Front
autofocus
magnification/
zoom
colour selection
brightness/contrast
line marker/blanking
9
4 Description of the control elements
4.1 Control panel baseplate
On/off (power switch)
By pressing the power switch on the right side of of the baseplate the
electronic magnifier is switched on.
Attention!: if the baseplate is not illuminated after switching on the unit,
check if the lighting of the unit is switched on (see lighting on/off) or if
there is electricity at the mains socket and that the plug is properly
pushed into the wall socket.
Lighting on/off
By pressing down the operating knob “lighting on/ off” on the control panel
of the baseplate, the lighting can be:
• switched on
• dimmed
• switched off
4.2 Control panel TFT-Front
Autofocus (AF)
By pressing the AF-button the autofocus will be switched on/off and the
camera sets automatically its optimal sharpness. The chosen state is
briefly (approx. 3 seconds) displayed.
Colour selection
With the operating knob “colour selection” on the TFT control front, following display
colours can be chosen (from left to right):
Position
Position
Position
Position
Position
Position
1:
2:
3:
4:
5:
6:
full colour display
white font, black background
black font, white background
green font, black background
yellow font, black background
yellow font, blue background
The chosen state is briefly shown at the lower section of the monitor.
10
Adjustment of enlargement
The magnification depends on the distance between the
document and the camera. The magnification from the electronic
magnifier ranges from 2.8-62 times.
This depends on the distance between reading material and
camera.
The magnification setting last used, will be activated, when the system is switched on
again. While adjusting the magnification, the current level will be shown temporarily.
The camera adjusts automatically, within its scale of reproduction, to optimum focus.
At the maximum magnification, the camera automatically provides a sharp picture up
to a thickness of the document of 7 cm.
Automatic colour saturation
Brightness and colour saturation are automatically adjusted, colours are displayed
true to original.
Contrast / Brightness
The automatic control knob has two functions. When it is pushed in it
adjusts the contrast. When it is pulled out it adjusts the line marker and
windowing. With the control pushed in turn the control anti-clockwise to
reduce the contrast; turn it clockwise to increase the contrast.
Windowing and line marker
The control knob on the right side of the TFT control front has a push- in
function. When pushing the button (forwards) the brightness and contrast
regulator is activated.
Pull the control knob out and turn it anti-clockwise. Black bands will appear
on the screen that can help you read, by masking unwanted parts of the
picture or text, and is helpful with certain eye conditions.
This marker can help you track across a picture or text, which again is helpful with
some eye conditions.
When you turn the knob clockwise the black bands disappear and are replaced by a
marker line. Adjust the control to change the position of the marker line.
11
5 Start-up mezzo
The mezzo can be operated on a mains power supply or without connection using
it’s built in battery.
Main operation
Check if the power adapter is connected to the mains and the power supply socket
(12 VDC) of the mezzo.
5.1 Activate
Press the on/off button to switch on the device. When the mezzo and the baseplate
is illuminated, you can put a page or an object onto the table.
All the optional settings – for example zoom, colour or brightness- can be adjusted
individually.
5.2 Closing-down and switching off the device
Switch off the device with the on/ off button.
5.3 Automatic save regulation for the device set-up
When you reset the device all settings used before will be activated again.
5.4 Replacement of the lighting
The electronic magnifier is equipped with a high power LED Illumination.
If replacement of the lamp is required it should only be done by a specialist or
by Reinecker Reha-Technik GmbH.
Attention: information about the power supply which is
included in the scope of supply of the mezzo
(Type: FW 7362M/12).
When using foreign manufactured products (for example a notebook power supply),
there may be a risk of destroying the system.
12
6 Mobility package/Use of battery
Additionally to the mezzo V2.0 a mobility package can be ordered as an option. This
package contains a battery as well as a carrier bag incl. strap.
Insertion of battery
When the mobility package was ordered separately, it is necessary to independently
insert the battery. For this, follow the procedure below:
• Press the black button on the back of the control panel on the base plate and keep
it down (1), while you pull the small metal housing on the control panel of the base
plate outwardly (2).
• Remove the empty metal housing and instead insert the housing with the battery (3).
12 VDC
(2)
(3)
(1)
Use of battery
• plug-in power supply is not connected
• keep pressing the on/ off button for approx. 1 second; device is ready to be used
• after switching on the system, the battery sign is shown on the display for approx.
6 seconds
• flashing of the battery sign: battery is empty and has to be re-charged. There is a
remaining time of a few minutes before the electronic magnifier switches itself off
Battery charging
•
•
•
•
•
when the battery sign flashes or the electronic magnifier has turned itself off
connect plug-in-power supply
battery is being charged; the yellow LED lights up
when fully charged, the yellow LED disappears
mezzo can be used and operated whilst it is being charged
Operating time when battery is fully charged
• When using full lighting approx. 2 hrs
• Without lighting the operating time is approx. 3,5 hrs
• The charging time of the battery is a total of 3,5 hrs when the mezzo is switched off
13
Check list: in case problems occur
Problem
Solution
Dark image
No display of the image
Is mezzo switched on?
Is the lighting switched on?
If not: What is the charge status
of the battery?
Is the power supply
connected?
If so: Check the correct settings
of the image
(brightness, contrast)
Missing colour
Is the reading material you want to
see displayed in colour?
Control if you are in the colour
mode!
Battery does not charge.
Check if the power supply is
The orange LED does not light up. properly connected to the socket
and the adapter is correctly
contacted.
14
Product Identity
Type:
electronic magnifier mezzo V2.0
Serial-Number:
Manufacturer:
Reinecker Reha-Technik GmbH
Supplier:
Year of purchase:
*Operator:
1.
6.
2.
7.
3.
8.
4.
9.
5.
10.
Final examination:
Date of despatch:
Power supply:100 VAC–240 VAC 50-60 Hz
over plug- in power supply: 12V 2,5A Typ: FW7362M/12
Power consumption:
approx. 30 Watt
Installed by:
****First safety check:
* Classification: Attention: When changing of operator, the new operator shall be
named in the corresponding column.
** If re-using the unit, a new safety check is required!
15
Warranty Information
(Valid only within the European Union)
1) Reinecker Reha-Technik GmbH grants a warranty of 24 months against defects in
manufacture counted from date of invoice ex Reinecker Reha-Technik GmbH.
2) All parts that have been replaced when repairing the unit will automatically
become property of Reinecker Reha-Technik GmbH.
3) Damage caused by improper use or by non-compliance with the operating
instructions will result in the invalidation of the warranty.
4) Interventions from persons other than Reinecker Reha-Technik GmbH authorised
specialists may lead to invalidity of warranty.
5) Not included in this warranty are lamps, batteries, mirrors, glasses, bulbs and
other parts subject to wear and tear.
6) If a warranty claim is necessary, the system has to be returned to the manufacturer in Alsbach-Hähnlein or to your authorised dealer. The manufacturer does not
carry the cost for transport, packaging and insurance.
phone-number:
+49 62 57-93 11-0
View our General Terms and Conditions.
Warranty Information
The legal requirements apply.
Your authorized distributor:
19
Headquarters Germany and Export
Development, Production, Sales, Service
Reinecker Reha-Technik GmbH
Sandwiesenstraße 19
DE- 64665 Alsbach-Hähnlein
Tel.: +49 (0) 6257 9311 0
Fax: +49 (0) 6257 2561
Email: [email protected]
www.reineckerreha.com
In case service is necessary,
please contact your authorized distributor.
Version V 2.2, Stand 06/11
Art.Nr.: 000 10 246