1
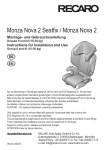
RECARO Monza Nova 2 Reha Group II − III Instructions for assembly and use of the Reha version (supplement) RECARO Monza Nova 2 Reha / RECARO Monza Nova 2 Seatfix Reha 1a 1b 2a 2b 3a 3b 4a 4b 5a 5b 5c 5d 6a 6b 7a 7b 8a 8b 8c 8d 9a 9b 10a 10b 3 RECARO Monza Nova 2 Reha – Instructions for assembly and use (supplement) RECARO Monza Nova 2 Reha – Instructions for assembly and use of the Reha version Dear RECARO Monza Nova 2 Reha user, To make handling of your new child restraint safe, practical and comfortable for both you and your child, please read these instructions and the instructions enclosed to the seat before use. This manual is a supplement to the original RECARO assembly and usage instructions. Some aspects in handling the car seat have changed, due to the modification into a Reha version. These changed aspects are described in this supplementary user manual. Should you have further questions or problems, please contact your specialist dealer or us directly. Our address: Thomas Hilfen für Körperbehinderte GmbH & Co. Medico KG · Walkmühlenstraße 1 · D - 27432 Bremervörde · Germany Phone: +49 (0)4761 886-63 or -68 · E-Mail: [email protected] · www.thomashilfen.com General instructions Please note: ALWAYS secure your child and the seat with the vehicle‘s 3-point belt. The 5-point positioning belt integrated in the seat is NOT security relevant. Suitable for a body weight of up to 50 kg / 110.2 lb: RECARO Monza Nova 2 Reha has successfully passed an overload test at Dekra (Klettwitz) on the basis of the requirements of ECE R 44/04. Thus, the RECARO Monza Nova 2 Reha is approved for the use as “restraint system for special needs (“S”)”. Play safe with RECARO Isofix (model Seatfix): Isofix (LATCH) is an internationally standardised fastening system for children car seats. Corresponding Isofix anchor points are firmly connected to the vehicle‘s bodywork. With Isofix children car seats can be quickly and easily anchored in these standardised fixture points. In this way, the seat is safely secured in the vehicle, even without a child and does not have to be retained with the 3-point vehicle belt. Please check beforehand whether your car has an Isofix anchor point. When using the seatfix connection for the swivel base, please mind the safety hints in the assembly instructions. Safety warnings WARNING! DEATH or SERIOUS INJURY can occur damage. See date of manufacture, located on restraint. reduced or completely voided. broken, do NOT use the restraint. occupants. using it again can cause serious injury or death. restraint, it can lower the risk of injury or death in most crashes. General information Extreme weather When it is hot, we recommend the following tips to reduce possible injury or discomfort to your child: When it is cold, we recommend the following tips to reduce possible injury or discomfort to your child: 4 RECARO Monza Nova 2 Reha – Instructions for assembly and use (supplement) Purpose / indication The children car seat RECARO Monza Nova 2 Reha / Monza Nova 2 Seatfix Reha is designed for the transport of children with special needs in vehicles. The clinical pictures are amongst others: The car seat is characterized by its shell design and pad system, which provide for additional seating safety, stabilization of head and pelvis, and support/control of the feet. Thus, the RECARO Monza Nova 2 Reha / Monza Nova 2 Seatfix Reha meets the needs of disabled children very well. Application risks / contraindications No application risks / contraindications are known. 5-point positioning belt Please note: The 5-point positioning belt helps positioning the child in the car seat and does not protect the child in the event of an accident. The 3-point belt in the car must always be used to secure the child in the seat. Do not route the 5-point belt through the red belt guides on the headrest. They are intended only for the 3-point belt. Adjusting the belt length: Pull the loose belt straps to shorten and tighten the belts. To lengthen the belts, press the release mechanism on the adjustment buckle and then pull out the belt to the desired length. If required, the belt length can also be adjusted with the two belt loops (bolted) at the back of the seat. Belt buckle: Press the red dent of the buckle to open. Separate the two upper belt fasteners. To close the belt, put the belt fasteners into the buckle and push together until they lock in place with an audible „Click“. The cover for the crotch pad (zipper) can be removed and washed in the machine at up to 30° C / 86° F. Please undo the zip on the bottom crotch pad as well to remove the cover. Fig. 1a: Adjusting the belt length Fig. 1b: Opening and closing the belt buckle („Click“) Headrest Adjust the seat‘s headrest to the highest position to facilitate attaching the headrest. Pull the covers of the supports over the side parts of the headrest and fasten them at the top with the press button. The pads are fastened to the lower part of the headrest with an elastic rubber band. The cover can be removed (zipper) and washed in the machine at up to 30° C / 86° F. Fig. 2a: Attaching the headrest Fig. 2b: Fastening at bottom Fig. 2c: Fastening at top Lateral trunk supports The lateral trunk supports can be fastened at 3 different heights on the left and right in the back area with press buttons and Velcro. Start with the press buttons. The supports can be fixed more firmly by pressing against the fleece strips in the back of the seat. The cover can be removed (zipper) and washed in the machine at up to 30° C / 86° F. Fig. 3a: Press button Fig. 3b: Velcro-fastening Lateral seat supports Adjust the backrest to a horizontal position to facilitate attachment of the lateral supports. Pull the covers of the lateral supports over the side parts of the seat surface and attach them to the rear of the seat surface with the press button. The cover can be removed (zipper) and washed in the machine at up to 30° C / 86° F. Fig. 4a: Attaching the support Fig. 4b: Press button, rear Abduction block The abduction block can be adjusted in depth. In order to do so, it first has to be released from the groin belt. Remove the belt strap end piece from the end of the groin belt and unthread the belt from the sliding buckle and belt buckle. Pull the abduction block up and off the groin belt. Thread the groin belt back through the sliding buckle and belt buckle, and secure the loose end of the belt with the belt end piece. Position the abduction block as needed on the hook-and-loop fastener provided on the seat bottom. The cover is removable (zipper) and machine washable at up to 30°C. To remove the cover, the abduction block first has to be released from the groin belt as described above. Fig. 5a: Belt end piece Fig. 5c: Unthreading the sliding buckle and belt buckle Fig. 5b: Removing the belt end piece Fig. 5d: Removing the abduction block Swivel base with footrest adapter (accessory) item code: 820/1 Please note our separate instructions for mounting! Download: www.thomashilfen.com Seatfix connection (for swivel base) (accessory) Please note our separate instructions for mounting! Download: www.thomashilfen.com 5 item code: 818 RECARO Monza Nova 2 Reha – Instructions for assembly and use (supplement) Stabilising bow, rear (for swivel base) (accessory) item code: 819 Please note our separate instructions for mounting! Download: www.thomashilfen.com Stand, front (for swivel base) (accessory) item code: 817 Please note our separate instructions for mounting! Download: www.thomashilfen.com Back stabilisers (accessory) item code: 816 The back stabilisers prevent the back from dropping. Please note our separate instructions for mounting! Download: www.thomashilfen.com Footrest, short 12 cm / 4.7" (accessory) Footrest, long 18 cm / 7.1" (accessory) item code: 806 item code: 805 Remove the two caps at the front bottom part of the seat before attaching the footrest. Press the catch springs in at the rear ends of the sliding rods and push the tubes into the holes as far as they will go. Secure the footrest using the belt that runs around the seat bottom of the RECARO Monza Nova 2 Reha. In order to do so, open the buckle under the seat and loop the front section of the belt around the crossbar of the footrest. Make sure that the belt is fastened correctly. Use the sliding buckle to adjust the belt length as required. To stabilize the footrest on the vehicle floor adjust the height of the support bars by screwing them in or out until they have contact with the vehicle. Then lock the support bars with the hand knobs to prevent them unscrewing accidentally. Screw the hand knobs upwards as far as possible and tighten them fast. Please note: If the swivel base is being used the footrest is attached to the footrest adapter integrated in the swivel base. In this case, make sure to always secure the footrest against falling off with the hand knob provided with the user manual. The receiver for the hand knob (metal block with thread) is situated on the left tube of the footrest adapter. Lower leg length: The lower leg length is adjusted by changing the height of the footrest. Loosen both outer screws. Retighten them after each adjustment. Foot angle: Loosen the four screws left and right on the underside of the footrest to adjust the desired foot angle with the rails. Then retighten the screws. Please note: The footrest cannot be used in combination with the seat depth extension, unless the swivel base is used in addition. Note: If the footrest should firmly be screwed to the seat, the “footrest adapter” (item code: 821) is required. Fig. 6a: Caps + inserting the footrest Fig. 6b: Adjusting height to vehicle Seat wedge, bottom (accessory) item code: 810 The seat wedge is positioned centrically below the car seat. The high edge is at the front to achieve an optimum rest position of the child. The cover can be removed (zipper) and washed in the machine at up to 30° C / 86° F. Please note: Function of the swivel base is considerably reduced if being used in combination with the seat wedge. We therefore do not recommend using seat wedge and swivel base at the same time. Fig. 7a: Positioning seat on seat wedge Fig. 7b: Final position Seat wedge, inside (accessory) item code: 809 The seat wedge (inside) can be fastened to the seat surface at 3 different positions: 1. An active posture is achieved by placing the seat wedge on the seat with the high side facing the back. 2. Velcro-fasten the seat wedge with the flat side facing rearwards for a more passive posture / rest position. 3. In order to reduce the seat depth or to achieve a bigger hip angle, you can also Velcro-fasten the seat wedge to the rear of the seat in an upright position with the broad side facing downwards. The two lateral pads for additional protection are Velcro-fastened to the sides. The cover can be removed (zipper) and washed in the machine at up to 30° C / 86° F. Fig. 8a: Active Fig. 8b: Passive Fig. 8c: Back Fig. 8d: With lateral pads Seat depth extension + 13 cm / 5.1" (accessory) item code: 808 Remove the two caps at the front bottom part of the seat before attaching the seat depth extension. Press the catch springs in at the rear ends of the sliding rods and push the tubes into the holes as far as they will go. Secure the seat depth extension with the belt that runs around the seat bottom of the RECARO Monza Nova 2 Reha. In order to do so, open the buckle under the seat and guide the front section of the belt through the belt loop on the seat depth extension. Make sure that the belt is fastened correctly. Use the sliding buckle to adjust the belt length as required. Please note: The seat depth extension cannot be used in combination with the footrest or swivel base, unless the swivel base is used in addition. The cover can be removed (cord) and washed in the machine at up to 30° C / 86° F. Fig. 9a: Removing caps Fig. 9b: Pressing in the catch springs Table (accessory) item code: 811 Slide the table onto the two sides of the seat surface. The table is fastened on both sides with two Velcro strips each. Guide the Velcro strips of the table through the plastic rings at the seat / seat back (pelvic belt). The cover can be removed (zipper) and washed in the machine at up to 30° C / 86° F. Fig. 10a: Attaching the table Fig. 10b: Attaching belts to seat 6