1
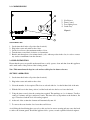
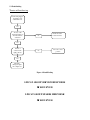
LT4X AND LT6X Electric Slot
Toasters
INSTALLATION AND USER INSTRUCTIONS
Please read the following carefully before commencing work on this equipment
WARNING AND PRECAUTIONS
This appliance must be installed by a competent installation engineer, in accordance with the
installation instructions and all relevant local and national standards including the following:
•
•
•
•
•
•
Health and Safety at Work Acts
IEE regulations
BS Codes of Practice
Local and National Building Regulations
Fire Precautions Act 1971
EN 60335-1 1994 and EN 60335-2-48 1997
It is mandatory that all appliances are installed, commissioned and serviced by a qualified and
competent person as defined by the regulations in force in the country of installation.
Failure to do so may invalidate the warranty.
!
If the supply cord is damaged it must be replaced by the manufacturer or its service agent or a
similarly qualified person in order to avoid a hazard.
IS150 ECN 2038
SECTION 1 - TECHNICAL DATA
Model number
Overall height (mm)
Width (mm) inc handles
Depth (mm) (excluding controls)
Weight (Kg)
Electricity supply requirements
Electricity supply connection
Power rating @240V (kW)
LT4X
245
390
220
6
Single phase 9.4 Amps
Single phase 13A plug
2.2
LT6X
245
480
220
7.5
Single phase 12.5Amps
Single phase 13A plug
3
Check list of enclosures
Please ensure that the following items are included with this piece of equipment
Model
Crumb tray (fitted in the toaster base)
User instructions
Guarantee card
LT4X
1
1
1
LT6X
1
1
1
Tick
SECTION 2 - INSTALLATION
2.1 PREPARATION
Remove all packaging materials and protective coatings from both the outer body and the crumb tray
prior to installation.
2.2 SITING
The appliance must be installed in accordance with the instructions listed below.
1. Ensure there is a free flow of air and adequate ventilation around the appliance, and that no vents are
blocked.
2. Ensure that the connection point to the wall socket is easily accessible and not either above or behind
the toaster.
2.3 COMMISSIONING
1.
2.
3.
4.
Slot Selector.
Timer Control.
Toast Lifting Lever.
Crumb Tray.
Figure 1.
SWITCHING ON
1.
2.
3.
4.
5.
Set the timer knob in the off position (knob vertical).
Plug in the toaster and switch on the socket.
Set the slot selector to the maximum number of slots.
Turn the timer control knob clockwise to four minutes.
Run the unit through two four minute timed cycles, without product in the slots, in order to remove
any surface contaminants from the elements.
2.4 USER INSTRUCTION
Ensure that the person responsible understands how to safely operate, clean and shut down this appliance
and is made aware of the position of the isolating switch.
Note: This manual must be kept in a safe and accessible place for future reference.
SECTION 3 OPERATION
1. Set the timer knob in the off position (knob vertical).
2. Plug in the toaster and switch on the socket.
3. Select the number of slots required. The slots are ordered with slot 1 on the left hand side of the unit.
4. With the lift lever in the down position, load the bread and raise the lever to lower the bread.
5. Using the timer control select the toasting time required. The markings are 1 to 4 minutes. Usually a
setting of 2 minutes will give satisfactory results. This time will vary dependant on the freshness, the
type of bread used and the level of browning required.
6. At the end of the set time the elements will automatically turn off.
7. To remove the toast from the slots lower the toast lift lever.
Avoid lifting the bread during the toast cycle as this can lead to uneven toasting and may cause the bread
to stick to the element guards. Should the appliance fail to operate, consult a qualified electrical engineer.
SECTION 4 CLEANING
Before carrying out any cleaning or maintenance of your toaster, isolate it from the power supply.
For best results wipe down the outside surface with a mild detergent solution and dry immediately.
Regularly check the crumb tray and empty as necessary.
Do not use any hard or metal objects to clean any crumbs etc from the inside of the unit.
Do not abrasives.
Do not use any products containing chlorine to clean stainless steel surfaces.
Do not clean the appliance using a water jet.
SECTION 5 SERVICE AND MAINTENANCE
All Lincat toasters are fully guaranteed for parts and labour for a period of 12 months (except LTX toaster
elements).
5.1 Routine service
We recommend that all servicing, other than routine cleaning, be carried out by our authorised
service agents.
1. Carry out a general check on the installation paying particular attention to the following:•
•
•
Is the supply cable in good condition.
Is it isolating switch easily accessible.
Check the elements for damaged / broken heating wires.
2. Check all components for correct operation and replace where necessary.
5.2 Fault finding
Toaster will not heat up
Is the unit plugged
in and the power
switch turned on.
Yes
Are any of the
elements turning on
when the timer is
activated ?
Check the mains
isolator and fuse
No
Yes
Is the slot
selector in the
right position?
Set to the correct
position
No
Yes
Elements
damaged replace
the complete set
Figure 2 Fault Finding
LINCAT GROUP SERVICE HELP DESK
01522 875520
LINCAT GROUP SPARES HELP DESK
01522 875510
CONDITIONS OF GUARANTEE
The guarantee does not cover:1)
2)
2)
3)
Element failure in LTX units.
Accidental breakage or damage
Operational misuse, wear and tear from normal usage, incorrect adjustment, or neglect.
Incorrect installation, maintenance, modification or unauthorised service work.