1
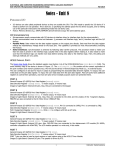
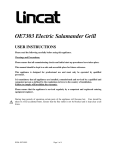
INSTALLATION AND USER INSTRUCTIONS
COUNTERTOP AND FREE STANDING FRYERS
IMPORTANT
PLEASE READ THESE INSTRUCTIONS CAREFULLY BEFORE USING THE EQUIPMENT.
KEEP THEM IN A SAFE PLACE FOR FUTURE REFERENCE.
WARNING:
APPLIANCES MUST BE EARTHED
ISOLATE THE POWER SUPPLY BEFORE CARRYING OUT ANY INSTALLATION WORK
PARTS OF APPLIANCES BECOME HOT DURING NORMAL USE. CARE SHOULD BE
TAKEN TO AVOID ACCIDENTAL BURNS
IMPORTANT
All Lincat electrical appliances must be installed, operated and serviced by a competent person. Users
should take care to adopt safe working practices when operating or cleaning appliances. Please contact
your local distributor for further advice.
INSTALLATION
1.
2.
3.
4.
5.
6.
7.
8.
Ensure that the electricity supply is adequate for the equipment being installed.
Partitions, walls, kitchen furniture and other materials less than 100mm from the appliance should
be made from non-combustible material.
Remove all protective plastic coating from the unit.
When siting the equipment, make sure that it is level and that there is a free flow of air around the
unit and that any vents to the rear are not blocked.
All appliances with an electric load of 3kW and below are fitted with a BS1363 fused plug and
should be connected to an earthed socket.
Appliances above 3k must be connected to the supply by a qualified electrician and should be
installed with a means of isolation with contact separation of at least 3mm on all poles.
Appliances must be installed in accordance with the Health and Safety at Work Act, IEE Wiring
Regulations, BS Codes of Practice, Local and National Building Regulations and Fire Precautions
Act 1971.
When fitting countertop units onto SLS stands, the feet should be located into the corresponding
holes in the base units. When fitting onto Ovens, HC pedestals or similar closed bases, the feet can
be removed if required.
GENERAL USE
Unless otherwise stated in the equipment instructions the following convention applies where indicator
lights are fitted to appliances:Green on - power to the unit.
Amber on - power to the element.
Amber off - temperature reached.
USER MAINTENANCE
1.
2.
3.
Before working on or cleaning the equipment, isolate it from the power supply and allow it to
cool to a safe working temperature.
Clean units regularly with hot water and detergent, do not use abrasive or chlorine based cleaners
on stainless steel. Take care to avoid wetting electrical components. Do not use a water jet.
For removing carbon deposits from fryers and griddles use "Carb'n'Off" or a similar
proprietary cleaner.
COUNTER TOP AND FREE-STANDING FRYERS
DF33, DF36, DF39, DF46, DF49
DF66, DF66/ST, DF612, DF618
J6, J9, J12, J18
WARNING
!
!
!
!
!
!
!
!
!
!
!
!
Do not move this appliance when the tank contains oil.
Hot oil can cause severe burns. Avoid direct physical contact.
Always drain food before frying.
Never put water into the oil, as this will cause splashing and possible overflow of the tank.
Never put anything other than food into the oil.
Disconnect the unit from the electricity supply before servicing or undertaking any electrical
maintenance.
Parts of this unit may become hot in normal use, therefore suitable precautions must be taken to
avoid accidental contact.
Never leave the unit unsupervised whilst frying.
If the unit should begin to smoke, switch off immediately.
In the event of a fire occurring, water should not be used to extinguish it. It is advisable to install
a fire extinguisher and have a fire blanket within reach of the fryer.
Do not overfill the tank with oil.
Maintain the oil level above the minimum mark.
OPERATION
1
Before first using the fryer and with it disconnected from the mains, clean the tank and element
with hot water and a little mild detergent. To gain clear access to the tank, remove the batter plate
by tilting backwards and sliding out from under the support plate. Lift the element up until the
element stay latches in uppermost position.
SUPPORT PLATE
BATTER PLATE
Do not attempt to lift the element without first removing the batter plate.
2
3
4
5
6
7
Clean out the tank and ensure that all parts are completely dry and then push the element back
allowing the element stay to be pulled out, and then gently lower the element into its working
position.
Replace the batter plate by placing into tank at an angle ensuring tabs locate under support plate.
Push batter plate down into horizontal position above element.
Ensure that the drain valve is closed before filling with a good quality oil, taking care not to exceed
the high level indicator.
Set the thermostat to the OFF position and switch on the power supply.
Turn the thermostat to the desired temperature setting.
The amber light will extinguish when the set temperature is reached.
CLEANING
To clean the unit after use, allow the oil to cool to a temperature below 55oC and drain it into a suitable
container. Raise the element from the tank following the instructions in section 1, using the lifting hook
provided. After cleaning, lower the element, replace the batter plate and refill the tank, following the
instructions in sections 2, 3 and 4.
TROUBLESHOOTING
If the green neon is illuminated but the elements do not heat up, the high temperature cut-out may require
resetting. This is located on the back panel of the unit and is reset by pressing the exposed button.
SERVICE INFORMATION
Catering equipment should be routinely serviced to ensure a long and trouble free life. With this in mind it
is recommended that appliances are serviced every six months by a competent engineer.
For help regarding the installation, maintenance and use of your Lincat equipment, please call:-
LINCAT GROUP SERVICE HELP DESK
01522 875520
AUTHORISED SERVICE AGENTS
We recommend that all servicing, other than routine cleaning, is carried out by our authorised service
agents and will accept no responsibility for work carried out by other persons. Note that for safe and
efficient operation, appliances need regular servicing.
Please quote both the model and serial numbers from the data plate attached to the unit. Give brief details
of the service requirement.
Lincat reserve the right to carry out any work under warranty during normal working hours, i.e. Monday to
Friday, 8.30 a.m. - 5.30 p.m.
CONDITIONS OF GUARANTEE
The guarantee does not cover: 1.
2.
3.
Accidental breakage or damage
Operational misuse, wear and tear from normal usage, incorrect adjustment and neglect.
Incorrect installation, maintenance, modification or unauthorised service work.
Part No. IS400
ECN 3305