1
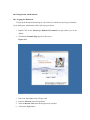
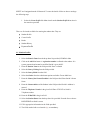
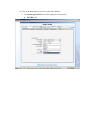
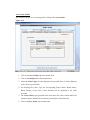
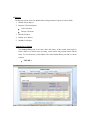
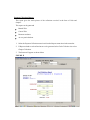
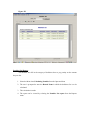
Fee Payment User manual Dated-26th August 2005 © Copyright 2005 Merit Scholar IT Solutions Pvt Ltd All Rights Reserved 1.0 Introduction Fee Payment Module in Hamstech enables the users to manage the entire details pertaining to a student’s personal profile , Course details , Details relating to his/her fee and various reports in detail in this regard. The main features of this module are: Creating a Student’s profile on his/her admission into various courses in the institute Maintaining the details related to students books Maintaining the details related to the payments made by the student Generating reports showing Student’s History from his date of joining Generating Reports showing the entire collections received by the organization in the form of fees Viewing the Details of the student availing the Search option 2.0 Hardware and Software requirements for Hamstech 2.1 Server Machine Requirements The machine on the Server side must have the following minimum configuration: Hardware: Pentium III or Above 10GB of Hard Disk space 256MB Ram or Above Software: Operating System: Windows 2000 /2003 Server Data Base SQL Server 2000 2.2 Client Machine Requirements The machine on the Client side must have the following minimum configuration: Hardware: Pentium III or Above 10GB of Hard Disk space 256MB Ram or Above Software: Operating System: Windows 2000 Professional/server Data Base M DAC Library (Microsoft data Access Component) version 2.8 . Net Frame Work 1.1 3.0 Installing the Software: Installation is very simple. The installation package is complete and self-contained. It doesn’t require any tools to be installed in the system. . Follow the instructions given below, to complete the installation process 1. Open the Folder named hts 2. Select and open the Folder named Debug. 3. Double Click the .msi Windows installer package 4. Follow the sequence of steps in the setup wizard 5. Enter the Drive and the Path where the application files are to be installed 6. Select one of the radio buttons stated below Every one-to allow any user to access the application Just me- to allow only the user entering at the time of installation of the setup 7. Once the installation is complete, a notification message appears on the screen. ` 8. To start the application, click on the Hamstech executable icon on your screen. 4.0 Getting Started with Hamstech: 4.0.1 Logging into Hamstech To login to the Hamstech Home Page as a first-time user with the user privilege(s) allotted to you by the System Administrator, follow the steps given below: 1. Double Click on the Shortcut for Hamstech Executable Icon provided to you on the desktop 2. The Hamstech Launch Page appears on the screen. Figure 4.0.1 3. Enter your User Name in the field provided. 4. Enter the Password in the field provided. 5. Select the Branch Name from the drop down list provided 6. Click on the Login button On login after giving the username, password and branch name the user will be directed to the main page of the application as shown below FIGURE 4.0.2 4.1Creating Student Profile On selecting the student profile option from the operator menu item in the menu bar we will have two sub-menu items available Create Profile Search Profile To enter the details of a student for the first time on/after his admission the following sequence of steps need to be followed For Example, Satish is a student who has taken admission into a Diploma Course SBTET in a Punjagutta branch of Hamstech .To enter the details of John we have to undergo the following steps. 1. Select the Create Profile Sub-Menu item from the Student Profile Menu item in the menu bar provided There are five heads available for entering the student data. They are Student Profile Course Profile Books Student History Payment Profile 4.1.1Student Profile: 1. Select the Branch Name from the drop down list provided, HYMB for John 2. Click on the Add New button .A registration number is allotted to the student. It is system generated and cannot be modified. Satish is given 60012. 3. Enter the Student Name in the field provided. Enter it a Satish 4. Select his Date of Joining from the field provided. 5. Select his Date of Birth from the field 6. Select the Gender from the radio button options available. Choose Male here 7. Enter the Name of the Parent/Guardian in the field provided. Enter Satish’s Parent Name 8. Enter the Contact address of the Student in the field provided. Satish’s Address is entered 9. Enter the Telephone Number in the given field. Enter 23745678 as Satish’s Telephone number 10. Enter the E-Mail ID in the given field. 11. Select the Student Status from the drop down list provided. From the list we choose REGISTERED as Satish’s status 12. Fill-in appropriate information in the fields provided. 13. The fields marked with a red asterisk (*), are mandatory. 14. Click on the Save Button to save this record in the database. 2. The Student Information form will be displayed as shown below FIGURE 4.1.1 4.1.2 Course Profile: The next tab in the process of creating profile is filling in the course details. Figure 4.1.2 1. Click on the course Profile tab of the student form. 2. Click on the Modify button of the student form 3. Select the Course Type from the dropdown list provided. Here we choose Diploma as the course type for Satish 4. On Selecting the Course Type, the corresponding Course Names, Batch Names, Batch Timings, Course Fees, Course Duration will be populated in the fields provided. 5. The Course History grid provided in the form shows the course related details like Semester Names, Duration of each semester and Subjects in that Semester. 6. Click on the Save button of the student form 4.1.3 Fee Concession: If the candidate is eligible for availing fee concession this is facilitated at the time of admission in the Create Profile 1. Select the Course Profile tab and click on Modify Button and choose the course. Then if any Concession is to be provided click on the Fee Concession Button which will enable the Course Fees field. Make modification in this field with the amount to be offered as fees and click on save and this fee is projected for future use. On click of the save button after giving concession this Fee Concession button will be made invisible. 4.1.4 Payment Profile : The Payment Profile tab of the form shows all the payment details pertaining to the student. This page comprises of three groups Installment Projections Payment Print Figure 4.1.4 I. Installment Projections For example Satish has chosen a Diploma Course SBTET and the Course fee is slated to be 32000/-, on filling of the course details the Course Name and the Course Fees will be reflected in the Payment profile tab of the form. Satish has agreed to pay 8500/- as down payment including registration fees of 500/- and rest of the course fees 24000/-(32000-8000) is agreed to be payable in 4 installments. 1. Enter the Amount considered as the Down payment in the field provided. 2. Enter the number of installments the fees is scheduled to be paid in. 3. Click on the Show Projections button 4. On click of this button we will view the amounts to be paid against Security fees, Down Payment and Installments that are to be paid by the student in due course 5. Click on the Update projections button. The changes get updated to the database 6. The projections grid is ready now. II. Payment: 1. When a student makes a payment, select the row against the Payment type in the installment projections frame and double click on it. 2. The values corresponding will be displayed in the fields provided in the Payment Group. 3. All the fields in this group except Registration fees and penalty are read only. 4. The values in different fields are summed up and service tax as a percentage is calculated on the total. For example if Satish makes payment for down payment on selecting the row corresponding to down payment and double clicking on it the values are shown as Down payment as Payment Type, 500/- against registration, 8000/-agianst Down payment and a total is arrived as 8500/-. Now 10.2% tax is calculated on this amount and a grand total of 9367/- is shown in the grand total field NOTE: To see whether a student is eligible for paying penalty is explained in the later part of the module. III. Print: The Print Group option of this form provides the mode in which the payment is made. The grand total we arrive at in the Payment group is paid in a specified mode. As described in the above scenario the amount in the Grand Total field is paid in a mode specified. For example if Satish makes his payment in the form of cash, the sequence is as follows 1. Select the Payment Mode from the drop down list. Choose Cash here as Satish makes his payment in cash 2. The Status of the payment is shown as Paid as entire amount is paid in cash 3. The amount of cash is automatically populated in the cash field 4. Enter the description regarding the payment 5. Click on the Modify button to make the Save button enabled 6. Click on the Save Button 7. This will save the details of the record 8. Click on the Print Button to generate a receipt for this Payment Note: When Payment is made by Cheque, Select CHEQUE from the drop down list and if it is made partly in cash and partly by Cheque, select the BOTH option from the drop down list. The status here would be CHEQUE SUBMITTED till the cheque is cleared and accordingly it is changed to Paid/Cheque-Bounced on clearing or bounce of the cheque respectively. On bouncing of a cheque the amount gets adjusted against the heads Cash adjusted Not paid (Balance Amount) Cheque bounced If payment is partly in cash & cheque and as well totally by Cheque except that Cash adjusted is zero if payment is entirely in the form of a cheque. For example if Satish makes the payment of his first installment of 6720/-(6000+10.2% of 6000) by cash 3000/- and by cheque 3720/-. There are two situations that are considered here Cheque gets cleared on the due date, to handle this issue follow the steps. Follow the sequence of steps: 1. Double click on the row against which the payment was made in the form of a cheque earlier. 2. The values get populated in all the respective fields in the Payment and the Print group. 3. The status of the Payment in the Print group would be shown as Cheque Submitted. 4. Now click on the Cheque Paid button to enable the fields. Cheque gets bounced on a later date, to handle this issue follow the steps. 1. Double click on the row against which the payment was made earlier. 2. The values get populate in all the respective fields in the Payment and the Print group. 3. The status of the Payment in the Print group would be shown as Cheque Submitted. 4. Click on Cheque Bounce button. 5. The values get adjusted in the Show Projection grid as follows 6. The amount against Cash Adjusted is shown as 7. The amount against Cheque Bounced is shown as 3720/8. The amount against Not Paid for this installment is shown as 9. Click on the Update projections button of the installment projections group so as to update these changes 4.1.5 Books Issue: The Books tab of the students form provides with the details of the books and the Date of Issue of the Book Figure 4.1.5 1. Click on the Modify button. 2. Select the Book Name from the drop down list provided. 3. Choose the Date of Issue of the Book from the field given. 4. Click on the Save button. 5. On click of the Save button the Books selected and the Date of issue will get added to the Books Issues grid. 4.2 Student Profile Modification: To View/Modify the details of a student after creating his profile follow the steps: 1. Select the sub-menu item Search Profile from the Student Profile in the menu bar 2. The student form is displayed. 3. Select the Branch Name from the drop down list. 4. Enter the Registration number or the Student Name in the fields provided. 5. Click on the Search button. 6. All the fields will be displayed with the data. 4.2. 1Calculating Penalty: The student will be eligible for penalty if he does not pay the fee on due date. Once he becomes liable to pay penalty the amount of penalty will be shown in the penalty field of the payment profile tab on double clicking a row against a payment 1. The check box named Penalty Waive is provided to facilitate waiver on part or whole amount of penalty if any for a student. On checking of this checkbox the penalty field is enabled and as well the field provided for entering the narration for the waiver is made visible. 2. This Checkbox is enabled only when there is an amount in the penalty field 3. The Calculation of penalty is to done after 10th and 25th of every month.Without Calculating these penalties on the stipulated dates the values will not be shown in the penalty field of the payment group 4. The Sub-menu item Calculate Penalties is chosen from the Menu item Operator in the menu bar in the Main form. Enter the Name of the Branch in the Prompt Message A message is displayed on successful calculation. 4.2.2 Batch Transfer & Course Transfer: In case of Batch transfer of the student during his tenure follow the steps in the search profile section Select the Course Profile tab Click on Modify button Batch Transfer and Course transfer Buttons will be highlighted Select the Batch transfer button and the necessary fields for Batch Transfer will be highlighted After necessary changes Click on the save button The changes will be affected and an amount of 1000/- against batch transfer will be automatically populated in the projections grid Note: Similar is the case with Course transfer In case of Course Transfer of the student from a higher fee course to a lower fee course and vice versa the fee amount whichever is higher in either cases will be taken into consideration. 4.3Reports: The Reports section of the user Module deals with generation of reports of various kinds. 1. Student History Report 2. Payment Collection Reports Cash Collections Cheque Collections 3. Defaulters Report 4. Penalty waive Report 5. Students List Report Student History Report The Student History tab of the form shows the history of the student with regard to his/her details as to his/her date of joining, course details and payment details and the status. To view the history of the student click on the Student History tab and it is shown as below FIGURE. I Payment Collections Report: This report gives the entire picture of the collections received in the form of Cash and cheques. This report can be generated Branch Wise. Course Wise. Between two dates. As on a particular date. 1. Select the Payment Collection menu item from the Reports menu item in the menu bar 2. If Report related to cash collections are to be generated select Cash Collection else select Cheque Collections 3. The format will appear as shown below FIGURE .II For example to generate a report showing cash collections of SBTET course of Himayat nagar Branch between two dates, follow the steps: 1. Select Branch Name from the drop down list 2. Select Course Name from the drop down list 3. Select Date From and Date To from the fields provided. 4. Click on the View Report button 5. The report will appear as shown in the figure below: Note: To generate a report of all courses select the option “ALL” from the drop down list of Course Name To generate a report as on a particular date, the dates given in the Date From and Date To must be same. Defaulters List Report: There are three categories that are considered to include a student in the defaulters list. These three categories are Backlog list Break list Drop list Student who is due for one month in paying his fees falls in the backlog list Student who is due for two months fall in the break list Student who is due for three or more months fall in the drop list 1. Select the Menu item Calculating Defaulters from the Operator Menu 2. The user is prompted to enter the Branch Name in which the defaulters list is to be calculated. 3. This calculation is made 4. The report can be viewed by selecting the Defaulters List report from the Reports menu Figure .III Penalties List Report: The Students who fall in the category of defaulters have to pay penalty on the amount they are due. 1. Select the Menu item Calculating Penalties from the Operator Menu 2. The user is prompted to enter the Branch Name in which the defaulters list is to be calculated. 3. This calculation is made 4. The report can be viewed by selecting the Penalties List report from the Reports menu Figure .IV