1
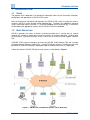
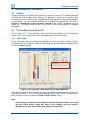
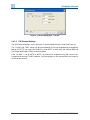
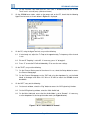
SOLAR 2
Simulcast over IP
Synchronised (SOLAR 2 Sync) &
Non-synchronised (SOLAR 2 Lite)
P25 ADDENDUM
to the
TECHNICAL HANDBOOK AND USER MANUAL
DTS-SOLAR 2-P25 Add
Issue – 1.0
REVISION
1.0
DATE
18 May 11
PREPARED BY
PJ
APPROVED
BO
POSITION
Dalman Technical Services Ltd.
Field House,
Uttoxeter Old Road
Derby
DE1 1NH
Tel:
+44 (0) 1332 375500
FAX:
+44 (0) 1332 375501
http://www.teamsimoco.com
Bid Eng.
©Simoco 2011
DTS-SOLAR 2-P25 Add
PREFACE
DECLARATION
This Technical Manual Addendum covers the SOLAR 2 P25 equipment. It should be used in
conjunction with the SOLAR 2 Technical Handbook and User Manual, Document Reference –
DTS-SOLAR 2-TH, Issue 1.0.
Any performance figures quoted are subject to normal manufacturing and service tolerances. The
right is reserved to alter the equipment described in this manual in the light of future technical
development.
Changes or modifications not expressly approved by the party responsible for compliance could
void the user’s authority to operate the equipment.
NOTE.
The manufacturer is not responsible for any radio or television interference caused by
unauthorized modifications to this equipment. Such modifications could void the
user’s authority to operate the equipment.
CERTIFICATION AND APPROVALS (APPLYING TO THIS EQUIPMENT)
This equipment is constructed to meet European Economic Community (EEC) Electromagnetic
Compatibility (EMC) and Safety Directives. A sample equipment has been examined by a United
Kingdom Accreditation Service (UKAS) testing organization and found to meet ETSI EN 301 489-1
and FCC 47 CFR parts 15.107 and 15.109.
Federal Communications Commission (FCC) Part 15b information is available.
COPYRIGHT
This document contains information that is the intellectual property of Dalman Technical Services
Limited (DTS). This information is for the use of the original purchaser of the equipment or their
agents in the maintenance of the equipment discussed herein. All rights are reserved. This
document may not, in whole or in part, be copied, photocopied, reproduced, translated, stored, or
reduced to any electronic medium or machine-readable form, without prior written permission from
DTS.
DISCLAIMER
There are no warranties extended or granted by this document. DTS accepts no responsibility for
damage arising from use of the information contained in the document or of the equipment and
software it describes. It is the responsibility of the user to ensure that use of such information,
equipment and software complies with the laws, rules and regulations of the applicable
jurisdictions.
DOCUMENT CONTROL
Application
This document is intended for the use of suitably qualified engineers and technicians engaged in
the installation and maintenance of the System.
Equipment and Manual Updates
In the interests of improving the performance, reliability or servicing of the equipment, DTS
reserves the right to update the equipment or this document or both without prior notice.
May 11
Page 2
PREFACE
DTS-SOLAR 2-P25 Add
ERRORS AND OMISSIONS
The usefulness of this publication depends upon the accuracy and completeness of the information
contained within it. Whilst every endeavour has been made to eliminate any errors, some may still
exist. It is requested that any errors or omissions noted should be reported to:
Dalman Technical Services Ltd
Field House
Uttoxeter Old Road
Derby
DE1 1NH
UK
Tel:
+44 (0) 871 741 1050
E-mail: [email protected]
DOCUMENT HISTORY
Issue
Date
1.0
May 2011
Comments
Initial Issue.
RELATED DOCUMENTS
1.
DTS-SOLAR 2-TH.
SOLAR 2 Simulcast over IP Synchronised (SOLAR 2 Sync) &
Non-synchronised (SOLAR 2 Lite) – Technical Handbook and
User Manual, Issue 1.0, dated 14 January 2011.
2.
SGD-SB2000-TM.
SB2000 Base Station, Repeater, Receiver and Transmitter –
Technical Handbook, Issue 1.0, dated March 2011.
3.
SGD-SR2000-TM.
SR2000 Base Station, Repeater, Receiver and Transmitter –
Technical Handbook, not yet Issued.
May 11
Page 3
PREFACE
DTS-SOLAR 2-P25 Add
TABLE OF CONTENTS
Page
Title Page ...................................................................................................................................... 1
Preface .......................................................................................................................................... 2
Table of Contents (this list) ......................................................................................................... 4
List of Figures .............................................................................................................................. 6
List of Tables ................................................................................................................................ 6
PERSONAL SAFETY .................................................................................................................... 7
EQUIPMENT SAFETY ................................................................................................................... 8
WEEE Notice .............................................................................................................................. 10
General Notes ............................................................................................................................ 11
Support – Contact Information ................................................................................................. 12
Abbreviations ............................................................................................................................. 13
Glossary of Terms ..................................................................................................................... 15
1
INTRODUCTION ................................................................................................................. 16
1.1 SCOPE ............................................................................................................................. 16
1.2 BRIEF DESCRIPTION.......................................................................................................... 16
1.3 FUNCTIONAL DETAIL ................................................................................................... 18
1.3.1
Transmit Path (Central to Station) .......................................................................... 18
1.3.1.1
Analogue Transmit Mode .............................................................................. 18
1.3.1.2
P25 Transmit Mode....................................................................................... 18
1.3.2
Receive Path (Station to Central) ........................................................................... 19
1.3.2.1
Analogue Receive Mode ............................................................................... 19
1.3.2.2
P25 Receive Mode........................................................................................ 19
2
INSTALLATION .................................................................................................................. 21
2.1 SOLAR NI CONNECTORS ................................................................................................. 21
2.2 FACILITY CONNECTOR ...................................................................................................... 21
2.2.1
Audio Input (pins 1 & 10)........................................................................................ 21
2.2.2
Audio Output (pins 2 & 11) ..................................................................................... 22
2.2.3
Audio/C4FM Input (pin 3) ....................................................................................... 22
2.2.4
Audio/C4FM Output (pin 4) .................................................................................... 22
2.2.5
Analogue RSSI Input (pin 22)................................................................................. 22
2.2.6
Isolated Input #1 (pin 19)........................................................................................ 22
2.2.7
Isolated Input #2 (pin 20)........................................................................................ 22
2.2.8
Isolated Input #3 (pin 21)........................................................................................ 23
2.2.9
Relay #1 (pins 16 & 24).......................................................................................... 23
2.2.10 Relay #2 (pins 17 & 25).......................................................................................... 23
2.2.11 Relay #3 (pins 18 & 26).......................................................................................... 23
2.3 SB2000 CONNECTORS ..................................................................................................... 23
2.3.1
CN1 Line I/O Connector ......................................................................................... 23
2.3.2
CN2 Monitor Connector.......................................................................................... 24
2.4 SR2000 CONNECTORS ..................................................................................................... 24
May 11
Page 4
CONTENTS
DTS-SOLAR 2-P25 Add
2.4.1
CN1 Line I/O Connector ......................................................................................... 24
3
ENGINEERING TERMINAL ................................................................................................ 25
3.1 GENERAL ......................................................................................................................... 25
3.2 STATION NETWORK INTERFACE ET.................................................................................... 25
3.2.1
Main Audio ............................................................................................................. 25
3.2.2
Signalling ............................................................................................................... 26
3.2.3
Facilities ................................................................................................................. 26
3.2.4
Environment........................................................................................................... 26
3.2.5
Handset.................................................................................................................. 26
3.3 CENTRAL NETWORK INTERFACE ET................................................................................... 27
3.4 TRAFFIC MANAGER ET ..................................................................................................... 27
3.4.1
Channel Setup ....................................................................................................... 27
3.4.1.1
Audio Mode................................................................................................... 27
3.4.1.2
P25 Channel Settings ................................................................................... 28
4
CONFIGURATION............................................................................................................... 29
4.1 STATION NI/SB2000......................................................................................................... 29
4.1.1
Tools, Test Equipment and Materials Required...................................................... 29
4.1.2
Procedure .............................................................................................................. 29
4.2 CENTRAL NI/AFSI ............................................................................................................ 37
APPENDICES
A.
SB2000 LINK SETTINGS FOR SOLAR P25
B.
CONFIGURATION PROCEDURE CABLE REQUIREMENTS
May 11
Page 5
CONTENTS
DTS-SOLAR 2-P25 Add
FIGURES
Page
Figure 1. SOLAR P25 Two Channel System – Basic Overview.................................................... 16
Figure 1. NI Engineering – Main Audio tab, new Audio Mode box................................................ 25
Figure 2. NI Engineering – Signalling tab, Signalling In box. ........................................................ 26
Figure 3. NI Engineering – Handset tab. ...................................................................................... 27
Figure 4. Channel Setup page – P25 tab. .................................................................................... 28
Figure 5. HyperTerminal – Menu.................................................................................................. 30
Figure 6. NI ET – Audio Mode to ‘Remote’. .................................................................................. 30
Figure 7. NI Engineering – Main Audio tab, “In Audio Sensitivity” settings.................................... 31
Figure 8. NI Engineering – Facilities tab, Test Tone Frequency. .................................................. 32
Figure 9. NI Engineering – Signalling tab, Manual Trigger. .......................................................... 32
Figure 10. MXTools – Channel Edit page..................................................................................... 33
Figure 11. Tx Modulation displayed on RTS................................................................................. 34
Figure 12. MXTools – Write Channel button................................................................................. 34
Figure 13. NI Engineering – Facilities tab, Test Tone settings...................................................... 35
Figure 14. Isolated Inputs and Outputs – Auto function. ............................................................... 37
Figure B1. T36 Module Serial Cable – wiring details. ................................................................... 39
TABLES
Page
Table 1.
Table 2.
Table 3.
Table 4.
Table 5.
May 11
26-way high density D – NI Facilities I/O Sockets........................................................... 21
CN1 Line I/O Connector – 15-way D Socket. ................................................................. 24
CN2 Monitor Connector – 9-way D Socket. .................................................................... 24
CN1 Line I/O Connector – 15-way D Socket. ................................................................. 24
MXTools, Channel Edit Settings. .................................................................................... 33
Page 6
CONTENTS
DTS-SOLAR 2-P25 Add
PERSONAL SAFETY
This equipment is designed and built to meet Safety and EMC requirements, adherence to these
requirements may be compromised if the equipment is operated in a condition or manner which the
design did not intend.
Safety Precautions
These Safety Precautions, Warnings and Cautions advise personnel of specific hazards which may
be encountered during the procedures contained in this document and that control measures are
required to prevent injury to personnel, and damage to equipment and/or the environment.
Before commencing the installation or any maintenance of this equipment, personnel are to
acquaint themselves with all risk assessments relevant to the work site and the task. They must
then comply with the control measures detailed in those risk assessments.
References covering safety regulations, health hazards and hazardous substances are detailed
under the WARNINGS section below. These are referred to in the tasks, when encountered.
Adequate precautions must be taken to ensure that other personnel do not activate any equipment
that has been switched off for maintenance. Refer to the Electricity at Work regulations 1992.
Where dangerous voltages are exposed during a task, safety personnel are to be provided as
detailed in the Electricity at Work regulations 1992. Where safety personnel are required for any
other reason, management are to ensure that the personnel detailed are aware of the hazard and
are fully briefed on the action to be taken in an emergency.
Where equipment contains heavy components or units that require lifting, lowering, pulling or
pushing operations to be performed on them during maintenance tasks, all managers and
tradesmen are to be conversant with the Manual Handling Operations Regulations 1992, ISBN
0110259203.
Hazardous Substances
Before using any hazardous substance or material, the user must be conversant with the safety
precautions and first aid instructions:
•
On the label of the container in which it was supplied.
•
On the material Safety Data Sheet.
•
In any local Safety Orders and Regulations.
WARNINGS
Beryllium and Beryllia
WARNING
BERYLLIUM AND BERYLLIA. COMPONENTS AND SEMICONDUCTOR
DEVICES CONTAINING BERYLLIUM OXIDE MAYBE USED IN THIS
EQUIPMENT. REFER TO THE CONTROL OF SUBSTANCES
HAZARDOUS TO HEALTH REGULATIONS (COSHH) 2002 AND/OR THE
APPROPRIATE SAFETY DATA SHEET.
May 11
Page 7
WARNINGS
DTS-SOLAR 2-P25 Add
Dangerous Voltages
Dangerous voltages exist in this equipment, for the appropriate Safety precautions, refer to the
Electricity at Work Regulations 1992.
Depending on the variant and model, the SOLAR 2 P25 equipment may be fitted with an Internal
AC Power Supply.
If an Internal AC Power Supply is fitted, a standard International
Electrotechnical Commission (IEC) mains connector will be fitted on the rear panel (refer to the
Power Requirements, Page 22 and the Section 3 – Description for further details).
WARNING
THIS EQUIPMENT MUST TO BE CONNECTED TO A MAINS POWER
SUPPLY THAT HAS A SAFETY EARTH CONNECTION.
WARNING
THIS EQUIPMENT IS DESIGNED TO BE CONNECTED TO TN AND TT
POWER SYSTEMS ONLY. IT SHOULD NOT BE CONNECTED TO IT
POWER SYSTEMS WITHOUT AN APPROPRIATE PROTECTIVE EARTH
CONDUCTOR CURRENT SENSING DEVICE. REFER TO DTS FOR
CONNECTION TO IT POWER SYSTEMS.
WARNINGS
DO NOT CONNECT THE MAINS ELECTRICITY SUPPLY UNTIL THE
INSTALLATION IS COMPLETE
DISCONNECT THE MAINS ELECTRICITY SUPPLY BEFORE WORKING
ON AN OPEN SOLAR 2 UNIT OR POWER SUPPLY UNIT TRAY
EQUIPMENT SAFETY
Installation and Maintenance
The SOLAR 2 P25 Network Interface System should only be installed and maintained by
qualified personnel.
Cautions
CAUTION
EQUIPMENT INSTALLATION. This equipment is designed to be installed in a
rack or equipment housing that is constructed to accommodate 19 inch
equipment. It MUST be installed using support shelves or runners so that the
weight is not taken by the front panel. The equipment should be held in place
using the correct fixing screws for the rack or enclosure fitted through the
front panel holes.
May 11
Page 8
WARNINGS
DTS-SOLAR 2-P25 Add
CAUTION
EQUIPMENT DAMAGE. Correct operation of the system requires adequate
ventilation. Do not cover ventilation panels otherwise overheating and damage
could result.
Maintenance Precautions
SOLAR 2 P25 is not designed for field repair; the equipment is supplied on a ‘Return to Factory’
basis for all repairs.
However, circumstances may arise whereby DTS may request that some basic work is undertaken
in the field. In the advent that work is conducted on the equipment it is essential that:
•
The input power connector is unplugged before any lid is removed.
•
All covers and screws should be replaced after completion of work.
•
Only approved replacement components issued from the factory are to be used.
Isolation from Power
The cover must not be removed or any work undertaken until the input power is removed.
To disconnect the equipment from the Power Input - remove the power input connector from the
rear panel of the equipment.
Power Input Fusing
AC versions: there is no input fuse fitted.
DC versions: a self-resetting fuse is fitted in the positive supply line.
Both the AC and DC input power supplies deliver +12 VDC to the circuit boards.
ESDS Devices
CAUTION
Electrostatic Discharge Sensitive Devices (ESDS Devices). This equipment
contains ESDS Devices, the handling procedures detailed in BS EN 61340-51:2007 or ANSI/ESD S20.20-1999 are to be observed.
May 11
Page 9
WARNINGS
WASTE ELECTRICAL AND ELECTRONIC EQUIPMENT (WEEE)
NOTICE
The Waste Electrical and Electronic Equipment (WEEE) Directive became law
in most EU countries during 2005. The directive applies to the disposal of
waste electrical and electronic equipment within the member states of the
European Union.
As part of the legislation, electrical and electronic equipment will feature the
crossed out wheeled bin symbol (see image at left) on the product or in the
documentation to show that these products must be disposed of in accordance
with the WEEE Directive.
In the European Union, this label indicates that this product should not be disposed of with
domestic or “ordinary” waste. It should be deposited at an appropriate facility to enable recovery
and recycling.
May 11
Page 10
WEEE NOTICE
DTS-SOLAR 2-P25 Add
GENERAL NOTES
APPLICABILITY
The information contained in this addendum is only applicable for:
•
Traffic Manager Firmware (FW) Version TM 21786 Ver 1.00;
•
Network Interface FW Versions FW 21786 Ver 1.00 & DSP 21786 Ver 1.00; and
•
Engineering Terminal (ET) Version PC 20786 Ver 1.00; or
•
Later versions of each.
PAGINATION
Following initial issue, any page that has been amended or updated will also bear an updated
reference.
DOCUMENT PRESENTATION AND AVAILABILITY
Presentation
The technical information is presented in electronic form on a Compact Disc (CD) with all
presentations as HTML or Acrobat PDF.
Availability
The latest version of the technical information is available on the Dalman web-site
(http://www.dalmants.co.uk) under the product name. The information on the website will be
updated as appropriate, revision/version references and the date of presentation will be shown.
May 11
Page 11
GENERAL NOTES
DTS-SOLAR 2-P25 Add
CONTACT INFORMATION
DTS is part of the Simoco Group.
At Simoco we welcome your comments, feedback and suggestions. Departmental contacts for
Team Simoco, which is also part of the Simoco Group, have been provided for your quick
reference below.
Customer Services
[email protected]
Customer Services:
Tel:
+44 (0) 871 741 1050
Fax:
+44 (0) 871 741 1051
Sales
[email protected]
For information regarding distributor agreements, general product and pricing information, contact
Team Simoco’s Account Management Team.
Marketing
[email protected]
For general corporate information, marketing programmes, public relations and other general
questions.
Technical Support
[email protected]
Technical Support Helpline:
Tel:
May 11
Page 12
+44 (0) 871 741 1040
SUPPORT
DTS-SOLAR 2-P25 Add
ABBREVIATIONS
The following abbreviations are used through out this document. Whenever practicable, wherever
the abbreviation is first used the full meaning is given with the abbreviation in parenthesis, after
that only the abbreviation will be used.
LIST OF ABBREVIATIONS
Abbreviation
AC
ADPCM
AF
AFSI
C4FM
CD
COR
COSHH
CTCSS
DC
DFSI
DTS
EEC
EMC
ESDS Devices
ETSI
ET
FCC
FM
FW
GPS
HDU
IEC
IMBE
I/O
I/P
IP
LDU
NAC
NI
OEM
O/P
PC
PCB
PCM
PL
PMR
PTT
RF
RSSI
May 11
Meaning
Alternating Current
Adaptive Differential Pulse Coded Modulation
Audio Frequency
Analogue Fixed Station Interface
Continuous 4 level Frequency Modulation
Compact Disc
Carrier Operated Relay
Control Of Substances Hazardous to Health
Continuous Tone Controlled Sub-audible Squelch
Direct Current
Digital Fixed Station Interface
Dalman Technical Services Limited
European Economic Community
Electromagnetic Compatibility
Electrostatic Discharge Sensitive Devices
European Telecommunications Standards Institute
Engineering Terminal
Federal Communications Commission
Frequency Modulation
Firmware
Global Positioning System
Header Data Unit
International Electrotechnical Commission
Improved MultiBand Excitation
Input/Output
Input
Internet Protocol
Logical link Data Unit
Network Access Code
Network Interface
Other Equipment Manufacturer
Output
Personal Computer
Printed Circuit Board
Pulse Coded Modulation
Private Line
Private Mobile Radio
Press (Push To Talk)
Radio Frequency
Received Signal Strength Indicator
Page 13
ABBREVIATIONS
DTS-SOLAR 2-P25 Add
LIST OF ABBREVIATIONS
Abbreviation
RTS
Rx/RX
TDU
TGID
TIA
TM
TRC
TSL
T/T
Tx/TX
UKAS
VDC
VOGAD
WEEE
May 11
Meaning
Radio Test Set
Receive or Receiver
Terminator Data Unit
Talk Group IDentification
Telecommunications Industry Association
Traffic Manager
Tone Remote Control
Team Simoco Limited
Talk Through
Transmit or Transmitter
United Kingdom Accreditation Service
Voltage Direct Current
Voice Operated Gain Adjusting Device
Waste Electrical and Electronic Equipment
Page 14
ABBREVIATIONS
DTS-SOLAR 2-P25 Add
GLOSSARY OF TERMS
The following terms are used through out this document.
Term
“……”
Meaning
Reference to a setting or feature (exactly as it is displayed) that may be
selected or enabled either directly or through a software application, e.g.
“Button”, “Control”, “Switch”.
0V
The internal negative supply line to which the internal circuitry is referenced.
1PPS
A One Pulse Per Second timing signal (timed from the leading or rising edge).
Audio
Frequency
A composite audio band signal that may include tones.
CTCSS
A sub-audio tone used for validating a received signal (also known as a PL
tone).
Closed
Contact
Connects to the common or pole contact when a relay is not energised (off).
Firmware
The embedded code that makes Voter II function.
G.726
G.726 is an ADPCM speech codec standard covering the transmission of
voice at rates of 16, 24, 32, and 40 kbit/s.
Ground/Gnd
A connection that is the same potential as the chassis or case (earth).
Go/GO
A signal that flows towards the base station transmitter.
In
A signal that is entering SOLAR 2.
Key/Keyed
A signal that can cause transmit mode or the transmit condition itself.
Open Contact
Connects to the common or pole contact when a relay is energised (on).
Out
A signal that is leaving SOLAR 2.
Press To Talk
The action or signal that causes the equipment to be placed into transmit
mode or to be keyed.
Return/RTN
A signal that flows from the base station receiver (receive).
Sig/Signalling
A state or tone that is used to indicate a defined condition.
Vote/voting
The selection of the best received signal from a collection of signals presented
individually and simultaneously.
May 11
Page 15
ABBREVIATIONS
DTS-SOLAR 2-P25 Add
1
1.1
INTRODUCTION
SCOPE
The purpose of this addendum is to provide the information necessary for the correct installation,
configuration and operation of a SOLAR 2 P25 system.
Much of the technical information and operation of a SOLAR 2 P25 system is exactly the same as
the basic SOLAR 2 system and will not be repeated here. Therefore, this addendum should be
used in conjunction with the SOLAR 2 – Technical Handbook and User Manual [1], as references
will be made to the appropriate sections of that SOLAR 2 Technical Handbook.
1.2
BRIEF DESCRIPTION
SOLAR 2 provides the means to deliver synchronised audio that is carried over an Internet
Protocol (IP) network to multiple base station transmitters for simulcast operation. Building upon
this well proven “synchronising engine” there is now a version of SOLAR 2 that supports simulcast
P25.
A SOLAR 2 P25 system will comprise of at least one SOLAR Traffic Manager (TM) and a number
of Station Network Interfaces (Station NIs). A single TM may be used as a standalone entity or be
paired with a second unit working in duplicated mode for enhanced resilience (1+1 operation).
A basic overview of a SOLAR P25 two channel system is shown below in Figure 1.
Figure 1. SOLAR P25 Two Channel System – Basic Overview.
May 11
Page 16
INTRODUCTION
DTS-SOLAR 2-P25 Add
As with the original version of SOLAR, the TM is capable of controlling a maximum of 32 Station
NIs, which may be deployed across more than one channel to a maximum of four (the non-P25
version can support sixteen). One or more NIs may be used in Central mode (Central NI) to
provide the console Analogue Fixed Station Interface (AFSI) to a P25 channel.
Development of a console connection direct to the TM via the Ethernet network, which will provide
Digital Fixed Station Interface (DFSI) functionality, is currently in progress and expected mid-2011.
On SOLAR P25 system, a channel may be configured to operate in either analogue only mode,
P25 only mode, or automatic mode. The latter mode enables mixed operation on a call-by-call
basis as might be necessary during system migration.
Unlike the original version of SOLAR, which may be used with any base station that is simulcast
capable, SOLAR 2 P25 simulcast has been designed to be used with the Simoco SB2000 Base
Station. When used with SOLAR P25, the SB2000 base station does not participate in any part of
the P25 signal processing as all that is handled by SOLAR. This is quite different to when the
SB2000 is used in standalone mode as a P25 base station/repeater.
In the future, base stations from Other Equipment Manufacturers (OEMs) may be deemed suitable
for operation with SOLAR 2 P25. The core requirements for P25 simulcast are no different to that
of non-P25 systems; i.e. the Tx modulation must be identical at all sites and Tx frequencies must
be accurately maintained.
The major factors that determine the suitability of a base station are that both the Tx and Rx audio
signal frequency responses extend down to around 10 Hz and that neither path is subject to any
signal processing by the base station itself. The lack of any signal processing is a crucial factor, as
it is absolutely imperative that the synchronised Continuous 4 level Frequency Modulation (C4FM)
signal is not manipulated in any way in the base station transmitters.
All SOLAR 2 P25 Station NIs and TM units must be provided with a global timing signal to achieve
system wide synchronisation; this is not mandatory for Central NI units, which can take timing from
the TM. The global timing signal is normally derived from a Global Positioning System (GPS) Rx,
and equipment that meets that requirement and is a direct plug-in to SOLAR 2 is available from
DTS.
The physical format of the SOLAR 2 P25 is identical to the non-P25 SOLAR 2 equipment, it is the
FW that changes the capability of the SOLAR 2 equipment to operate in P25 mode. Although any
existing SOLAR 2 system could be upgraded to P25 mode, ultimately, this is dependant upon the
base station that is being used as outlined below. Any such upgrade would result in considerable
disruption to operation of the system, as the inter-connections between the Station NI and base
station are significantly different and would have to be changed at every site as a minimum.
The Station NI will also decode the voice data and output audio to feed to the monitor loudspeaker
of the SB2000, if fitted (for unencrypted audio only). Similarly, the audio from the engineer’s
microphone front panel socket is fed into the Station NI where it is encoded into P25 frames
allowing the engineer to talk-out on the Tx or talk-back to the control in an unencrypted format.
The TM receives IP packets from, and sends IP packets to, every NI on the system. The IP
packets are formatted in exactly the same way as for SOLAR 1, in order to maintain commonality
as well as using time-proven format and simplifying processing when signals are conventional
analogue and not P25.
In the Tx direction (outgoing), the TM constructs the P25 frames from the voice data bit stream
coming from the Central NI in IP packets or from the voted Station NI if in talkthrough (T/T) mode.
The TM sends out the P25 frames in IP packets to every Station NI on the channel. In non-P25
mode, the packets from the Central NI or voted Station NI are basically replicated for each Station
NI. In the Rx direction (incoming), the TM reads the data in the packets to determine the mode of
May 11
Page 17
INTRODUCTION
DTS-SOLAR 2-P25 Add
signal. For P25 signals, the TM checks for errors and applies error correction. Received Signal
Strength Indication (RSSI) information is used for signal quality comparison measurements, so that
the site offering the best incoming signal is selected or voted.
The site that is presenting the best quality signal will be selected and data packets passed to the
Central NI, which will decode the plain or P25 audio as appropriate and output analogue audio to
the console system with any corresponding signalling.
1.3
FUNCTIONAL DETAIL
The task fulfilled by the SOLAR 2 NI varies according to the role of the unit (Central or Station) and
the mode of operation of the channel and/or the type of signal being received. In Central mode,
the NI provides the P25 voice coding (vocoding) and decoding, and provides the AFSI to the
dispatch console. In Station mode, the NI will output synchronised audio or synchronised P25
C4FM data, which is fundamental to operating the channel in simulcast mode. Audio from the
base station Rx is digitised by the NI and processed according to the channel mode before being
passed back to the TM for signal evaluation and Rx voting.
1.3.1
Transmit Path (Central to Station)
Audio is fed into a Central NI through the isolated, balanced 600R input from a dispatch console
and will be accompanied by a signal (dry contact) to show that the Tx function is active (Press To
Talk (PTT) on). The audio is digitised (over sampled) and the processing route for the audio is
then determined by the mode of operation.
1.3.1.1
Analogue Transmit Mode
The Tx audio is pre-emphasised, limited and then compressed to G.726 Adaptive Differential Pulse
Coded Modulation (ADPCM) standard. The resulting digital stream is assembled into IP packets
every 20 ms where the SOLAR supervisory data is added and then passed to the Ethernet
encoder for sending to the TM.
The TM receives IP packets from the Central NI, checks the timing of the packet arrival, then
replicates the data for every Station NI that is on the channel. SOLAR supervisory information is
added and then passed to the Ethernet encoder, which wraps up the data into IP packets to send
to every Station NI at the next internal timing signal.
At the Station NI, incoming packets from the TM are checked for timing and placed in a buffer store
in their true original sequence as opposed to the order in which they arrive although it is likely to be
the same. The supervisory data is extracted and appropriate actions taken, which can range from
activating an output such as the Tx key to adjusting a setting or level control.
The G.726 encoded digital stream is decoded back to full Pulse Coded Modulation (PCM) and deemphasised to restore a flat end-to-end response. It is then high pass filtered to remove any subaudio content, but has to be pre-emphasised and limited again to ensure that the Tx modulation
mask is not exceeded (the Tx modulation input is wideband and unlimited for maximum fidelity).
The shaped audio is fed into a mixer where Continuous Tone Controlled Sub-audible Squelch
(CTCSS) “Private Line”(PL) tone can be mixed with the audio (this was not possible with SOLAR 1
and sub-audio tones had to be fed into the Tx through a separate input).
1.3.1.2
P25 Transmit Mode
The Tx audio from the dispatch console is first encoded to the Improved Multiband Excitation
(IMBE™) standard resulting in a vocoded digital bit stream. This is assembled into IP packets
every 20 ms where the SOLAR supervisory data is added and then passed to the Ethernet
encoder for sending to the TM.
May 11
Page 18
INTRODUCTION
DTS-SOLAR 2-P25 Add
The TM receives IP packets from the Central NI, checks the timing and order of the packet arrival,
separates and buffers the audio data. The voice data and status bits are interleaved and
assembled into the final P25 voice message structure starting with a ‘Header Data Unit’ (HDU),
then followed alternately by ‘Logical Link Data Units’ types 1 and 2 (LDU1 and LDU2) to make a
‘Superframe’. The end of the message is signalled with a ‘Terminator Data Unit’ (TDU).
The resulting P25 frames are split into 20 ms blocks, which are replicated for every Station NI on
the channel. The SOLAR supervisory information and system management data are added and
passed to the Ethernet encoder, which wraps up the data into IP packets to send to every Station
NI on the occurrence of the next internal timing signal.
At the Station NI, the P25 information is extracted from the IP packets and buffered, the
supervisory data being used as appropriate. The P25 data is now turned into the C4FM
modulating signal, the waveform is shaped and, after level adjustment, is output from the Station
NI at exactly the same time (real time) at every Station NI. This output connects directly to the Tx
modulator and therefore achieves transmitted signal synchronisation across all sites.
1.3.2
Receive Path (Station to Central)
The unprocessed wideband audio from the Rx is fed into the Station NI through the unbalanced
wideband input. A RSSI voltage and a squelch open or Carrier Operated Relay (COR) signal are
also required, each being fed into dedicated inputs. The Rx squelch signal is used by the Station
NI to validate the presence of a received signal. The received audio is digitised (over sampled)
and passes through two routes in parallel; one route processes plain audio and the other route
processes P25 signals.
1.3.2.1
Analogue Receive Mode
The audio is band pass filtered and the level adjusted according to channel spacing. It is then
encoded to G.726 ADPCM and assembled into IP packets every 20 ms. The RSSI and SOLAR
supervisory data is added and then passed to the Ethernet encoder, which wraps up the data into
IP packets to send to the TM at the next internal 20 ms timing signal.
The TM receives IP packets from the Station NI, checks the timing and order of the packets,
separates and buffers the audio data, and reads the RSSI information. Comparisons of RSSI
levels are made from all incoming packets that originated at the same time, in order to make as
close a like-for-like signal comparison as possible. The packet (site) offering the highest RSSI
level is selected or voted and that packet is output towards the Central NI.
At the Central NI, packets are again buffered and checked for arrival order. Under the control of
the timing settings applied to system, the Central NI will take the audio data from the buffer,
decode it back to audio at the correct time and output it to the dispatch console system.
If the channel is operating in T/T or Repeat mode, the audio from the voted packet will be used for
the outgoing path, outgoing supervisory data will be added and then passed to the Ethernet
encoder so that the IP packets are re-broadcast to all sites on the channel.
1.3.2.2
P25 Receive Mode
The P25 processing route takes the incoming audio that is a C4FM signal and extracts the P25
symbols to produce a digital bit stream. This process also flags that the incoming signal is P25 as
opposed to plain audio. The data stream is split into 20 ms data blocks, the SOLAR supervisory
information and system management data are added, and the resulting digital stream is wrapped
up into IP packets for the Ethernet encoder to send to the TM at the next internal timing signal.
May 11
Page 19
INTRODUCTION
DTS-SOLAR 2-P25 Add
The TM receives IP packets from every active Station NI (site), checks the timing and order of the
packets, the SOLAR supervisory information is removed, then the P25 bit stream is decoded to
detect the frame synchronisation bits. Once synchronisation is achieved, the TM separates and
buffers the audio and LC/ES/LS data for each Station NI, then calculates and applies data error
correction.
The RSSI information extracted from each packet is initially used to determine the site offering the
best signal. Once a site has been voted, the voice data frames and error rate information are
extracted. The SOLAR supervisory information and system management data are added and the
resulting digital stream passed to the Ethernet encoder, which wraps up the data into IP packets to
send to the Central NI at the next internal timing signal.
The next step in the process assumes that the NI is set to “Auto” mode, whereby the NI determines
the nature of the incoming signal and acts accordingly. If P25 is detected, the recovered P25 data
is placed into SOLAR IP packets, however, if the signal is conventional audio (i.e. no P25 sync
word), the digitised audio will encoded with G.726 and placed directly into SOLAR IP packets. The
result of either action is that IP packets carrying a representation of the input signal will be passed
to the TM over the Ethernet network.
If the channel is set to a fixed mode of operation such that it will only pass one format of signal; i.e.
only P25 or only analogue, the voter will only select that type of incoming signal.
May 11
Page 20
INTRODUCTION
DTS-SOLAR 2-P25 Add
2
INSTALLATION
2.1
SOLAR NI CONNECTORS
The electrical and physical specifications of the SOLAR 2 P25 unit are the same as the non-P25
version of SOLAR 2. For further information, refer to Section 2 – Specifications of the SOLAR 2
Technical Handbook and User Manual [1].
Similarly, the GPS, I/O (Environment), Serial and Ethernet connectors on the rear panel of the
Solar 2 P25 unit are physically and functionally identical to those of the non-P25 SOLAR 2 unit.
For further information, refer to Section 3 – Installation of the SOLAR 2 Technical Handbook and
User Manual [1].
2.2
FACILITY CONNECTOR
On the Facilities connector for a NI, the functional role of some of the inputs and outputs presented
differ for the P25 version and these are detailed below. Whilst the role of many connections
remains exactly the same as for the non-P25 version of the SOLAR 2 NI, the use of some such as
the ‘Analogue RSSI Input’ for example is now mandatory, hence they have been included in the
following sections. Some of these signals are referenced to the 0 V – Common/Ground line, which
is presented on several pins and it is therefore assumed that one or more of these pins will be
wired.
To achieve the correct operation of these inputs and outputs for the SOLAR P25 systems they will
require specific configuration settings, which will be detailed later in this addendum.
Table 1. 26-way high density D – NI Facilities I/O Sockets.
Pin
Function
1
2
Audio I/P (balanced 600R with pin 10)
Audio O/P (balanced 600R with pin 11)
Audio/C4FM I/P – high (high impedance with
0 V – not DC isolated)
Audio/C4FM O/P – high (unbalanced 600R with
0 V – not DC isolated)
0 V – Common/Ground
0 V – Common/Ground
Relay # 1 – Normally closed
Relay # 2 – Normally closed
Relay # 3 – Normally closed
Audio I/P (balanced 600R with pin 1)
Audio O/P (balanced 600R with pin 2)
0 V – Common/Ground
0 V – Common/Ground
3
4
5
6
7
8
9
10
11
12
13
Pin
Function
14 0 V – Common/Ground
15 0 V – Common/Ground
16 Relay # 1 – Common (pole)
17 Relay # 2 – Common (pole)
18
19
20
21
22
23
24
25
26
Relay # 3 – Common (pole)
Isolated I/P # 1
Isolated I/P # 2
Isolated I/P # 3
Analogue RSSI I/P
0 V – Common/Ground
Relay # 1 – Normally open
Relay # 2 – Normally open
Relay # 3 – Normally open
Note.
The 0 V Common/Ground connection on pins 5, 6, 12, 13, 14, 15 and 23 are joined
internally.
2.2.1
Audio Input (pins 1 & 10)
Station NI. The audio for this input will come from the engineer’s handset/microphone allowing an
engineer to select whether to talk-out over the air or to talk-back to a dispatch/console system.
Central NI. The audio for this input will come from a console/dispatch system.
May 11
Page 21
INSTALLATION
DTS-SOLAR 2-P25 Add
2.2.2
Audio Output (pins 2 & 11)
Station NI. The source of the audio signal that is output on these pins will either be the base
station Rx or the network as selected by the engineer on the NI ET. Whichever source is selected,
when P25 data is detected or P25 mode is selected, the signal will be passed through the P25
decoding process, otherwise this is bypassed. The recovered audio passed to the audio output is
wired to the base station monitor loudspeaker circuit allowing the engineer to monitor the
unencrypted speech traffic in either direction as selected.
Central NI. The source of the audio output will be taken from the IP packets that have originated
from the site selected by the TM during the voting process. The data in these packets may be a
vocoded bit stream, which will be decoded by the NI or plain audio according to the nature of the
incoming signal. The audio output will present the best received (incoming) signal to the
console/dispatch system.
2.2.3
Audio/C4FM Input (pin 3)
Station NI. This input is wired directly from the unprocessed/unfiltered Rx output of the
SB2000/SR2000 base station. The NI will digitise the incoming signal and process the data to
determine if it is a P25 signal with sync information or simply a plain analogue signal. Either result
produces IP packets that carry a representation of the input signal which are sent to the TM over
the Ethernet network.
Central NI. This input has no function.
2.2.4
Audio/C4FM Output (pin 4)
Station NI. This output connects directly to the Tx direct modulation input. The NI will produce a
signal from the IP packets: when operating in P25 mode this will be the C4FM modulation signal;
or a response limited analogue waveform when operating in analogue mode. In analogue mode,
this output may also contain a CTCSS (PL) tone if one is to be transmitted on the channel. In
either analogue or P25 mode, the output signal will be synchronised across all stations operating
within the same channel.
Central NI. This output has no function.
2.2.5
Analogue RSSI Input (pin 22)
Station NI. The variable voltage RSSI output from the SB2000 Rx connects to this input.
Central NI. This output has no function.
2.2.6
Isolated Input #1 (pin 19)
Station NI. This input is used to indicate that the Rx squelch is open. The input is pulled low to
0 V by the ‘M’ wire output from the SB2000/SR2000.
Central NI. This is the channel key (PTT) input from the dispatch console by a closing contact.
Note.
This input may be programmed to be active when pulled low or not active when pulled
low.
2.2.7
Isolated Input #2 (pin 20)
Station NI. This input has no system specific function but is available for a user defined purpose.
Central NI. This input is used to control the T/T function on the channel. When this input is active
T/T is enabled.
May 11
Page 22
INSTALLATION
DTS-SOLAR 2-P25 Add
Note.
This input may be programmed to be active when pulled low or not active when pulled
low.
2.2.8
Isolated Input #3 (pin 21)
Station NI. This input has no system specific function but is available for a user defined purpose.
Central NI. This input is used to indicate if the call to be transmitted by the dispatch console is
P25 mode or not. When this input is active P25 mode is invoked.
Note.
This input may be programmed to be active when pulled low or not active when pulled
low.
2.2.9
Relay #1 (pins 16 & 24)
Station NI. The closing contact of Relay #1 (also referred to as Isolated Output #1) is used to key
the SB2000 Tx. As such, one side is wired to 0 V/common/ground, the other connecting to the
SB2000 PTT line.
Central NI. This relay output is activated by the presence of an incoming (voted) signal.
2.2.10 Relay #2 (pins 17 & 25)
Station NI. This relay output has no system specific function but is available for a user defined
purpose.
Central NI. The closing contact of Relay #2 (also referred to as Isolated Output #2) is activated
whenever an alarm condition exists on the TM.
2.2.11 Relay #3 (pins 18 & 26)
Station NI. This relay output has no system specific function but is available for a user defined
purpose.
Central NI. The closing contact of Relay #3 (also referred to as Isolated Output #3) is activated
whenever the incoming (voted) signal is P25.
2.3
SB2000 CONNECTORS
For general information and the layout of the rear panel connectors on the SB2000, refer to
Section 1 – General Description of the SB2000 Technical Handbook [2]. Those connectors that
are used for SOLAR 2 P25 NI are detailed in the following paragraphs together with their role.
2.3.1
CN1 Line I/O Connector
The connector pin-puts for the 15-way D Line I/O socket are shown overleaf in Table 2.
May 11
Page 23
INSTALLATION
DTS-SOLAR 2-P25 Add
Table 2. CN1 Line I/O Connector – 15-way D Socket.
Pin
Function
1
2
3
4
5
6
7
8
Alarm O/P #2
Tx VF Loopback or Rx CTCSS out
Rx Audio
Rx Audio – unfiltered & unsquelched
Alarm O/P #3
Alarm O/P #1 or M wire
Rx Talk
Repeater Enable
2.3.2
Pin
9
10
11
12
13
14
15
Function
Tx Audio I/P (unbalanced 600R)
0 V – Common/Ground
Tx Talk
Tx PTT/E wire I/P
Tx Wideband AF I/P
Rx Squelch O/P
Rx Audio O/P (unbalanced 600R)
CN2 Monitor Connector
The connector pin-puts for the 9-way D Monitor socket are shown below in Table 3.
Table 3. CN2 Monitor Connector – 9-way D Socket.
Pin
1
2
3
4
5
2.4
Function
0 V – Common/Ground
Rx RSSI O/P
External PTT In or Monitor Point
Tx Forward Power
+12V DC O/P (max load 500mA)
Pin
6
7
8
9
--
Function
Tx Reflected Power
Muted Rx Audio
Final Tx Audio Monitor
Test Tx Modulation I/P
SR2000 CONNECTORS
For general information and the layout of the rear panel connectors on the SR2000, refer to
Section 1 – General Description of the SR2000 Technical Handbook [3] Those connectors that
are used for SOLAR 2 P25 NI are detailed in the following paragraphs together with their role.
2.4.1
CN1 Line I/O Connector
The connector pin-puts for the 15-way D Line I/O socket are shown below in Table 4.
Table 4. CN1 Line I/O Connector – 15-way D Socket.
Pin
1
2
3
4
5
6
7
8
May 11
Function
Alarm O/P #2
Tx VF Leg B
Rx VF Leg A
Rx Audio – unfiltered & unsquelched
Alarm O/P #3
Alarm O/P #1 or M wire
Rx Mute
Rx RSSI O/P
Pin
9
10
11
12
13
14
15
Page 24
Function
Tx VF Leg A
0 V – Common/Ground
Tx Wideband AF I/P
Tx PTT/E wire I/P
Tx DC-FM I/P
Rx Squelch O/P
Rx VF Leg B
INSTALLATION
DTS-SOLAR 2-P25 Add
3
3.1
ENGINEERING TERMINAL
GENERAL
In order to configure the SOLAR 2 P25 system, the Engineering Terminal (ET) software application
(PC 20786 Ver 2.00 or higher) will be required. This application is identical to and used in exactly
the same way as the non-P25 version, it automatically detects and identifies the type of hardware it
is connected to. For more detailed information on connecting and configuring the ET, refer to
Section 4 – Introduction to the Engineering Terminal of the SOLAR 2 Handbook and User
Manual [1]. The specific aspects of the ET for SOLAR 2 P25 are described in the following
paragraphs.
3.2
STATION NETWORK INTERFACE ET
For the Station NI ET, all the differences specific to P25 are contained on the “NI Engineering”
window, which is accessed from the NI main window by selecting the “Eng” button.
3.2.1
Main Audio
On the “Main Audio” tab of the NI Engineering window, a new box has been included that shows
the Audio Mode, which allows the Station NI to be configured and operated locally independent of
the TM (see Figure 1 below).
Figure 1. NI Engineering – Main Audio tab, new Audio Mode box.
When the Audio Mode is set to “Remote”, the Station NI follows the Audio Mode of the channel it is
assigned to, however, it can be set locally to Analogue, P25 or Auto, with the Analogue modes
being 12.5 kHz or 25 kHz to match the SB2000/SR2000 bandwidth setting.
Note.
On a working site, setting the Audio Mode to anything other than ‘Remote’ can end up
with this station being at odds with others on the channel, which can cause a
degradation in overall transmitted signal quality in overlap areas.
May 11
Page 25
ENGINEERING TERMINAL
DTS-SOLAR 2-P25 Add
3.2.2
Signalling
The “Signalling” tab of the NI Engineering window differs only in that the “Signalling In” box is
always set to “Voltage” mode because there is no tone RSSI available from the SB2000/SR2000 in
P25 mode (see Figure 2 below).
Figure 2. NI Engineering – Signalling tab, Signalling In box.
3.2.3
Facilities
The Facilities tab of the NI Engineering window is identical in appearance to the analogue
SOLAR 2 ET. Test tones will only be generated in Analogue or P25 modes.
Note
Attempting to activate a test tone in Auto mode will have no effect.
In P25 mode, the test tone is the standard Telecommunications Industry Association (TIA) 1011 Hz
test signal, in this mode the level control has no effect. This tone can be routed in either/both
directions as per the analogue test tone.
3.2.4
Environment
The Environment tab of the NI Engineering window is identical to the analogue SOLAR 2 ET.
3.2.5
Handset
For P25, the Station NI Engineering window has an additional “Handset” tab (see Figure 3
overleaf). This “Handset” tab is only of relevance when the SB2000/SR2000 base station is fitted
with an engineers monitor loudspeaker and microphone.
The “Mic Sensitivity” and “Speaker Level” controls are used to set the approximate levels, as the
microphone input is fitted with a Voice Operated Gain Adjusting Device (VOGAD), which
compensates for a wide range of sound levels and the speaker (if fitted) has a front panel volume
control. The “Handset Mode” selector determines the audio source feeding the loudspeaker and
the direction the microphone audio is sent (Mobile or Control) when its PTT switch is pressed.
May 11
Page 26
ENGINEERING TERMINAL
DTS-SOLAR 2-P25 Add
Figure 3. NI Engineering – Handset tab.
3.3
CENTRAL NETWORK INTERFACE ET
For the Central NI ET, all the differences specific to P25 are contained on the “NI Engineering”
window, which is accessed from the NI main window by selecting the “Eng” button.
The “Main Audio” tab is the same as the Main Audio tab on the Station NI Engineering window,
except that the “In Audio Sensitivity” and “Out Audio Level” controls operate on the 600R audio I/P
and O/P and affect the levels to/from the dispatcher console.
The “Signalling” tab is the same as the Signalling tab on the Station NI Engineering window, except
that the “Signalling In” controls have no effect.
The “Facilities” tab is the same as the Facilities tab on the Station NI Engineering window, except
that there is no “CTCSS Tone” control as this is not relevant in a Central NI.
The “Environment” tab is the same as the Environment tab on the Station NI Engineering window.
There is no “Handset” tab on the Central NI ET.
3.4
TRAFFIC MANAGER ET
For the TM ET, all the specific differences for P25 operation are contained on the “Channel Setup”
pages, which are accessed by selecting the “Setup” button on the appropriate “Chn:” tab located at
the top of the lower area of the TM main window. For more detailed information, refer to Section 6
– Traffic Manager ET in the SOLAR 2 Technical Handbook and User Manual [1].
3.4.1
Channel Setup
On the “Channel Setup” pages, the significant difference is that the page now contains “Main” and
“P25” tabs, with the new features/parameters accessed via the P25 tab (see Figure 4 overleaf).
3.4.1.1
Audio Mode
The channel’s Audio Mode is set here. This mode will be adopted by all NIs assigned to this
channel as long as they have their individual Audio Mode set to Remote. (See Section 3.2.1 Main Audio). In Analogue or Auto mode, the channel bandwidth must be set to either 12.5 kHz or
25 kHz to match the setting in the SB2000/SR2000 base stations and all the base stations must be
set the same.
May 11
Page 27
ENGINEERING TERMINAL
DTS-SOLAR 2-P25 Add
Figure 4. Channel Setup page – P25 tab.
3.4.1.2
P25 Channel Settings
The “P25 Channel Settings” area is where the Tx and Rx Network Access Codes (NAC) are set.
The “Tx NAC” and “TGID” settings will be transmitted for all P25 calls originated by the dispatcher
and for all P25 T/T calls unless the Rx NAC is set to 0xF7F, in which case, the received NAC and
Talk Group Identification (TGID) will be transmitted.
If the “Rx NAC” is set to 0xF7E or 0xF7F, the channel will respond to any P25 transmissions
irrespective of their own Tx NAC, however, if set to anything else, the received NAC must match or
the call will be ignored.
May 11
Page 28
ENGINEERING TERMINAL
DTS-SOLAR 2-P25 Add
4
CONFIGURATION
4.1
STATION NI/SB2000
All level setting is carried out with the SOLAR 2 P25 equipment in analogue mode using an
analogue Radio Test Set. A final check of P25 Modulation Fidelity can be carried out at the end if
a P25 Test Set is available.
Notes.
(i).
When injecting tones into the SOLAR 2 P25 NI it is important to avoid exactly 1 kHz as
the measuring bar graph on the ET is a little unstable at exact sub-multiples of the 8
kHz sample rate. The level measurement is subject to the 6 dB/octave receive deemphasis so it is advisable to stay close to 1 kHz. The test tone frequency used for
P25 testing is 1011 Hz, therefore, this can easily be used for analogue testing as well.
(ii).
On the ET, before any changes to settings can be made, the “Eng” button must be
selected. Once any change has been made, the “Apply” button must be pressed for
the change to take effect. Multiple changes may be made and implemented together
with a single “Apply” action. Failure to apply a change will result in the attempted
change being abandoned and settings will revert to their previous state when the
corresponding “Eng” button is released.
4.1.1
Tools, Test Equipment and Materials Required
The following Tools, Test Equipment and Materials will be required to perform this procedure:
Analogue Radio Test Set (RTS).
T36 Module Serial Cable (refer to Appendix B for the required cable details).
Personal Computer (PC) with the following software installed:
•
SOLAR 2 Engineering Terminal.
•
MXTools
•
HyperTerminal
4.1.2
1.
Procedure
On the SB2000 base station, carry out the following:
1.1. Ensure that the power is switched off.
1.2. Refer to Appendix A and check that all the internal links are set correctly.
1.3. Check that the T36 External Reference option is correctly configured.
2.
Using the T36 Module Serial cable, connect the PC with the HyperTerminal software or
similar serial communications program installed to the pin header HDR1 on the T36 Module
in the SB2000 base station.
3.
On the PC, set the serial communications parameters to: 9600, 8, None, 1, None.
4.
On the NI ET main window, check that the NI is not outputting any audio or tones by carrying
out the following:
4.1. Select the “Eng” button to access the “NI Engineering” window.
4.2. On the NI Engineering window, select the “Facilities” tab.
May 11
Page 29
APPENDIX A
DTS-SOLAR 2-P25 Add
4.3. On the “Facilities” tab, check that the “Test Tone” is disabled and that the “CTCSS
Tone” level is set to 0 (zero) (slider to minimum).
5.
On the SB2000 base station, switch on the power and, on the PC, check that the following
HyperTerminal menu as shown below in Figure 5 is displayed.
Figure 5. HyperTerminal – Menu.
6.
On the PC, using the HyperTerminal, carry out the following:
6.1. If not already set, adjust the Tx Freq to the approximately Tx frequency of the channel
in use.
6.2. Ensure AF Coupling is set to AC. If necessary, press “6” to toggle it.
6.3. Press “5” to zero the DC offset followed by “S” to save the new settings.
7.
On the TM ET, carry out the following:
7.1. On the Channel Status panel of the channel in use, select the Setup button to access
the Channel Setup page.
7.2. On the Channel Setup page, on the “P25” tab, using the drop-down list, set the Audio
Mode to Analogue and either 12.5 kHz or 25 kHz to match the SB2000 channel
bandwidth.
8.
On the NI ET, carry out the following:
8.1. On the main window, select the “Eng” button to access the “NI Engineering” window.
8.2. On the NI Engineering window, select the “Main Audio” tab,
8.3. On the Main Audio tab, ensure that the Audio Mode is set to “Remote”. If necessary,
use the drop-down list to change the audio mode (see Figure 6 below).
Figure 6. NI ET – Audio Mode to ‘Remote’.
May 11
Page 30
APPENDIX A
DTS-SOLAR 2-P25 Add
9.
Using the Radio Test Set, inject a signal at the appropriate Rx frequency, modulated at 100%
FM deviation at 1011 Hz at a level of -80 dBm into the Rx antenna socket of the
SB2000/SR2000. Check that there is no CTCSS tone on this signal.
10.
On the NI ET, on the Main Audio tab of the NI Engineering window, adjust the “In Audio
Sensitivity” controls for an indication of 10,000 with the blue bar close to the middle of the
green section (see Figure 7 below). Approximate settings are: the coarse control to 0 dB
and the fine control to around 112. (Expect small variations between receivers).
Note.
If the SB2000 is configured to use CTCSS, it will be necessary to temporarily change
Isolated Input #1 to “Monitor” mode on the Signalling tab to make this adjustment.
Once the adjustment has been made, change it back to Auto mode immediately
afterwards.
Figure 7. NI Engineering – Main Audio tab, “In Audio Sensitivity” settings.
11.
On the SB2000 base station, connect the analogue Radio Test Set to the Tx RF O/P.
12.
On the NI ET, on the NI Engineering window, carry out the following:
12.1. On the “Facilities” tab, set the Test Tone “Frequency” to 200 Hz and select the
“External” Route.
12.2. Select the “Apply” button.
12.3. On the “Facilities” tab, check that the Test Tone “Frequency” has changed to “MOD”
indicating that the SB2000 Modulation Balance test signal is being generated (see
Figure 8 overleaf).
12.4. On the “Signalling” Tab, select “Manual Trigger” (see Figure 9 overleaf).
12.5. Select the “Apply” button. The SB2000 Tx will be keyed and modulated with a 200 Hz
square wave.
May 11
Page 31
APPENDIX A
DTS-SOLAR 2-P25 Add
13.
On the Radio Test Set, use a Wide Band AF Filter setting with a response of at least 15 kHz
and monitor the SB2000 Tx modulation.
Figure 8. NI Engineering – Facilities tab, Test Tone Frequency.
Figure 9. NI Engineering – Signalling tab, Manual Trigger.
14.
On the PC, carry out the following:
14.1. Start/open the MXTools software.
14.2. On the MXTools main window, select the “Channel Info” button and, on the channel
table, double click on the channel in use to access the MXTools “Channel Edit” page.
May 11
Page 32
APPENDIX A
DTS-SOLAR 2-P25 Add
14.3. On the MXTools “Channel Edit” page (see Figure 10 overleaf), adjust the various
settings as per Table 5 below.
Table 5. MXTools, Channel Edit Settings.
Area
RF Mode
Setting
Setting Required
TTR Channel
Simplex Channel
Scan Channel
Wide Band or Narrow Band
Frequency Settings Tx Subtone (Hz)
Digital
Potentiometer
Settings
All unchecked
As required (25 or 12.5 kHz bandwidth)
Disabled
Continuous Updated Enabled
Ref Osc Freq
VCO Level (VF Audio)
Checked
128
200
14.4. On the MXTools “Channel Edit” page, adjust the “Ref Osc Level (LF Audio)” so that the
top and bottom of the 200 Hz square wave displayed on the RTS is as flat as possible.
Note.
When making the adjustment in Para 14.4, any overshoot near the transitions can be
ignored. The “Ref Osc Level (LF Audio)” control should end up around the 230 level
and, with care, it’s possible to get the square wave nearly perfect where one step
either way is obviously incorrect (see Figure 11 overleaf).
Figure 10. MXTools – Channel Edit page.
May 11
Page 33
APPENDIX A
DTS-SOLAR 2-P25 Add
Figure 11. Typical result for Tx Modulation displayed on RTS.
14.5. On the MXTools “Channel Edit” page, when adjustment of the 200 Hz square wave is
completed, select the “OK” button.
Note.
When selecting the “OK” button in Para 14.5, if any significant adjustment of the “Ref
Osc Level (LF Audio)” has been made in Para 14.4, an ‘Information’ message will be
displayed advising that changes have been made and they have to be saved and sent
to the base station to take effect.
14.6. If the Information message is displayed, select the “OK” button to save the changes
and prepare the data to be sent to the base station.
14.7. On the MXTools main window, select the “Write Channel” button to store the settings
back to the SB2000 base station (see Figure 12 below).
Figure 12. MXTools – Write Channel button.
15.
On the NI ET, on the NI Engineering window, carry out the following:
15.1. On the “Signalling” tab, deselect “Manual Trigger” to de-key the Tx (see Figure 9).
May 11
Page 34
APPENDIX A
DTS-SOLAR 2-P25 Add
15.2. On the “Facilities” tab, set the “Test Tone” to a frequency of 1011 Hz and to a level of
−4.4 dB. Set the “CTCSS Tone” level to 0 (see Figure 13 below).
15.3. On the “Signalling” tab, select “Manual Trigger”.
Figure 13. NI Engineering – Facilities tab, Test Tone settings.
16.
On the Radio Test Set, set it up to use a Band Pass AF Filter response (ideally 300 Hz –
3.4 kHz) and monitor the SB2000 Tx modulation.
17.
On the NI ET, on the “Main Audio” tab of the NI Engineering window, using the coarse and
fine “Out Audio Level” controls, adjust the Tx deviation to 60%, i.e. 1.5 kHz for 12.5 kHz
channel or 3 kHz for 25 kHz channel. (Approximate settings are: coarse control to 0 dB and
fine control to around 70).
18.
On the NI ET, on the “Facilities” tab, deselect the “External” Test Tone Route.
19.
If CTCSS is being used, on the “Main” tab of the TM ET “Channel Setup” page, ensure that
the CTCSS tone frequency is set correctly.
20.
On the Radio Test Set, set it up to use a Low Pass AF Filter response (300 Hz or less) and
monitor the Tx deviation.
21.
On the NI ET, on the NI Engineering window, carry out the following:
21.1. On the “Facilities” tab, adjust the “CTCSS Tone” control for the required deviation.
(The tone deviation should be kept to the minimum necessary and certainly no greater
than 250 Hz for a 12.5 kHz channel and 500 Hz for a 25 kHz channel).
21.2. On the “Signalling” tab, deselect “Manual Trigger” to de-key the Tx.
Note.
Steps 19 to 21 describe the setting of the CTCSS sub-audio tone deviation. Although
the deviation level is not critical, it is absolutely essential that level is set the same
across all transmitters – this may entail using the same RTS to set each station.
May 11
Page 35
APPENDIX A
DTS-SOLAR 2-P25 Add
22.
On the TM ET, on the “P25” tab of the “Channel Setup” page, use the drop-down list and set
the “Audio Mode” as required (Analogue, P25 or Auto).
23.
In order to measure P25 Modulation Fidelity, on the rear panel of the SB2000 base station,
connect a suitable P25 Radio Test Set to the Tx O/P.
24.
On the TM ET, on the “P25” tab of the “Channel Setup” page, use the drop-down list and set
the “Audio Mode” to P25.
25.
On the NI ET, on the NI Engineering window, carry out the following:
25.1. On the “Facilities” tab, select the “External” Test Tone Route.
25.2. On the “Signalling” tab, select “Manual Trigger”.
Note.
In this configuration, tone frequency and level settings are not relevant, as a standard
P25 TIA 1011 Hz test signal will be transmitted.
26.
On the P25 Radio Test Set, confirm that the modulation fidelity is around 2%.
May 11
Page 36
APPENDIX A
DTS-SOLAR 2-P25 Add
4.2
CENTRAL NI/AFSI
The SOLAR 2 P25 Central NI is set up in the same way as SOLAR 2 Analogue except that in
normal operation some of the Isolated Inputs and Isolated Outputs have different functions.
In SOLAR 2 P25 all of the Isolated Inputs and Isolated Outputs have an “Auto” function and should
normally all be set to this mode (see Figure 14 below).
Figure 14. Isolated Inputs and Outputs – Auto function.
The functions of the Isolated Inputs and Isolated Outputs are as follows:
•
Input #1
PTT (as SOLAR analogue).
•
Input #2
T/T (as SOLAR analogue).
•
Input #3
P25 select – With the channel Audio Mode set to “Auto”, activating this I/P will
cause the channel to transmit in P25 mode. This I/P has no function if the
channel Audio Mode is set to Analogue or P25 and, in these cases, the I/P can
be ignored or used as an independent I/P.
•
Output #1 COR (as SOLAR analogue).
•
Output #2 Alarm (as SOLAR analogue).
•
Output #3 P25 receive – this O/P set indicates that any incoming call is from a P25 mobile.
If the channel Audio Mode is set to “P25”, this O/P will be active continuously
and, if the channel Audio Mode is set to “Analogue”, it will never be active.
Therefore, in both these cases, the O/P can be ignored or used as an
independent O/P.
There is currently no tone keying option with SOLAR 2 P25 although Tone Remote Control (TRC)
is planned.
May 11
Page 37
APPENDIX A
DTS-SOLAR 2-P25 Add
APPENDIX A
SB2000 LINK SETTINGS FOR SOLAR 2 P25
The link settings detailed in this Appendix should only be carried out by qualified engineering
personnel.
CAUTION
Electrostatic Discharge Sensitive Devices (ESDS Devices). This equipment
contains ESDS Devices, refer to the Personal Safety and Equipment Safety
pages.
LINK SETTINGS
When the SB2000 base station is working with a SOLAR 2 P25 NI, four separate audio paths for
the Tx Audio, Rx Audio, Microphone Audio and Speaker Audio have to be created through the
SB2000 Micro Controller Printed Circuit Board (PCB). This is achieved by adjusting various link
and jumper settings on the Micro Controller as detailed below.
For details of the Micro Controller PCB component layout, refer to Section 8 – Drawings of the
SB2000 Technical Handbook [2].
For details of the functions of the Micro Controller Jumpers, refer to Section 2 – Installation and
Operation of the SB2000 Technical Handbook [2].
Tx Audio
This input from SOLAR 2 NI enters the SB2000 on Pin 13 of CN1 DB15 Line I/O connector.
•
JMP8
2-3
IN.
•
JMP27 2-3
IN.
•
T99 link
IN.
Rx Audio
This output to SOLAR 2 NI leaves the SB2000 on Pin 14 of CN1 DB15 Line I/O connector.
•
SKK
1-2
OUT
Microphone Audio
This output to SOLAR 2 NI leaves the SB2000 on Pin 15 of CN1 DB15 Line I/O connector.
•
JMP22
IN/OUT (depending on the gain required).
•
RV11 on the Micro Controller sets the microphone level.
Speaker audio
This input from SOLAR 2 NI enters the SB2000 on Pin 9 of CN1 DB15 Line I/O connector.
•
JMP4
•
JMP3
•
RV10 on the Micro Controller sets speaker level (as well as front panel control).
May 11
2-3
IN.
OUT.
Page 38
APPENDIX A
DTS-SOLAR 2-P25 Add
APPENDIX B
CONFIGURATION PROCEDURE CABLE REQUIREMENTS
T36 MODULE SERIAL CABLE
The details of the cable required to connect the PC to the pin header HDR1 on the T36 Module in
the SB2000 base station are shown below in Figure B1.
PC
RS232 DB-9
HDR1
GND
RSTX
RSRX
10
9
8
7
6
5
4
3
2
1
5
9
4
8
3
7
2
6
1
T36 Option Module
Figure B1. T36 Module Serial Cable – wiring details.
May 11
Page 39
APPENDIX B
Dalman Technical Services Ltd (part of the Simoco Group),
Field House, Uttoxeter Old Road, Derby DE1 1NH
Tel:
+44 (0) 1332 375500
FAX:
+44 (0) 1332 375501
www.teamsimoco.com