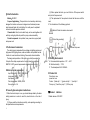
1
①lock screw ②connecting pin ③power switch ④power box
⑤brightness control ⑥hose ⑦lamp holder ⑧flare-adjusting ring
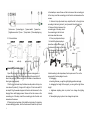
2. Fixture interface
picture2
table clip
picture3
wall clip
picture4
guide rail clip
picture5
in the desktop or mesa. Screw out the lock screw on the connecting pin
of the lamp, insert the connecting pin into the hole and screw down the
screws.
3. Guide rail clip style check lamp: adjust the bolt to the right size
according to the track (picture 4), carry forward it into orbit and lock
it. Screw out the lock screw on the
connecting pin of the lamp, insert
the connecting pin into the hole
and screw down the screws.
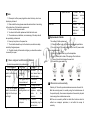
4. Floor prop style check lamp:
first install the chassis pulley in
place,then contrapuntal connect
the base and the strut and the lamp.
Lock the screw. Please operate as
C
the diagram A.B.C.
A
B
floor prop
Ⅷ Assembly and debugging
Open the packing box, check whether there are missing parts or
damage phenomenon of the products according to the product list. If
there is any problem, please contact with the dealer or manufacturer in
time to get solved properly.
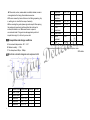
1. Wall hung style check lamp: first determine the position of clip, size
is as shown in picture (2). Using a drill to dig four 10 mm holes with 25
mm depth. Plug the wooden stopper into the hole with a hammer, fix the
hanging fixture with tapping screws. Screw out the lock screw on the
connecting pin of the lamp, insert the connecting pin into the hole and
screw down the screws.
2. Table clip style check lamp: first install the clip (picture 3) in desktop
or mesa satisfying position, lock the fixed screw to make the clip firmed
9
Install according to the steps above, the lamp can work. Turn on the
power switch, the lamp begins to work.
5. Debugging:
a. bending the hose, you get the right lighting position and angle.
b. debugging the height of the support, you can get the right illume
height.
c. brightness adjusting knob in picture1 can change the lighting
intensity.
d. flare-adjusting ring in picture1 can change the spot size.