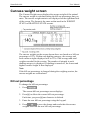
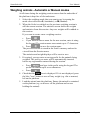
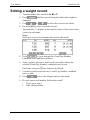
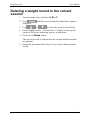
1
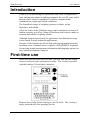
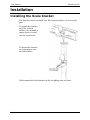
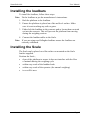
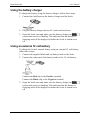
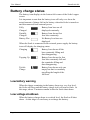
SmartScale 600 User Manual SmartScale 600 Page i User Manual SmartScale 600 PUBLISHED BY Gallagher Group Limited Kahikatea Drive, Private Bag 3026 Hamilton, New Zealand Copyright© Gallagher Group Limited 2004. All rights reserved. Patents Pending. SmartScale 600 User Manual 3E1036 - Edition 11 - January 2006 DISCLAIMER Whilst every effort has been made to ensure accuracy, neither Gallagher Group Limited nor any employee of the company, shall be liable on any ground whatsoever to any party in respect of decisions or actions they may make as a result of using this information. In accordance with the Gallagher policy of continuing development, design and specifications are subject to change without notice. Developed and manufactured by Gallagher Group Limited, an ISO 9001:2000 Certified Supplier. Page ii SmartScale 600 User Manual Contents Introduction...................................................................................................... 1 First-time use ................................................................................................... 1 Installation........................................................................................................ 2 Installing the Scale bracket .................................................................................2 Installing the loadbars .........................................................................................3 Installing the Scale ..............................................................................................3 Power and batteries......................................................................................... 4 Charging the battery............................................................................................4 Battery charge status ..........................................................................................6 The mode select switch .................................................................................. 7 Setup................................................................................................................. 8 Selecting a setup option......................................................................................9 Drafting .............................................................................................................10 Session menu ...................................................................................................16 Set the time and date ........................................................................................20 User options ......................................................................................................21 Communications ...............................................................................................26 Select a country ................................................................................................29 Viewing weighing details during a session ................................................ 30 Selecting a view ................................................................................................30 Viewing session statistics..................................................................................30 Weight gain screen ...........................................................................................33 Weight records screen ......................................................................................34 Carcass weight screen......................................................................................35 Recording animal information...................................................................... 36 About weighing.............................................................................................. 37 Weighing modes ...............................................................................................37 Before you begin the weighing session.............................................................39 The weighing session........................................................................................40 At the end of the weighing session....................................................................46 Editing weight records .................................................................................. 47 About editing weight records .............................................................................47 Editing a weight record......................................................................................48 Deleting a weight record in the current session.................................................49 Memory full warning...................................................................................... 50 Weight-on-scale memory.............................................................................. 51 Zero tracking .................................................................................................. 52 Page iii User Manual SmartScale 600 Printing ........................................................................................................... 53 Printing weights during a weighing session.......................................................54 Using Electronic IDs...................................................................................... 55 Using a data logger ....................................................................................... 56 Care and maintenance .................................................................................. 59 Loadbar and platform options...................................................................... 60 Gallagher Standard Loadbars ...........................................................................60 Gallagher Heavy Duty Loadbars .......................................................................61 Gallagher Super Heavy Duty Loadbars.............................................................61 Specifications ................................................................................................ 62 SmartScale 600 Dimensions .............................................................................62 General .............................................................................................................62 Weight increments ............................................................................................63 Contact details ............................................................................................... 64 Page iv SmartScale 600 User Manual Introduction Thank you for purchasing the SmartScale 600 Scale. Gallagher have been making agricultural weighing equipment for over 60 years and in that time have earned a reputation for quality equipment that withstands our tough agricultural conditions. The SmartScale range of weighing systems is simple, tough, innovative and reliable. All of the Scales in the Gallagher range can be matched to a choice of loadbar systems, as well as a range of platforms and crates to make an accurate and reliable weighing system. Although designed specifically for agriculture, the SmartScale range is also suited to many industrial applications. Features of the SmartScale 600 include entering tag numbers and the condition score of animals when weighed, a full QWERTY keyboard for entering animal management information and graphing options for easy animal performance analysis. First-time use When you open the Scale the first time, you will find that the display screen is covered with a transparent overlay. The overlay is printed with the number 630 and other characters. Remove this overlay before starting to use the Scale. The overlay is easily removed after first grasping the tab. Page 1 User Manual SmartScale 600 Installation Installing the Scale bracket The bracket can be mounted on a flat vertical surface, or on a round post. To mount the bracket on a flat vertical surface, for example a square post or board, use the outer holes. To mount the bracket on a round post, use the inner holes. Don't mount the Scale bracket on the weighing crate or chute. Page 2 SmartScale 600 User Manual Installing the loadbars To install the loadbars, follow these steps: Note: Fit the loadbars as per the manufacturer's instructions. 1. Bolt the platform to the loadbars. 2. Ensure the platform is placed on a flat and level surface. Make sure it is not touching any rails or gates. 3. Either bolt the loadbars to the concrete pad or locate them on studs set into the concrete. This will prevent the platform from moving during the weighing session. 4. Connect the loadbar cables to the Scale. Note: If you are using non Gallagher loadbars ensure the loadbars are correctly calibrated. Installing the Scale The Scale can be placed on a flat surface or mounted on the Scale bracket supplied. Position the Scale ; clear of the platform to ensure it does not interfere with the flow of animals during the weighing cycle within easy reach of the loadbar leads within easy reach of the operator (for manual weighing) in a well-lit area. Page 3 User Manual SmartScale 600 Power and batteries During a weighing session, the Scale can be powered by its internal battery alone or by its internal battery and either the battery charger or an external 12 volt battery. The battery charger connects between an AC outlet and the Scale. If either the battery charger or an external 12 volt battery is connected to the Scale, the Scale's internal battery will be charged while the Scale is in use. For optimum performance, switch off the Scale and charge its internal battery for at least five hours. When fully charged, the internal battery on its own will power the Scale continuously for a minimum of eight hours. Battery life may be reduced if the Scale is being used to power an Electronic ID reader. Charging the battery The battery in the Scale can be recharged using either a battery charger or an external 12 volt battery. Recharging the battery will take up to five hours depending on the level of charge already in the battery. The Scale can be in use or can be switched off while the battery is being charged. Page 4 SmartScale 600 User Manual Using the battery charger To charge the battery using the battery charger, follow these steps. 1. Connect the lead between the battery charger and the Scale. 2. Plug the battery charger into an AC outlet and switch on. 3. Open the Scale case and make sure the battery charge icon on the main screen is flashing. This indicates that the battery is charging and will be displayed whether the Scale is turned on or off. Using an external 12 volt battery To charge the Scale's internal battery using an external 12 volt battery, follow these steps. 1. Connect the supplied black and red battery leads to the Scale. 2. Connect the other end of the battery leads to the 12 volt battery. Connect the Red clip to the Positive terminal Connect the Black clip to the Negative terminal 3. Open the Scale case and make sure the battery charge icon on the main screen is flashing. This indicates that the battery is charging and will be displayed whether the Scale is turned on or off. Page 5 User Manual SmartScale 600 Battery charge status The battery icon displays in the bottom left corner of the Scale's upper screen. It is important to note that the battery icon will only ever show the actual amount of charge left in the battery when the Scale is turned on and disconnected from external power. Fully Charged Battery Icon bars are all displayed constantly. Partially Charged Battery Icon shows first four bars constantly. Battery Flat No Battery Icon bars are displayed. When the Scale is connected to the external power supply the battery icon will display the charging status. Charging Battery Icon shows all the bars constantly filling and then disappearing. Topping Up Battery Icon shows the first four bars constantly full and the remainder filling and then disappearing. Trickle Charge Battery Icon shows only one empty bar that is constantly travelling the length of the full Icon. Low battery warning When the charge remaining in the battery drops to a very low level, the Scale will beep and the battery charge icon will start to flash. At this stage, about 15 minutes remain before the Scale shuts down. Low voltage shutdown When the battery charge drops to a critical level, the Scale will shut down. At this stage it is necessary to recharge the battery. Page 6 SmartScale 600 User Manual The mode select switch The Scale can operate in three weighing modes and a setup mode. The mode select switch is located on the left hand side of the Scale. The mode select switch has five positions: , A, M, F and S. Immediately after you turn the switch to any position except , explanatory information will display on the lower of the two Scale screens. The explanatory information will display only for a few seconds; after it disappears, the screen displays information relevant to the selected option. This position turns the Scale off. A This position selects weighing in Automatic mode. You can also store Electronic IDs and update the Scale's crossreference table when there are no loadbars connected. M This position selects weighing in Manual mode. You can also record animal information, without weighing, when there are no loadbars connected. F This position selects weighing in Fine mode. It is designed for static-load weighing. S This position accesses the setup options. Page 7 User Manual SmartScale 600 Setup To access the Setup menu, turn the mode select switch to S. The setup menu displays on the lower of the two screens on the Scale. In setup mode, the main screen normally displays the time in 24 hour format. Every minute the main screen momentarily displays the date, then automatically reverts to displaying the time again. The setup menu contains six options: 1. DRAFT MENU - select the drafting mode and specify the drafting limit(s). 2. SESSION MENU - select a session and view, print or delete the session. 3. SET TIME AND DATE - set the current time and date. 4. USER OPTIONS - select weight units, turn Visual Tag Number checking on or off, turn live printing on or off. 5. COMMUNICATIONS - set up a connection to a computer, printer, Electronic ID reader or other external device and enable drafting via the auto Drafter. 6. SELECT COUNTRY - for a specific country, selects a language and country-specific terminology and weight unit. Page 8 SmartScale 600 User Manual Selecting a setup option When you turn the mode select switch to S, one of the setup menu options displays. To select an option from the Setup menu: 1. Press the menu option. 2. Press or soft key to display the required . Alternatively, using the keypad, you can press the number of the menu item that you want to select. For example: to select the Session Menu, press 2, to select Communications, press 5. For more information about each of the setup menu items, refer to the following sections. Page 9 User Manual SmartScale 600 Drafting The Draft Menu lets you select a drafting mode and set drafting limits. You can select two-way drafting or three-way drafting or you can turn drafting off. Changing the drafting mode To change the drafting mode, select 1. DRAFT MENU from the setup menu, as described previously. The current mode will be displayed at the top of the screen. Each time you press the button, a new drafting mode will display. The Scale cycles between the following modes: DRAFTING OFF 2 WAY DRAFTING 3 WAY DRAFTING When the drafting mode that you want to select is displayed, you can change the drafting limits if necessary. Refer to Changing the Drafting Limits (p 11). Press setup menu. Page 10 to save the settings on this screen and return to the SmartScale 600 User Manual Changing the drafting limits Two-way drafting To change the drafting limit when 2 WAY DRAFTING is the selected mode: 1. Press to delete the existing limit. 2. Use the keypad to enter the new limit. 3. Press menu. to save the changes and return to the SET UP Page 11 User Manual SmartScale 600 Three-way drafting To change the drafting limits when 3 WAY DRAFTING is the selected mode: To change the upper limit: 1. If necessary, press 2. Press to select upper Draft Limit. to delete the existing limit. 3. Use the keypad to enter the new limit. To change the lower limit: 1. If necessary, press 2. Press to select lower Draft Limit. to delete the existing limit. 3. Use the keypad to enter the new limit. When you have entered the required Draft Limits, press save the changes and return to the setup menu. to Note: If you enter the limits the wrong way round, the Scale will automatically reverse them when you save the changes. The Scale always saves the largest number as the Upper Limit and the lowest number as the Lower Limit. Page 12 SmartScale 600 User Manual Changing the drafting direction If you have set up a port on the Scale for connection to a drafter, you can configure the direction (left, right or straight ahead) an animal must take after being weighed. About drafters A drafter sends an animal in a nominated direction, usually left or right; sometimes left, right or straight ahead. Most drafters do this with an arrangement of gates managed by a controller. To set up a drafting direction, the Scale transmits to the drafter's controller a number in the range 0 through 9. This is called a drafting number. After it receives the drafting number, the controller changes the status of the gates. The drafting number corresponding to a drafting direction is specified by the drafter manufacturer. A single drafting number may cause a drafter to set more than one gate. As an example, one manufacturer's three-way sheep drafter requires the Scale to transmit 6 to open the sheep release gates and draft left; 5 to open the sheep release gates and draft right; and 4 to open the sheep release gates and draft straight ahead. Some drafters require all gates to be reset after an animal has passed through. When you draft animals after weighing them, you need to assign a drafting direction to each weight category. You do this at the Scale when you associate a weight category with a drafting number. Page 13 User Manual SmartScale 600 Displaying drafting numbers Drafting numbers display when either 2 WAY DRAFTING or 3 WAY DRAFTING has been selected from the DRAFT menu. Note: Drafting numbers will only display when a port on the Scale has been set to Drafter, Drafter Special or Drafter Fast from the COMMUNICATIONS menu. On the 3 WAY DRAFTING screen, drafting numbers are shown against the H Gates, C Gates and L Gates labels. H Gates sets the drafting number for animals that weigh the anything higher than the upper Draft Limit. C Gates sets the drafting number for animals that weigh higher than the lower Draft limit to as high as the upper Draft Limit. L Gates sets the drafting number for animals that weigh anything the lower Draft Limit or less. On the 2 WAY DRAFTING screen, drafting numbers are shown against the H Gates and L Gates labels. H Gates sets the drafting number for animals that weigh anything higher than the Draft Limit. L Gates sets the drafting number for animals that weigh the Draft Limit or less. If drafting numbers have not been previously assigned, an underscore ( _ ) will appear in place of the number. Page 14 SmartScale 600 User Manual Changing drafting numbers 1. Press the button repeatedly to select the drafting category (H Gates, C Gates or L Gates) you want to change. 2. Using the keypad, press the required digit (a number between 1 and 9) to set the route the animal in this drafting category must follow. • • Refer to the drafter manufacturer's specification to determine the drafting number corresponding to the drafting direction. If you enter 0, the gate setting will be cleared. This means no gate changes on the drafter will occur when an animal in this drafting category is weighed. 3. Press to save the changes and return to the setup menu. Configuring the connection to the drafter To configure the connection between the Scale and the automatic Drafter, follow these steps: 1. Set the mode select switch to S. 2. On the numeric key pad, press 5 to select the Communications menu. 3. If necessary press the the DRAFTer is connected. button to select the port to which 4. Press the button repeatedly until DRAFTER displays. 5. Press the button. Resetting the drafter Some drafters require that all gates are reset after the weighed animal has passed through and before the next animal is weighed. If you need to reset the DRAFTer between measurements, carry out steps 1 through 5 but select DRAFTER SPECIAL at step 4. Page 15 User Manual SmartScale 600 Session menu The session menu lets you select and then view, print, rename or delete sessions. To display the Session Menu screen select 2. SESSION MENU from the Setup menu. The following screen displays: The currently selected session displays in the title bar of the screen. You can use the the options. Page 16 and buttons to move between SmartScale 600 User Manual Selecting a session To select a particular session, complete the following steps: 1. Turn the mode selection switch to S. 2. Select 2. SESSION MENU. 3. Press the SESSION. 4. Press or soft keys to highlight . A list of the stored sessions in the Scale displays. Each session is identified by the date the session was created and by the session name if one was entered. If the session has no name the time (24 hour clock) that the session was created on that date is displayed (preceded by the "@" character). 5. Press the required session. 6. Press menu. or soft keys to highlight the to select the session and return to the Session Page 17 User Manual SmartScale 600 Renaming a session You can rename any of the sessions stored on the Scale from the Session menu. To rename a session, complete the following steps: 1. Select the session, as described in Selecting a Session (p 17). 2. Press the soft key. The existing session name displays on the screen. 3. Press the key to delete characters, as required. 4. Type in the new name, using the Scale keypad. The session name can contain up to 17 characters. 5. Press to save the new session name and return to the Session menu. The new session name is displayed in the title bar of the screen. Viewing a session To view the details of a session, complete the following steps: 1. Select the session, as described in Selecting a Session (p 17). 2. Press the or 3. Press the soft key. soft keys to highlight VIEW. The details of the session display. 4. Press the and details of the session. soft keys to scroll through the The details include the tag number, weight, condition score or any note entered for each record in a session. 5. Press to return to the Session menu. Note: You cannot edit the weight records from this view. Refer to Editing weight records (p 47) if you want to edit records in the current weighing session. Page 18 SmartScale 600 User Manual Printing a session Make sure the SmartScale printer is connected to the Scale. To configure the port that the printer connects to on the Scale, refer to Communications (p 26) later in this section. 1. Select the session, as described in Selecting a Session (p 17). 2. Press the or soft keys to highlight PRINT. 3. Press to print the session details and return to the Session menu. 4. Press SORT to select the required printing order. 5. Press PRINT to print the session on the attached printer. Note: If a printer is not installed the Scale displays "No Printer Available". Deleting a session Note: Deleting a session removes it permanently from the Scale's memory. Before deleting a session it is recommended that you copy weighing sessions to your computer using the MyScale Pro software supplied with the Scale. Using MyScale Pro, you can restore the deleted session to the Scale, by copying it from the computer at a later date. 1. Select the session, as described in Selecting a Session (p 17). 2. Press the 3. Press or soft keys to highlight DELETE. . A screen displays asking you to confirm you want to delete the session. 4. Do you want to delete the session? • If yes, press . The session is deleted and the Session menu displays. • If no, press . The Session menu displays. The session is not deleted. Page 19 User Manual SmartScale 600 Set the time and date The SET TIME AND DATE screen lets you set the current time and date on the Scale's internal clock. The system time and date is recorded each time you create a new weighing session. You can view the current system time on the Scale's main screen when it is in Setup mode. Note: The date format changes depending on how the country options are set up; see Select a country (p 29). In New Zealand and Australia the date format used is DD-MM-YYYY. In the USA the date and time format is MM-DD-YYYY. In French Canada the date format used is YYYY-MM-DD. The time must be entered in 24-hour format i.e. 8:35 pm would be 20:35 8:35 am would be 08:35. To change the time or date, complete the following steps: 1. Turn the mode selection switch to S. 2. Select 3. SET TIME AND DATE. The SET TIME AND DATE screen displays. or 3. Press the that you want to change. soft keys to move to the digit The currently selected digit flashes. 4. Enter the new digit using the keypad. The flashing digit is replaced with the typed number and the cursor moves to the next digit. 5. Press Setup menu. to save the new time and date and return to the Note: The colon (:) that separates the hours from the minutes and the forward slash (/) that separates the day, month and year are not editable. Page 20 SmartScale 600 User Manual User options The USER OPTIONS screen lets you select the weight unit to use when weighing animals. You can turn tag checking or live printing on or off from this screen. To display the USER OPTIONS screen select 4: USER OPTIONS from the Setup menu. Changing a user option To change a user option, complete the following steps: 1. Turn the mode selection switch to S. 2. Select 4. USER OPTIONS. 3. Press the or you want to change. 4. Press soft keys to highlight the option to toggle between the available options. Refer to the sections below for more information on each of the user options. 5. Press to save the changes and return to the Setup menu. Weight units You can specify whether the Scale uses kilograms (kg) or pounds (lb) for displaying and storing weights. Page 21 User Manual SmartScale 600 Live printing When Live Printing is turned on, the Scale prints the weight, tag number and condition score each time it locks onto a weight. Live Printing only occurs if you have connected the SmartScale printer to the Scale and set the port to Printer as described in Communications (p 26). To print the weights at the end of the session, refer to Session menu (p 16). Note: This feature does not work with a standard computer printer, you need a SmartScale printer. Tag checking If Tag Checking is on, the Scale checks for duplicate Visual Tag Numbers. If a duplicate occurs within a weighing session, the Scale lets you edit either the current Visual Tag Number or the one that occurred earlier in the session. A duplicate Visual Tag Number can occur for any of the following reasons: The same Visual Tag Number is entered twice during a session. A Visual Tag Number is entered using the keypad and an Electronic ID is scanned that has the same Visual Tag Number assigned in the Scale's cross-reference table. Two Electronic IDs are scanned and each has the same Visual Tag Number assigned in the Scale's cross-reference table. Note: The Scale checks for a duplicate Visual Tag Number, not a duplicate Electronic ID. This means duplicate Electronic IDs can occur in a session, provided that the Electronic ID does not have a Visual Tag Number linked to it in the Scale's cross-reference table. Page 22 SmartScale 600 User Manual Editing a duplicate Visual Tag Number If a duplicate Visual Tag Number occurs, the following screen will be displayed and the Scale will beep three times. This screen lets you change the current Visual Tag Number or the Visual Tag Number that was entered earlier in the session. To change the current Visual Tag Number: 1. Use the backspace key to delete the Visual Tag Number. If the Visual Tag Number is linked with an Electronic ID, pressing deletes the entire number. If the Visual Tag Number isn't linked with an Electronic ID, pressing deletes one digit. 2. Use the keypad to enter a new Visual Tag Number. To change the Visual Tag Number that was entered earlier in the session: 1. Press the button. to delete the Visual Tag Number. If the 2. Use the backspace key Visual Tag Number is linked with an Electronic ID, pressing deletes the entire number. If the Visual Tag Number isn't linked with an Electronic ID, pressing deletes one digit. 3. Use the keypad to enter a new Visual Tag Number. Accepting duplicate Visual Tag Numbers If you do not want to change either of the duplicate Visual Tag button. Numbers, press the The lower screen will display the Visual Tag Number just entered and you can continue with the usual weighing process. In this case, two records in the current session will contain the same Visual Tag Number. Page 23 User Manual SmartScale 600 Edit a previously recorded tag number To edit a previous recorded Visual Tag Number, complete the follow steps. 1. Press the 2. Press the soft key. key to delete the Visual Tag Number. If the tag number is associated with an Electronic ID, pressing deletes the entire number. • If the tag number isn't associated with an Electronic ID, pressing deletes one digit. 3. Use the keypad to enter a new Visual Tag Number. • You can now complete the following, as required: Page 24 Add a condition score and note as required. Continue with the weighing or tag reading procedure. Refer to Weighing and Drafting Animals - Automatic and Manual. SmartScale 600 User Manual Updating the Cross-Reference Table with Tag Checking When a duplicate tag number occurs and you change a Visual Tag Number that is already linked to an Electronic ID, the cross-reference table in the Scale, as well as the current session, is automatically updated. For more information about the Scale's cross-reference table or about linking a Visual Tag Number to an Electronic ID, refer to Using Electronic ID (p 55). The following procedure provides an example of how duplicate tag number checking can be used to update the Scale's cross-reference table: 1. In different sessions you read two Electronic IDs. By mistake you assign both the same Visual Tag Number of 500. The crossreference table in the Scale records this information as shown below. Electronic ID 90000000555 Visual Tag Number 500 90000000444 500 2. You start a new session and read the first Electronic ID (90000000555). Later in the session you read the second Electronic ID (90000000444). The duplicate tag number screen displays with the Visual Tag Number 500 displayed. 3. You realise the Visual Tag Number linked with Electronic ID 90000000444 should be 600 not 500. To correct the mistake, you press the soft key to delete the 500 and use the keypad to enter the correct Visual Tag Number of 600. When the animal leaves the platform the current session and the cross-reference table are automatically updated. The crossreference table now records the information shown below. Electronic ID Visual Tag Number 90000000555 500 90000000444 600 Page 25 User Manual SmartScale 600 Communications The Communications menu lets you tell the Scale what device is connected to each port. The devices that can be connected to the Scale include a computer, printer, drafter or Electronic ID reader. Connections are made either to Port 1 or Port 2. The ports are located on the upper left hand edge of the Scale. Once you attach a device to a port, you must configure the port to suit. You do this from the Communications menu. To display the Communications menu, complete the following steps: 1. Turn the mode selection switch to S. 2. Select 5. COMMUNICATIONS from the Setup menu. The following screen displays: Page 26 SmartScale 600 User Manual Setting up a port To select the device to attach to the port, complete the following steps: 1. In the Communications menu, press the the port to which the device is connected. 2. Press displayed. button to select until the device that is attached to the port is Note: You cannot select a device for one port if it is already selected for the other. For example, you cannot select Computer on Port 2 if it is already selected on Port 1. Selections available for the ports are: Unused The port is unused (this is the default option). Computer Enables the connection of a computer. Used to copy weighing sessions to or from the computer. Printer Enables the connection of a Gallagher Printer. Used to print weighing session data either during or after the session. Data Logger Enables the connection of a data logger. Used to log weight records during a weighing session. Refer to Using a data logger (p 56) for more information. EID Allflex Enables the connection of a Gallagher/Allflex Electronic ID stick reader with a set baud rate. Refer to Using electronic tags (p 55). EID Destron Enables the connection of a Destron Electronic ID reader. EID Special Enables the connection of an Electronic ID reader with a selectable baud rate. Press to cycle through the options - 1200, 2400, 4800, 9600, 19200 bps - until the desired baud rate is displayed. Drafter Enables the connection of an auto drafter. Page 27 User Manual SmartScale 600 Drafter Special Enables the connection of an auto drafter that requires its gates to be reset after each animal has been weighed. Enable the Drafter Fast option if you are connecting to an auto drafter that you want to operate in a fast mode. Drafter Fast Enables the connection of an auto drafter that requires fast drafting, for example, the Racewell Automatic Sheep Crate. When operating an auto drafter in Drafter Fast mode, there is a slight decrease in the accuracy of weight measurements. Ruddweigh 3. Press Enables the connection of devices using the Ruddweigh protocol. Not available in some countries. (NZ/AU only) to save the settings and return to the Setup menu. Autodrafter The Scale can interface directly with auto drafters. There are three options for communicating with the connected port, Drafter, Drafter Special and Drafter Fast. The Scale sends drafting commands to the auto drafter during the weighing session. To connect an auto drafter with the Scale, complete the following steps: 1. Turn on the Scale. 2. Ensure the auto drafter is turned off. 3. Connect the auto drafter to one of the ports on the Scale. 4. Set the port to the required option, Drafter, Drafter Special and Drafter Fast. Refer to Communications (p 26) for more information. 5. Turn the auto drafter on. Note: For information about setting up the auto drafter into three-way drafting, refer to Drafting. Page 28 SmartScale 600 User Manual Power feed to Electronic ID readers The Scale can supply power to an Electronic ID reader. Power is supplied only if the reader is connected to Port 2 and if any one of the three Electronic ID reader options is selected. With Port 2, if you nominate a device other than an Electronic ID reader, power feed is disabled. If the Electronic ID Reader you are using does not require power from the Scale, you can connect it to either Port 1 or Port 2. Select a country The Select Country menu lets you select the required country settings. The Scale country settings determine the following: the language used with the screens and prompts; some country-specific terminology; and some default options. To display the Select Country menu, complete the following steps: 1. Turn the mode selection switch to S. 2. Select 6. SELECT COUNTRY from the Setup menu. The following screen displays: Changing the country To change the country, complete the following steps. 1. Press the country. 2. Press or soft key to select the desired to save the changes. IMPORTANT: Ensure that the country set on your Scale is the same as the country set in MyScale Pro. Page 29 User Manual SmartScale 600 Viewing weighing details during a session The SmartScale 600 Scale provides four different formats for viewing weighing information during a weighing session. You can view: Summary Weight Statistics Weight Gain Individual Weight Records (Tag Number, Weight, Condition and Note) Carcass Weight The weighing session data is displayed on the lower screen on the Scale. Selecting a view To select a different data view during a weighing session: 1. Turn the mode select switch to either A, M or F. 2. Press to cycle through the available screens. The data displayed on each of the screens is described in the following sections. Viewing session statistics The Weight Stats or Draft Stats screen displays summary weight data for animals in the current weighing session. The screen that is displayed depends on the weighing mode that you are using and whether drafting is turned on or off. If you are using automatic or manual weighing modes with two way or three way drafting switched on, the Draft Stats screen will display. This screen shows the number, average and total weight of the animals in each drafting category. If drafting is switched off or you are weighing in fine mode, the Weight Stats screen will display. This screen shows the number, average, total, highest and lowest weights for all the animals in the current session. Page 30 SmartScale 600 User Manual Statistics screen The WEIGHT STATS or DRAFT STATS screen displays information about the animal currently being weighed in the left hand portion of the screen. The tag number, prefix and condition score will be displayed if you have entered this information. The weight gain is calculated and displayed if there is at least one weight recorded in a previous session for the same tag number. button will only be displayed if you have configured The one of the Scale's ports for a Printer. If you connect the SmartScale printer to the port you can use this button to print the statistics on this screen. The daily weight gain will not be printed. Drafting off If drafting is turned off or you are weighing in fine mode, the WEIGHT STATS screen will display. Page 31 User Manual SmartScale 600 Two-way drafting If Two Way Drafting is selected and you are using automatic or manual weighing modes, the DRAFTING STATS screen displays. In the example above, the drafting limit was set to 300 "kg" or "lb". Twelve animals weighed 300 "kg" or "lb" or less; they had an average weight of 275 "kg" or "lb" and a total weight of 3,300 "kg" or "lb". Fourteen animals weighed more than 300 "kg" or "lb". They had an average weight of 318 "kg" or "lb" and a total weight of 4,452 "kg" or "lb". Three-way drafting If Three-way Drafting is selected and you are using automatic or manual weighing modes, the DRAFT STATS screen will display. In the example above, the lower drafting limit was set to 250 "kg" or "lb" and the upper drafting limit was set to 300 "kg" or "lb". Twelve animals weighed 250 "kg" or "lb" or less; they had an average weight of 241 "kg" or "lb" and a total weight of 2,892 "kg" or "lb". Eight animals weighed from 251 "kg" or "lb" to 300 "kg" or "lb"; they had an average weight of 269 "kg" or "lb" and a total weight of 2,152 "kg" or "lb". Ten animals weighed more than 300 "kg" or "lb". They had an average weight of 312 "kg" or "lb" and a total weight of 3,120 "kg" or "lb". Page 32 SmartScale 600 User Manual Weight gain screen The Weight gain screen shows weight gain data for the animal being weighed and weight gain statistics for all animals in the session. The weight gain graph on the left side of the screen shows the change in an animal's weight gain from one session to the next. The vertical axis represents weight gain, the horizontal axis represents time. Each point on the graph represents the weight gain (in kg/day) that occurred between two weighing sessions. For example, if the graph slopes upward, the rate of weight gain has increased. If the graph slopes downward the rate of weight gain has decreased. Note: Provided the weight gain figure is positive the animal has gained weight. The graph plots changes in weight gain not changes in weight. A downward slope in the line on the graph indicates a decrease in the rate of weight gain, not a decrease in actual weight. The weight gain (in kg/day) for the animal currently being weighed is displayed in the top left corner of the screen. This is also the last point on the graph. For example, in the screen shown above, the weight gain for the current animal and the last point on the graph is 1.09 kg/day. The graph shows that only one of four previous sessions has matched this weight gain. For the graph to be displayed: 1. There must be at least two previous sessions with a weight recorded for this animal (i.e. with the same tag number). 2. The sessions must have been created on different dates. The weight gain is calculated from the weight recorded in the most recent session for the same tag number. If there is no previous data for an animal, the screen displays "--.-" in place of the weight gain figure. Note: The session statistics (average, lowest and highest weight gain per day) displayed on this screen only include those animals for which weight comparisons can be made. The statistics do not include animals which are being weighed for the first time and therefore have no weight gain comparison. Page 33 User Manual SmartScale 600 Weight records screen The Weight Records screen shows the data recorded for each animal: Tag number Weight Condition score Notes The last weight to be recorded is displayed at the top of the screen. You can use and to scroll up or down the list and view or edit other weight records in the current session. This screen can also be used to edit the weight records in the current session. From further information, refer to Editing Weight Records (p 47). Page 34 SmartScale 600 User Manual Carcass weight screen The Carcass Weight screen displays the carcass weight of the animal. The carcass weight is calculated using the kill-out percentage that you enter. The carcass weight statistics are displayed on the right hand side of the screen. The format is the same as that used in the WEIGHT STATS or DRAFTING STATS screens. The carcass weights on the screen shown above are based on a kill-out percentage of 53%. Within each drafting category, the average and total carcass weights displayed will be 53% of the average and total weights recorded for the session. The number of animals in each drafting category is displayed. If drafting is turned off, the lowest and highest carcass weight is also displayed. Note: If the kill-out percentage is changed during the weighing session, the carcass weights are recalculated. Kill out percentage To change the kill-out percentage: 1. Press . The current kill-out percentage screen displays. 2. Press to delete the current kill-out percentage. Each time you press one character is deleted. 3. Enter the new kill-out percentage using the keypad. 4. Press to save the change and recalculate the carcass weights based on the new kill-out percentage. Page 35 User Manual SmartScale 600 Recording animal information To store condition scores and notes about animals without recording a weight, follow these steps: 1. Make sure there are no loadbars connected to the SmartScale 600. 2. Turn the mode select switch to M. 3. If you are using Electronic IDs to identify the animal, read the animal's Electronic ID. 4. Enter the animal's Visual Tag Number using the keypad, if it is not already displayed. Note: If you read an Electronic ID that was already linked to a Visual Tag Number in the Scale's cross-reference table, it will be displayed and you will not be able to edit it. 5. Press 6. Press keypad. and enter a one or two digit condition score. and enter the note (up to 13 characters) using the 7. Press the green weigh button to store the record. A text record is added to the current session containing the information you entered and with the weight set to zero. The session statistics do not change. None of the fields are compulsory (Electronic ID, Visual Tag Number, Condition Score or Note), however, you must enter some information before the record is saved. Normally, you will want to identify the animal (using the Electronic ID or Visual Tag Number) before saving information about the animal using the condition score or note. Page 36 SmartScale 600 User Manual About weighing The Scale has three weighing modes: Automatic, Manual and Fine. The Automatic and Manual weighing modes are optimised for weighing live animals. The Fine mode is optimised for weighing static objects. Weighing modes Automatic Automatic mode is recommended for yards that allow a smooth flow of animals across the weighing platform. In Automatic mode, the Scale automatically starts the weight measurement process as soon as the animal steps onto the platform. After the weight has been captured, the Scale beeps and displays the captured weight. The captured weight continues to display until the next animal steps onto the platform. After the animal leaves the platform, the Scale attempts to compensate for the weight of any accumulation of mud or dung left on the platform. If it succeeds, the Scale displays a zero icon. If it does not you can manually restore zero by pressing the blue zero button. Manual Manual mode is recommended for yards that do not allow a smooth flow of animals across the weighing platform or where the animals are restless. This mode allows the operator to decide when the measurement is made. In manual mode, the operator presses the green weigh button to start the weight measurement process. After the weight has been captured, the Scale beeps and displays the captured weight. The captured weight continues to display until the next animal steps onto the platform. After the animal leaves the platform, the Scale attempts to compensate for the weight of any accumulation of mud or dung left on the platform. If it succeeds, the Scale displays a zero icon. If it does not you can manually restore zero by pressing the blue zero button. Page 37 User Manual SmartScale 600 Fine Fine mode is recommended for weighing small static loads such as fleeces or produce. Zero tracking is switched off. This means that the platform does not automatically zero between weights. However you can manually zero off any weight left on the platform by pressing the blue zero button. Note: The icon does not display in Fine mode. In Fine mode, the Scale does not lock onto the weight until the operator presses the green weigh button. The Scale operates like a bathroom scale — when the load is removed from the platform, the weight displayed returns to zero. Page 38 SmartScale 600 User Manual Before you begin the weighing session Before you begin the weighing session, complete the following steps: 1. Release the catches on the front of the Scale and open the case. 2. Place the Scale on a flat surface or clip it onto the Scale bracket. 3. Connect the leads from both loadbars to the Scale. 4. Determine if you require additional power for the Scale. Either connect to an AC outlet via the battery charger or connect to a 12 volt battery. If you are not connecting to an external power source, the Scale's internal battery should be fully charged. Refer to Charging the Battery (p 4), if required. 5. Ensure the Scale is setup correctly for the weighing session. To check the set up options, turn the mode select switch to S to display the Setup menu. Before you begin a weighing session, ensure that you have set up the Scale with the correct date and time, and that you have selected other options such as tag checking or drafting if you require them. If you are using an EID reader to scan Electronic ID during the weighing session, you need to connect the EID reader to the Scale and configure the port. Refer to Setup (p 8), if you need more information. You are now ready to start a weighing session. Page 39 User Manual SmartScale 600 The weighing session Note: If you are using the Scale without connection to an external power source, ensure that the battery has been charged for at least five hours before use. Page 40 SmartScale 600 User Manual Weighing animals - Automatic or Manual modes At all times during the weighing session ensure that the underside of the platform is kept free of dirt and stones. 1. Select the weighing mode that you want to use by turning the mode select switch to A (Automatic), or M (Manual). 2. When the Scale is switched on, the previous weighing session is still the current session. The statistics screen shows the weights and statistics from this session. Any new weights will be added to this session. If you want to create a new weighing session: • • Press If you want to enter a name for the new session, enter it using the keypad. The session name can contain up to 17 characters. Press to save the session name. The previous session is stored in the Scale's memory and can be viewed from the Session menu. • The statistics and weight displays will be reset to zero. 3. If required, you can enter an ear tag prefix for the animals being weighed. The prefix you enter will be automatically inserted before any tag numbers entered during the session. • Press and type in the prefix using the keypad. The prefix can contain up to seven characters. • Press icon is displayed. If it is not displayed, press 4. Check that the the blue "zero" button to zero off any weight (e.g. dirt or manure) left on the platform. 5. Load the animal onto the platform. Ensure the animal is contained on the platform (e.g. no hooves off the platform and no one holding the animal). Page 41 User Manual SmartScale 600 6. If required, you can record the animal's Visual Tag Number or scan an Electronic ID. • Using Visual Tag Numbers Use the keypad to enter the Visual Tag Number. If an incorrect Visual Tag Number is entered, press to delete each incorrect character. Re-enter the correct tag number. Up to seven characters, alphabetic or numeric, can be entered. The Visual Tag Number can be entered at any time before or while the animal is on the platform. When the Visual Tag Number is entered, the date and any note entered the last time the animal was weighed will be displayed on the screen. • Using an Electronic ID Scan the animal's Electronic ID. The Electronic ID can be scanned at any time before or while the animal is on the platform. If you are using Electronic ID numbers only, the last 4 digits of the tag number preceded by a colon will display on screen. If you entered a Visual Tag Number the first time the Electronic ID was scanned, the Visual Tag Number will display on screen. If this is the first time you have scanned the Electronic ID and you want to enter an associated Visual Tag Number, you can enter it now. In future, each time you scan the Electronic ID the Visual Tag Number you entered will display on screen. Refer to Using Electronic IDs (p 55) for more detailed instructions. Page 42 SmartScale 600 User Manual 7. If required, you can store information about the animal being weighed using the "Condition Score" and "Notes" fields. Refer to the following table for instructions on entering a condition score or note. You can enter this information before the animal steps onto the platform (i.e. when the platform is empty) or while the animal is on the platform. Field What can be stored How to use Condition Score One or two digits Press the button on the keypad and type the score. Notes Up to 13 characters, Press the button on alphabetic or the keypad and type the note. numeric. to delete each incorrect If an incorrect entry is made, press character and then re-enter the correct information. 8. Follow the instructions for the weighing mode you have selected. Automatic Mode When the Scale has determined an accurate weight for the animal, it locks on to the weight and hold it on the screen. The time taken to lock on to the weight varies depending on the movement of the animal. • Manual Mode Press the green weigh button to weigh animal. When the Scale has determined an accurate weight for the animal, it locks on to the weight and hold it on the screen. The time taken to lock on to the weight varies depending on the movement of the animal. 9. When the Scale has locked onto the weight: • • the Weight OK light illuminates; displays on the screen; and • the Scale beeps. If drafting is turned on, H (High), C (Central) or L (Low) will display, indicating the drafting category. • The statistics screen updates immediately. The weight screen will not update until the animal has left the platform. Page 43 User Manual SmartScale 600 10. If the weight has locked on but you want to re-weigh the animal, press the green weigh key. The Scale re-weighs the animal and lock onto the weight again. The new weight replaces the original weight and the statistics are updated. For example, if the animal was not completely on the scale, the Scale may have locked onto an incorrect weight. You do not need to re-enter the Visual Tag Number, condition score or note if you have re-weighed the animal. 11. When the animal steps off the platform, the weight, Visual Tag Number, condition score and note are stored in the Scale's memory. The Weight screen updates. Refer to Viewing weighing details during a session (p 30). The weight remains on the screen until the next animal steps onto the platform. If the animal has left the platform and you want to delete the weight that has just been recorded, press the red delete button. The last weight entered is deleted from the Scale's memory and the following screen displays. 12. The Scale automatically zeros off any weight left on the platform (e.g. dirt or manure). When this has occurred the icon is displayed on the screen. If the zero icon does not display, press the blue zero button. The Scale does not need to return to zero before the next animal is loaded on to the platform. Once the weight has dropped by 30%, the display will unlock ready for the next animal to be loaded onto the platform. This is a useful feature when weighing sheep. 13. Repeat the process from step 5 until all animals are weighed. Page 44 SmartScale 600 User Manual Weighing static loads - Fine mode 1. Turn the mode select switch to F (Fine mode). 2. When the Scale is switched on, the previous weighing session will still be the current session. The statistics screen will show the weights and statistics from this session. Any new weights will be added to this session. If you want to create a new weighing session: Press If you want to enter a name for the new session, enter it using the keypad. The session name can contain up to 17 characters. • Press to save the session name. The previous session is stored in the Scale's memory and can be viewed from the Session menu. The statistics and weight displays will be reset to zero. • 3. Check that the weight displayed is zero. If it is not zero, press the blue zero button to zero off any weight on the platform. Note: The icon is not displayed in Fine mode. 4. You can store information about the load being weighed using the "Tag Number", "Condition Score" and "Notes" fields. For example, you may want to enter a wool bale reference number or a note to identify specific bales. Page 45 User Manual SmartScale 600 Refer to the table to select the field that you want to use. You can enter this information before the load is placed on the platform (i.e. when the platform is empty) or while the load is on the platform. Field Visual Tag Number (Reference number) What can be stored How to use Up to seven Use the keypad to enter the characters, reference number. alphabetic or numeric. Condition score One or two digits. Press the button on the keypad and type the score. Notes Up to 13 Press the button on characters, the keypad and type the alphabetic or note. numeric. to delete each incorrect If an incorrect entry is made, press character and then re-enter the correct information. 5. Place the load onto the platform. 6. To record the weight, press the green weigh button. The statistics screen will update immediately. The weight screen will not update until the load is removed from the platform. 7. Move the load off the platform. The weight screen will update. At the end of the weighing session 1. Switch the Scale off by turning the mode select switch to the position. 2. Disconnect the loadbar cables. 3. Fit the protective caps to the loadbar cables. 4. Fit the protective caps to the Scale. Page 46 SmartScale 600 User Manual Editing weight records The weight records in the current session can be edited during or after a weighing session. About editing weight records Only records in the current session can be edited on the Scale. To edit records in other sessions you need to copy them to the computer. Refer to the MyScale Pro User Manual for more information. The Visual Tag Number, Condition Score and Notes can be edited during or after a weighing session. Weights cannot be edited. Weight records cannot be edited while viewing the session in setup mode. Page 47 User Manual SmartScale 600 Editing a weight record 1. Turn the mode select switch to A, M or F. 2. Press displayed. 3. Use until the screen listing the individual weights is or 4. Press the to select the record to be edited. key once, to edit the record. Two asterisks ** displays in the top left corner of the screen when you are in edit mode. Note: Moving to a new row automatically cancels edit mode. 5. Press to cycle through the Visual Tag Number, Condition Score and Note columns. to delete the 6. After you have selected a field to edit, press selected Visual Tag Number, condition score or note. Each time you press one character is deleted. 7. Use the keypad to enter the new Visual Tag Number, condition score or note. 8. Press to save the changes and exit edit mode. 9. Do you want to edit another field in the record? • • Page 48 If yes, go to step 5. If no, end procedure. SmartScale 600 User Manual Deleting a weight record in the current session 1. Turn the mode select switch to A, M or F. 2. Press displayed. 3. Use until the screen listing the individual weights is or to select the record to be deleted. key once. Two asterisks ** display in the top left 4. Press the corner of the screen indicating you are in edit mode. 5. Press the red Delete button. The selected record is deleted from the session and the statistics are updated. 6. Repeat the procedure from Step 3 if you want to delete another record. Page 49 User Manual SmartScale 600 Memory full warning The Scale can store up to 16000 records. This is a total of 16000 records across all weighing sessions, not just the current session. When the record tally is 1000 records short of the limit, the scale beeps and a memory full warning displays. The warning displays again fifty short of the limit accompanied by three beeps. When the record tally is only twenty short of the limit, the warning displays and three beeps sound each time a new record is added. When the record tally reaches 16000, the Scale will beep four times and not accept any more records. To continue weighing, switch the Scale to Set Up mode and use the Session Menu screen to select and delete a previous session. Before deleting a session, you can also copy the weighing sessions to a computer, so that you can keep a record of the data. Refer to the MyScale Pro User Manual, for more information. Page 50 SmartScale 600 User Manual Weight-on-scale memory The Scale remembers the weight on the display at the time it is switched off. This weight is restored if the same weight is on the platform at the time the Scale is switched back on. For example, if you are using Fine mode to weigh wool in a bale on a wool press, you can part-fill the bale and then turn the Scale off at the end of the day. Provided the load is still on the Scale, this weight is remembered when you return the following day and switch the it back on. As you add to the bale, the weight increases from the remembered weight at the end of the previous day. Page 51 User Manual SmartScale 600 Zero tracking As animals pass through the weighing crate, an accumulation of mud and dung may build up on the weighing platform. The Scale can compensate for the weight of this accumulation by subtracting it from the total weight. The automatic subtraction of the residual weight from the total weight is called zero tracking. Zero tracking ensures that the Scale captures the animal's weight and not the mess left on the platform. The way zero tracking is initiated depends on the weighing mode. Automatic and manual modes In the Automatic and Manual weighing modes, zero tracking is automatically implemented if, after the animal leaves the weighing platform, the residual weight is within a defined zero tracking range. If the residual weight is within the defined range, the icon displays. If the residual weight is outside the defined range, the icon does not display. To manually compensate for the residue, press the blue zero icon displays. button. The During a weighing session, if the Scale consistently does not restore to zero, check that there are no obstructions under or around the platform or crate. Fine mode In the Fine weighing mode, automatic zero tracking is disabled. The Page 52 icon does not display in the Fine weighing mode. SmartScale 600 User Manual Printing A SmartScale printer can be attached to the SmartScale 600. If the SmartScale printer is connected during a weighing session, you can configure the Scale to print each animal's tag number, weight and condition score when the Scale locks on to the weight. The SmartScale printer has its own internal rechargeable battery. The battery can be recharged using the battery charger supplied with the printer. For instructions on printing weights at the end of the weighing session, or from a previous session, refer to Session menu (p 16). Note: You can only use a SmartScale printer with the SmartScale 600 Scale. Page 53 User Manual SmartScale 600 Printing weights during a weighing session To print each weight record during a weighing session, follow these steps. 1. Connect the printer cable to one of the two serial ports on the Scale. 2. Turn the mode select switch to S to display the setup menu. 3. Select 5. COMMUNICATIONS. Ensure the port to which the printer is connected is set to Printer. When the Scale case is open, Port 1 is on the top, left side of the Scale. Port 2 is directly below. Press to return to the setup menu. 4. Select 4. USER OPTIONS on the setup menu. 5. Ensure LIVE PRINTING is turned ON. Each time the Scale locks on to a weight, the following information prints. Page 54 Visual Tag Number, or if none exists, the last four digits of the Electronic ID number preceded by a colon. Weight. Condition score. the drafting gate, if drafting is turned on. SmartScale 600 User Manual Using Electronic IDs The Scale can be used with an electronic ear tagging system. During a weighing session an animal can be identified by reading its Electronic ID. You can use Electronic IDs on their own, or the Scale can also link and store the Visual Tag Number that identifies the same animal. The Visual Tag Number is whatever alpha numeric (up to nine characters) code that you choose to enter against an Electronic ID for a given animal. It might be based on the visible number printed on the ear tag or a combination of the number and the colour of the ear tag: "1234" or "123RED" etc. Setting up the Scale to use Electronic IDs The Electronic ID reader connects to one of the serial ports on the Scale. As described in Communications (p 26), this port must be set to read EID Allflex. Page 55 User Manual SmartScale 600 Using a data logger The SmartScale 600 can send an animal's weight and other associated information to a data logger connected to one of the serial ports on the Scale. The data logger can be any device that is capable of receiving serial ASCII data. The data logger can be hardware or software running on a computer. To configure the Scale to send weight records to a data logger during a weighing session, follow these steps. 1. Set the data logger to receive data at 19,200 bits per second. 2. Connect the data logger to one of the two serial ports on the Scale. 3. Turn the mode select switch to S to display the setup menu. 4. Select COMMUNICATIONS from the Setup menu. Ensure the port to which the Data Logger is connected is set to Data Logger. When the Scale case is open, Port 1 is on the top, left side of the Scale. Port 2 is directly below. 5. Press to return to the Setup menu. When the Scale has captured a weight and the animal has left the platform, the weight record is sent to the data logger as a fixed length, comma delimited string. Each weight record has seven comma-delimited fields arranged in the order shown in the table. Each field has a fixed length. Spaces are inserted if the field does not contain the maximum number of characters. Each record ends with a carriage return and line feed — one byte is used for each. The following table defines the format of the fields. Page 56 SmartScale 600 Field EID tag number User Manual Bytes Width Possible Values Example 16 16 characters Any string of 5540000000320 up to 15 02 characters preceded by a space. Visual Tag 7 Number Seven characters Any string of seven characters. A714 Weight 6 Six characters Any number less than 10,000 and expressed to one decimal place. 240.5 Weight unit 2 Two characters kg lb kg Condition score 2 Two digits Any two digits. 90 Drafting category 1 One character L - low L C - central H - high N - drafting off Notes 13 13 characters Any string of VACCINATE up to 13 characters. Fixed length fields make it easy to extract specific data from each record. If a field does not contain any information, for example Electronic ID are not being used or a condition score has not been entered, spaces are inserted so that all other fields maintain the same position in the string. Page 57 User Manual SmartScale 600 An example of a weight record string is shown in the diagram. The boxed outline is included to show the relative position of each data field. It is not included in the data sent to the data logger. Note: Before they transmit information read off a tag to the Scale, some Allflex EID readers embed alphabetic characters. The alphabetic characters correspond to the country code contained in the first three digits of the Allflex EID tag number. For example if the Visual Tag Number is 554000000032002, some Allflex EID readers will convert the 554 to NZL and transmit NZL000000032002 to the Scale. Country codes are assigned in accordance with ISO 3166. Some of these codes are listed below. 036 AUS Australia 076 BRA Brazil 124 CAN Canada 208 DNK Denmark 484 MEX Mexico 554 NZL New Zealand 840 USA United States of America If the Scale receives a country code as three alphabetic characters, it converts them back to the corresponding ISO 3166 country code numeric characters. Thus, even though the Scale may have received NZL000000032002 from the Allflex EID reader, the data logger will display 554000000032002. Page 58 SmartScale 600 User Manual Care and maintenance The SmartScale 600 is a tough and reliable product designed for use in typical livestock environments. However proper care and maintenance can extend its life. Listed below are guidelines for keeping the SmartScale Scale in good condition. Don't submerge the Scale in any liquid. Store the Scale in a cool, dry place. Avoid storing it in direct sunlight unless it is housed in the purpose-built outdoor housing. After use, clean the Scale with a damp cloth. Take care not to scratch the display. Fit the connector caps to keep the connections clean and dry. Page 59 User Manual SmartScale 600 Loadbar and platform options It is recommended that you use Gallagher Loadbars with the SmartScale 600 Scale. The SmartScale 600 Scale recognises most commonly available Loadbar sets. To connect to some Loadbar sets, adapter cables may be required. If you are not using Gallagher Loadbars, a calibration check will be required prior to first use. Gallagher Standard Loadbars Features 2000 kg weighing capacity - Available in 600 mm (23") and 1000 mm (39") lengths Tough rugged steel loadbars Bottom feet mounting holes extend beyond top covers for ease of bolting down Slotted top mounting holes fit all sizes of platforms and crushes 6 m (18') long tough loadbar cables fitted with high quality connectors Fully waterproof No rubber mounts Talk to your Gallagher dealer about the best platform and/or crate for your requirements. Page 60 SmartScale 600 User Manual Gallagher Heavy Duty Loadbars Features 3500 kg weighing capacity 1000 mm (39") rugged steel loadbars Bottom feet mounting holes extend beyond top covers for ease of bolting down 6 m (18') long tough loadbar cables fitted with high quality connectors Fully waterproof No rubber mounts High capacity load cells withstand large shock loads Heavy steel chassis construction absorbs the harshest of impacts Set them and forget them for permanent installation under large crushes. Talk to your Gallagher dealer about the best platform and/or crate for your requirements. Gallagher Super Heavy Duty Loadbars Features 4500 kg weighing capacity 1000 mm (39") rugged steel loadbars Bottom feet mounting holes extend beyond top covers for ease of bolting down 6 m (18') long tough loadbar cables fitted with high quality connectors Fully waterproof No rubber mounts High capacity load cells withstand large shock loads Heavy steel chassis construction absorbs the harshest of impacts Set them and forget them for permanent installation under the largest crushes Talk to your Gallagher dealer about the best platform and/or crate for your requirements. Page 61 User Manual SmartScale 600 Specifications SmartScale 600 Dimensions Length 232 mm (9.25") Width 212 mm (8.5") Height 90 mm (3.5") Weight 2 kg (4.4 lb) General Operating Temperature -20º to 50º C (-5º to 120º F) Accuracy ± 1% Environmental protection rating IP67 Page 62 SmartScale 600 User Manual Weight increments For Gallagher Loadbar sets, the weight increments are preset as shown in the table. For other loadbar sets talk to your Gallagher dealer. Gallagher Standard Loadbars (2000 kg) Gallagher Heavy Duty Loadbars (3500 kg) and Gallagher Super Heavy Duty Loadbars (4500 kg) 0 - 50 kg 200 g increments 500 g increments 50 - 200 kg 500 g increments 500 g increments 200 - 500 kg 1 kg increments 1 kg increments 500 - 2000 kg 2 kg increments 2 kg increments 2000 - 4500 kg Not Applicable 5 kg increments 0 - 50 kg 100 g increments 200 g increments 50 - 200 kg 500 g increments 500 g increments 200 - 500 kg 1 kg increments 1 kg increments 500 - 2000 kg 2 kg increments 2 kg increments 2000 - 4500 kg Not Applicable 5 kg increments Weight Range Automatic or Manual modes: Fine mode: Page 63 User Manual SmartScale 600 Contact details The SmartScale range of products is distributed by the following companies: Page 64 NEW ZEALAND UNITED KINGDOM Gallagher Group Ltd, Private Bag 3026 Hamilton Gallagher Power Fence™ (UK) Ltd, Unit 5, Eastboro Fields, Hemdale Business Park, Attleborough, Nuneaton CV11 6GL. IRELAND NORTHERN IRELAND Gallagher Power Fence Systems (IRL) Ltd, Kinsale Road, Cork Sam Nelson & Son, 16 Lower Ballinderry Road, Upper Ballinderry, Lisburn, Co. Antrim BT28 2JB. TWO YEAR WARRANTY FOR THIS WEIGH SCALE PRODUCT FROM DATE OF PURCHASE MODEL SELLING DEALER STAMP ..................................................................................... SERIAL NO ..................................................................................... DATE PURCHASED .................................................................................... This product is guaranteed free from defects in material or workmanship for a period of two years from date of purchase by the end user. Gallagher Group Ltd will repair or replace at their option any faulty product returned to them or their Dealer within this time period. Freight/forwarding costs incurred by the Customer in the warranty process remain the responsibility of the Customer. This warranty does not cover damage (including subsequent corrosive damage) due to: Unauthorised repairs Modifications Failure to follow care and maintenance guidelines described in the User Manual Physical Mishandling Lightning Strike Floods, fires or acts of God Gallagher Group Ltd, their Distributors, and their Dealers accept no responsibility for the misuse of this product. Gallagher Group Ltd, their Distributors, and their Dealers accept no responsibility for any accident caused subsequently to any tampering with or modification to or misuse of this product. Gallagher Australia Pty Ltd, their Distributors, and their Dealers accept no liability for consequences and/or secondary damages or losses of any kind sustained directly or indirectly, a result of failure or defect in any product, material, installation or service. AUSTRALIA Gallagher Australia Pty Ltd, A.C.N. 005 550 845, P.O. Box 122, Rydalmere, Sydney, NSW 2116. CANADA Gallagher Power Fencing Systems Inc., P.O. Box 576, Owen Sound, N4K 5R1 Ontario. IRELAND Gallagher Power Fence Systems (IRL) Ltd, Kinsale Road, Cork. NEW ZEALAND Gallagher Group Ltd, Private Bag 3026, Hamilton. NORTHERN IRELAND Sam Nelson & Son, 16 Lower Ballinderry Road, Upper Ballinderry, Lisburn, Co. Antrim BT28 2JB. SOUTH AFRICA Gallagher Power Fence (S.A.) Pty Ltd, 6 Charlie Avenue, Hughes Extension 23, Jetpark, Johannesburg. P.O. Box 30074, Jetpark, Witfield 1467. UNITED KINGDOM Gallagher Power Fence™ (UK) Ltd, Unit 5, Eastboro Fields, Hemdale Business Park, Attleborough, Nuneaton CV11 6GL. UNITED STATES OF AMERICA Gallagher USA 130 W. 23rd Avenue, P.O. Box 7506, North Kansas City, MO 64116. PLEASE READ INSTRUCTIONS CAREFULLY BEFORE USE. PLEASE COMPLETE DETAILS AND KEEP WITH YOUR RECEIPT — IT IS YOUR PROOF OF WARRANTY