1
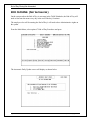
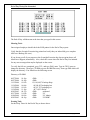
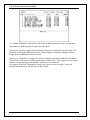
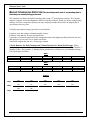
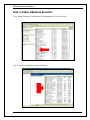
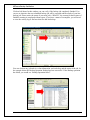
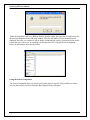
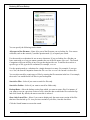
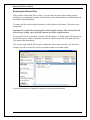
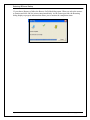
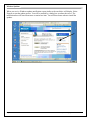
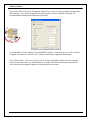
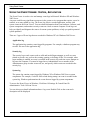
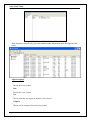
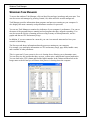
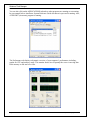
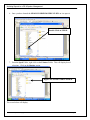
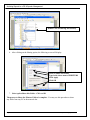
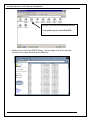
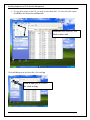
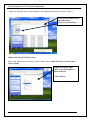
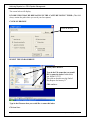
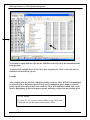
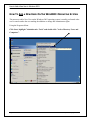
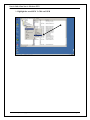
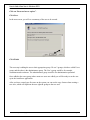
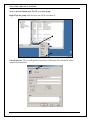
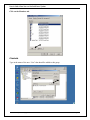
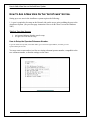
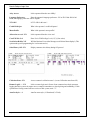
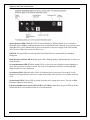
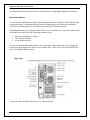
CRITICAL PROCESSES FOR YOUR
COMPUTER SYSTEM
525 Technology Park
Suite 109
Lake Mary, FL 32746
www.autopower.com
Ph. 407-695-7300
Fax: 407-695-8001
Copyright Notice
Copyright Notice
AutoPower Corporation makes no warranty of any kind with regard to this material, including, but not limited to, the
implied warranties of merchantability and fitness for a particular purpose. AutoPower Corporation shall not be liable for
errors constrained herein or for incidental or consequential damages in connection with the furnishing, performance, or
use of this material.
The software described in this document is furnished under a license agreement or on disclosure agreement. The
software may be used or copied only in accordance with the terms of the agreement.
This document contains proprietary information, which is protected by copyright laws. All rights are reserved. No part
of this document may be copied, reproduced, transmitted, or translated into another language in any form or by any
means, electronic or mechanical, for any purpose, without the express written permission of AutoPower Corporation.
The information contained in this document is subject to change without prior notice. Companies, names, and data
used in examples herein are fictitious unless otherwise noted. Other product names mentioned herein may be
trademarks or registered trademarks of the respective companies.
MS is a trademark of Microsoft
SB+ is a trademark of System Builder (IBM owned)
CA is a trademark of Computer Associates (BrightStor ARCserve Backup)
IBM
APC SmartUPS
Copyright 2007. AutoPower Corporation. All rights reserved.
Printed in the United States of America.
Page 2
AutoPower Corporation Copyright 2007
TABLE OF CONTENTS
EOD CLOSING (Automated Process)............................................................................................................... 4
EOD CLOSING (Not Automated) ..................................................................................................................... 6
MONTH END CLOSING MENU (This is a Manual Process.)...................................................................... 10
Backup Scheduling Rotation The most important part of any backup plan is that they are actually being performed.
............................................................................................................................................................................... 16
A successful system backup is more than just changing out the tape............................................................ 18
How to Verify ARCserve Backups?.................................................................................................................. 19
Restoring .............................................................................................................................................................. 23
Using the Search Companion............................................................................................................................. 24
Restoring the Selected Files................................................................................................................................ 27
Windows Updates................................................................................................................................................ 29
AntiVirus Software (eTrust InoculateIT)......................................................................................................... 31
Using the Event Viewer: System, Application.................................................................................................. 33
Event Types................................................................................................................................................... 35
Windows Task Manager..................................................................................................................................... 37
Network map....................................................................................................................................................... 39
Maintenance Agreements (Very Important) ................................................................................................... 40
Spooler Backup ................................................................................................................................................... 41
Archiving Reports to a CD ................................................................................................................................. 41
How To Add a New User On The Win2003 Operating System...................................................................... 62
How To Add A New User On The ‘AutoPower’ System. ................................................................................ 73
How to Setup the Operator/Salesman Number. ............................................................................................... 73
How to Setup a Login User ................................................................................................................................ 75
Proper Computer Room Environment ............................................................................................................. 77
Lights on the front of the Server ....................................................................................................................... 79
How to Logoff a User in Universe ..................................................................................................................... 83
Smart UPS – 1500VA.......................................................................................................................................... 85
AutoPower Corporation Copyright 2007
Page 3
End of Day Closing Automated
EOD CLOSING (AUTOMATED PROCESS)
The End User who is running the End of Day Procedure needs to have administrator rights from the
Windows System.
The End of Day is a scheduled process in your Task Scheduler in Windows. It is set to perform the UV
Backup to File (File-Save) and then your End of Day will run.
The Task Scheduler can be located by clicking on Start à Settings à Control Panel à Scheduled Task.
Click on Scheduled Tasks.
The Task Scheduler screen below will display.
The Task Scheduler will show the EOD and the UV Backup Jobs that are scheduled to be run daily. You
will see when the next scheduled time that is set for the EOD and Backup and the last run time. You
could also have other programs that are schedule to run besides the EOD and the Backup programs. The
UV Backup to file will always be scheduled to run before the EOD.
Morning Task:
Page 4
AutoPower Corporation Copyright 2007
End of Day Closing Automated
One assigned employee should check the EOD printer for the End of Day reports.
Verify that the Overnite Execution log printed and verify that you did indeed get a complete UV Backup
(file-save).
If you do not get all of your reports or the Overnight Execution log does not print, please call AutoPower
Support, immediately. Also, check the screen where the End
of Day was initiated for any error messages that may be displayed on the screen.
No other action is needed after you have confirmed that the EOD & UV Backup was successful.
Brightstor ARCserve Backup is the tape backup performed daily. This process is discussed under the
Windows Server Task in this manual. Suffice to say this process is critical to your disaster recovery plan
and an integral part of your operation.
AutoPower Corporation Copyright 2007
Page 5
End of Day Closing Not Automated
EOD CLOSING (NOT AUTOMATED )
On the systems where the End of Day is not setup in the TASK Scheduler, the End of Day will
need to run from the menu every day at the end of the day’s business.
The employee who will be running the End of Day’s will need to have Administrative rights on
the system.
From the Main Menu, select option #7 End-of-Day Procedure and press R.
The Automatic Daily Update screen will display as shown below.
Page 6
AutoPower Corporation Copyright 2007
End of Day Closing Not Automated
Type in option #1 Daily File Backup and End of Day Update and press Enter.
The Sleep Timer screen will display as shown below.
The current time of day will be displayed. You must type in the time that you wish the End of
Day to start. Type the time in Military format as shown on the screen. The next prompt will be
Accept? (Y, N, E):
Y – Yes, N – No, E – Exit. You can change the time that you entered by
typing in “N” and pressing enter or type in “Y” for yes to continue with the End of Day Process
or type in E and press Enter to Exit completely out of this screen.
If you select “Y” for Yes to continue with the End of Day process you will see the countdown
begin.
AutoPower Corporation Copyright 2007
Page 7
End of Day Closing Not Automated
The End of Day will then start at the time that you typed in this screen.
Morning Task:
One assigned employee should check the EOD printer for the End of Day reports.
Verify that the Overnite Execution log printed and verify that you indeed did get a complete
ARCserve Backup (file-save).
If you do not get all of your reports or the Overnight Execution log does not print please call
AutoPower Support, immediately. Also, check the screen where the End of Day was initiated
for any error messages that maybe displayed on the screen.
To verify the fail save completed, go to TCL, and type DOS, enter. Type in CD D:\ enter to
change the directory. Then type CD IBM to get to the IBM Directory. Next type DIR which will
display the directory. You should see the following screen.
Directory of D:\IBM
04/27/2006
04/27/2006
11/15/2006
11/14/2006
11/15/2006
11/14/2006
02/05/2003
02/17/2006
10/04/2004
02/05/2003
10:10p
10:10p
05:45a
06:46a
05:45a
11:10p
04:17p
10:38a
08:26a
04:19p
<DIR>
.
<DIR>
..
15,110,168,576 backup.bkup
60,298,807 backuplog.last
60,315,787 backuplog.txt
48,734,033 filelist
<DIR>
unishared
<DIR>
UV
<DIR>
UV Admin
<DIR>
UVODBC
Evening Task:
Set the Sleep Timer for the End of Day as shown above.
Page 8
AutoPower Corporation Copyright 2007
End of Day Closing Not Automated
Overnight Execution Log Example
AutoPower Corporation Copyright 2007
Page 9
End of Month Closing Not Automated
MONTH END CLOSING MENU (THIS IS A MANUAL PROCESS.)
You must initiate the EOM process from the menu.
The End User who is running the End of Month Procedure needs to have administrator rights
from the Windows System.
The end of month process generates A/R statements, A/R reports, generates counterman reports,
inventory reports, updates inventory, updates A/R, and prints sales analysis reports. Some of
these reports and A/R statements may be held in your spooler to print at a later time. This is not a
system wide setup.
The EOM MUST be run before the first EOD of the new month. If you have an automated
EOD running on your system, you can run the EOM anytime on the first day of the new month,
regardless of the entry or processing of data for the new month. The EOM does not run an EOD
any longer, so there is no harm in running an EOM during business hours. The only issue with
running an EOM during business hours is that the Inventory Value Report will have been
affected by any transactions that have been processed prior to the EOM. This is generally not a
problem for a business except perhaps on the last day of your fiscal year. If this is a problem
then you will need to make sure the EOM runs before any inventory movement is recorded.
Just remember that the End of Month must be run before the first EOD for the new month. If you
do run an End of Day in the new month first then this will cause that day’s business to be posted
to the previous month.
Example:
You forgot to run your End of Month on January 31 st .
Then on February 1st you continue doing business and you run an End of Day for the February
1st as normal. On February 2nd you run your End of Month process, it will include the Februa ry
1st day’s business. This End of month will include January 1 st – February 1st .
Very important……..
If the last day of the month falls on Friday.
End of Month = Friday 31st and you are working on Saturday for business and you run your End
of Day on Saturday also, then you must run the EOM on this Saturday.
If the End of Month = Friday 31st and you do not run your EOD on Saturday, you can run your
End of Month on Monday even though you were open for business on Saturday.
So, if you run your End of Day 6 days a week then you might want to watch this carefully
because you will more than likely be running the End of Month on a Friday.
Page 10
AutoPower Corporation Copyright 2007
End of Month Closing Not Automated
In all cases, you should always make sure that you get all of your End of Day reports and an
Execution log from the End of Day on the last day of the month. If any reports are missing or
the Execution log did not print, you should not close the month and immediately contact
AutoPower Support. If the End of Month runs and the prior End of Day did not complete, this
will cause some major issues.
From the Accounts Receivable Menu select the Month End Closing Menu.
From the Month End Closing Menu select the End of Month Processing Menu.
The E-O-M process is a required option. The completion of this process makes it possible to
interface the Accounts Receivable and Sales with the General Ledger.
AutoPower Corporation Copyright 2007
Page 11
End of Month Closing Not Automated
Only from the screen should this process be stopped, and then only by the use of the “E” as
noted in the screen above. This process should never be interrupted or stopped using any other
manner.
If you would like to exit this window prior to running your E-O-M, type in the letter “E” to exit.
You must use a UPPER CASE “E” in order to exit out.
If you should start the EOD instead of the EOM, you can let the EOD complete and then run
your E-O-M process.
If you should have questions on the E-O-M process please contact AutoPower Support
Department.
After pressing Enter to continue you will see the Sleep Timer screen below. Type in sleep time
using the military format of time and press enter.
Page 12
AutoPower Corporation Copyright 2007
End of Month Closing Not Automated
This process will sleep until the time that you entered and then the EOM will start processing.
Below is the first screen that you will see after the EOM has been started.
You will then see each End of Month process, as it starts and stops on this screen. You will also
see how long it takes for each process to successfully complete.
AutoPower Corporation Copyright 2007
Page 13
End of Month Closing Not Automated
It is with the completion of this process that all the monthly information, sales, receipts, and
adjustments are pulled together to update all A/R reports.
This process will also compile all the information necessary to update the General Ledger. The
final step of pulling the information into the General ledger is completed within the General
Ledger system and detailed in that document.
This process will produce a complete set of End of Month reports and send them to the spooler.
They are sent to the spooler in order to print them at another time. These reports are to be used to
balance your general ledger and should be maintained as an audit trail.
An example of an EOM Overnight Execution Log is shown on the next page. Yours will
probably not look exactly like this but it will be similar.
Page 14
AutoPower Corporation Copyright 2007
End of Month Closing Not Automated
Example of the EOM Overnight Execution Log
AutoPower Corporation Copyright 2007
Page 15
Windows Server Tasks
BACKUP S CHEDULING ROTATION The most important part of any backup plan is
that they are actually being performed.
The AutoPower software should be backed up daily using a 3rd party backup software. We currently
endorse Computer Associates Brightstor ARCserve backup software. Before we discuss using backup
software let’s take a moment to discuss your tape rotation procedure that will be an integral part of
your disaster recovery plan.
Using the tape rotation strategy provides several benefits:
It protects your data using a minimum number of tapes.
It reduces wear and tear on tapes and tape heads.
It provides a systematic approach to tape storage that ensures the highest possible protection for your
data and gives you an easy way to locate stored files.
AutoPower suggest that you use a 10-day tape rotation.
2-Week Rotation For Daily Backups and 5 Month Rotation For Month End Backups . Please
label your tapes with the information below. You have 3 –sets of tapes in the rotation. Week number 1,
Monday-Friday, Week number 2, Monday-Friday and the last set of tapes are your Monthly backups.
Label your tapes as follows.
WEEK 1
LABEL
SUN
---None
MON
---MON-1
TUE
---TUES-1
WED
---WED-1
THU
---THU-1
FRI
---FRI -1
SAT
---None
WEEK 2
LABEL
SUN
---None
MON
---MON-2
TUE
---TUES-2
WED
---WED-2
THU
---THU-2
FRI
---FRI -2
SAT
---None
MONTHLY
LABEL
JAN
MONTH 1
FEB
MONTH 2
MAR
MONTH 3
APR
MONTH 4
MAY
MONTH 5
LABEL
JUN
MONTH 1
JUL
MONTH 2
AUG
MONTH 3
SEP
MONTH 5
OCT
MONTH 6
LABEL
NOV
MONTH 1
DEC
MONTH 2
Page 16
AutoPower Corporation Copyright 2007
Backup Scheduling Rotation
To ensure you are changing the tapes we recommend keeping a backup log similar to the one shown to
record by date the results of the backup, tape used by date and tape loaded for the next scheduled
backup.
DATE
TAPE
AutoPower Corporation Copyright 2007
SERVER
BY
RESULTS
Page 17
Windows Server Tasks
A SUCCESSFUL SYSTEM BACKUP IS MORE THAN JUST CHANGING OUT
THE TAPE.
Critical steps for a successful system backup.
•
•
•
•
•
•
Become familiar with your Backup software. Verify that the ARCserve software is running.
Change out backup tapes daily.
Verify that the backup tapes are not damaged from being used so many times. The backup tapes do
wear-out and become damaged. Pay careful attention to the physical condition of your backup tapes.
You may need to perform a recovery but your information may not have been saved because the tape
was damaged.
Verify daily that you are indeed getting a good backup. Check the job status of the daily backups and
verify that there are no error messages. If you should encounter an error message do not ignore it.
Common error messages are related to the condition of the tape or a malfunction with the tape drive
itself.
You never know when you might have a major catastrophe. What would a major catastrophe do to
your company? Always keep some of your backup media off-site.
The employee who is responsible for backups must have administrative rights in windows.
Please contact Computer Associates Support (800-832-6827) if you are experiencing issues with the
ARCserve Software.
Page 18
AutoPower Corporation Copyright 2007
ARCserve Backup Verification
HOW TO V ERIFY ARCSERVE BACKUPS?
Click Startà Settingsà Control Panel à Administrative Tools à Services.
All CA Services should have a status of Started.
AutoPower Corporation Copyright 2007
Page 19
ARCserve Backup Verification
Verify that you are getting complete and error free backups.
From the Server Desktop, click on the ARCserve Icon
The ARCserve Brightstor Backup window will display as shown below.
Page 20
AutoPower Corporation Copyright 2007
ARCserve Backup Verification
Click on Job Status. In this window you can verify if the backup job completely finished. You
can see at what time the next scheduled backup job will be executed and the results of your last
backup job. Please notice the status of your next job is “READY”, the current job had a status of
finished, meaning it completed without errors. If you have a status of incomplete, you will need
to view the activity log to find out what files did not backup.
You can click on any job and view what information was backed up and the status of the job. In
the example below the Backup Operation finished and was successful. If the Backup operation
has failed, you would see “Backup Operation failed”.
AutoPower Corporation Copyright 2007
Page 21
ARCserve Backup Verification
From this window you can add a new backup job. You can also add, modify, reschedule, stop or
delete an existing job.
This information is under the Job Queue Tab.
Click on the Activity Log Tab to the right of the Job Queue tab to view history. This will show
errors, warnings and the status of backup jobs in the past.
Page 22
AutoPower Corporation Copyright 2007
Restoring ARCserve Backup
RESTORING
Please do not perform this task without first contacting AutoPower Support about what files
should be restored. This can cause some major issues if the wrong files are restored.
Restoring files with BrightStor ARCserve Backup is easy and intuitive. Select the files that you
want to restore and choose the location where you want to restore the files.
Restoring Your Files
To restore your files, open the BrightStor ARCserve Backup Restore window. Click on the
ARCserve Manager icon.
Depending upon the policies defined by your BrightStor ARCserve Backup administrator, you
might need to enter your password before you can start a restore. If this is the case, enter your
password, and then click OK. The password must be the administrator password for the server to
allow full control the files.
AutoPower Corporation Copyright 2007
Page 23
Restoring ARCserve Backup
When the BrightStor ARCserve Backup Restore Window opens, the right pane is blank except for
the message illustrated in the following window. The files and folders in your backup data are
displayed only after yo u conduct a search. Before conducting the search, you need to decide on the
criteria that you want to use in searching your backup data. See Using the Search Companion
below for information about search criteria.
Using the Search Companion
The Search Companion helps you search your backup data for specific files or folders to restore.
You can enter search criteria to limit the data displayed in the right pane.
Page 24
AutoPower Corporation Copyright 2007
Restoring ARCserve Backup
You can specify the following search criteria:
All or part of the file name —Enter all or part of the file name you are looking for. You can use
wildcards, such as the asterisk (*) and the question mark (?), to expand your search.
Use the asterisk as a substitute for one or more characters. If you are looking for a file that you
know starts with case, but you cannot remember the rest of the file name, type case*. The Search
Companion will locate all files of any file type that begin with case. To narrow the search to a
specific type of file, type the file extension; for example, case.txt.
Use the question mark as a substitute for a single character in a name. For example, if you type
case?.doc, the Search Companion locates the file case1.doc or case2.doc but not casement.doc.
You can also search for certain types of files by entering the file extension in the box. For example,
the search *.txt would find all .txt files in your backup data.
Search for Files—Select if you want to search for files only.
Search for Folders—Select if you want to search for folders only.
Backup Dates—Select the backup session from which you want to restore files. For instance, if
you want to revert to a previous version of a file, select the date on which the file was backed up
and click Search. By default, the most recent date is selected.
Show Only Latest Files—Select if you want to display only the most recent version of the files
that have been backed up. To view previous versions of your files, clear this check box.
Click the Search button to execute the search.
AutoPower Corporation Copyright 2007
Page 25
Restoring ARCserve Backup
Selecting the Files to Restore
The BrightStor ARCserve Backup Restore window presents the backup files that match your
search criteria in the right pane.
To sort the files, click the column headers. The menu bar and toolbar provide point-and-click
access to the functions that you can perform. Quick references to both are provided at the end of
this chapter.
To select a single file for restoration, click it once. A green check mark appears.
To select all files, click Edit from the menu bar then Select all.
Page 26
AutoPower Corporation Copyright 2007
Restoring ARCserve Backup
Restoring the Selected Files
After you have selected the files to restore, you can choose to restore them to their original
locations or to an alternative location. Use the Restore Now and the Restore to Folder buttons on
the toolbar as described below.
To restore the files to their original locations, click the Restore Now button. The restore starts
immediately.
Important! Be careful when restoring files to their original locations. The restored files will
overwrite any existing copies of the files that are still in the original location.
To restore the files to an alternative location, click the Restore To Folder button. The Browse for
Folder dialog opens. Select an alternative location in which to restore the files, then click OK.
The restore starts immediately.
You can also right-click the files to open a drop-down menu. From the menu, you can choose
whether you want to restore the file to its original location or to another folder.
If you choose Restore to Original Location, the restore starts immediately.
AutoPower Corporation Copyright 2007
Page 27
Restoring ARCserve Backup
If you choose Restore to folder, the Browse for Folder dialog opens. When you select the restoreto location and click OK, the restore starts immediately. As the restore proceeds, the Restoring
dialog displays a progress indicator that allows you to monitor the completion status.
Page 28
AutoPower Corporation Copyright 2007
Windows Updates
WINDOWS UPDATES
Always make sure that your Windows are being updated properly. This will insure that Windows will
routinely check the Windows Update Web site for high-priority updates that can help protect your
computer from viruses and security threats. Windows can be set so that you are notified when these
updates need to be installed. You can set your Windows to update automatically by clicking on Start à
Settings à Control Panel à Automatic Updates. We don’t recommend Automatic updates on the server
because the system will do a re-boot after the install. We recommend using the option “Download updates
for me, but let me choose when to install them.”
This will allow the updates to be downloaded but you will choose the time to install them as shown below.
If you selected Automatic (recommended) the updates will require a reboot. The reboot is automatic which
may not be convenient based on other scheduled jobs that could be running, such as, filesaves, backups or
EOD processing.
AutoPower Corporation Copyright 2007
Page 29
Windows Updates
When you receive Windows updates notification screen similar to the one below will display. Select
Express to start the update process. You will be notified by a dialog box to reboot the server. The
notification box will state reboot now or remind me later. You will then choose when to install the
updates.
Page 30
AutoPower Corporation Copyright 2007
AntiVirus Software
ANTIV IRUS SOFTWARE (ET RUST INOCULATEIT)
You will also want to make sure that your Antivirus Software is being updated with the most
recent updates. This will help prevent Viruses, Worms, Trojans, on your system.
Click Start à Programs à eTrust InoculateIT à eTrust InoculateIT
From the taskbar, right click the eTrust icon. Select Launch eTrust AntiVirus. The Dashboard
will display which shows status of eTrust.
Click Scanner à Manage Services
The status of the services should be started. You can also check this in the task manager
processes to verify that the eTrust InoculateIT services are running.
AutoPower Corporation Copyright 2007
Page 31
AntiVirus Updates
You can also click on Scanner à Signature Update Services and view the scheduled download time
and frequency. You can also change the time and frequency for the scheduled downloads. We
recommend that scheduled downloads take place daily.
If you should have issues with the eTrust InoculateIT software, or question give us a call or contact
Computer Associates at 1-800-832-6827 with your maintenance agreement information.
View eTrust results – Click view à Log Viewer à Select Scheduled scanner and view complete
times for scans and review any infections that were found. The distributed events, should also be
viewed to insure the signature updates are being applied to the system.
Page 32
AutoPower Corporation Copyright 2007
Using Event Viewer
USING THE E VENT VIEWER: SYSTEM, APPLICATION
The Event Viewer is used to view and manage event logs in Microsoft Windows XP and Windows
2003 Server.
An event would be any significant occurrence in the system or in a program that requires you to be
notified, or an entry added to a log. The Event Log Service records application, security, and
system events in the Event Viewer. You can obtain information about your hardware, software, and
system components, and monitor security events on a local or remote computer. Event logs can
help you identify and diagnose the source of current system problems, or help you predict potential
system problems.
There are 3 types of Event logs that are recorded in Windows XP’s & Windows 2003 Server.
Application log
The application log contains events logged by programs. For example, a database program may
record a file error in the application log.
Security log
The security log records events such as valid and invalid logon attempts, as well as events
related to resource use, such as the creating, opening, or deleting of files. For example, when
logon auditing is enabled, an event is recorded in the security log each time a user attempts to
log on to the computer. You must be logged on as Administrator or as a member of the
Administrators group in order to turn on, use, and specify which events are recorded in the
security log.
System log
The system log contains events logged by Windows XP or Windows 2003 Server system
components. For example, if a driver fails to load during startup, an event is recorded in the
system log. Windows predetermines the events that are logged by system components.
To access the Event Viewer in Windows, Click Start à Settings à Control Panel à
Administrative Tools à Event Viewer
You can also access detail information about a Log event. Double Click on the event and a
description will be displayed.
AutoPower Corporation Copyright 2007
Page 33
Using Event Viewer
Each log entry is classified by type, and contains header information, and a description of the
event.
Field Descriptions
Date
•
The date the event occurred.
Time
•
The time the event occurred.
User
•
The user name that was logged on when the event occurred.
Computer
•
The name of the computer where the event occurred.
Page 34
AutoPower Corporation Copyright 2007
Using Event Viewer
Event ID
• An event number that identifies the event type. The Event ID can be used by Administrative Support to
help understand what occurred in the system.
Source
• The source of the event. This can be the name of a program, a system component, or an individual
component of a large program.
Type
•
The type of event. This can be one of the following five types: Error, Warning, Information, Success
Audit, or Failure Audit.
Category
•
A classification of the event by the event source. This is primarily used in the security log.
Event Types
The description of each event that is logged depends on the type of event. Each event in a log can be
classified into one of the following types:
Information (Blue I inside a white circle)
• An event that describes the successful operation of a task, such as an application, driver, or service. For example,
an Information event is logged when a network driver loads successfully.
Warning (Yellow Warning Triangle)
•
An event that is not necessarily significant, however, may indicate the possible occurrence of a future problem.
For example, a Warning message is logged when disk space starts to run low.
Error (Red X)
• An event that describes a significant problem, such as the failure of a critical task. Error events may involve data
loss or loss of functionality. For example, an Error event is logged if a service fails to load during startup. As a
general rule a white “X” inside a red circle should be cause for alarm that something is not right. These errors
require further research to determine root cause and corrective action.
Success Audit (Security log) (Yellow key)
•
An event that describes the successful completion of an audited security event. For example, a Success Audit
event is logged when a user logs on to the computer.
AutoPower Corporation Copyright 2007
Page 35
Using Event Viewer
Failure Audit (Security log) (A Silver lock)
• An event that describes an audited security event that did not complete successfully. For example, a Failure Audit
may be logged when a user cannot access a network drive.
Page 36
AutoPower Corporation Copyright 2007
Windows Task Manager
WINDOWS TASK MANAGER
To access the windows Task Manager, click on Start, Run and type in taskmgr and press enter. You
can also access task manager by pressing Control, Alt, delete and click on task manager tab.
Task Manager provides information about programs and processes running on your computer. It
also displays the most commonly used performance measures for processes.
You can use Task Manager to monitor key indicators of your computer’s performance. You can see
the status of the programs that are running and end programs that have stopped responding. You
can also assess the activity of running processes using as many as fifteen parameters, and see
graphs and data on CPU and memory usage.
In addition, if you are connected to a network, you can view network status and see how your
network is functioning.
The Processes tab shows information about the processes running on your computer.
For example, you can display information on CPU and memory usage, page faults, handle count,
and a number of other parameters.
This is a great tool if your system is slow or is slowing down, allowing you to determine cause.
You can also view the sessions that have an error, system errors, and potential system bottlenecks.
You can look in the CPU column and find the highest number in the column and then look at the
Image name to the left and you will know what process is slowing down the computer.
AutoPower Corporation Copyright 2007
Page 37
Windows Task Manager
You can also click on the APPLICATIONS tab and see what programs are running or not running.
In our example below AutoPower System Reference Guide document is open and is running. Also,
ATWIN2K2 (Accuterm) program is running.
The Performance tab displays a dynamic overview of your computer’s performance including:
graphs for CPU and memory usage. This monitor shows how frequently the server is moving data
from memory to disk and vice versa.
Page 38
AutoPower Corporation Copyright 2007
Network Map
NETWORK MAP
It is highly recommended that the setup of your Network be documented in a map format
identifying all peripherals along with their inside and outside IP addresses that are connected on
your network.
This is a very highly effective cost-saving and timesaving tool when maintenance needs to be
performed on your network system.
Label each server with it’s
An example of a Network map is shown below.
inside and outside IP address.
Keep this map near your server for reference.
Also label the firewall and
routers with their inside and
outside IP address.
Label each PC with its IP
address and the name of
the User.
AutoPower Corporation Copyright 2007
Label the Printer
servers with its
IP address.
Page 39
Maintenance Agreements
MAINTENANCE AGREEMENTS (VERY IMPORTANT)
It is very important to renew your Maintenance Agreements. Since some of the software and
hardware on your system are purchased from Third-party vendors, you must be very careful
before letting a maintenance agreement expire. The repercussions from a non-renewal on a
maintenance agreement can be costly. This can also mean being down for not just hours but days
because the third-party vendor may service their customers who have active maintenance
agreements prior to the customers who call in for time and material.
It is advisable to renew the maintenance agreements. Annual maintenance agreements that are
not renewed can adversely impact any future upgrades of your third-party hardware and software.
Service and support will be provided but for an additional cost based on the third-party rates in
effect at the time.
Check your warranties to see when they expire, AutoPower will monitor your renewal dates,
however, mistakes happen. Don’t put this in the hands of a vendor to manager for you. Keep a
current list of agreements and expiration dates by your server and check dates often. If you don’t
receive your update to an agreement then call us for support. Letting a contract lapse is usually a
bad situation.
Example of Third-Party Support and Maintenance Renewal are:
Universe
IBM
ARCserve Computer Associates 800-832-6827
ETrust InoculateIT Computer Associates 800-832-6827
SB Client
This is just an example listing of the third-party vendors. You may have more third-party
software on your system. Of course, anytime you may have questions about which vendor to
contact with third-party issues please contact AutoPower support at 407-695-7300 or e-mail
[email protected].
Page 40
AutoPower Corporation Copyright 2007
Archiving Reports to a CD & Spooler Management
Spooler Backup
Did you know you should backup your spool folder and clean it out at LEAST every quarter? If not,
this can cause problems when your spooler reaches over 16,000 print jobs and locks up the windows
print spooler service, which will dump out users during the invoice creation process.
You can always backup the spool folder to a CD and label the CD with its contents. You can also
setup EOM/EOD folders on yo ur hard-drive and move your print jobs to these folders and then delete
the jobs in the spooler.
Right Click Start à Explore à Windows à System32 àSpool
ARCHIVING R EPORTS TO A CD
It is recommended to Archive the print spooler reports to a CD or DVD that are in your EOD-EOM
print spooler once a month after your end of month process has run.
Step 1: Setup a Share called PRINTERS Folder on the Main Server for the EOD/EOM Printer.
This will allow you to access the printer’s folder from your PC.
GO TO YOUR MAIN SERVER
This step only needs to be done just this first time for the initial setup. Once you have set this up
on your system you never have to do this again. You need to share the printer’s folder on the server
so you can access it from any PC. These steps MUST be performed at the main server.
1. On the Server, Right Click On Start from the Task Bar at the bottom of the screen.
Right Click on Start
2. Left click on Explore .
AutoPower Corporation Copyright 2007
Page 41
Archiving Reports to a CD & Spooler Management
Left click on Explorer
3. From the Explore Screen, click on C: drive.
Left Click on your Local Disk C:
4. Click on WINDOWS. THIS FOLDER MAYBE WINNT. If you are running an NT system
this will be WINNT.
Page 42
AutoPower Corporation Copyright 2007
Archiving Reports to a CD & Spooler Management
Locate Your Windows Folder And Click On It.
5.
In the WINDOWS Folder, Double Click on SYSTEM32 to open this folder.
Double Click On SYSTEM32 folder to open it.
AutoPower Corporation Copyright 2007
Page 43
Archiving Reports to a CD & Spooler Management
From this folder
scroll down to
locate the
SPOOL
FOLDER. This is
not a file to the
Left click on the
scroll button and
scroll down to find
the SPOOL Folder.
Page 44
AutoPower Corporation Copyright 2007
Archiving Reports to a CD & Spooler Management
6. Once you have located the SPOOL FOLDER DOUBLE CLICK on it to open it.
Double Click on SPOOL
7. From the Spool Folder, right-click on the Printers Folder. This will display box of
selections. Click on the Sharing option.
Right Click on PRINTERS FOLDER.
The screen below will display.
AutoPower Corporation Copyright 2007
Page 45
Archiving Reports to a CD & Spooler Management
Double Click on Sharing and Security.
8. After clicking on the Sharing option, the following screen will display.
Click on Share this Folder
Type in the share name of PRINTERS
Click Apply
Click OK
7. Select option Share this Folder. Click on OK.
The process to Share the Printers Folders is complete. You may use this procedure to share
any folder from any PC in the network also.
Page 46
AutoPower Corporation Copyright 2007
Archiving Reports to a CD & Spooler Management
FROM THIS POINT FORWARD YOU WILL ALWAYS START FROM HERE TO COPY THE SPOOLER
TO A CD. You will not have to follow step 1 again.
GO TO YOUR PC WORKSTATION THAT HAS THE CD BURNER.
Step 2:
The next step is to copy the reports to your CD. This step will be done from your workstation PC.
To copy the EOD/EOM reports to a CD, you will need a PC with a CD burner.
Now you are ready to copy the reports from the Print Spooler.
1.
From the Desktop click on My NETWORK PLACES The screen will be slightly
different if you are running Windows 2000, 2003, XP.
Click on My NETWORK PLACES on the Desktop
You will see the PRINTERS folder that we shared out.
Double Click on the
Printers Folder
AutoPower Corporation Copyright 2007
When the window opens it will
list all printers that are shared
on the Network. You will see
the printer that we just shared
out.
If you do not see the PRINTERS
folder after the share has been
setup, check with your system
administrator for your permission
rights.
Page 47
Archiving Reports to a CD & Spooler Management
DOUBLE CLICK ON THE EODEOM PRINTER
Your printer may be named EODPTR
3. Double-click on the Printer EODPTR Printer. This will display a list of the print jobs
currently in the printer spooler from the EOD Runs.
Page 48
AutoPower Corporation Copyright 2007
Archiving Reports to a CD & Spooler Management
4. To copy these reports to the CD, you need to select them first. To select all of the reports
click Edit on the Menu Bar and Select All.
Click Edit on the Menu bar. Then
Click on Select ALL.
Click on Edit again on the Menu Bar, click on Copy.
Click on Edit again on the Menu
Bar. Click on Copy.
AutoPower Corporation Copyright 2007
Page 49
Archiving Reports to a CD & Spooler Management
Then go to the down arrow as shown below on the address bar and click on your CD Drive.
Click on the down arrow on
the address bar.
Click on your CD Drive.
Double click on your CD drive letter.
Then in the white space to the right, it doesn’t matter where, right click and go down to paste.
Click on Paste.
Right Click in this white
space to get the drop down
menu as shown.
Click on Paste.
Page 50
AutoPower Corporation Copyright 2007
Archiving Reports to a CD & Spooler Management
You will see the print jobs
being copied.
You will then see the print jobs display on the screen.
Notice the print jobs do not
have a name. How do you
know what these print jobs
are?
We will now create a Table
of Contents.
Click on Write these files to
CD.
Click on Write these files to CD.
This will write the reports to the CD.
Now the reports have successfully been copied to a CD. As you notice that the names are
stored on the CD are not descriptive of the data in the report. The steps below will walk
you through creating a “Table of Contents” so you know the data each report number
represents.
AutoPower Corporation Copyright 2007
Page 51
Archiving Reports to a CD & Spooler Management
We are still at your PC Work Station.
The second step we will be doing will be to Create a Table of Contents for the information that we will
be copying to the CD.
We will create this Table of Contents using Accuterm.
Logon to Accuterm.
Logto AutoPower
Type in the letter T to go to TCL and
press R.
From the Main Menu Type in the letter T and press R. You will now be at the screen shown
below. At a TCL prompt.
Go to a TCL prompt in Accuterm.
Page 52
AutoPower Corporation Copyright 2007
Archiving Reports to a CD & Spooler Management
From this screen click on the TOOLS option from the menu bar.
Click on Tools from the Menu bar.
From the Tools drop down menu Click on Capture .
Click on Capture .
AutoPower Corporation Copyright 2007
Page 53
Archiving Reports to a CD & Spooler Management
The screen below will display.
IGNORE WHAT MAY BE DISPLAYING IN THE “CAPTURE TO FILE” FIELD. (This field
always retains the path where you saved your last capture)
CLICK ON BROWSE
Click on Browse.
SELECT THE CD ROM DRIVE.
Select your CD Drive.
Type in the File name that you would
like to name the index tI named this
one EOD0131.TXT.
This tells me that this was the End of
Day Reports for January 31st .
Click on Save.
Type in the file name that you would like to name this index.
Click on Save.
Page 54
AutoPower Corporation Copyright 2007
Archiving Reports to a CD & Spooler Management
Your will be back at the capture screen in Accuterm.
Click on Overwrite Existing
File
Click on Received Data Button
Click on Start Capture
Click on the Overwrite Existing file button.
Click on the Received data button.
Click on Start Capture.
In Accuterm, You will be back at a TCL prompt >.
Your Screen will display as shown below.
After clicking Start Capture you will be back
at a TCL prompt in Accuterm.
AutoPower Corporation Copyright 2007
Page 55
Archiving Reports to a CD & Spooler Management
Type in the following:
SPOOL –LIST –PRINTER EODPTR and press R.
Type in SPOOL –LIST –PRINTER
EODPTR and press R.
If your EOD printer is named EODEOM
make sure you type that in. This has to be the
name of the printer where the spool jobs are
held for the EOD or EOM.
This command will display a list of the jobs that are in the spooler. Shown in the example below.
Press the Enter key until you have went thru the complete list and you are back to another TCL
prompt >.
Press Enter until you are back at a
TCL prompt. This will scroll all the
report names on the screen.
Once you have pressed
Enter thru all of the report
names then click on Tools.
Once you have pressed R thru all of the reports and you are back to the TCL prompt, go back
and click on the Tools option on the menu bar.
Page 56
AutoPower Corporation Copyright 2007
Archiving Reports to a CD & Spooler Management
Then Click on Capture from the Tools drop down menu.
CLICK ON
CAPTURE
Click on END CAPTURE.
CLICK ON END CAPTURE
You will see a message at the bottom of the screen telling you that you have files waiting to be
writing to a CD. The screen below will display.
AutoPower Corporation Copyright 2007
Page 57
Archiving Reports to a CD & Spooler Management
Click on Write these files to CD
Click on Write these files to CD.
Click on Next.
Page 58
AutoPower Corporation Copyright 2007
Archiving Reports to a CD & Spooler Management
Click on Next.
The files will then be copied to the
CD.
The files will then copy to the CD.
On this CD we will have the Table of Contents which list the name of the reports.
Also, we will have the reports copied to the CD.
AutoPower Corporation Copyright 2007
Page 59
Archiving Reports to a CD & Spooler Management
You will have copied both the .SPL and the .SHD files to the CD. One is the data and the other
is the program.
As shown in the example above on the CD we have the print jobs. Then we have the table of
contents to tell us what the job # is.
Example
After verifying that the jobs were indeed successfully saved to a CD or DVD it is recommended
to delete the jobs in the printer spooler This is only recommended once a month to clear the
printer spooler after the jobs have been saved to a CD or DVD and been verified. This can be
done by highlighting all jobs in the printer spooler and doing a right click and selecting delete.
You are finished.
If you are PC Savvy you can create a folder on the CD for each
month and then put the reports in that month’s folder.
Page 60
AutoPower Corporation Copyright 2007
Spooler Backup
If your print services should stop because of too many jobs in the spooler, you need to clean out
your spooler after you have copied your jobs to a CD or to another folder.
Click on Start à Settings à Control Panel à Administrative Tools à Services and right-click on
Print Spool à Click Start, this will turn your print spooler services back on again.
AutoPower Corporation Copyright 2007
Page 61
How to Add a New User in Windows 2003
HOW TO ADD A N EW USER ON THE WIN2003 OPERATING S YSTEM
The process to add a New User on the Windows 2003 operating system is usually performed at the
server console unless the user making the addition or change has administrator rights.
Using the Programs Menu:
Click Start, highlight "Administrative Tools" and double click "Active Directory Users and
Computers".
Page 62
AutoPower Corporation Copyright 2007
How to Add a New User in Windows 2003
Ø Highlight the word NEW àClick on USER
AutoPower Corporation Copyright 2007
Page 63
How to Add a New User in Windows 2003
The following screen below will display.
Type in the user's First name, Last name. The Full name field will complete automatically.
Type in the logon name in the User logon name field. The @domain name will fill in
automatically. The path will default to the correct path.
After completing the user’s information, Click Next to add the user’s passwords in the following
screen.
Type in the new us er’s password and then type it in again in the confirm password field.
Page 64
AutoPower Corporation Copyright 2007
How to Add a New User in Windows 2003
Click on “Password never expires”.
Click Next.
In the next screen, you will see a summary of the user to be created.
Click Finish.
The next step is adding the user to their appropriate group. We set 2 groups, which are called Users
group, and the other is the administrators group. The User’s group would be for example,
countermen and warehouse. The administrators group would be for administration personnel.
Once added to the users group (where most new users are added) you will be ready to set the user
up in the AutoPower application.
After you have created your first user on the system you can use the copy feature when creating a
new user, which will duplicate the user rights & groups to the new user.
AutoPower Corporation Copyright 2007
Page 65
How to Add a New User in AutoPower
Now we need to add the user “TEST” to a users group.
Right Click the group where this new user will be a member of.
Click Properties. The Users Properties screen below will display. The description will be
completed automatically.
Page 66
AutoPower Corporation Copyright 2007
How to Add a New User on the AutoPower System
Click on the Members tab.
Click Add.
Type in the name of the new “User” that should be added to this group.
AutoPower Corporation Copyright 2007
Page 67
How to Add a New User in AutoPower
Click OK.
You will see your new user added to the group.
Click OK to exit this screen.
Page 68
AutoPower Corporation Copyright 2007
How to Add a New User on the AutoPower System
Add the local path for the user
For each new user that you add to the network you will also need to add the “path” that the user
will be using when they logon to the AutoPower system.
Right Click on
User’s name
Click Properties
Click on Profile Tab.
In the local path field, type
in the starting path for the
new user. This will be the
account where this new
user will be when he logs
onto the AutoPower
system.
Click OK.
AutoPower Corporation Copyright 2007
Page 69
How to Add a New User in AutoPower
Create a new user using an existing user’s setup.
Right Click an existing user’s name.
Click Copy.
Page 70
AutoPower Corporation Copyright 2007
How to Add a New User on the AutoPower System
The screen below will display.
Complete the new user’s information as shown.
Click Next.
Type in the new user password.
Type in the same password again in the Confirm Password field.
Click Next.
AutoPower Corporation Copyright 2007
Page 71
How to Add a New User in AutoPower
The following screen will display.
Click Finish.
Page 72
AutoPower Corporation Copyright 2007
How to Add a New User on the AutoPower System
HOW TO ADD A N EW USER O N THE ‘AUTOP OWER’ S YSTEM.
Setting up a new user in the AutoPower system requires the following:
1. A user is required to be setup on the Network side on the server prior to adding the user to the
AutoPower System. (See previous page instruction: How to Add a New User on the Windows
2003)
This Is A Two-Step Process:
1. An Operator/Salesman Number must be setup.
2. A Login User F/M must be setup.
How to Setup the Operator/Salesman Number.
Logto the AutoPower System, at the Main Menu, go to Utilities Program MENU, and then go to the
Operator/Salesperson F/M.
You may want to enter and review first an existing salesman/operator number, compatible to the
new salesman number, so that the settings are the same.
AutoPower Corporation Copyright 2007
Page 73
How to Add a New User on the AutoPower System
Salesman Number: Enter a new salesman number
1) Name........: Enter the salespersons full name.
2) File Maintenance Password..........: If this salesman is authorized to make file maintenance changes enter a
password here. If not leave blank.
3) Credit Hold Release Password..........: If this salesman is authorized to release credit holds on customer accounts
enter a password here. If not leave blank.
4) Price Change Authorization Password: ..........: If the salesman is authorized to change prices enter a password
here. If not leave blank.
Option 5 & 6, if the company is setup for vehicle repair/shop program then the following would need to be filled
in. If not leave blank and continue to option 7.
5) Shop Cost per Hour.................: Enter the shop person wage per hour.
6) Shop Billing Rate per Hour.........:Enter the shop person billing rate per hour.
7) Location (W1, W2, etc).............: What warehouse location is this operator/salesman in. You must enter something
here.
8) Time clock Password.................: If the time clock software in AutoPower is being utilized a password is required
to be entered here.
9) Employee Payroll Number............: This field is an informational entry. Enter the Salesman payroll number.
Leave blank if the Payroll Module is not being utilized.
Page 74
AutoPower Corporation Copyright 2007
How to Setup a User’s Login
HOW TO S ETUP A LOGIN USER
Logto the AutoPower System, at the Main Menu, go to Utilities Program MENU, and then go to
the Login User Name F/M.
TIP: Compare an existing Salesman/Operator number to the new salesman number, so that the
settings are the same.
Operator Number:
Enter the User’s operator number.
Printer Group:
Enter the printer group that this operator will be defaulting to.
Start Menu:
Enter the Start Menu. Enter the highest starting menu for this user.
Spooler Access:
Should this User have access to the Spooler? Y/N?
File Maintenance:
Is this operator allowed to perform file maintenance?
Credit Memo’s:
Is this operator allowed to enter credit memos?
Release Credit Holds:
Is this operator allowed to release credit holds?
Time Clock Manager:
Enter "N", "YN" or "YY" for timeclock access / editing. Enter N if this user
does not have timeclock access. Enter “YN” if the user has timeclock access but he cannot edit the
timeclock entries. Enter “YY” if the user can access the timeclock menu and edit the timeclock entries.
Stock Adj. Locations:
Enter allowable stock adjust locations, separated by commas, or ALL.
Inventory Locations:
Enter this operator's default inventory location.
Department Number:
Enter this operator's default department or '?' for choices.
AutoPower Corporation Copyright 2007
Page 75
How to Setup a Login User
Arby Access:
Is this operator allowed to use ARBy?
Language Preference:
Enter the operator's language preference - EN or FR. If this field is left
blank, the language preference will be English.
TCL OK?
Is TCL OK for this user?
Credit Hold Que:
What is the operator’s credit hold queue?
Menu Profile :
What is this operator's menu profile?
Allowed to see cost? Y/N
Is this operator allowed to view cost?
Cust F/M Priv Lvl:
Enter User's F/M Privilege Level (1,2,3) (Not active)
Scroll Alert BAMs: Y/N
Will the Business Event Alert Messages scroll below Menu display? (This
option needs special programming for it to become active.)
Sales History O/E: Y/N
Display customer sales history during OE process?
Collection Notes: Y/N
Access customer's collection notes? (Access Collection notes from OE)
Remote Login?....: Y/N
Is this a remote login user? (Some of our customers have their customers
logging into their system via remote access, example Autoconnect, to check pricing and availability). If this
operator that is being created will have access to their system, enter “Y”.
AutoCat Style....: 1
Page 76
AutoCat menu style (1=Wrenchead, 2=Triad).
AutoPower Corporation Copyright 2007
Proper Computer Room Environment
PROPER COMPUTER R OOM ENVIRONMENT
The Computer operates best in a controlled environment
Environment
The computer room should be:
Cool
Temperature should be maintained between 50 and 75 degrees, with the best range between 68 and
72 degrees.
Keep the computer away from direct sunlight or heat.
The computer must be well ventilated, and air must flow freely through the vents in the front and
back of the unit.
Dry
Humidity should be between 40 and 60 percent.
Clean
The room should be dust free and as clean as possible. If your operation creates dust or other
particles, choose a location away from the source of dust.
Location
Locate your computer and system console on a sturdy and vibration- free desk or table. The
computer may be placed upright on the floor next to a desk or table.
Failure to keep a cool, clean and safe environment for your computer system may cause periodic
failures resulting in loss of data, and loss of processing time. In extreme cases, you could
jeopardize your maintenance agreements.
Computer Equipment Peripherals
Terminals and PC/Thin Client Monitors
Terminals and Monitors should also be placed in a cool, dry, and clean location, and be well
ventilated.
AutoPower Corporation Copyright 2007
Page 77
Proper Computer Room Environment
You may want to purchase keyboard covers. These keyboard covers allow the use of the keyboard
through the cover, but protect the circuits from dirt and dust.
Never place anything on top of a terminal or monitor, or restrict the air into the air vents in any
fashion. The life of your terminals, monitors and PC’s will be reduced if the unit experiences
excessive heat over a period of time.
Printers
Printers need to be kept cool, dry and clean. Over time, paper dust will accumulate inside a printer.
Periodically, clean the dust out of your printers. Refer to the printer installation manuals for
specifics on your printer.
Page 78
AutoPower Corporation Copyright 2007
Lights on the Front of the Computer
LIGHTS ON THE FRONT OF THE SERVER
The lights on the front of the server are indicator lights about the hardware status of your system.
If you should see an amber light on the front of the server this is an indication that something is
failing on the system. You should contact the system administrator so that they can inspect the
Light Path Diagnostic panel. The component with the failure will be lit with an amber light.
AutoPower Corporation Copyright 2007
Page 79
Lights on the Front of the Server
System power-on LED: When this LED is lit and not flashing, it indicates that the server is turned on.
When this LED is flashing, it indicates that the server is turned off and still connected to an ac power source.
When this LED is off, it indicates that ac power is not present, or the power supply or the LED itself has
failed. A power LED is also on the rear of the server.
OK LED: This green LED is lit only when the Front Panel LED test is performed by the Enhanced
Diagnostics.
Hard disk drive activity LED: When this green LED is flashing rapidly it indicates that there is activity on
a hard disk drive.
System-information LED: When this amber LED is on, the server power supplies are non-redundant, or
some other non-critical event has occurred. The event is recorded in the error log. Check the light path
diagnostic panel for more information.
System-error LED: When this amber LED is lit it indicates that a system error has occurred. Use the
diagnostic LED panel and the system service label on the inside of the left-side cover to further isolate the
error.
System locator LED: Use this LED to visually locate the server among other servers. You can use IBM
Director to light this LED remotely.
Ethernet transmit/receive activity LED (Tx/Rx 1 or Tx/Rx 2): When these two green LEDs are lit they
indicate that there is activity between the server and the network.
Page 80
AutoPower Corporation Copyright 2007
Lights on the Front of the Computer
What component failures can the Light Path Diagnostic detect?
On the left side of the computer you will see the diagnostic panel below.
Diagnostics panel lit LED
NMI (non-maskable interrupt occurred)
S_ERR (soft error)
TEMP (temperature exceeded a threshold level) Note: The FAN LED might also be lit. Make sure that all
fans are operating correctly.
FAN (a fan failed or is operating slowly) Note: The TEMP LED might also be lit.
MEM (memory failure (LED next to the failing DIMM is on)
CPU (microprocessor failure (LED next to the failing microprocessor is on)
PCI (PCI error; LED on system board at failing adapter will also be lit)
VRM (VRM or integrated VRD failed (LED next to the failing VRM is on)
DASD /RAID (hard disk drive failure (check drive LED) or RAID failure (check LEDs) Note: This LED
will also be lit when a hard disk drive is removed from the server.
1. Be sure the fans are operating correctly and the airflow is good so that the drive is not
overheating.
SERVICE PROCESSOR BUS (service processor error)
EVENT LOG (system warning has occurred)
CPU/VRM mismatch (microprocessor does not match VRM or VRD)
AutoPower Corporation Copyright 2007
Page 81
Lights on the Front of the Server
The Operating System does not need to be functional for the Light Path Diagnostics to function.
Blue Remind Button
You can use the Remind button to place the front panel system-error light into a Remind mode. By
pressing the button, you acknowledge the failure but indicate that you will not take immediate
action. (Not recommended) If a new failure occurs, the LED will turn on again.
In the Remind mode, the system-error light flashes every 2 seconds. The system-error light remains
in Remind mode until one of the following situations occur:
•
•
•
All known problems are resolved
The system is restarted
A new problem occurs
You can use the Remind button to delay server maintenance until a later time. Also, resetting the
system-error light enables the LED to react to another error. If the LED is still solid from the first
error, it will mask additional errors.
Your system may be different because it was custom ordered.
Page 82
AutoPower Corporation Copyright 2007
How to Logoff a User in Universe
HOW TO LOGOFF A USER IN UNIVERSE
From time to time you might need to log someone off of the system. Sometimes employees do not
exit correctly out of a program, which leaves their Universe license in an active status, and they
find that they cannot log back on because all of the licenses in Universe are in use. You might see
the message “Universe License limit has been reached”.
>Type in the letter “T” at any AutoPower Menu
You will now be at a TCL prompt. >
Type in the word LISTU to see who is logged onto the system.
>LISTU
uid
User No
User Name
Terminal No
Login Time
0
197615
197615
0
197616
197616
NT AUTHORITY\system
ABCSERVER\hollis
ABCSERVER\hollis
ABCSERVER\autopower
ABCSERVER\wmiller
ABCSERVER\wmiller
uvdlock:1276
telnet:1340
telnet:1500
phantom:1836
telnet:1984
telnet:1752
May 7 18:03
May 15 05:23
May 15 05:58
May 8 13:52
May 15 06:03
May 15 06:14
1276
1340
1500
1836
1984
1752
If would like to see what program the user is running prior to logging them off, you can type
in PORT.STATUS at the TCL prompt.
>PORT.STATUS and press ENTER
>MASTER OFF user# for documentation purpose use user #1500 or LO user# command
AutoPower Corporation Copyright 2007
Page 83
How To Logoff a User in Universe
(EXAMPLE)
>MASTER OFF 1500 or LO 1500
>LISTU
uid
User No
0
1276
197615 1340
User Name
NT AUTHORITY\system
ABCSERVER\hollis
*
0 1836 ABCSERVER\AUTOPOWER
197616 1984
ABCSERVER\wmiller
197616 1752
ABCSERVER\wmiller
Terminal No
Login Time
uvdlock:1276 May 7 18:03
telnet:1340
May 15 05:23
PHANTOM:1836 MAY 8 13:52
telnet:1984
May 15 06:03
telnet:1752
May 15 06:14
USER 1500 IS NO LONGER LOGGED ON
*REMEMBER: PHANTOM PORT FOR (NT ABCSERVER\autopower phantom:####) SHOULD
NOT BE LOGGED OFF.
Page 84
AutoPower Corporation Copyright 2007
Smart UPS – 1500VA
SMART UPS – 1500VA
The Smart UPS – 1500VA is the current Un- interrupted Power Supply that is the most common
UPS that is purchased with your AutoPower system. The front panel of the UPS will look like the
diagram below.
The descriptions of the lights are as follows.
AutoPower Corporation Copyright 2007
Page 85
Smart UPS – 1500VA
You can perform a manual Self-Test by pressing and holding the Test button for a few seconds to
initiate the self- test.
If the utility power fails, the Smart-UPS switches to battery operation automatically. While running
on battery, an alarm beeps four times every 30 seconds.
Press the Test button (front panel) to silence the UPS alarm for the current alarm only. If the utility
power does not return, the UPS continues to supply power to the connected equipment until the
battery is exhausted.
If you should have a power failure, you should be prepared to shutdown before the UPS turns off.
If you are using the Power Chute software it will perform an orderly shutdown if you are not
available to shutdown the system during a power failure. The shutdown time is approximately 6-8
minutes. This time is a setting in the PowerChute software. The AutoPower programmer installs
the UPS hardware and the PowerChute software. Please read the user’s ma nual that is provided
with your hardware so that you are familiar with the UPS and it’s diagnostic features. You can also
get more information by accessing www.apc.com/support and enter your product number 9901062A.
Page 86
AutoPower Corporation Copyright 2007
AutoPower Corporation Copyright 2007
Page 87