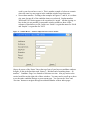
1
SCREEN DRIVER USERS MANUAL
For Graphical User Interface Users
NORSE SYSTEMS INC.
D. L.. Hopper
1/19/2009
Table of Contents
SCREEN DRIVER USERS MANUAL............................................................1
For Graphical User Interface Users...............................................................1
NORSE SYSTEMS INC...............................................................................1
I) Introduction..............................................................................................................4
A Few Key Concepts............................................................................................5
II) Navigating Menus....................................................................................................6
Group Labels........................................................................................................8
Selection Lines.....................................................................................................8
A) Selection Methods...............................................................................................8
Accessing ‘Help’..................................................................................................9
B) Command Mode – The Dot (.) command...........................................................11
C) Calculator – The Plus (+) Command..................................................................12
D) Ad Hoc Query Tool – The Minus (-) Command................................................13
E) Ticklers – The Asterisk (*) Command................................................................13
III)Operating Data Screens - The 'SCREEN' Method..................................................17
A Item Key Fields..................................................................................................22
1Old Items..........................................................................................................22
...........................................................................................................................25
...........................................................................................................................26
2New Items.........................................................................................................29
B Entering Data Into Fields...................................................................................30
2Multi-line (Text) fields......................................................................................31
3Multi-line (List) fields.......................................................................................31
4Option Fields....................................................................................................32
C Fields with Browsers..........................................................................................32
D Spreadsheet-like windows..................................................................................33
E Using Links........................................................................................................35
1Sub-Windows...................................................................................................35
2Services............................................................................................................36
3Attachables.......................................................................................................36
F Accessing 'Help'.................................................................................................43
IV Argument Windows - The 'GetArgs' method.........................................................46
V Controlling Reports................................................................................................47
A Phrase Reporting................................................................................................47
First Case – Simple Report.................................................................................47
Second Case – A little more complicated, a little more powerful........................48
B File Selectors......................................................................................................49
C Reports with 'Forms'............................................................................................51
VI Manipulating 'Lists'...............................................................................................53
VII Output Presented in 'Text' windows......................................................................55
A 'File' Menu.........................................................................................................56
B 'Edit' Menu.........................................................................................................56
C ‘Send’ Menu......................................................................................................57
VIII Building Queries.................................................................................................58
Concepts.............................................................................................................58
A Data Dictionary..................................................................................................59
B Query Designer..................................................................................................60
1Dictionary Window...........................................................................................60
2Layout Window................................................................................................61
On-Layout commands.........................................................................................63
3Extraction Window...........................................................................................64
4Options Window...............................................................................................65
C Query Test, Save, and Recall..............................................................................66
D Query Ownership and Security..........................................................................67
Query ‘Owner’ field............................................................................................68
Security ‘Password’ field....................................................................................68
I)
Introduction
Norse Systems Inc. strives to provide clients, and their employees, with application
software, which focuses squarely on bottom-line performance. To that end we have
compiled a very simple, yet very powerful set of object-oriented methods, which provide
a standard approach for operating the various components of the systems. This
standardized set of methodologies is called ‘ScreenDriver.’
It is the goal of these standardized methodologies to enable you, the operator, to become
fully functional across all the basic operations very quickly, and to also provide featurerich ‘power-tools’ which will be mastered over a longer period of time.
To accomplish the ‘Quick-Start’ we strive for three things: 1-Respect for user
preferences, 2- Intuitive operations, and above all, 3-Standardized methods.
Respect for user preferences starts with your choice of Screen Driver operating ‘Mode.’
When you first sign on to the Norse System, you will be presented with a window of
‘settings’ which you can change, and which will govern how the system will work with
you during the session. This ‘Settings’ window is shown in Figure 1.
Figure 1 - Screen Driver 'Session Parameters'
The ‘Help’ button will explain most of the fields. Please take notice of the 4th field –
‘Windows Preference’. If you specify ‘Y’es, you prefer a user interface based in
Microsoft Windows (GUI Mode), than that will be the case throughout your session. If
on the other had you would rather work with the older style of user interface, sometimes
called ‘Green Screens,’ then choosing a Windows Preference of ‘N’o, will cause that to
be the case.
IF YOU CHOOSE ‘NO’ HOWEVER, YOU ARE USING THE WRONG MANUAL.
This manual is dedicated to describing user interface method standards for those
operating in GUI Mode.
For those of you still in this Manual, GUI users, let's look further at the session
parameters window. To let you further control session settings to match your
preferences, you can choose things like ‘Monitor Resolution’ to make screens bigger or
smaller, you can choose the kind of office package you want to use when the system
makes spreadsheets of documents for you, and you can control your own password reset.
If you use the ‘Persistent’ switch, you can even make the options you choose for this
session, to become the defaults for the next time you sign in.
A Few Key Concepts
It should be noted that, in signing in to the ‘Corporate’ system, you are establishing a
‘session’ that involves you the operator, plus two other computers – (1) the PC you are
working on and (2) the companies corporate data center. The jargon here is that your PC
is called a ‘client’, and the company data center is called the ‘server.’
The computer software your PC is running (AccuTerm) makes your PC act as a
‘terminal’ for the corporate server. All of the key business data, and the intelligence
provided by the Norse application resides on the server. If in the course of your work
you receive a report, in the form of a spreadsheet, that’s cool. You didn’t have to enter
any data, any yet you get to do all the things spreadsheets can do. You can analyze, sort,
graph, etc. Always remember however that if it is stored on your PC, it represents a
moment in history and that the rest of the company doesn’t have access to it.
Do not do things like make customer lists and save them on your PC. Moreover, if you
cannot refrain from violating the above rule, know with certainty that all files on your PC
are obsolete within seconds of being saved.
II)
Navigating Menus
When you sign into the Norse server, you may ‘see’ one or more 'Informational
Windows' before being presented with your ‘Starting Menu.’ If there are any such
windows, you will find that each has just one control, an ‘OK’ button. Read the notice,
then click ‘OK’ and proceed through the process until you get to your menu.
The 'informational windows' may be any of several types. ‘System Bulletins’ can be
posted by the administrator for all the company to see. You may also see, job specific
type notices. For example accountants may see an advisory reminding them as to period
closings, and System administrators may see alerts as DBA chores past due. And lastly
there may be ‘Ticklers’ addressed specifically to you or to your department. See heading
II-D below for more on ‘Ticklers.’
You will notice that this menu system has a ‘Green Screen’ look and feel even for users
with a GUI preference. Microsoft Windows ‘menu methods’ are sufficient for simple
File/Edit/Settings/Help lists, but are not particularly user-friendly for serious business
applications with over one thousand selectable programs, reports, and procedures, each
with multiple ‘help’ links.
Figure 2 - 'Typical Starting Menu'
Your ‘Starting Menu’ will appear once the sign-on operations are complete. System
administrators have the ability to re-define and re-arrange both menus per se, and the
selections on them, virtually without limit. Further, each individual UserID may be
provided with a menu completely unique to them. Therefore, we cannot show you in this
manual exactly what your starting menu will look like. We can however tell you what its
characteristics will be, and how to operate it in general terms. Consider a typical
‘Starting Menu’ shown in Figure 2 and the typical 'lower level' menu shown in Figure 3.
Figure 3 - Typical 'Lower Level' menu
As with any menu, you are presented with several selections from which you may
choose. The menus will usually also have a ‘Title’ area, and in some cases group labels.
Title Area
Depending upon the system administrator who built your starting menu, the title will
consist of some sub-set of the following:
• The port number you are signed in on (0031 in Figure 2, not used in Figure 3.)
• The ‘UserID’ you are signed in on (dhopper in Figure 2, not used in Figure 3.)
• A Static Title (‘Practice Master Menu’ in Figure 2, ‘Charter Manager Tables’ in
Figure 3.)
•
•
•
The name of the Company you are signed into (‘Well Managed Company’ in 2,
not used in 3.)
The current Date (not shown these examples.)
The current Time (not shown in these examples.)
Group Labels
The words ‘Maintenance’ and ‘Lists’ in Figure 3 are examples of ‘Group Labels’. They
are not selections, but rather simply text elements added for readability, and to help you
visually locate the selection you are looking for.
Selection Lines
The ‘meat’ of any menu is, of course, the selection lines. At first glance, the selection
lines in Figures 2 and 3 appear to be simply little ‘text lines.’ In fact, each menu line will
consist of up to 4 elements as follows:
• The ‘Text Lines’ per se,
• A ‘Fast Key’ letter,
• A ‘Menu-is-menu’ symbol,
• One or more ‘Help Text’ documents.
The Text lines are intuitive. They simply tell you what the selection is or does.
The ‘Fast Key” letters are optional – A few menus may not have any, usually menus with
more than 26 selections. You can tell what each selection’s ‘Fast Key’ letter is, because
it is shown in an alternate color scheme. Note that, in the example menu shown in Figure
2, the ‘Fast Key’ letters are embedded within the selection Text Lines. By contrast, the
example menu shown in Figure 3 places the Fast Key letters in front of, rather than
within, the selection text lines. This is irrelevant to operations. The person who created
the menu simply chose one way of the other for readability.
The ‘Menu-is-menu’ symbol can be seen in the example menu shown in Figure 2. It is
the ‘greater than sign’ (>) at the end of all the selections. When you see this symbol at
the end of menu selection line, it simply means that ‘this menu selection does not, in and
of itself, actually run anything.’ Instead, it will simply lead you to a lower level menu.
The fourth element of the menu selection line is it’s associated ‘Help Text’ item(s). The
system lets you ask for help in several ways as discussed further below.
A) Selection Methods
While in any menu screen, you will need to ‘navigate.’ These means both moving up and
down in the menu hierarchy, as well as up and down the lines within the active menu.
Between menus there are two directions you can go – backwards to the previous (or
‘higher level’) menu, or forwards to some sub-menu or function associated with one of
the selection lines.
Backwards (or Menu exit)
To go ‘backwards’ you can either hit the Escape key (Esc) on your keyboard, or hit the
letter ‘X’ as in ‘eXit.’ It doesn’t matter which you use or if the ‘X’ is upper or lower
case. In any case, the menu exit operation will take you back to the previous menu. If
there is no previous menu, in other words if you are exiting from your ‘Startup Menu’,
then the system will clear the screen and prompt you with a line like the following:
'O'ff, 'C'ommand mode, or 'R'esume.. _
If you really intended to log off the system, Hit the letter ‘O’ (Off) to confirm your intent.
If you want to enter ‘Command Mode’, (discussed below), then Hit the letter ‘C’. If you
don’t want either, i.e. if you Hit the Escape or eXit by accident, then Hit the letter ‘R’ to
re-instate your startup menu and continue working.
Forwards (Choose a selection)
There are three basic ways to make a menu selection as follows:
• Click (left-click) the line using your mouse.
• Strike the key on your keyboard that corresponds to the selections Fast Key.
• Scroll the ‘Hi-light’ to the selection you want, and then press the ‘Enter’ key.
In the last case, you can use any of the following keys to scroll the Hi-light:
• Arrows keys - Up Down Left or Right.
• The PageUp, PageDown, Home, or End keys.
• The equivalent keys, 1 thru 9, as represented on your keyboards number pad.
(be sure ‘Num Lock’ is on.)
Accessing ‘Help’
There are three ways to access the help associated with a menu selection line.:
• Right-Click the line using your mouse.
• Scroll the ‘Hi-light’ to the selection you want, and then Hit the ‘?’ and ‘Enter’.
• Type a question mark followed by a fast key letter.
Invoking help by any of these methods will usually give you more than one help option.
The list of available help documents for your particular situation will be shown to you in
a fashion similar to those shown in figure 4. The ‘Payable Batch Report’ item has been
hi-lighted. The “?-Enter” option has been invoked. And Figure 5 shows the several
‘help’ options that are then available.
Figure 4 - Sample Menu and Help Navigation
The ‘Help Options List’ can be seen in Figure 5. It is the ‘Box’ providing access to your
choice of four help documents or the ‘Exit’ of the Help function. Choose any of these 5
lines by using the ‘up’ or ‘down’ arrow keys to move the pointer (=>) to the line you
want. Then press ‘Enter.’
Most menu help functions will provide 3 or 4 document options. Numbered (179)
options will generally NOT be specific to the selection line per se, but will rather talk
about the menu you are on in over-all terms. “The purpose of the Accounts Payable
reporting menu is to…” Coded (AP1*C*21) documents will be specific to your menu
selection. “This selection will produce an Accounts Payable Batch report which…” The
‘Menu Instructions’ selection will provide you with a brief ‘recap’ of menu navigation
commands we are describing here. And lastly, the ‘Execution Specification’ option
should always be in your list. You may not find this one very interesting as a help
resource per se. A sample of one such ‘Execution Specification’ is shown in the
background of Figure 5. These help displays are present primarily for the benefit of
‘Help Desk’ people in the event you need to call for further assistance or to report
problems. Your local system administrators may change the ‘on-screen words’
associated with a menu selection, and thus technical personnel we may not be able to
recognize what process you are talking about. The ‘Executable’ information eliminates
possible confusion and also provides other information as to the circumstances of your
run.
Figure 5 - Help options available re 'Payable Batch Report'
When you are finished using the ‘Menu Help’ function, move the pointer (=>) to the
‘Exit’ line and press the Enter key. You will be returned to the menu where you started.
B)
Command Mode – The Dot (.) command.
Sometimes, while in a menu, users will want to do something, which is not an option on
their menu, but neither do they want to leave the menu they are on.
Perhaps you want to study COD (Cash on Delivery) purchases, in preparation for credit
negotiations with some suppliers. You may have navigated up and down menus, and
found the report which gives you the purchases listings in the format you want. But in
order to run the report you need to know the system ‘Terms Code’ for COD receiving.
You could exit the menu, navigate to the Accounts Payable Tables menu, where a ‘Terms
Table List’ option exists. But then you would have to re-navigate to the reporting menu
where you started.
The ‘Command Mode’ capability, together with a little experience with the system, gives
you an easier way. You could simply type “.SORT TERMS-TABLE” right in the middle
of the A/P reporting menu. The dot (‘.’) character invokes ‘Command Mode’ and the
‘SORT TERMS-TABLE’ command is a valid reporting command. You will see the list
of the Terms Code Table without ever having to leave the reporting menu.
The ‘Dot’ command can be invoked anytime from any menu. Clearly, taking advantage
of ‘Command Mode’ requires experience on the part of you, the user. You have to have
know how to enter commands. There are a very large number of commands that can be
used in conjunction with the underlying (UniVerse) database. It is clearly beyond the
scope of this document to provide that level of training. Interested users should consult
the “UniVerse User’s Guide” available for download at the IBM web site http://www01.ibm.com/software/data/u2/pubs/.
It should be noted that Command Mode preserves and enforces you ‘Security Profile’. It
will let you access directly, anything which you could equally well access from any of
your authorized menus. It will not allow you to access procedures or data to which you
have not been granted access.
C)
Calculator – The Plus (+) Command.
Just as the ‘Dot’ command can be invoked anytime, from any menu, so can the Plus (+)
command be used to access the ‘Calculator.’ The calculator is not intended to be the
most powerful available. It does however offer some unique capabilities as follows:
• It is accessible via a single key stroke (the Plus key.)
• It offers not one, but 20 memory locations.
• The memory locations are not transient – They will still be there the next time
you invoke calculator, even if that occurs in a subsequent session.
• Certain UniVerse-specific tools are included – Internal/External conversion of
Dates and Times.
• Several useful constants are pre-loaded into memory locations for easy access.
• It offers ‘built-in’ help instructions.
When the calculator is invoked, it will appear something like show in Figure 6. Typing a
question mark (?) accesses a complete guide to its capabilities. Within the guide, use the
‘Enter’ screen to advance through its successive screens. The pre-loaded constants are in
memory location 17 thru 20. These are (17) the Fibonacci number, included mostly for
fun, (18) ‘e’ then natural log base, (19) ‘π’ pi, the geometric ratio, and (20) the number of
days in the year. Use the calculator 'F6' command to set precision to 6-decimal floatingpoint precision to see these (and other) numbers in greater detail.
Figure 6 - The Desktop Calculator
D)
Ad Hoc Query Tool – The Minus (-) Command.
Users with sufficient security can, at any time from any menu, access the build-in ad hoc
query tool called ‘Easy Query’, or simply ‘EZQ’. To do so, you need only to hit the
minus (‘-‘) key. EZQ is a very powerful report creation tool which allows you, the user,
to ‘invent’ several kinds of reports. You can define On-screen Listings, Printed Reports,
and even Spreadsheet Objects. Data can be extracted from virtually any database table
(you are authorized to use) and tabulated, sorted, and displayed in a myriad for formats.
The Query tool is such a significant feature of Screen Driver that it has it’s own chapter
in this user manual. See Section VIII for complete information.
E)
Ticklers – The Asterisk (*) Command.
In section III-E-3-c of this manual, where we discuss the data-entry processes of this
system, you will see that sometimes there are processes whereby ‘Ticklers’ can be
created. A ‘Tickler’ is just a message or reminder, and it is usually created in conjunction
with some data entry operation.
For example, if you have a customer on the phone, and you are entering a new charter
order for him, and during that conversation the customer says he wants to talk to the
driver on a recent charter, you would under normal circumstances try to transfer the call.
If that driver is not available, you need to get a message to him to contact the customer.
The Tickler processes let you do that via the system.
As described in III-E-3-c, you would make a ‘link’ right from the screen in front of you,
(The Customer Maintenance Screen) to ‘Journal/Tickler’ processing. There you would
create a new ‘Tickler’ with an addressee of ‘the driver’ and a due date of ‘yesterday.’
The next time the driver signs onto the system he will, during his sign-on process, see a
message that a tickler item exists requiring his action. When he gets to his startup menu,
he will process his Tickler items by hitting the asterisk key.
Just as that driver must be responsive to his tickler tasks, so must you be. In other words,
you must hit the asterisk key from time to time to see and act upon your notices. It is a
good idea to check for your ticklers several times throughout the day. Even if you had no
ticklers assigned to you at the time you signed in, new ones may have occurred since that
time.
When you hit the asterisk key, any ticklers addressed to you will come up automatically.
Figure 7 shows what such a notice might look like.
The important fields to notice here are the two option fields – ‘Task Complete’ and
‘Mission Complete.’ The ‘Task Complete’ would mean ‘Yes I checked.’ The ‘Mission
Complete’ would mean, ‘Yes we got the check.’
Through these two option fields, you basically have three options:
• If you hit the Cancel button, or if you hit the ‘Save’ button with both of these
indicators still set to ‘No’, then you will leave the tickler unprocessed. You will
see it again the next time you check Ticklers.
•
If you indicate the Task is complete, but the Mission is still not complete, then the
system will want to now what should happen next. This process is described
below.
•
If you indicate that the mission is complete, then the task is closed and becomes
part of the history of any and all referenced items.
Figure 7 - Typical 'Tickler' Screen
Dealing with the case where the task was done, but the mission is still open, Figure 8 is a
typical list of ‘task names’ where you can choose what should the next task be. You will
need to bring your business judgment to figuring out what the answer should be. Some
resources that might help you decide are on the ‘Tickler’ screen itself, via the ‘Links’
menu. You can look at (1) the History of this tickler, (2) You can look at the items this
Ticker makes reference to. I.e. you can directly look at the records for Tdesc item (Bus
number) 3041 and/or look at the records for Customer number 18. Or (3), you can look
at notes others may have made on this tickler, or even make notes of you own on it. Our
selection in Figure 8 indicates the next task regarding this mission will be to again
attempt to verify receipt.
Figure 8 - What is the next task.
Once we have defined what kind to Tickler to create for the next task, The system will
need to know to whom it should be addressed, and when it should become active. Figure
9 shows the window in which you can provide these answers. By default, this ‘next task’
ticker will be address to yourself with a due date of 8:00 a.m. tomorrow. But all of these
defaults can be changed. If the mission needs to be escalated, you can change the
addressee to your boss. If there is no basis for expected action by tomorrow, you can
defer the tickler resurfacing by extending the due date, etc. Be sure to provide the next
addressee Instructions and Info fields to help make his job a little easy.
Figure 9 - Next Task Addressee
III)
Operating Data Screens - The 'SCREEN' Method
A key aspect of all business operations is ‘data entry.’ All the processing, analysis, and
reporting tools in the world are useless without comprehensive, accurate, and integrated
data. Accurate data, centrally-accessible by all of the parties with a need to know is
critical to business.
The ‘Screen’ method is the key tool for data-entry into the Norse system. Like ‘Menu’
behavior, all ‘Screen’ behavior is standard. Once you learn the methods for operating
one set of these data screens, you will be able to run them all. There are several types of
‘Screen’ objects as follows:
• Type ‘F’ – Always the first screen for a data entry process.
• Type ‘Fn’ – Always a sub-window of an F-Screen for over-flow data fields.
• Type ‘W’ – Always a sub-window of an F-Screen for ‘Spreadsheet-Like’ data.
• Type ‘L0’ – Always a sub-window of an F-Screen Major sub-categories of data.
• Type ‘Ln’ – Always a sub-window of an L0-Screen for ‘Spreadsheet-Like’ data.
Some Examples:
When a data entry process is first invoked (chosen from a menu) the process always starts
with a Type ‘F’ screen. Figure 10 shows what this screen looks like in the case of
‘Inventory Maintenance.’ Sub windows are always accessed via the F-Screen ‘Links’
menu.
Figure 10 - Type 'F' Screen for Inventory Part data entry
Figure 11 below shows a ‘W1’ type of screen, linked from the F-Screen in figure 10
above. Note that this ‘W’ type of sub-window is ‘Spreadsheet-like’.
Figure 11- Type 'W' Inventory Part sub-window of Warehouse quantities
As another example, Figure 12 shows the first (F-Type) window for maintenance of
records in the ‘Customer File’ and Figure 13 shows one of its sub-windows, a simple ‘F1’
type for over-flow information which is not spreadsheet like.
Figure 12 - Type 'F' Data Entry Screen for the Customer File.
Figure 13 - Type 'F1' Overflow Screen for Cusotmer Credit fields.
For completeness, lets look at one more ‘set’ of data entry screens. Figure 14 shows
three separate Screen Types on one desktop. In the upper left, we started Purchase Order
data entry for PO number 43. From that window we did a ‘Link’ to the Purchase Order
Lines window, an ‘L0’ type screen. From that window, we in turn did another link, to the
receiving window – an ‘L1’ spreadsheet-like sub-window of the purchase order line item
showing (potentially) multiple lines of receiving occurrences.
Figure 14 - A Screen 'Tree' of Type 'F', Type 'L0', and Type 'L1'
These window type descriptions may at first seem a little confusing, but these 5 types are
all there is. Further, you may be able to operate these windows just fine without
appreciating some of the subtle distinctions between the types. The key things you do
want to notice are just (1) whether there are ‘Key’ fields, (2) If I am in a ‘key’ field, “Is
the word ‘NEW’ shown”, and (3) am I in a ‘Flat Screen’ or a ‘Spreadsheet-like’ window.
When you first start a data entry process, you will be in an F-Screen and there will be a
record key field, and there will be a browse button.
If you were in an F-Screen, and you did a link, and you are not now in a Spreadsheet-like
window, then you have to know whether or not record key processing is in vogue. You
may either be in an L0 window (where record key is an issue), or you my be in an FnScreen (where record key is not an issue.) The thing to look for is the big ‘Browse’
button near the first field. L0 screens have it, Fn screens don’t.
If you are in a ‘Spreadsheet-like’ window, it doesn’t matter if it is a ‘W’ type or and ‘Ln’
type. They both operate exactly the same way, and neither ever has to worry about
record keys.
A
Item Key Fields
The idea behind the record key issue is really quite simple. Every record in every data
base table has a key. In the Customer File, the key is the Customer Number. In the
Invoice File, the key is the invoice number. In the Accounts Payable file, there are two
parts to the key. The first part is the SupplierNumber and the second part is the
Supplier’s Invoice number, but it is still just one key. In some files the record key is a
just a simple numeric integer, like invoice file. When we create a new one, it’s key is
‘one-greater’ than the last one we created. In other files may use abbreviations as codes,
and when we need a new one we have to make one up.
1
Old Items
If you are doing data-entry work on some business table, then there are always two
possibilities. The record (or item, or file, or folder) you need to work with is either
already on file, or it is not. When in doubt, always presume it is already ‘on-file’ and try
to retrieve the ‘old item’ for changes. If, for example, you are dealing with ‘Customer’
records, and you create a 2nd number when one is already on file, then by doing so you
will create a “Business Problems.” Your enterprise will not be able to manage pricing or
credit terms correctly, if the customer calls in a address change, the chance are one or the
other customer numbers would get changed, but not both.
There are two ways to retrieve a record already on-file. If you know the ‘record key’,
you can simply enter it, if you don’t, click the big ‘Browse’ button next to the ‘record
key’ field(s) and look it up.
In the case where you know the record key, in most circumstances simply typing in the
key value is completely straightforward. Just type the key into the field, then press
<Tab> or <Enter>, and the record will load into your window. About the only wrinkle
that will change this is if the table in question uses a multi-part key, but this is also simple
and straightforward. For example, Accounts Payable invoices may be filed first by
Supplier number and then second by specific Invoice number. In such a case, the
maintenance screen simply has two fields – the first ‘Supplier Number’ and the second
‘Invoice Number’. Type in the first field, hit <Tab> or <Enter> to move to the second
field, then type in the second part and hit <Tab> or <Enter> again, and the record will
then load.
In the case where you do not know the key of the existing record Screen Driver provides
a powerful search tool to help you find it – The ‘Browse’ button.
What happens when you use the ‘Browse’ button depends on some circumstances. In the
case of little tables, a list of all the records on-file may just pop up in a list window. This
is called a ‘Candidates List’ and you can choose the one you want to maintain, simply by
clicking it. In the case of larger tables, the Browse process will entail two windows, the
first being ‘Search Criteria’ and the second be the ‘Candidates List.’ You can go back
and forth between these two windows any number of times until you find the record you
want to retrieve for maintenance.
Figure 15 - Sample 'Browse' Search Criteria window.
When using a ‘Search Criteria’ window you should keep a few things in mind:
• ‘Less is More.” Just like when you are browsing the Internet, there is a
tendency to try and type a search value or phrase, which is very specific to
what you are looking for. When you do so, you often get ‘Cannot find any
such thing.’ Typing less improves your odds, but risks returning candidate
lists that are untenable. You may need to try several different approaches.
• ‘Field Specific Match Criteria’ -- Unlike Internet browsers, Screen Driver
usually allows you to associate your search value with just one part of the
table. See figure 15 as an example. The browse will return candidates where
the first two digits of Customer Number are ‘18’ but will not clutter up the
candidate list with items that have 18… Invoice numbers, or 18… Patron
numbers etc.
• ‘One Search Value at a time.’ – Although planned for future releases, the
Screen Driver ‘Browse’ method does not, as of this writing, support using
multiple ‘Field Specific’ match criteria concurrently.
Figure 16 - Sample 'Browse' Candidate Window.
A few notes about the Browse ‘Candidates List’ windows are in order.
• In the sample window shown in Figure 16, the candidates ‘sort sequence’ may not
seem obvious. The sequence in this example is Customer Number, Departure
Date 2-digit Year, and Departure Date Month. Most of the time the lists will be
less confusing, but the point is, “before you jump to the conclusions that what you
are looking for is not within the list, think closely about what the sort order may
be.
• Record keys (Quote Numbers in this case) are not necessarily all unique.
Although rare, in some instances non-unique keys might appear. In other words
the same record key may appear more than once in the candidate list. This
happens when some database indices are constructed to search multiple fields at
the same time, and where the search value occurs in more than one field. In the
Criteria window shown in Figure 17, the Search field ‘SoundexWords’ looks for
matches in First Name, Last Name, and Parent/Guardian name fields. Student
numbers may in these instances be listed once for one field (Student Last Name)
and again for another field (Parent Last Name.)
• Soundex search criteria are supported and are frequently available. This feature
helps find items that may be filed with misspellings.
• Case Insensitivity. If you search for ‘smyth’ and find no matches, don’t waste
your time looking for ‘SMYTH’. The first search would have already reported
anything on file in either upper, lower, or mixed case.
• ‘PhoneX’ Convention. This word, with this ‘mixed-case’ spelling, may be found
in many database table search criteria windows. Files such as Customer,
Supplier, Student, Employee, etc. which contain ‘Phone Number’ fields, are
usually indexed on the last four digits of these phone numbers. This ‘PhoneX’
•
word is your clue on how to use it. This is another example of a browse scenario
where the same key may appear in the candidate window more than once.
Non-evident matches. Looking at the examples in Figures 17 and 18, it is evident
why most, but not all, of the candidate items were selected. Student numbers
30644 and 31032 do not appear to be a matches for ‘smyth’. All that is going on
here is that it is not possible (in reasonable window widths) to show all the
columns of data that are on file. In this case ‘Smith’ is a guardian name for 30644
and ‘Smythe’ is a guardian for 31032.
Figure 17 – Student Browse - Another sample 'Browse Criteria' window.
Always be aware of the ‘Status’ line at the top of any of your browse candidate windows.
In figure 18 this is the line that reads “Status 3 – Reached end of matching items – 40
matches.” Candidate ‘Pages’ are limited to 100 items at a time. Also pay notice to the
vertical scroll bar on the right side of these windows. You may need to scroll up or down
to see the entire candidate listings on your current page. You can use the ‘Next’ and
‘Previous’ buttons to navigate through an unlimited number of these index pages.
Figure 18 – Student Soundex Matches for 'Smyth'
There is an interesting wrinkle that can happen with browsers. Consider the situation
shown in Figures 19 and 20. We have entered a maintenance function for
‘MechanicFile’, which is a “sub-set” of the ‘EmployeeFile.’ When we click the browse
button, the system pops up the question window (Fig. 20.)
What is going on here is the ‘Sub-set’ factor. There may be thousands of records in the
EmployeeFile, dozens of whom are already in the Mechanic file. There are two possible
‘intents’ of your browse. (1) You may want to retrieve one of the employees who is
already in the MechanicFile, perhaps just to change their costing rate, or (2) you may
want look up an Employee who has just become qualified as a mechanic, so you can
create the NEW Mechanic record.
Screen Driver allows you to do either search, depending upon how you respond to the
Question window. Click ‘Yes’ and you will browse the smaller list of Employees who
are already Mechanics. Click ‘No’ and you will get a search of the entire EmployeeFile,
probably starting with a Criteria window.
Figure 19 - Browsing for 'Mechanic'
Figure 20 - Mechanic Browse - Interesting Question
One last note about the ‘Browse’ – It is very efficient. In some technical environments,
where many users are transacting operations against an integrated corporate database,
users are asked to use search services sparingly. Lesser tools are ‘resource intensive’ and
can bog systems down, sometimes even slowing down the entire company. This is not
the case with Screen Drivers browse. It can routinely search tables of hundreds of
millions of rows, without consuming significant resources. Failing to use the browse tool
sufficiently is much more likely to be detrimental to the enterprise. The highest priority
is to assure we do not create duplicate records.
Once you retrieve your ‘Old’ item for maintenance, either through entering its record key
or by browsing for it, the maintenance window will change. The ‘Exit’ button will
become disabled and the ‘Save’ and ‘Cancel’ buttons become enabled. You may make
and ‘Save’ changes, or you may ‘Cancel’ updates of that particular record, but you must
do one or the other, before you can then ‘Exit’ the maintenance application.
It is a good idea to avoid holding a maintenance item open for any unnecessary amount of
time. Once those ‘Save’ and ‘Cancel’ buttons are enabled, do what ever you need to do
and then move on. Understand that this is important even if you are the only person in
the whole company who maintains this particular table. In the case of a Customer table
for example, even though you are simply corrected the spelling in a customer name,
while you have the record open you may be preventing sales from being able to book a
new order from that customer, or blocking accounting from processing a payment they
have sent in.
On the Menu Bar, pay attention to the ‘Links’ item. Many (perhaps most) maintenance
screens have one or more link selections leading to other maintenance windows, or to
‘services’ available relative to the item you then have in process.
2
New Items
Once all efforts have been exhausted to assure that your Customer, or Invoice, or Student
etc. does not already have a number in the Database, you will need to create a new
record. All files have record numbering, or naming, rules which lead us to just a few
possible situations. Either (1) new records are given computer-assigned number as
record key, or (2) records are given codes you enter as a record key, or (3) some
combination of the two.
In the first case, sequentially numbered files, the word ‘NEW’ will automatically appear
in the record ‘key’ field as soon as you open then maintenance window. All you need to
do is hit <Tab> or <Enter> and your new item will be automatically created and assigned
a number. In the second case, where a ‘code’ is the record key, simply type the new
code into the key field and then hit either <Tab> or <Enter>. Your new record will be
created. In the last case, more complex multi-part record keys, these same methods still
work. Enter the keys part(s) which are codes, and then hit <Tab> or <Enter> on the key
part. If a part of a key says ‘NEW’ just hit <Tab> or <Enter> and your new record will
be created.
Figure 18 - Sample Maintenance Screen - Inventory Part
When we say, Screen Driver will create the new record for you, we should be clear – a
skeletal record will indeed be created with your record key, but that record will very
likely not conform to all the business rules it must satisfy in order that it may be filed
back into the database. To begin with, most new records in any table will have at least a
few ‘Required Fields.’ Screen Driver shows ‘Required Fields’ with a yellow Hi-Lite
background. Figure 21 show that 4 fields are required to establish a Part Number – The
‘Description’, the ‘Class’ (Raw Material of Finished Goods), the unit of measure for
stocking/pricing this part (Each, Pounds, etc.), and lastly the Standard Cost valuation per
unit.
Note that there are four fields on this Maintenance window which have a light-blue HiLite – Times Ordered, Average Cost, Total Receiving Volume, and the date when this
part number was last on a customer sales order. The blue background means the data
elements are calculated by other aspects of the systems and cannot be maintained via the
data-entry window.
The remaining fields on this data window, those with a normal white background should
probably not be called ‘optional’, but more like ‘As Appropriate.’ If the Part Number is
class ‘Finished Goods’ and it is available for sale on Customer Orders, then business
sense tells us it really should have a ‘Price Table ID.’ On the other hand, many parts in
this application are ‘Raw Material’ class parts, are not available for sale, and thus it
would be a waste of time to try and assign them a ‘Price Table ID’
To recap: Yellow is Required, Blue is non-maintainable, and White is ‘as-appropriate.’
B
Entering Data Into Fields
The sample maintenance window in Figure 21 also demonstrates the several ‘kinds’ of
data fields that Screen Driver uses. These field types are very much normal Microsoft
Windows fields types -- Text Boxes, List Boxes, etc. These should be comfortable to
most users. Before discussing the field types individually, please note that the “Copy
and Paste” operations are dependant on your AccuTerm ‘Settings’. This manual assumes
that your AccuTerm->Settings->7-Keyboard->CopyPaste-Shortcut is set to “Ctrl-C/CtrlV.” (You can also set AccuTerm to do copy/paste functions using the Ctrl-Ins/Shift-Ins
method, which works equally well, but we do not advise choosing a setting of ‘none.’)
For users who are not familiar with Windows copy/paste functions, without benefit of an
‘Edit’ menu, the procedure is to:
• Go into the window where the ‘Copy’ text already exists
• Select the copy text using the mouse,
• Press Ctrl-C on the keyboard to cause the ‘Copy’ to occur,
• Go to the location in the target window and position the cursor where you want
the paste,
• Finally, Press Ctrl-V on the keyboard to cause the ‘Paste’ to occur.
1
Simple Text Fields
The simplest type of data-entry field is the ‘text box.’ Examples of ‘text boxes’ seen in
the Figure-21 sample screen are (1) the Part Number field per se (the Key field), (2) the
(Product) Line field, (3) the Original Manufacturer field, etc.
You navigate into these fields either by clicking in the box, or by ‘Tabbing’ into them
from earlier fields. Once in a text box field you enter data either by typing or pasting.
Once the data in the text box is correct, you exit the field either by hitting <Enter>, or
‘Tabbing’ down to later fields, or clicking on some other control.
You should be aware that Screen Driver potentially does ‘Field Default’ type operations
when a Text Box (or other field type) ‘Gets Focus.’ Similarly it potentially does ‘Field
Validation’ type operations as fields ‘Lose Focus.’ In either of these modes, these
‘Business Logic’ operations may require that you re-do something, or do things in a
different order, etc. On-screen messages will provide clear guidance.
There is one aspect of changing a ‘Text Field’s content which can be a little tricky. If the
field is blank and you type something in there, it’s fine. Similarly, if the field has
something in it already, and that ‘something’ is wrong, changing it is also OK. But if the
field has something in it already, and the field should become blank, then you’ll see the
wrinkle. If you simply delete all that characters in the box and then press <Enter>, then
Windows will report (to the server) that you entered nothing. And the servers treats ‘you
entered nothing’ as ‘no-change.’ I.e. the erroneous data will persist. The trick is “Type
in two spaces.” Screen Driver will recognize this scenario and will not store the spaces
but rather cause the field to become blank.
2
Multi-line (Text) fields
In the Figure-21 Sample maintenance window, Part Description is a good example of a
multi-line text field. As the name and shape imply, you are free to type free-flowing text
into this field. Punctuation is allowed including commas, semi-colons, stars, ampersands,
dashes and periods. Note however that these types of fields do not sustain formatting
operations. A <Tab> or an <Enter> will neither indent nor advance to the next line. Both
will instead advance you to the next field in the maintenance window (in this case the
‘Class’ field.) Multiple consecutive spaces are discarded a field-storage time.
3
Multi-line (List) fields
In the Figure-21 sample maintenance window, the field labeled ‘Substitutes’ is a good
example of a multi-line List field. In this case the list is a list of other part numbers,
which can serve as stand-ins for this one. In other types of maintenance screens, you will
often see List Type fields for things like ‘Address Lines’, ‘Phone Numbers’, ‘Email
addresses’, etc.
Note that in Figure-21 the ‘Description’ multi-line Text field does not have any lines
within the field. By Contrast, the ‘Substitutes’ multi-line List field does. This is how
you can distinguish Multi-Line Text fields and List fields.
When entering several lines into any such field, the normal routine is to use the downarrow key to advance to the next line. You can of course also position to a line with the
mouse. All of the normal Windows editing tools work including copy/paste.
While in a Multi-line List field, you can get access to ‘line manipulation tools’ via a
right-mouse click. Just point to one of the lines in the list, right-click, and a pop-up menu
will allow you to ‘Append’, ‘Insert’, ‘Delete’, ‘Move Up’, of ‘Move Down.’ It should be
noted that in some circumstances only some sub-set of these tools will be available. For
example ‘Line Delete’ may not be allowed because of business rules. In other
circumstances, ‘Move Up/Down’ options may not be present if the list will be computerre-sorted every time it is saved.
4
Option Fields
In Figure-21 the ‘Class’ field (‘R’aw Material type part or ‘F’inished Goods type part) is
an example of an options field. Another example is the ‘Cash Refund’ (‘Y’es or ‘N’o)
field. These option fields are completely normal Windows options. They are usually
manipulated with either the arrow keys or with the mouse.
C
Fields with Browsers
Earlier in this section we discussed using the big ‘Browse’ button in conjunction with
‘Record Key’ fields, to look-up the item we need to maintain. The same concept applies
to helping you look-up the correct codes to be used in some of the other fields. Field
Browsers can be seen in Figure-21 for fields ‘Line’, ‘U/M’, ‘Comm Grp’, ‘Price CD
Table’, and ‘Substitutes’. The Field Browse Buttons are the small [>] buttons behind
these fields. To use the field browsers to help you look up codes for these fields, you
simply ‘click’ on these buttons.
The Field Browsers function just like record browsers. They actually use the same
methods. This means that all the variations described above are possible. You may get
only a ‘Candidates’ window, or you may get both ‘Browse Criteria’ and ‘Candidates’
windows. It also means that all the instructions provided above, work equally well here.
If you get only a ‘Candidates’ window, just double-click the appropriate line and the code
will be entered into the data field for you. If you get a ‘Browse Criteria’ window, then
enter some search criteria that will enable the system to give you manageable sized
candidate list.
It is worth noting that Screen Driver’s behavior in regards to browsers is dependant upon
file sizes, availability of secondary indices, and the existence of browser definitions
provided by the application. The browsers will always work, but the way they work one
day may not be exactly the same way they work another.
One last comment about fields with browse buttons. Some of them may not be browsers.
Application programmers using Screen Driver have the option of substituting special
subroutines in lieu of browsers so you may see behavior that is different from out
descriptions.
D
Spreadsheet-like windows
As described at the beginning of this chapter, there are two basic forms of Screen Driver
maintenance windows. The ‘header screen’ type form as described at length above and
in Figure-21, and the Spreadsheet-like windows.
Technically, there are three variations on the header form, (1) the ‘true’ type-F screen, (2)
the F-screen overflow type (Fn), and (3) the embedded line-item header (L0) type. All
three variants behave exactly the same way. The only difference worth mentioning is
that the ‘F’ and ‘L0’ types have record keys with keys browsers and the ‘Fn’ has neither.
Operationally, there are no differences.
Figure 22 - Manager Table Maintenance
The 2nd major category of window types is the ‘Spreadsheet-like’ windows. Technically,
there are two different types, the ‘Wn’ and the ‘Ln’, but again operationally they are
identical so we’ll make our comments and instructions Generally.
Figures 22 and 23 show maintenance windows for a ‘Manager Table’ application. Figure
22 is a type ‘F’ window as described earlier, and Figure 23 is an associated (Linked)
‘Spreadsheet-like’ window for this Managers Contact Information.
The information within the ‘Spreadsheet-Like’ window is fully maintainable (depending
upon programmer provided privileges) just like the fields in the ‘F’ window type.
Required fields (Columns) are shown with a yellow Hi-Lite. Unchangeable field
(Columns) are show with the light blue back-ground.
You enter data into the ‘cells’ of these tables exactly as you would into a ‘field’ of a 'flat
screen.' All normal ‘Windows’ tools are available to you including copy/paste functions.
Note that ‘Default’ programs may run when you click into a cell, and the ‘Validation’
programs may run when you exit one. This simply means the system may present you
with error messages or questions as you operate, but these should always be straightforward.
Figure 23 - Manager Table 'Contacts' window.
Note that the ‘Menu Bar’ in the ‘Spreadsheet Type’ windows contains a ‘Lines’ option.
This menu selection provides access to tools that operate on entire rows within the table –
‘Append’, ‘Insert’, ‘Delete’, ‘Move Up’, and ‘Move Down.’ Most of these tools (all
except ‘Append’) require that you first select a line. To do this, you simply click the leftmost cell on the line you want to select.
It should be noted that, depending upon business rules specified by the programmer, not
all of these tools may be available. In tables that are computer sorted when they are re-
filed, the positional tools (Insert and Move tools) are not available. In other types of
tables, line deletion may not be allowed.
As with flat windows, there are often fields (columns) where field-level browsers are
available. Unlike in flat screens, there is no room for browse buttons ([>]) so instead you
access them with a right mouse click directly in the cell where you want to load a value.
This will usually provide access to just the ‘Browse’ tool, but if more than one tool is
listed, you can then choose ‘Browse.’
The Browsers per se work here the same as everywhere else. Perhaps only a
‘Candidates’ window will appear. Or perhaps a ‘pair’ of windows - ‘Search Criteria’
plus ‘Candidates.’ Either way, find the item in a candidate list and click it, and then that
code will be entered into the cell for you.
E
Using Links
On all of the F-screen windows, and frequently on other window types as well, you will
note that there is a ‘Links’ entry on the Menu Bar. This menu selection is your key to
navigating through other screens and services relative to the record you have under
maintenance. In the previous example (Manager Table Maintenance – Figures 22 and
23) the links menus was used to call up the Contacts (Type-W) window from the
Manager (Type-F) window.
The variety of ‘Links’ available from any given window vary greatly from application to
application, depending upon how the programmer constructed the application. Generally,
these links fall into one of three major categories – Sub-windows, Services, or
Attachables. To operate, simply click on the ‘Link’ menu, and drag down to which ever
link you wish to take.
1
Sub-Windows
Sub-window links allow you to navigate from the maintenance screen you are on, to
other screens related to the same database item. For example, from a Manager screen to
Manager Contact Information, or from an Inventory Part to it’s storage locations screen.
Note that when you link to a sub-window, the buttons on the sub-window will not contain
a ‘Save’ button, but rather will have an ‘Apply’ button. This is because filing a subwindow does not commit your edits directly to the database. The information within the
sub-windows is just a different part of the one database record in process at the parent
window. You can ‘Cancel’ changes on a sub-window and thus ‘Undo’ that portion of
your item edits un-applied. When you ‘Cancel’, ‘Apply’, or ‘Exit’ a sub-window, you
will automatically be return to it’s parent window. The ‘Cancel’ or ‘Save’ issue at the
Parent screen is more significant in that the ‘Save’ there, and only there, actually commits
your edits to the database.
2
Services
The ‘Link’ entries of ‘Services’ category are difficult to describe in that application
programmers can offer a myriad of options. Two types of services you may frequently
see are ‘PopInfo’ links and ‘FormsPrinter’ links.
Both of these link categories are non-updates, so you can use them without fear of
changing data inadvertently.
The PopInfo links will generally show you a summary of all the information on file
relating to the item you have in process. In other words, you’ll be able to see information
from the entire sub-window tree without actually having to Link to those sub-windows
individually. In many cases these links will show you information, related to the item in
process, for other files as well. For example, form a ‘DriverMasterFile’ screen, a PopInfo
link might show you a good deal of information from the ‘EmployeeMasterFile’ allowing
you to see a good deal more information than that which is maintained in the Driver
record alone.
The ‘FormsPrinter’ services you may find as ‘Links’ again vary widely depending upon
what the application programmer has provided. From a ‘Vehicle’ screen, you may be
able to print the vehicle record in-process directly onto the State’s ‘Registration Renewal’
form. Or from the Purchase Order screen, you may be able to print the PO you have just
created directly onto the company’s letterhead.
All of the ‘Service’ type links available from one a maintenance window will return you
back to that same window once the service process is completed.
3
Attachables
The third ‘Link’ category is ‘Attachables’ and within this category there are three
different kinds of things which might be ‘attached’ to the record you have open for
maintenance. In all three sub-categories, you have the option to both look at items
already attached, or make new attachments of your own.
a
Notes
The simplest form of an item attachment is called an ItemNote. The ‘Link’ to Item notes
will always be through a subroutine type link to ‘NotesManager.’ When you click on this
link, you will see a ‘Notes Index’ window similar to the one shown in Figure 24.
Figure 24 - Item Notes Index.
In this example we took an ‘Item Notes’ link from a ‘SupplierFile’ maintenance screen
where we had already retrieved supplier number 21 for maintenance. As you can see in
the Note Index window, this supplier has not one, but two notes attached – Note Items
100 and Note item 107. To ‘See’ or ‘Edit’ the specifics of either of these notes we need
only to click one of these note numbers. Figure 25 shows the details of Note Item 100.
Figure 25 - Detail Item Note
As you can see the ‘Note’ detail contains a Title, a note Text area, a History list, and a
‘Where Used’ list. You are free to edit both the Title and the Note per se, however the
History and Where used are maintained automatically by the system. The History tells
you all of the people who have made changes to this note item. The ‘Where Used’ list
shows all of the database tables, and table items, which have an attachment to this note.
If, as is shown in this example, a note applies to more than one record in the database,
then each of the items to which it applies must be maintained to reflect the attachment. In
this case, we did maintenance on the ‘EmployeeFile’, Browsed for or otherwise loaded
Employee number 101, went to ‘Links-Notes Manager’ and used the ‘Attach’ option on
that records ‘Note Index’ screen, and then attached Note 100 to that employee. This
process was then repeated for Employee number 203. Then we entered maintenance for
the InventoryFile, part number 98761223 and did the same thing there. The ‘Where
Used’ list is thus automatically built by the system.
The ‘Auto Alert’ check box allows you to flag notes that may be critically important.
This has the effect of automatically alerting maintenance operators throughout the
enterprise of important situations. When you enter maintenance for any item with an
Auto Alert message attached, you will be immediately notified. In other words, If we
were now to enter Employee Maintenance, and either browsed for, or directly entered,
Employee number 203, we would see a notice as shown in Figure 26. When you see
such a notice, just click the OK button and the Maintenance Screen you are loading will
then load the record requested. Once the record loads, you should generally immediately
to the ‘Link’ to Notes manager and read the details of that particular note.
Figure 26 - An Auto Alert Notification.
b
Objects
The next form of ‘Attachables’ is simply called ‘Objects’. These are basically Microsoft
files. The system currently supports uploading, storing, indexing, and attaching objects
with ‘File Type’ extensions as listed below.
SORT ObjTypes 03:59:05pm 29 Jan 2009 PAGE
1
Obj. Description............... Default....... MSOfficeOpen... OpenOfficeOpen.
Type
Obj Library...
AVI
BAS
BMP
DOC
ITM
JPG
PDF
RTF
TXT
XLS
Video Clips
uniVerse Basic Programs
Bit map images
MS Word Documents
uniVerse Dynamic Item
Digital Images
Acrobat Document
Rich Text File
Simple text documents
XL Spread sheets
ObjLibrary
iexplore.exe
iexplore.exe
ObjLibrary
ObjLibrary
paint.exe
winword.exe
sdraw.exe
swriter.exe
ObjLibrary
PDFLibrary
iexplore.exe
AcroRd32.exe
iexplore.exe
AcroRd32.exe
ObjLibrary
ObjLibrary
ObjLibrary
wordpad.exe
winword.exe
excel.exe
swriter.exe
swriter.exe
scalc.exe
The access and manipulation of objects is very similar to that of ItemNotes. When an
item is loaded for maintenance, you access the Link which is associated with the
Subroutine ‘Attachables’. An Object Index will appear similar to the one shown in
Figure 27.
Figure 27 - An index of 'Attached Objects'
In this example, we have loaded and item for Maintenance, in this case an ‘ScrForm’
definition for a form named ‘NYS-MV-82p1’. (‘.jpg’ type objects, attached to Forms
definitions in Screen Driver, have a special use – They are ‘print overlays’.) As the
‘Caption Line’ in this example says we have four options (1) left click the ‘152’ to
download/view the object, (2) left-click ‘NEW’ to upload, index, and attach an new
object from your PC, (3) left-click ‘Attach’ to associate an already server-resident object
to this item, or (4) right-click the ‘152’ to detach it from this form.
The ‘New’ object upload process starts by spawning a browse function against your PCs
file system so you can select the DOS file you want to send/attach. The process looks
something like that shown in Figure 28.
Figure 28- Object Upload Browser
Files are stored on the corporate server using DOS ‘Short Names.’ When you select an
item in this browser, it will be uploaded automatically. If an object with the same DOS
Short name already exists, you will be asked if you want to over-write the file already on
the server. If you are asked if it is OK to over-write the existing server object, be sure
that you know if it is indeed the same file.
As soon as the file upload finished, the server will automatically create and index record
for it, and ask you to type up a description of the object so it can be found later on by the
server browsers. A sample ‘Object description Entry’ window is shown in figure 29. If
you want to attach this same object to some other item at a later date, you may not
remember its object number. The ‘Attach’ function (figure 27) will ask you what object
you want to attach. One of the lookup options there is ‘Key Word’ and the works you
type here will be available for matching.
Figure 29 - Text Entry Window for Description of an uploaded Object
c
Ticklers and Journals
The last type of Screen Driver Attachable is the ‘Journal/Tickler’ entry. The ‘Link’ item
for these ‘attachables’ is always done via the ‘JournalManager’ subroutine. Just as with
‘ItemNotes’, and ‘Objects’, the process begins with an index window similar to the one
shown in Figure 30.
Figure 30 - Jorunal/Tickler Item Index.
As the name suggests, Journal/Tickler attachments are more ‘Action’ oriented then the
other Attachables. The are two kinds of entries, (1) the Journal or Log, which allows you
make notes as to some action which has already happened relative to the Item you have
open for edit, or (2) a Tickler entry, which allows you to create a reminder to yourself, or
to someone else, that at some future point in time something should happen. In the first
case, you click the word ‘NewLog’ and in the later case you click the word ‘NewRem.’
Entering a ‘NewLog’ will produce a very simple screen like the one shown in Figure 31.
These ‘Log’ type entries become a part of our records relative the Accident in question.
Note that there is no option to ‘delete’ either Log type entries or Tickler type entries.
Figure 31 - Entry of a Journal/Tickler 'Log' Type Entry.
If you click on ‘NewRem’, to create a Tickler, the entry screen is a little more involved as
shown in Figure 32. In addition to the Title and ‘Mission’ statement, you will need to
define the person (User ID or Department) who should be acting on this Tickler, the Date
and Time when they should be ‘Tickled’ to take the action, a specific ‘Task’ they are to
perform, and lastly references or instructions which might be helpful to the ‘addressee’ in
the performance of the task. As a general rule, state the ‘mission’ as a goal-oriented
objective. There may be many ‘Tasks’ taken toward reaching the goal. You’re
immediate addressee may be frustrated at the first step – Verify Receipt. They may
process the tickler on schedule and have to record ‘Task Complete’, but mission ‘Not
Complete.’ In this case, the tickler will be rescheduled, and perhaps re-directed to
different addressees. As this sequence of goal-oriented steps are taken, the system will be
keeping, and documenting all of the efforts made.
Figure 32 - Creating a 'Tickler' Log entry.
F
Accessing 'Help'
Last, but certainly not least, you will frequently have questions while operating the data
entry and maintenance windows of Screen Driver. The mechanism for doing so is the
‘Help’ selection of the Menu Bar, on every Screen Driver screen.
Figure 32 - Maintenance Screen for 'Charter Destinations'
Consider the maintenance window shown in figure 32. Clicking on the menu bar entry
‘Help’, and then the sub-menu ‘Help’ again, produces the ‘Help Navigator’ window
shown in Figure 33.
Figure 33 -- Sample 'Help Navigator'
This simple ‘Help Navigator’ provides easy and direct access to all of the documentation
provided by the programmer, which is specific to the screen in process. The first
Column, Field, lays out the ‘Tab Sequence’ to the underlying window. This is indented
to help you relate the available help documents to the field on the window which they
address. The Amc# column displays the mapping from the On-Screen Fields, to the field
numbers within the database records where they relate. The ‘Name’ column replicates
the name of the On-Screen fields, to eliminate any confusion as to which field the help
documents relate. The last three columns, ‘Help’, ‘Spec’, and ‘DDD’ house buttons each
of which corresponds directly to document.
You simply click those little o’s to see the help text you want.
The documents available in the ‘Help’ column per se will usually be your best source of
information. These are documents the programmers typed in with the intent of answering
questions they think you might have.
The documents available under the ‘Spec’ column tend to provide technical information
about the field. You may glean helpful information by reading them, but they are there
primarily as an aid to customer support personnel. In the event you need to call for more
help, your support agent may want to know this information as to the field you are in.
The documents available under the ‘DDD’ column points to an underlying set of what is
called ‘meta-data’ - Information about the information. DDD stands for ‘Detailed
Database Definitions.’ You will find quite frequently that if the programmer did not
provide adequate explanations in the Help document, they may have none-the-less
provided it in their data schema work.
IV
Argument Windows - The 'GetArgs' method
In Screen Driver based applications, may functions offer you, the user, exceptional
flexibility to control standardized (Objectized) reports and processes. You generally do
this by specifying ‘Arguments’ or ‘Parameters’ which effect the way programs run. The
standardized method for argument entry is called ‘GetArgs.’
GetArgs appears as a window resembling a ‘Screen’ data entry window. A primary
example of a GetArgs window is the Screen Driver ‘logon window’ show as Figure 1 at
the beginning of this manual. Just a few notes are appropriate:
•
•
•
•
•
•
•
•
In a GetArgs window, you will never have a ‘Save’ or ‘Apply’ button. These
windows simply have an ‘OK’ for you to use when to have all of the fields set the
way you want them.
There is no ‘Menu Bar.’ There are only two navigational directions – ‘OK’–Go
forward, or ‘Cancel’–Go back.
‘Help’ instructions, if provided by the programmer, are available to you via a
‘Help’ button in the lower left corner of the window.
Copy and Paste functions are available but only via the Windows Ctrl-C/Ctrl-V
keyboard functions.
Field types, corresponding to the individual arguments you are entering, are all
simple ‘Windows’ standard data fields.
As with Screen windows, Required fields have a yellow background
Screen Driver browse buttons ([>]) are used in the same way they are in ‘Screen’
windows.
GetArgs sometimes uses ‘Pull Down’ lists (Which ‘Screen’ windows do not
currently use.) These are completely ‘Windows Standard.’ You simply use the
pulldown button ([v]) to access valid selections in the same fashion as the
Browse ([>]) buttons.
V
Controlling Reports
Many of your many menu selections will, of course, produce reports. There are many
kinds of reporting tools that your programmers may have used. Methods run the gamut
from ‘custom programs’ usually written to deal with specialized complex reports, to any
number more simple database ‘listing’ tools.
Many times when you select a ‘Report’ item from one of your application menus, you
will be running one of several Screen Driver unique reporting tools. In these cases, the
descriptions below should help you manipulate the reporting processes to get what you
want. In other cases you will need to use the ‘Help’ or ‘Instructions’ which the
programmers will have provided in their programs, or in ‘Application Specific’ manuals.
A
Phrase Reporting
There are actually three types of ‘Screen Driver unique’ reporting tools. The first,
discussed here is called ‘Phrase Reporting.’ The second type is ‘Format Based
Reporting’ discussed later in this section. The third is called ‘Easy Query’ (or EZQ)
which is sophisticated enough that we dedicate and entire section of this manual to it.
(See Section VIII below.)
The first category of ‘Screen Driver unique’ reporting tool is called ‘Phrase Reporting.’
This tool is designed to let you get meaningful information out of a potentially huge
database tables. It is useful to think of these database tables as huge spreadsheets. In
business applications, database tables will frequently contain hundreds of columns and
millions of rows. Without sophisticated selectivity, reporting simply produces
information overload.
There are two aspects to selectivity – Column selectivity and Row selectivity. Consider
for example the case on an Inventory File. The columns enumerate, for each part number
defined, many data attributes such as ‘Description’, ‘ProductTypes’, ‘UnitOfMeasure’,
‘Warehouse Location’, ‘QuantityOnHand’, ‘StandardCost’, ‘SellingPrices’, ‘Suppliers’,
‘Purchases’, and ‘CustomerOrders’.
First Case – Simple Report
If you have a mission that requires reporting from the ‘Inventory’ database table, then the
mission will usually suggest your selectivity needs. For example, If you want a report to
help you negotiate better purchasing of something, you will want to see only columns
like ‘UnitOfMeaser’, ‘Cost’, and ‘Purchases. Further, you will want your report to
include only Part numbers (rows) of some specific ‘ProductType’. Other columns and
rows do not want to be on your report.
Concepts:
• The columns of every database table have names.
•
•
•
•
These names are defined in a ‘Data Dictionary’ associated with the table.
Every standardized reporting ‘tool’ needs a list of column names.
A Dictionary may contain one or more Words, called ‘Phrases’ which are
themselves just lists of column names.
Phrase Reporting works by letting you choose one phase name to specify your
column selectivity.
Figure 34 - Simple Phrase Report - Inventory File
Assume that you have made a Menu Selection for Phrase Reporting of ‘InventoryFile.’
The process will start with a ‘GetArgs’ window as shown in Figure 34. There are two
arguments to specify (1) the report ‘Destination’ i.e. where do you want the report sent,
and (2) the ‘Format’ meaning, ‘Which of the defined Phrase Names (Sets of Columns) do
you want on your report. You choose your destination by clicking the appropriate Option
Box, and you choose the set of columns you want to see by selected a ‘Phrase Word’
from the drop-down list.
The Phrase Word ‘@’ should always be present and is, by definition, the default sub-set
of column names. Other phrase names you will find will vary greatly depending upon the
type of database table.
To get the report, you will simply set these two arguments to define what you want, and
then click ‘OK.’
Second Case – A little more complicated, a little more powerful
There is a second class of ‘Phrase Word’ that may sometimes exist within the dictionary
of the database table you are reporting from. These ‘Phrase Words’ are ‘Sort By’ type
phrases, and they allow you to not only control the sub-set of database columns you want
to report, but also control the order in which the rows are sorted. When you select a
menu line that calls for ‘Phrase Reporting’ against such a table, the process will again
start with a ‘GetArgs’ window, but it will be more like the one shown in Figure 35.
Figure 35 -- Phrase Report - Example 2
Again, set these arguments to define (1) the ‘Destination’ - where you want the report to
go, (2) the ‘Format’ – Which sub-set of database columns do you want to see, and (3)
How do you want the rows sorted, (or grouped.) When you are ready, just click ‘OK.’
Third Case – More powerful still – Adding ‘Row’ selectivity.
The final case of our ‘Phrase Reporting’ discussion is actually not so much an extension
of this tool per se, but rather the result of marrying it together with another standardized
Screen Driver tool call ‘File Selectors.’
B
File Selectors
File Selectors are a method Screen Driver applies to database tables, to allow you, the
user, to specify the criteria by which a sub-set of database rows can be isolated for
processing. The ‘file selector method’ is linked by application programmers to
enumerable system processes, which need to process some, but not all, of the rows of
some table. You will find File Selectors at the front of several kinds of reporting
processes. You will also find file selectors at the front of ‘processes,’ for example
perhaps selecting ‘AccountsPayable’ items due for Check Printing.
They occur anywhere in you application where you must select a sub-set of table rows.
When a File Selector runs, you will see a window, which contains the words ‘Selection
Criteria’ in the title bar and which looks something like the one shown in Figure 36.
Figure 36-- A Sample 'File Selector' window.
In this example, the File Selector is for a ‘Dispatch’ database table, where the records
(rows) define all of the assignments relative to the ‘Bussing’ jobs the enterprise must
perform. Unlike with ‘Browsers’ you can use any combination of the available fields to
very specifically define the criteria for exactly the sub-set of table records to be
processed. Further, you may frequently use multiple ‘match’ criteria, within each
selector field.
Some points to note:
• As with all Screen Driver windows, required fields are shown with a yellow
background.
• You will find that the field labels in File Selector relate directly to words in the
database data dictionary for the table in question.
• Fields where the data dictionary word is suffixed with (,) or (,s) are the ones that
allow you to specify more than one match criteria. If you want to use the
‘JobNo(,s)’ field in figure 36 example, you could enter ‘36, 48, 192’ to select
Dispatch records associated with any of those three job numbers. Spaces after the
commas are OK.
• Fields with Code Lists (for example ‘Job Type’ and ‘Event Type’ in the example)
allow you to choose multiples as well. Use Shift-Click to select ranges or CtlClick to select individuals.
•
•
•
C
Labels with ‘Min’ or ‘Max’ prefixes (for example MinDate/MaxDate in the
example) allow you specify minimum values and/or maximum values for the field
in question.
As with other Screen Driver windows, fields with ‘Browse’ buttons ([>]) allow
you to look-up codes to use for match criteria in the specified field.
Don’t be surprised if there is some screen variation. Application programmers
may build more than one File Select definition for any given database table.
Reports with 'Forms'
In many Screen Driver data entry windows you will find a ‘Link’ for Forms Printing.
Likewise you will find that many times certain of your Menu Selections correspond to
‘Forms Printing.’ In these cases, your application programmers have taken advantage of
Screen Drivers basic Form Printing methodology.
The Screen Driver ‘Forms Printing’ Tool is a powerful set of methodologies allowing for:
• Defining Background forms as Text and Lines, or
• As PCL Graphics components, optionally include bit-map images, and/or
• Either of the above in conjunction with “.jpg” image files of actual scanned
forms.
The forms printing tool further provides for One-pass data printing, allowing for the
intersection of a data record from any database table, with any given form. Auto location
of data elements onto the form is predefined as part of the form definitions. The process
is highly efficient, taking advantage of printer memory where available to pre-store both
‘.jpg’ overlay layers, and background layers, allowing page-by-page data transmission of
only the ASCII data elements.
In the case of ‘Links’ from maintenance windows, there may or may not be asked a
question as to ‘Which Form?’ In the case where your programmers have provided one
and only one form definition, relative to the file you are processing, the form and your
data will print directly to your slave printer without further question. If however, more
than one form has been defined, a list box will appear similar to the one shone in Figure
37. In this example we have linked to the FormsPrinter from a Maintenance Screen for
MotorVehicles within a fleet. FormsPrinter here is used to print Vehicle Registration
Renewal applications directly onto the States Forms. Simply click on the form you want
to print your item with, and the combination will go to your slave printer.
In the case of application menu selections that launch print ‘Batch’ jobs, for example
‘Print Customer Invoices’, or ‘Print A/P Checks’, the process will usually start with a
‘File Selector’ and then not involve any further interaction with you, the user. These
‘Batch’ type forms printing jobs are usually configured to one specific printing task, with
one pre-specified form definition.
Figure 37 -- Forms Printer 'Which Form' selection list.
There is one additional note regarding Printing with Forms. In some printing tasks,
particularly those that involve ‘.jpeg’ image files, it will be necessary for you to have
installed ‘PrintWizard’ on your PC. Additionally, when this is done, your AccuTerm
setup parameters will need to reflect that ‘PringWizard’ is available. Contact your PC
support staff for assistance with these setup issues if Forms printing functions are not
behaving as expected.
VI
Manipulating 'Lists'
There is Screen Driver standardized method, which your application programmers will
have almost certainly used within your software, called the ‘Screen List Box.’ This ‘List
Manipulator’ is similar to Microsoft list boxes you frequently see as parts of data entry
windows. It differs in that ‘Screen List Boxes’ are (1) not part of any other screen, and
(2) they are capable of far more manipulations.
Figure 37 (above) is one of the simplest uses of a Screen List Box. In this case the tool is
being used to support a “Select One Item From a List” requirement. For you, the user,
the key to effectively operating all Screen List Boxes is the ‘Instruction Line.’ In figure
37, this is the line which reads “Choose/Select/Click which line.” This ‘Instruction Line’
will have different wording with different usage, but will always be in this location – just
above the list items per se.
Figure 38 is another example of a Screen List Box. In this case, the ‘Instruction Line’
tells you that there is another option available to you besides just clicking your selection.
In this case, you can right-click any of the lines to see much information and therefore
help you decide which line to choose.
Figure 38 -- Another Screen List Box
Programmers can, in any instance where they call a ‘Screen List Box,’ configure it to
allow you, the user, to have access to some sub-set of the following options:
•
•
•
•
Choose One or Choose Multiple lines,
Add lines to the list,
Delete lines from the list,
Edit (Change) the text of a lines within the list, and/or
•
Re-order (move lines up/down.)
Screen Driver will, in any given instance of a Screen List Box, provide you with an
‘Instruction Line’ which will make it clear which options are available to you in this
instance.
Here are some general rules:
•
•
•
In list boxes without any advanced options, a single left-click is sufficient to
select an item and close the list window.
In list boxes with advanced functions, a single click selects a line for processing
(e.g. to be edited or moved) and a double-click is used to select and close the list
window.
In list boxes with advanced functions, there will be a ‘Lines’ element within the
Menu Bar. This 'Lines' menu provides access to functions like ‘Append’, ‘Insert’,
‘Delete’, etc. as may be appropriate for this instance of list box.
VII
Output Presented in 'Text' windows
As you run your application, you will frequently find information presented to you in the
form of ‘Text – Inside a Window.’ This is frequently the case when you invoke a ‘Help’
function, when you select ‘Window’ as the destination for some report, or when you run
programs which simply use this form of output. Like most other recurring situations,
Screen Driver has a standardized (Objectized) methodology for allowing you to
manipulate these ‘Text Display’ windows.
Figure 39 shows the output of ‘ListDDD’ (List Detail Database Definitions) that has been
directed to a ‘Window’ destination.
Figure 39 -- A sample 'Text Display' window.
‘Text Display’ will, if the information it is handling is not already broken into pages,
paginate it into blocks that would roughly fit onto 8-1/2 x 11 paper. To navigate all the
information in the display, you will usually need to use both the scroll bar to move up and
down within a page, and the ‘Prev’ and ‘Next’ page buttons at the bottom of the window
advance through pages. You can use either the ‘Cancel’ button or 'close the window'
when you are done with the display.
‘Text Display’ windows always show a menu bar with three main options.
A
'File' Menu
The options available under the ‘File’ menu are ‘Print’, ‘Item Print’, ‘Print Setup’, ‘Save
As’, and ‘Cancel.’
Use the ‘Print’ option if you want to ‘Slave Print’ a picture of the ‘Text Display’ window
exactly as it currently appears. This will not print the entire document or report. It will
only print the window as it is shown.
User the ‘Item Print’ option to print the entire underlying document. This option is
sometimes useful to get a ‘hard copy’ version of some system report that does not
otherwise have a printer options as a report destination. Reports can usually be directed
to a ‘Text Display’ window, and from there printed.
The ‘Print Setup’ option is very much Microsoft Windows standard, and let’s you select
which printer you want to use, Portrait or Landscape orientation, etc. Note that ‘Item
Print’ operations may need to over-ride you Portrait/Landscape selection given the ‘Text
Geometry’ it currently has in process.
Use the ‘Save As’ option to save the report or document you are looking at, as a PC “.txt”
file on your local work station. When you use this option, you will be asked to assign the
document a name under which it will be saved. The system will save the document,
using the name you provided, in your default File Transfer Directory. (See session signon arguments at the beginning of this document to see where you specify what you want
to use as your default File Transfer Directory. )
B
'Edit' Menu
In Text Display windows, the ‘Edit’ menu provides options for ‘Find’, ‘Find Next’, ‘Fine
Prev’, and ‘Copy.’
Using the ‘Find’ option allows you to enter a ‘Search String’ for some word or phrase,
which should appear within the document or report you are looking at. The system will
prompt you to type in the ‘text’ you want to look for and, if it exists, position you to the
page and line where the first occurrence of that string is found.
The ‘Find Next’ and ‘Find Prev’ menu options can only be used after a ‘Find’ has already
be done. They simply repeat the search, advancing either forward or backward through
the document.
Use the ‘Copy’ menu function if you want to extract some portion of document or report,
for later ‘Paste’ operations into some other windows function. This feature is again
Microsoft Windows standard. Simply highlight the portion of text you want to copy, then
click the Edit/Copy menu function (or simply hit Ctrl-C.) The highlighted text will then
be available on your PC clip-board for your subsequent ‘paste’ operation.
C
‘Send’ Menu
The ‘Send’ menu of Text Display windows has only one option – email. Use this option
to send the report or document you are looking at, to some e-mail address. Here are some
things to remember about the e-mailer:
•
•
•
•
The e-mailer does not sent the report as an attachment, but rather as the body of
an e-mail per se.
You will be prompted to enter the ‘Addressee(s)’ and ‘Subject’ line for your email.
The addressee will see a ‘Reply To:’ equal to that which you specified in your
system sign on parameters.
The e-mailer is not magic. It cannot circumvent internet size limitations.
VIII
Building Queries
Screen Driver offers users an exceptional database query tool named ‘Easy Query’ or
simply ‘EZQ.’
The access to EZQ processing starts when you touch the minus (‘-‘) key while at any
application menu.
What launches is actually a Screen Driver maintenance screen, complete with Browser, to
help you find existing queries, and/or oversee your process of building a new one.
Figure 40 shows a sample of an EZQ Library Header screen, where we have retrieved a
query named ‘PARTIAL.PAYS2.’
Figure 40 -- EZQ Library Query Header Screen
The ‘Links’ available from this screen include ‘Design’ ‘Run’, ‘Users’, and ‘Notes.’
We will start our EZQ section of this manual with a discussion of the general concepts.
In the second part we deal with detail descriptions and discussions relating to the ‘EZQ
Designer’ -- How queries are created. These menu links are discussed in more detail at
the end of this section.
For now, this manual will focus on the steps for creating a query. These are (1) enter a
‘new’ EZQ.NAME, (2) Provide a description, (3) select the File name you will be
reporting from, and (4) use the ‘Links’ menu to invoke the EZQ Query designer.
Concepts
In our discussion of ‘Phrase Reporting’ earlier in this manual, we described a simple, yet
powerful tool for extracting reports from the database, according to specification you, the
user define when you run these reports. In Phrase Reporting, you choose which ‘predefined’ data dictionary ‘Phrase’ describes the set of Columns you want on your report.
Further, when you run a Phrase Report (if the programmer who set it up provided one)
you specify ‘match criteria’ in a pre-defined ‘File Selector’ to control which set of rows
are extracted from the table for your report.
In EZQ, unlike in Phrase reports, you are not confined to pre-defined dictionary phrases,
nor to pre-defined ‘File Selectors.’ With EZQ you are free to define your own reports
derived from any table in the database. (At least any for which you have authorization.)
You can choose as your report columns literally any that are defined in the table’s data
dictionary. You have control over which, and how many columns are used for sorting
and control breaks. And you can define ‘Extraction’ specifications that perform
unlimited ‘match criteria selection’ against any field in your table.
The tool becomes even more powerful in that there are several standardized ‘options’ you
can employ to do things like ‘suppress details’, or route the output to any variety of
‘destinations’ including printers, on-screen windows or spreadsheets. Yes, you can build
queries that supply virtually any data from your corporate database, directly into your
spreadsheets.
Further, EZQ queries can be saved, recalled, shared, restricted, and even converted into
application software ‘menu objects’ by your system administrator. In other words, you
queries can become an integrated part of your application software.
A
Data Dictionary
Before you try to design a query, it is important that you are comfortable with the concept
of database tables and, in particular, data dictionaries. Database tables are analogous to
‘spreadsheets’ in that they can be thought of as rows and columns. For any given table,
‘words’ in the dictionary are the names given to the ‘columns’ of the table. As with
spreadsheets, there are usually two basic types of columns – Those that contain ‘physical
data’, and those that contain ‘formulas’ and thus show a ‘value’ that is calculated rather
than stored.
When you are designing a query, you are ‘choosing’ words from the dictionary, which
you want to be shown as columns on your report. In order to ‘choose wisely’ you should
be aware of these dictionary word types.
In IBM Universe database dictionaries, words are all assigned a type code of either ‘A’,
‘D’, ‘I’, ‘S’, or ‘PH’.
Words that are Type-PH are ‘Phrases’ – for the most part, just lists of other dictionary
words. Phrase words are used in Phrase Reporting, described earlier in this manual, but
are not used in query processing.
Dictionary Word Types ‘A’ and ‘D’ are in a sense redundant. They are both used to
identify words that collectively provide a complete ‘record layout’ or ‘Column List’ for
the table. In other words, they name columns of ‘physical data’ rather than computed
data, and the ‘set’ of Type-A words should account for every physical column. . If type
‘A’ words are provided, there should generally be exactly one type-A word for the first
field, exactly one Type-A word for the second field, etc. The same is true for the ‘set’ of
type-D words. They provide you with a comprehensive view of the physical records.
You will frequently find that a table’s data dictionary contains type-A words, but no typeD words, of visa versa. If the dictionary provides the ‘physical data layout’ both ways, in
other words a full set of Type-A’s and also a full set of Type-D’s, then the Type-D word
set will usually be the more modern set.
Type-I words are the ‘modern’ version for computed columns, usually manipulating typeD words. Type-S words are typically older style manipulations of Type-A words, also
denoting computed columns. Unlike ‘Type-A’ and ‘Type-D’ words, there is seldom any
redundancy between Type-I and Type-S columns. If you are looking for a dictionary
word that corresponds to a ‘computed column’, then generally you will want to look for
the appropriate word in both (‘I’ and ‘S’) word groups.
It may frequently also be useful to look at the ‘I’ and ‘S’ word groups, for alternate
definitions of ‘physical’ columns. You may find words there that are ‘trivial
computations’ or even ‘synonym’ words. You may find synonyms which show the same
data as an ‘A’ or ‘D’ word, but which use a different column width, column heading, or
numeric precision. Perhaps a D-Type word for field 17 is ‘SalesDollars’ and an I-Type
word exists like SalesKDollars. The Kdollars alternative may be preferable to your query
with a smaller column width and a heading like Sales($000).
B
Query Designer
When you invoke the EZQ designer, you will automatically see two windows. The first
is the data dictionary window, and the second is the Query layout window. Essentially,
you are going to be selecting a word in the dictionary window, and then clicking the top
of a column in the design window, to ‘drop’ that word in as a definition of what you want
in that column of your query.
1
Dictionary Window
Figure 41 shows a typical Dictionary window used by EZQ. In this case we are defining
a query against the AccountPayable database table. The column heading (of the
dictionary window) are:
• Name – the dictionary word per se
• Type – A, D, I, or S discussed at length above
• Amc – Physical field (or column) number for Types A and D
• Oconv – for Output Conversion formatting. ‘D2/’ for ‘Date’
fields means format dates using ‘/’ as a delimiter and show 2-
•
•
•
digit years. ‘MD2,’ for ‘Amount’ fields means ‘Mask a
decimal point 2 digits from the right side, and use commas to
show thousands, millions, etc.
Formla – for definition of the computed columns.
Just – For ‘Justification’ within the report column, left-aligned
or right-aligned
Wdth – for the ‘Width’ of this column if used on your report.
Note that in Figure 41, the word (line) ‘CreateDate’ has been ‘clicked. It is the active
dictionary word and can be dropped on the designer layout screen with just a mouse
click.
Figure 41 -- EZQ Display of 'AccountsPayable' table Dictionary
2
Layout Window
Figure 42 shows the sample EZQ Layout window where we are building the definitions
for our query. With the ‘Create Date’ word active in the dictionary window, we need
only click the designer-layout cell at ‘Dictionary/2’ to change our query from a
‘DateDue’ to a ‘CreateDate’ report.
This layout screen provides a good sense of what our query output is going to look like,
including column headings, Control-break lines, and column totals. We need only to
manipulate this image to control what our query will actually produce when we run it.
Figure 42 -- Sample EZQ Design Layout window.
The Menu Bar items hear on the Layout page include ‘File’, ‘Edit’, ‘Columns’, ‘Tools’,
and ‘Help’.
The ‘File’ menu provides options for ‘Run’, ‘Save’, ‘Save As’, ‘Cancel’, ‘Print’, ‘Print
Setup’, and ‘Exit.’
You use the ‘File/Run’ options when you think your query is defined the way you want to
see it, and you are ready to see the real thing. Use the ‘Save’ and ‘Save As’ options as
you would in any Microsoft Windows application. I.e. ‘Save’ a query that is good before
you experiment with some change that may not be.’ Use ‘Save As’ after you have
retrieved a working query, and want to build a new one which is a variation on the first.
The ‘Print’ and ‘Print Setup’ options let you print the Layout Page, and the ‘Cancel’ and
‘Exit’ options both end the EZQ design session.
The ‘Edit’ menu provides access to the typical ‘Cut’, ‘Copy’, and ‘Paste’ functions that
may be occasionally useful within the designer, but which mostly are included just for the
sake of completeness.
The ‘Columns’ menu, provides assess to options for ‘Append’, ‘Insert’, ‘Delete’, ‘Move
Left’, and ‘Move Right.’
Except for the ‘Append’ option, these services require that you first select one of the
existing columns, by clicking on the column number above the column you want to
process. If in the example, if we want to Add a column for ‘Create Date’, rather than use
it as a replacement for ‘DueDate’ column, then we would click the ‘3’ above the
‘AMOUNT’ column, and then choose ‘Columns/Insert’ from the menu bar.
The ‘Tools’ menu let’s us open either of two additional windows used in query design –
the ‘Extraction’ (record select) criteria window, and the ‘Options’ window. These are
discussed further below.
The ‘Help’ menu provides access to (basically this) instructional text on query building.
On-Layout commands
Besides dropping dictionary words onto column headings within the layout, and beyond
the functions accessed via the menu bar, there are other commands that are done directly
on the layout page.
In the Cells of the ‘Sort Priority’ line, we can ‘just by clicking’ add additional aspects to
the sorting of our query. In figure 42 we can see the ‘Supplier#’ is already designated as
sort priority 1. This means that, when our query is run, the selected A/P rows will be
grouped first and foremost by supplier number. If ‘within supplier’ we would like rows
sorted by date, we can specify this simply by clicking in the ‘Sort Priority’ cell under the
‘Date’ column.
In the ‘Bigger Values’ line, we see the letter ‘A’ under the Supplier# column. This
corresponds to Sort Priority line and can only be used in conjunction with columns which
are sorted. The ‘A’ stands for ‘Ascending’. Clicking this cell repeatedly toggles back
and forth between ‘A’scending and ‘D’ecending settings. If we wanted our selected A/P
invoices listed ‘Within Supplier’ by Dollar amount. And if we wanted biggest items in
each supplier group listed first, then we would click in the Sort Priority row, under the
‘Amount’ column, to set it as the 2nd sort priority, and then in the cell beneath, click to set
the sort to ‘D’ecending.
The ‘Exploding’ line is a set of specifications where by you can insert an ‘X’ in sorted
columns to cause a sorted column to be a ‘BY.EXP’ type sort rather than a simple ‘BY’
type sort. This is a subject which is a little beyond the scope of this users manual, but for
user’s who are familiar with the difference, a simple mouse click in these cells will turn
the ‘X’ flags on and off.
Turning attention now to the lines on the lower part of the layout page, the ‘Break’ row is
a control where you can click cells, of sorted columns, to indicate if you want controlbreaks in your report, when values in this column change.
Lastly, the ‘Total’ row of the layout page lets you indicate which numeric columns of the
report should be totaled. Again, simply click in the appropriate cells to turn totals on or
off.
3
Extraction Window
As mentioned above, the ‘Tools’ menu of the layout window provides links by which you
can open the ‘Extraction Logic’ window, and/or the ‘Options’ window. Figure 43 shows
an example of the ‘Extraction Logic’ window.
Figure 43-- Sample EZQ 'Extraction Logic' window.
The EZQ run-time process will automatically incorporate a ‘Select’ process against your
database file (AccountsPayable in our example) if you have specified Extraction Logic
via this window. In other words, it will process only ‘rows’ from the database which
meet all of the criteria you specify here.
The columns of the ‘Extraction’ window are as follows:
• # -- Just a row number used for reference.
• Connector – one of several valid ‘Key Words’ for associating this line of
‘Extraction’ logic with the others. As you add lines to this table, and you enter
this column, you will see a ‘pull-down’ list showing you all the valid Connector
phrases you may use.
• Dictionary – A word from the data dictionary of your table, that you want to use
in some comparison to ‘match’ in order for the row to be selected into your report.
As you add lines to this table, and enter this column, you will find that the
selected word in the data dictionary window will appear automatically. If this is
not the word you want, then activate the data dictionary window, click on the
correct word, and then click back to this window.
• CompO – Comparison Operator – any of a list of valid ‘Comparison’ words
which describes the relationship between values for rows of the database table,
and the ‘Match’ value you specify in the Arguments column, in order for that row
to be included in your report. When you add lines to this table, and you enter this
column, you will again find that there is a drop-down list of all your valid choices.
•
Arguments – Match values to be compared to database rows for the given
dictionary word and comparison operator.
Note that in the ‘Argument’ column, match values should generally be enclosed in
quotes. The convention of “<<….>>” is used to defer specifying the match value you
want until the time when your query is run. The EZQ run-time process will see these
specifications and incorporate the enclosed ‘prompt’ as one of the ‘GetArgs’ elements it
will look for before running the query select.
4
Options Window
If, from the query ‘layout’ window, you activate the ‘Tools/Options’ window, you will
see a control that looks something like the one shown in Figure 44.
Figure 44 -- Sample EZQ 'Options' window.
Check the ‘HEADING’ option, and you will then be able to type in a ‘Report Heading’
you want on you query output. In report heading lines the ‘D’ and ‘P’ conventions are
used to cause ‘Run Date’ and ‘Page Number’ substitutions at run time.
Check the ‘FOOTING’ box, and you will be able to type in page footing text to appear on
your output report.
If you are totaling one or more columns, EZQ will always include grand totals. The
‘GRAND-TOTAL’ check activates the ‘Total Label’ field so you can control how that
line is labeled.
The other ‘check’ controls here are largely self explanatory. Check ‘DET-SUPP’ and
your query will suppress detail (invoices) from your report, showing you only Total lines.
(in the case of our example, our Supplier Totals.)
The two ‘Run-time Elections’ allow you to specify specific destinations and formats you
want to always use when your query runs, but the ‘default’ in both cases is ‘Prompt’
meaning, “Ask me at run-time.”
C
Query Test, Save, and Recall
When you believe your query definition is the way you want it, it is time for the first test
run. This is usually done from the ‘File’ menu of the Layout window, but before you run
it, be aware that every ‘run’ event causes the query to be saved. If you are making
changes to a ‘working’ query, and do not want to immediately overlay it with your
changes, then do a ‘Save As’ operation before your first run.
When we run the sample query we have been using in these discussions, the run-event
starts with a ‘GetArgs’ window as shown in Figure 45. Note that both ‘Destination’ and
‘Format’ are included as Arguments to be specified at run time, just as we specified on
the ‘Options’ tool. The ‘Target File’ argument is here, ‘just in case’ we were to choose
‘FTP Site’ as a report destination. The ‘GetArgs’ list also asks us for “Earliest Invoice
Date”. The system needs our specification for this ‘Argument’ so that it can complete the
‘Extract Logic’ table. Once we have specified all the arguments, we click ‘OK’ and our
report is displayed on the PC.
Figure 45 -- Run Time 'GetArgs' window for query 'PARTIAL.PAYS.2'
After the report finishes, we see a window as shown in figure 46. This ‘Run Event
Recap’ report happens only when a query is run from the Layout ‘File/Run’ menu bar. It
does not appear when queries are run from the Screen Driver EZQ Header Screen ‘Links’
process. (Figure 40 above.)
Figure 19 -- 'Run Event Recap' window for Query 'PARTIAL.PAYS2'
Press the ‘OK’ button to return to the ‘Layout’ page and fix any problems you noticed in
the output. When the Query is perfect, then again consider using the ‘File/SaveAs’ menu
option to save it using the actual name. When you are done, you may just close the
Layout page to exit the Query designer.
If, during your design session you have done any ‘Save As’ operations using temporary
names, remember to retrieved and delete these ‘test versions’ once you are back at the
EZQ Header Screen.
It is a good idea, when you finish building (or changing) an EZQ query definition, to
always go to the ‘Notes’ function, available as a ‘Link’ from the EZQ Query Header
Screen. Once there, make sufficient notes as what the query does, and/or how you
changed it. These notes can be very helpful when the query is accessed at a significantly
later point in time, or by persons other than yourself. 'Notes' are attached to EZQ Queries
as ‘Help Text.’
D
Query Ownership and Security
As shown on the EZQ Header Screen (Figure 40 above,) there are security related fields
for ‘Security Type’, ‘Owner’, and ‘Password.’ In addition, through the ‘Links’ menu you
have access to a Sub-Window for Users which is also a part of the EZQ Access Security
function.
Before determining what kind of security you need on you query, if any, please consider
that EZQ Security is in addition to Screen Driver security, which is itself in addition to
database (uniVerse) and operating system (Linux) security. For example, if you query
reports from the 'EmployeeFile,' other users will not be able to run your query unless
their Screen Driver Security Profile authorizes access to that file. Access will be denied
to those other users even if you choose EZQ security mode 'NONE'. Also remember
neither Screen Driver Security, nor EZQ Security, can be deemed truly secure from any
user granted SYS4 access privilege.
The ‘Security Type’ field.
If you want to limit others from changing and/or running your query, the first step in
doing so is to specify a security mode. There are four security modes to choose from.
These settings, in combination with the other security related fields (Password, Owner,
and Authorized user list) let you control who (besides yourself) can modify and/or run
your query.
•
MODE = NONE (or blank) Use this mode when little or no security is needed.
Essentially, all system uses have access to change and/or run the query. Access is
unrestricted even if the authorized user list is populated and/or the password field
is non-blank.
•
MODE = PWD Use this mode for straightforward 'Password' security. Any/All
users who know the password may run the query. The owner, and only the
owner, may make changes. When you use this mode, you MUST define a
password.
•
MODE = USERS Use this mode for deeper security. Specifically, you must use
the 'Links' menu and complete the list of 'Authorized userIDs' for the people
allowed to access the query. In this mode, the use of a password is optional. If
you specify a password, in order for someone to access the query they must
BOTH (1) be in the authorized list, and (2) be able to provide the appropriate
password. NOTE that in this security mode, users who gain access are authorized
to both run and to to change the query.
•
MODE = OWNER Topmost security level. The owner, and only the owner may
make changes to the query definition. When you use this security mode, you
must supply both a password and a list of authorized users. I.e., you and only you
can change it, Only users in the list can run it, and then only by providing the
password.
Query ‘Owner’ field
The UserID of the person who created, or who now owns the query. Note that the
ownership may be changed at any time by the current owner, or by other users who may
be authorized to make changes to the query.
Security ‘Password’ field
The secret word needed to gain access to this query. Note that this field has effect only
when used with a non-nominal security mode, I.e. only with PWD, USERS, or OWNER
modes.