1
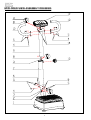
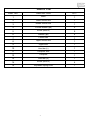
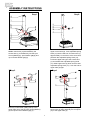
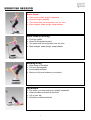
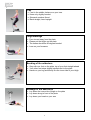
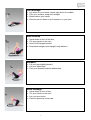
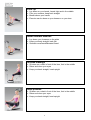
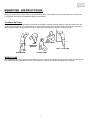
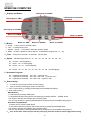
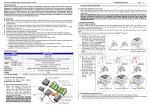
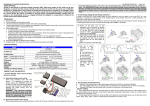
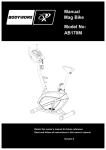
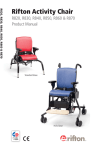
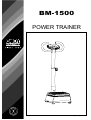
BM-1500
POWER TRAINER
www.body--sculpture.com
INDEX
IMPORTANT SAFETY INFORMATION ……………….… 1
EXPLODED VIEW ……………..…………………………….…… 2
PARTS LIST
……………..…………………………….…… 3
ASSEMBLY INSTRUCTIONS
…………..……………..……… 4
EXERCISE SESSION ………………………………..…..……… 5
EXERCISE INSTRCUTION …………………………..…..…….
EXERCISE COMPUTER
……………………………………
9
10
Important Safety Information
Please keep this manual in a safe place for easy reference.
1.
It is important to read this entire manual before assembling and using the equipment.
Safe and effective use can only be achieved if the equipment is assembled, maintained and used properly. It is
your responsibility to ensure that all users of the equipment are informed of all warnings and precautions.
2.
Before starting any exercise program you should consult your doctor to determine if you have any medical or
physical conditions that could put your health and safety at risk, or prevent you from using the equipment
properly. Your doctor's advice is essential if you are taking medication that affects your heart rate, blood
pressure or cholesterol level.
3.
Be aware of your body's signals. Incorrect or excessive exercise can damage your health. Stop exercising if you
experience any of the following symptoms: pain, tightness in your chest, irregular heartbeat, extreme shortness
of breath, lightheadedness, dizziness or feelings of nausea. If you do experience any of these conditions you
should consult your doctor before continuing with your exercise program.
4.
Keep children and pets away from the equipment. The equipment is designed for adult use only.
5.
Use the equipment on a solid, flat level surface with a protective cover for your floor or carpet. To ensure safety,
the equipment should have at least 0.5 meters of free space all around it.
6.
Before using the equipment check that the nuts and bolts are securely tightened.
7.
The safety of the equipment can only be maintained if it is regularly examined for damage and/or wear and tear.
8.
Always use the equipment as indicated. If you find any defective components while assembling or checking the
equipment, or if you hear any unusual noises coming from the equipment during use, stop immediately. Do not
use the equipment until the problem has been rectified.
9.
Wear suitable clothing while using the equipment. Avoid wearing loose clothing that may get caught in the
equipment or that may restrict or prevent movement.
10. The equipment has been tested and certified to CE. Suitable for home use only. Maximum weight of user: 100kg.
11. The equipment is not suitable for therapeutic use.
12. Care must be taken when lifting or moving the equipment so as not to injure your back. Always use proper lifting
techniques and/or seek assistance if necessary.
13. If you experience any problems or require assistance, please contact our customer service at 01274
693888. This is only available for UK residents.
WARNING:
Before beginning this or any exercise program, consult your physician. This is especially
important for persons over the age of 35 or persons with pre-existing health problems. Read all instructions
before using.
1
EXPLODED-VIEW ASSEMBLY DRAWING
2
PARTS LIST
PART NO.
DESCRIPTION
QTY
1
Base
1
2
Lower control wire
1
3
Middle control wire
1
4
Curved Washer (φ8)
5
5
Screw (M8X15)
9
6
Washer (φ8)
4
7
Center tube
1
8
Upper control wire
1
9
Upper tube
1
10
Hand bar (L)
1
11
Computer wire
1
12
Computer
1
13
Hand bar (R)
1
14
Screw (M5X12)
4
15
Adjustable spring Knob
1
3
ASSEMBLY INSTRUCTIONS
Step1.
Step2.
Connect the Lower control wire (2) to the
Connect the Middle control wire (3) to the
Upper control wire (8). Lock Adjustable spring
Knob (15) into the side nut of Center tube (7)
approximately 1/3 and then, at the same time,
pull back the Adjustable spring Knob (15).
Put down Upper tube (9) to the Center tube
(7) and release the Adjustable spring Knob
(15). Slide Upper tube (9) down until it meets
Adjustable spring Knob (15). Lock the hole of
Upper tube (9) tight.
Middle control wire (3) than assembly the
Center tube (7) to the Base by use the 5pcs
Screw (M8X15)(5), 4pcs Washer (φ8)(6) and
1pcs Curved Washer (φ8)(4).
Step3.
Step4.
Assembly the Hand bar (L&R)(10&13) to the
Connect the Computer wire (11) to the Upper
control wire (8), than assembly the Computer
(12) to the Upper tube (9).
Upper tube (9) by use the 4pcs Screw (M8X15)
(5) and 4pcs Curved Washer (φ8) (4).
4
EXERCISE SESSION
Knee- bend
*
*
*
*
Feet in the middle, slightly separated
Knee 80 degree bended
The knees shall not be bended over the toes
Back straight, head upright, keep balance
Knee- bend on one leg
*
*
*
*
Foot the middle
Knee 60-90 degree bended
The knee shall not be bended over the toes
Back straight, head upright, keep balance
Bending of leg
*
*
*
*
Stay along on the plate
Put your feet together
Knee slightly bended
Bend your hip and embrace your ankles
Leg biceps
*
*
*
*
Lay down, your feet setting up, slightly separated
Keep shoulder and head on the floor
Lift up your hip
Stomach muscles stretched
5
Calf
*
*
*
*
Feet in the middle, balance on your toes
Knee only slightly bended
Stomach muscles flexed
Back straight, head upright
Thigh massage
*
*
*
*
Face turned away from the plate
Please put the thighs on the plate
The knees should be 90 degree bended
Lean on your forearms
Bending of the adductors
* Stay with one foot on the plate, top of your foot straight ahead
* Your other foot stays slightly bended next to the plate
* Hands on your leg and slowly flex the inner side of your thigh
Massage of the adductors
* Lay down the inner side of thigh on the plate
* Lay down along in front of the plate
* Lay down your head on your arm
6
Calf massage
*
*
*
*
Lay down on your hands, hands tight and in the middle
Flex your muscles, keep back straight
Breast above your hands
Exercise can be done on your knees or on your toes
Arm muscles
*
*
*
*
Squat down in front of the item
Put your hands on the item
Arms 30-60 degree bended
Keep back straight, head upright, keep balance
Stomach
* Lift your legs slightly bended
* Lift your upper body
* Flex your stomach muscles deliberately
Hand massage
*
*
*
*
Squat down in front of item
Put your hands on the item
Let your arms loose
Exercise pressure in intervals
7
Push- up
*
*
*
*
Lay down on your hands, hands tight and in the middle
Flex your muscles, keep back straight
Breast above your hands
Exercise can be done on your knees or on your toes
Lower stomach muscles
* Lay down your forearms on the plate
* Keep your body straight, back flat
* Stomach muscles deliberated flexed
Foot/toe massage
* Sit down on a chair in front of the item, feet in the middle
* Relax and close your eyes
* Keep your back straight, head upright
Lotus position
* Sit down on a chair in front of the item, feet in the middle
* Relax and close your eyes
* Keep your back straight, head upright
8
EXERCISE INSTRUCTIONS
Using your power trainer will provide you with several benefits, it will improve your physical fitness, tone muscle and
in conjunction with calorie controlled diet help you lose weight.
The Warm Up Phase
This stage helps get the blood flowing around the body and the muscles working properly. It will also reduce the risk
of cramp and muscle injury. It is advisable to do a few stretching exercises as shown below. Each stretch should be
held for approximately 30 seconds, do not force or jerk your muscles into a stretch - if it hurts, STOP.
INNER THIGH
FORWARD
BENDS
CALF / ACHILLES
。
SIDE BENDS
OUTER THIGH
WEIGHT LOSS
The important factor here is the amount of effort you put in. The harder and longer you work the more calories you will
burn. Effectively this is the same as if you were training to improve your fitness, the difference is the goal.
9
EXERCISE COMPUTER
1、Display and Button
LED display for SPEED
LED display for Automatic
PROGRAM
LED display for TIME
LED display for POWER
Button for POWER
2、Button
Button for TIME
Button for MODE
Button for SPEED+
Button for SPEED-
a、Power :to set monitor for ON/OFF status
b、Time :to select training time
c、Speed+、Speed- :to increase or decrease vibration speed
d、Mode :to select vibration mode for Manual,and automatic program A0、A1、A3
3、Time :Timing for30 seconds、60 seconds、300 seconds
4、Speed :Vibration speed level S0、S1、S2、S3、S4、S5、S6、S7、S8、S9
S0:no action(S0 LED lighting)
S1:Level1(S0、S1 LED lighting)
S2:Level2(S0、S1 、S2 LED lighting)
、、、、、、、
S9:Level9(S0、S1、S2、S3、S4、S5、S6、S7、S8、S9 LED lighting)
5、Automatic Program:
A0(2 speed level switching ,S3<->S5,cycle time 10S)
A1(4 speed level switching ,S2<->S4<->S6<->S8,cycle time 10S)
A2(3 speed level switching ,S3<->S6<->S9,cycle time 10S)
6、Start training:
a、 To insert the power plug to socket of power supply.
b、 Turn on the main power supply switch on main item .
c、Turn on the monitor by pressing Power Button and POWER LED lighting
d、How to start training
Manual Mode:
.To select time by pressing TIME button
.To set wished vibration speed and to start training by pressing SPEED+、SPEED- button
.The vibration will stop automatically when finishing timing
.You can stop vibration by pressing POWER button during training and POWER LED going out
Automatic Program Mode:
. To select time by pressing TIME button
. To set wished automatic program and to start training by pressing PROGRAM button
.The vibration will stop automatically when finishing timing
.You can stop vibration by pressing POWER button during training and POWER LED going out
e、 Turn off the main switch and pull out the power plug from the socket of power supply after training
10
11
EXERCISE NOTES
Use this space to record your own exercise routine results.
7
COPYRIGHT ©2003 BY BODY SCULPTURE INTERNATIONAL EUROPE LTD ALL RIGHTS RESERVED. UNAUTHORIZED DUPLICATION IS A VIOLATION OF LAW.
1