1
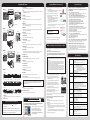
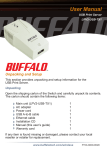
English
TeraStation Pro WSS
35012011-03
TM
8
Setup Guide
13
1. Enter the desired settings.
・For most users, checking Use DHCP is
recommended. For Mac OS, click Use DHCP.
1. Click Start - All Programs - Administrative Tools - Computer Management.
2. Click Shared Folders.
3. Right-click Shares, then click New Share.
2. Click OK.
Computer
Follow the instructions below to set up the TeraStation.
Create a shared folder.
4. Click Next.
・Enter the TeraStation's username and password
when asked. By default, these are
“Administrator” and “password”, respectively.
5. Enter “D:\Share” for the folder path, then click Next.
6. Click Yes.
7. For the share name, enter “Share”, then click Next.
If using OS X 10.4 or later, download and install "Remote Desktop Connection Client for Mac 2" from
www.microsoft.com. If using OS X 10.3.9, use version 1.0.3 instead.
8. Check Customize permissions, then navigate to Custom... - Everyone, then check
Allow for “Change”.
9. Navigate to Security tab - Edit... - Add.
10. Enter “Everyone” under "Enter the object names to select", then click OK.
1
Connect the supplied USB device to your computer.
Open the USB device, then locate TSNavi.exe and
double-click it to open.
4
・ Use LAN port 1 for initial setup. After setup, you may connect a second cable to
LAN port 2.
・Before removing the sticker on the power connector, be sure to read the terms
and conditions of the Microsoft Software License contained in the “ms-licence”
folder in the USB device.
If using Windows 2000 or 2000 Server, make sure that write-protection on
the USB device is disabled before connecting it. To disable write-protection,
slide the switch on the USB device toward the USB connector.
WS-6VL
TeraNavigator will launch.
13. Navigate to Computer Management - Local Users and Groups.
9
1
2
3
・For Mac OS, hold the Control key, click the TeraStation icon, and click
Open Remote Desktop.
Power connector
・If “Do you want to allow the following program to make changes to this
computer ?” is displayed in Windows 8 or Windows 7, click Yes. If “A
program needs your permission to continue” is displayed in Windows
Vista, click Continue.
②
①
PC
Power connector
Ethernet cable
Power cable
WS-WVL
10
1. Click Start - Control Panel - User Accounts.
2. Click Change your password.
3. Enter "password" as the current password, then enter your desired new
password and confirm the new password.
4. Click Change password.
Power connector
TeraStation
②
①
Username: Administrator
Password: password
③
Ethernet cable
Click Begin Installation.
Double-click the TeraStation's icon.
The TeraStation's shared folder will open.
With Mac OS, the TeraStation is either mounted as
a drive on the Desktop or in the Finder sidebar.
Computer
Computer
Windows Storage Server will open in the Remote
Desktop screen.
Power outlet
PC
WS-RVL
15
Enter your username and password,
then click OK.
The default settings are:
Network
(Router or Hub)
Setup is complete.
Power cable
LAN port 1
Insert the Ethernet cable until it clicks.
LAN port 1
Insert the Ethernet cable until it clicks.
TeraStation
Network
(Router or Hub)
Power connector
①
②
Files can be saved to the TeraStation shared folder in the same
way as folders on other hard drives.
11
③
Install the Windows Storage Server update program.
1. Click Download and install updates on the “Initial Configuration Tasks”
screen.
PC
The TeraStation must be connected to the Internet.
Power outlet
Never disable the LAN (network device) settings in Windows Storage Server.
Disabling the LAN settings will also disable access to the TeraStation.
2. Click Check for updates.
3. When updates are displayed, click Install
updates.
Power cable
6
Change the TeraStation's password.
③
Power outlet
・In Mac OS, double-click the disc image “WSVL_SERIES-xxx.dmg” (where
xxx is a three-digit number) in the supplied USB device to mount, then
double-click TeraNavigator in the image.
5
14
LAN port 1
Insert the Ethernet cable until it clicks.
TeraStation
Network
(Router or Hub)
・Disable your antivirus software and firewall before continuing. You may
not be able to install the TeraStation software if you have any antivirus
software or firewalls enabled. Before continuing onto the next step, be
sure to disable your antivirus and/or firewall.
16. Uncheck Account is disabled under General tab and click OK.
・If “The identity of the remote computer cannot be verified. Do you want
to connect anyway?” is displayed, click Yes or Continue.
Power cable
WS-QVL
15. Double-click Guest.
・If the message “The publisher of this remote connection cannot be
identified. Do you want to connect anyway?” is displayed, click Connect.
Power outlet
Ethernet cable
・If using Windows 8 or Windows 7 or if TeraNavigator does not start,
double-click TSNavi.exe in the “TeraNavi” folder in the USB device.
14. Double-click Users.
Right-click on the TeraStation
icon in NAS Navigator2, then
choose Open Remote Desktop.
Computer
TeraStation
PC
・If “What do you want Windows to do?” is displayed or if the AutoPlay
window appears, select ”TeraNavigator for WS-VL”.
3
12. Click OK - OK - Finish.
LAN port 1
Insert the Ethernet cable until it clicks.
Network
(Router or Hub)
2
11. Select Everyone, then check Allow for “Modify”.
Follow the steps on the screen to connect the Ethernet cable
and power cable to the TeraStation and turn it on.
Click Finish to complete setup.
After this, follow the steps on the screen to
install the Windows update program.
* If you had disabled your antivirus software and/or firewall earlier for this
installation, be sure to enable them after you complete setup.
Remote Desktop
Installation of an antivirus software package (available commercially) on
Windows Storage Server is strongly recommended.
NAS Navigator2 will start automatically.
If it doesn't, double-click NAS Navigator2 on the desktop (Windows) or click it in
the Dock (Mac).
Install NAS Navigator2 on the additional computer from the supplied USB
device. Then open the shared folder as shown in 15 and 16 above.
Computer
7
Right-click on your TeraStation’s icon,
then choose Properties - IP Address.
12
Computer
These examples show screens from Windows.
On Mac systems, hold the Control key and click the TeraStation icon, then click
Configure - IP Address.
Opening the TeraStation shared folder from an additional computer
Data Backup
Set the date and time.
1. Click Set time zone on the “Initial Configuration Tasks”
screen.
2. Click Date and Time - Change date and time.
3. Select the current date and time, then click OK.
Remote Desktop
While using the TeraStation, you may loose your important data due to
sudden accidents, hard disk failure, or accidental misoperation. Back up your
data regularly!
For best results, back up your data to Buffalo drives like the TeraStation,
LinkStation, or DriveStation series.
Please read the back of this sheet
Diagrams and Layout
1 Power Button
WS-6VL
1
Front View
2 3 4 5
6
Rear View
7
19
8
13
14
15
16
17
18
9
11
10
20
21
20
12
2 Info LED
3 Error LED
When LAN port 1 is connected to a network, it is illuminated in green. The light next to
LAN port 1 will be illuminated as well.
5 LAN2 LED
1
Front View
2 3 4 5
6
When LAN port 2 is connected to a network, it is illuminated in green. The light next to
LAN port 2 will be illuminated as well.
Rear View
7
19
8
13
14
15
16
17
18
9
10
6 LCD Panel
21
Displays the status of the TeraStation.
Switches between the different display modes.
8 Function Button
Open the front panel with the key to replace hard drives, or to access the reset button.
10 Reset Button
Use to perform a forced restart of the TeraStation.
11 Status LEDs
1
2 3 4 5
LEDs 1 through 6 will glow green when the corresponding hard drives are accessed. If a
drive fails, the corresponding LED will glow or flash red (or just flash amber).
6
Rear View
7
19
8
20
9
10
21
11
13 14 15 16 17 18
12 Display Port
13 Boot Mode Switch
Use to recover the Windows Storage Server installation on the TeraStation.
14 UPS Port
Connect a UPS (Uninterruptible Power Supply).
15 USB 3.0 Port ×2
16 USB 2.0 Port ×2*
*WS-RVL: USB 2.0 port (Series A) × 3
12
17 LAN Port 1
WS-RVL
Connect the supplied LAN cable here.
Front View
9
18 LAN Port2
This is used for backup and when connected to another network.
Use the included power cable to connect to an UPS, surge protector, or outlet.
with cover attached
11 *1 2 3
45
1
6
7 11
8
10 11
A user license sticker is affixed to the power connector. Before removing the sticker, be
sure to read the terms and conditions of the Microsoft Software License contained in the
“ms-licence” folder of the supplied USB device. Removing the sticker constitutes
agreement to this license.
with cover removed
Do not block the fan while the unit is running.
21 Anti-Theft Security Slot
*1
13
14 15 16 17 18
12
21
19
20
You can connect an off-the-shelf wire lock to this slot.
*1 UID Button
Press the UID button on the front or the back of the unit to cycle the blue LED between on
and off.
*2 Factory Use Only
Turning Off the TeraStation Power
1. In the Remote Desktop screen, click next to Log off.
2. Click Shut down.
3. Click OK. The power button will change from glowing green to off.
Viewing the On-screen Manual
TeraStation PRO WSS User Manual
For details on the setting procedures and convenient features in
the TeraStation, see the on-screen manual.
Connect the supplied USB device to your computer. Open
the USB device and double-click TSNavi.exe.
TeraNavigator will launch, then click User Manuals.
TeraStation User Manual is available from the link.
Failure to follow the above procedure, such as unplugging the power
cable while power is on, can damage the TeraStation.
Computer
Your computer must be connected to the Internet to
access the user manual.
Add an exception to your firewall software, or disable the firewall software completely. Turn off
any security software (including antivirus and/or firewall software), then try again.
Cause 3. Wireless and wired adapters are both enabled.
Disable all adapters except for the LAN adapter connected to the TeraStation.
Cause 4. The LAN cable is defective, or the connection is unstable.
Try changing the hub port or LAN cable that you use to connect.
Cause 5. The LAN board, card, or adapter that you are using is defective.
Try changing the LAN board, card, or adapter.
Cause 6. The LAN board or hub transmission mode has not been set.
3. Enter the username and password shown below,
Change the transmission mode in the LAN board or hub to 10M semi-duplex or 100M semi-duplex.
Some LAN boards or hubs may be unable to connect to the network correctly when the
transmission mode is set to Auto Negotiation.
then click OK.
Username: Administrator
Password: password
Cause 7. A network bridge is installed.
If the network has a network bridge that is not being used, remove it.
Computer
Cause 8. You are searching from a different network.
You cannot conduct searches beyond the network segment. Connect the TeraStation to the same
segment as the computer performing the search.
4. Windows Storage Server is started in the Remote Desktop.
Cause 9. TCP/IP is not operating correctly.
This completes the opening of Windows Storage Server.
Cause 10. “Remote Desktop Connection Client for Mac” is not installed on your Mac.
Reinstall the LAN adapter drivers.
If using OS X 10.4 or later, download and install "Remote Desktop Connection Client for Mac 2"
from www.microsoft.com. If using OS X 10.3.9, use version 1.0.3 instead.
Windows Storage Server Recovery Procedure
If Windows Storage Server no longer functions properly, perform recovery using the
supplied USB device.
・When recovery is performed, all data on drive 1 is erased.
・Do not connect the supplied USB device to another TeraStation. The recovery
process performed by the supplied USB device is intended for this product
only.
Recovery is performed by deleting the area for drive 1, setting up a new 100 GB
(Basic Disk/Simple) area, and then copying the Windows Storage Server image
to this area.
If there are system areas (or mirrored locations) on hard drives other than drive 1, be sure
to delete the system areas (or disable the mirrored locations) before performing the
recovery procedure. If recovery is performed without deleting these areas, Windows
Storage Server may not run after recovery is performed.
If Windows Storage Server fails to run, turn off the TeraStation and perform the recovery
procedure again while all hard drives except for drive 1 (disk 0) are disconnected. After
recovery is complete, reconnect the disconnected drives, which will appear in Disk
Management as "Foreign". In Disk Management, right-click Foreign, select Import Foreign
Disks, then right-click this area and click Reactivate Volume to rebuild the RAID array.
1. Turn off the TeraStation by following the procedure in
“Turning Off the TeraStation Power” on the back page.
removal procedure, see the separate sheet “Hard Drive
Replacement Procedure”.
Boot Mode switch
■ When TeraStation shared folders suddenly do not open
If the TeraStation shared folder is assigned and used as a network drive, access to the
TeraStation may suddenly fail when the IP address or network group is changed, or for other
reasons. When this happens, follow the procedure on the front page to open the TeraStation
shared folder using the supplied NAS Navigator2.
In Mac OS, the TeraStation is either mounted as a drive on the Desktop or is displayed in the
Finder.
Specifications
Check www.buffalotech.com for information about the latest products and specifications.
Installed System
Microsoft Windows Storage Server 2008 R2 Workgroup*
・The Microsoft Software License is contained in the “ms-licence” folder in
the supplied USB device. Be sure to read the terms and conditions of
this license.
* WS-RVL: Microsoft Windows Storage Server 2008 R2 Standard
Interface (LAN port)
Interface: Complied with IEEE802.3ab (1000BASE-T),
Complied with IEEE802.3u (100BASE-TX),
Complied with IEEE802.3 (10BASE-T)
Transfer speed: 1000 Mbps Full duplex (auto-negotiation),
100 Mbps Full duplex/Half duplex (auto-negotiation)
10 Mbps Full duplex/Half duplex (auto-negotiation)
Number of ports: 2 port (supports AUTO-MDIX)
Connector type: RJ-45 8-pin
Interface (USB port)
USB 2.0 port (Series A) × 2*
USB 3.0 port (Series A) × 2
Interface (UPS port)
Interface: RS-232C (D-SUB 9 pin(Male)) × 1
Compatible UPS: UPS manufactured by Omron or APC.
・See the Buffalo Technology website for a current list of compatible UPS
products.
Internal Hard Drive
Drive configuration: By default, drive C is a mirrored array using drives 1
and 2 and drive D is a RAID 5 array using all drives*.
* WS-WVL: drive D is a mirrored array using drives 1 and 2.
・If a hard drive in the TeraStation malfunctions, replace it with a Buffalo
Technology OP-HD series drive of the same capacity, available from
www.buffalotech.com.
Power / Power
Consumption
WS-6VL: AC 100- 240 V, 50/60 Hz, max ~170 W
WS-QVL: AC 100- 240 V, 50/60 Hz, max ~86 W
WS-WVL: AC 100- 240 V, 50/60 Hz, max ~47 W
WS-RVL: AC 100- 240 V, 50/60 Hz, max ~110 W
Dimensions (W × H × D)
(excluding protruding
parts)
WS-6VL: 300 × 215 × 230 mm; 11.8 × 8.5 × 9.1 in.
WS-QVL: 170 × 215 × 230 mm; 6.7 × 8.5 × 9.1 in.
WS-WVL: 170 × 170 × 230 mm; 6.7 × 6.7 × 9.1 in.
WS-RVL: 430 × 45 × 420 mm; 16.9 × 1.7 × 16.5 in.
Weight
WS-6VL: ~11.5 kg (25.4 lb.)
WS-QVL: ~8 kg (17.7 lb.)
WS-WVL: ~4.5 kg (10 lb.)
WS-RVL: ~9 kg (19.9 lb.)
Operating Environment
Temperature: 5 - 35° C; 41 - 95° F
Humidity: 20 - 80% (no condensation)
Compatibility
Windows and Mac computers with Ethernet interface.
BOOT
USB
HDD
* WS-RVL: USB 2.0 port (Series A) × 3
3. Connect the supplied USB device to the USB 2.0 port.
4. Set the Boot Mode switch to “USB”, then press the
power button. This executes the recovery process.
5. The TeraStation shuts down automatically when the
recovery process is complete.
20 Fan
Rear View
20
Cause 2. Software running in the background is blocking communication.
・If two or more LinkStations or TeraStations are connected
on the same network, multiple icons will be displayed.
Select the TeraStation you want to open.
Computer
・Selecting the TeraStation icon enables checking of the IP
address and other individual information for the
TeraStation.
・Click Yes or Continue when “The identity of the remote computer cannnot be verified. Do you
want to connect anyway?” is displayed.
2. Remove all hard drives except for Drive 1. For the
19 Power Connector
11 *2 16
The cables are not physically connected, or there may be a contact defect. Reconnect the AC
cable and LAN cable then restart both the computer and TeraStation.
2. Right-click the TeraStation icon (in Mac OS, click
9 Drive Lock
12
Front View
Cause 1. The cables are not connected correctly.
This is not featured on this product.
11
WS-WVL
・In Windows, double-click the BUFFALO NAS Navigator2 icon on the Desktop.
・In Mac OS, click NAS Navigator2 icon in the Dock.
For security reasons, visit the "Change the TeraStation's
password" step in this guide.
7 Display Button
20
1. Open NAS Navigator2.
while holding down the Control key), then select
Open Remote Desktop.
This is not featured on this product.
4 LAN1 LED
WS-QVL
■ If you are unable to search using NAS Navigator2 (or if the
Remote Desktop screen does not open), it may be due to one of the
following issues.
Windows Storage Server can be opened using the procedure below.
Press the power button to turn on the device.
Note:
The TeraStation cannot be turned off using the power button. To turn off, see “Turning Off
the TeraStation Power” below.
The red error LED is illuminated when an error occurs. Check the LCD panel for more
information.
with cover removed
Troubleshooting
Opening Windows Storage Server
USB 2.0 port
Power button
6. Remove the USB device, set the Boot Mode switch to
“HDD”, and press the power button.
When the initial setup is complete, the TeraStation will
reboot into Windows Storage Server.
During the recovery process, the Power button flashes green. Also, “TeraStation Booting System” is
displayed on the LCD panel.
After the recovery process is completed, the TeraStation is set to the state
below (at default settings).
・Drive 1
100 GB (Basic Disk/Simple). The remaining space is an unallocated area.
・Drives 2 to 4
The data on the drives cannot be viewed. They appear as a “Foreign” in Disk
Management.
・The data on the drives can be viewed by right-clicking the area displayed as “Foreign” in Disk
Management and then selecting Import Foreign Disks. Right-click this area and click Reactivate
Volume to rebuild the RAID array.
・ To configure a RAID array using Drive 1, convert the “Basic Disk” to a “Dynamic Disk”. To
convert, right-click the basic disk in Disk Management and select Convert to Dynamic Disk.
This completes the recovery procedure.
The TeraStation requires an Ethernet connection with your computer for
operation. It cannot be connected via USB.
Supported OS
Windows 8*, Windows 7*, Vista*, Windows XP*, Windows 2000, Windows
Media Center Edition 2004 and 2005, Windows Server 2008*, Windows
Server 2003*, and Windows 2000 Server
OS X 10.3.9 or later
* Supports both 32-bit and 64-bit versions.