1
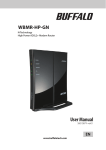
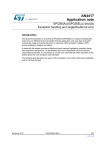
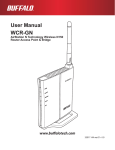
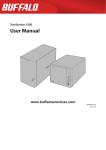
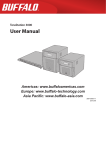
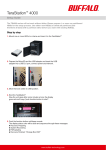
TeraStation WS
Setup Manual
www.buffalotech.com
35011179 ver.01
Contents
Chapter 1
Getting started..................................................................3
Package Contents.................................................................... 3
Diagrams.................................................................................. 4
Initial Setup.............................................................................. 7
Log in to Windows Storage Server........................................... 14
Chapter 2
Additional Information..................................................... 15
Optional Software..................................................................... 15
Troubleshooting....................................................................... 16
System Recovery..................................................................... 18
Appendix
. .................................................................... 19
Specifications........................................................................... 19
Compliance Information........................................................... 20
FCC Information.............................................................................. 20
CE Mark.......................................................................................... 20
Environmental Information.............................................................. 20
Contact Information.................................................................. 21
North America................................................................................. 21
Europe............................................................................................ 21
Asia Pacific..................................................................................... 22
LinkStation WS Setup Manual
2
Package Contents
Chapter 1
Getting started
□ Main Unit (TeraStation).....................................................1
□ Power Cable.....................................................................1
□ Keys..................................................................................2
□ Cable lock.........................................................................1
□ Ethernet cable..................................................................1
□ TeraNavigator DVD...........................................................1
□ TeraStation WS Quick Setup Guide..................................1
□ Warranty Statement..........................................................1
* The keys are required to open the front cover and access the hard drives or execute a
system recovery. Keep them in a safe place.
* Keep your original receipt. It will be required for any warranty replacement.
TeraStation WS Setup Manual
3
Chapter 1 Getting Started
Diagrams
Front View
1
2
3 4
5
6
7
8
9
1
Power Button
Push the power button to turn on the TeraStation. The button is lit when power is on.
To turn the TeraStation off, shut it down from within Windows.
2
Info LED
If there is a message about the current status, the amber Info LED is illuminated.
Check the LCD display for current status.
3
Error LED
The red Error LED is illuminated when an error occurs. Check the LCD display for
more information.
4
LAN1 LED
When the LAN Port is connected, this LED glows green.
5
Not used
6
LCD Display
Displays the status of the TeraStation.
7
Display Toggle Button
Switches between different display modes.
8
Not used
TeraStation WS Setup Manual
4
Chapter 1 Getting Started
9 Lock
Open the front panel with the included key. You’ll need the key to replace hard drives
or initialize the unit.
With Door Open
10
11
10 Recovery Button
This is used to do a system recovery.
11 Status LED 1 - 4
LED 1 to 4 will be illuminated in green when the corresponding hard drive is accessed.
When an error occurs on a hard drive, the corresponding LED will turn red.
TeraStation WS Setup Manual
5
Chapter 1 Getting Started
Rear View
15
12
13
14
16
17
12
UPS Port (Serial Port)
For connecting a serial UPS (Uninterruptable Power Supply).
13
USB 2.0 Connector
14
LAN Port
Connect to your network with the included Ethernet cable.
15
Power Connector
Use the included AC cable to connect to a UPS, surge protector, or power outlet.
Read the Microsoft Software License terms in the document “ms-license.doc”,
located on the TeraNavigator DVD. Remove the protective sticker from the AC
power cable to accept the terms of the license.
16
Fan
Do not block the fan. Leave enough room around the Terastation to allow airflow.
17
Anti-Theft Security Slot
You may attach a cable lock to the TeraStation for security.
Turning Off the TeraStation
Click [Start] – [Shut down] – [Yes] from the Windows Storage Server desktop to shut down the
TeraStation. Do not unplug the TeraStation without shutting it down first, or it may be damaged.
TeraStation WS Setup Manual
6
Initial Setup
Begin by inserting the TeraNavigator DVD into your computer.
If you are using an Mac OS X, please download and install "Remote Desktop Connection
Client for Mac" from Microsoft’s web site before continuing.
1
Insert the TeraNavigator DVD into your computer.
2
When "What do you want Windows to do?" is displayed, select [TeraNavigator for WS-QL/
R5] and click [OK].
TeraNavigator will launch.
If the "What do you want Windows to do?" message doesn’t appear, open the DVD and
double-click the TSNavi.exe icon
.
For Windows 7 and Vista, click [Run TSNavi.exe] when the auto-play screen is displayed.
When [A program needs your permission to continue] is displayed, click [Continue].
For OS X, double-click on the disk image, WSQL-xxx.dmg (xxx is a 3-digit number) from
the TeraNavigator DVD and mount it. Then double-click [TeraNavigator].
TeraStation WS Setup Manual
7
Chapter 1 Getting Started
3
Click [Begin Installation].
Screen on PC
4
Follow the instructions on the screen to connect the TeraStation and install NAS
Navigator2.
Network
(Hub or Router)
Power Connector
LAN Port
Fasten the plug with the strap
1
2
3
PC
Ethernet Cable
Wall Socket
Power Cable
Before detaching the sticker from the power cable, read End-User License Agreement in
"ms-license.doc", located on your TeraNavigator DVD.
5
You’ve connected to the TeraStation and installed NAS Navigator2. Click in the top
right corner of TeraNavigator to close it. (On a Mac OS, click the red button in the top left
corner.)
TeraStation WS Setup Manual
8
6
Launch NAS Navigator2.
* From Windows, double-click the [BUFFALO NAS Navigator2] icon on your desktop.
* From OS X, click on the [NAS Navigator2] icon in the Dock.
7
In Windows, right-click on the TeraStation icon,
and click [Properties] - [IP Address].
For a Mac, press and hold the Control key,
click on the TeraStation icon, then click
[Configure TeraStation] - [IP Address].
Screen on PC
8
Check [Obtain IP address automatically via
DHCP] to have DHCP configure your IP
address settings automatically. Or, you can
configure your IP address, subnet mask and
default gateway manually. Click [OK] when
done.
Screen on PC
TeraStation WS Setup Manual
9
Chapter 1 Getting Started
9
Right-click on the TeraStation icon in NAS
Navigator2, then click [Open Remote Desktop].
For OS X, hold the Control key, click on the
TeraStation icon, then click [Open Remote
Desktop].
If you see the message, “The source of this
remote connection cannot be identified. Do
you still want to connect?", click [Connect].
If the message "Cannot verify the computer ID
of the destination" is displayed, click [Yes] or
[Continue].
Screen on PC
10
Enter the user name and the password.
Click [OK].
By default:
User name: Administrator
Password: password
Screen on Remote Desktop
11 Windows Storage Server will launch in the
Remote Desktop Screen.
Run Windows Update.
Click [Start] – [All Programs] – [Windows Update].
Step through the wizard to complete the update.
The TeraStation must be connected to the Internet
to perform the update.
Screen on Remote Desktop
Anti-virus software is strongly recommended for Windows Storage Server.
TeraStation WS Setup Manual
��
10
Set the time.
12
1.Double click on the time in the task tray.
Screen on Remote Desktop
2.Set the correct date and time, then click [OK].
Time zone settings can be changed if necessary.
13
Create a shared folder (share).
1.In Windows Storage Server, click [Start] – [All Programs] – [Administrative Tools] –
[Windows Storage Server Management].
2.Double-click [Buffalo Tool].
3.Click [Create Shared Folders].
4. Right-click [Shares], then select [New Share].
5. When the "Share a Folder" wizard opens, click
[Next].
6. Enter [D:\share] in [Folder Path] and click [Next].
7. The message, "Do you want to create a shared
folder?" is displayed. Click [Yes].
8. Enter [share] in [Share name] and click [Next].
Screen on Remote Desktop
9. Select [Administrator has full access; other users
have read and write access] and click [Finish].
10.When "Sharing was successfull." is displayed,
click [close].
11.Right-click on the shard folder, then select
[Properties]-[Security]. Click [Add] menu and
select the user name as necessary.
Adding [guest] permits access from any users.
Check [Full Control] from [Permission to Guest]
menu, then click [OK].
Screen on Remote Desktop
12.Click [Local User and Group (Local)] in [Buffalo Tool].
13.Select [Local Users and Groups (Local)] – [Users]. Double-click [Guest] from [Name]. Guest Properties will be displayed.
14.Click [General] - [Account is disabled], and uncheck the checkbox.
15.Click [OK].
TeraStation WS Setup Manual
��
11
Chapter 1 Getting Started
The above steps show the process of creating a shared folder on the TeraStation. This is
only an example. We do not recommend using the C: drive for any of your shares. Please
use the default RAID5 partition or any that you might have created.
It’s recommended that you change your TeraStation’s Administrator password from the
factory default.
1.Click [Start] – [Windows Security].
2.Click [Change Password].
3.Enter "password” in [Old Password],
and enter a new password in
[New Password] and [Confirm New
Password].
Screen on Remote Desktop
14
Double-click the TeraStation icon.
Screen on PC
15
The TeraStation’s shared folders are displayed.
In OS X, the TeraStation is mounted as a drive icon on the desktop, and displayed in the
sidebar of the Finder.
Setup is complete. You can now use the TeraStation's shared folders to save files just
like other hard drives.
TeraStation WS Setup Manual
��
12
Never disable the TeraStation's LAN port in Windows Storage Server. If you do, you will not be
able to access the TeraStation. If you disable it, you will have to perform a system recovery to be
able to use the TeraStation again.
Opening the TeraStation's shared folder from other computers
Install NAS Navigator2 on each computer that will be accessing the TeraStation. You may install
NAS Navigator2 from the included TeraNavigator DVD or download it from www.buffalotech.
com. Once NAS Navigator2 is installed, you can open shared folders as described in the previous
section.
Configuring RAID
By default, the TeraStation is configured with Drive C, a mirrored array accross drives 1 and 2, and
Drive D, a RAID 5 array accross drives 1, 2, 3 and 4. Other configurations are available. Changing
the RAID configuration will erase all data on the drives. Back up any important data before
changing RAID mode. To change RAID settings, consult the TeraStation WS User Manual. The
following RAID modes are available:
RAID 5 array - 3 or 4 hard drives are combined in a single array. Parity data equivalent to 1 hard
drive is saved, so if a single drive malfunctions, data can be recovered by replacing the failed drive.
Usable capacity is the total space of all drives combined, minus the space of a single drive.
Mirrored Volume - Partitions on 2 drives are paired in a mirror array. Identical data is written to
each partition. Usable capacity of the array is the size of whichever partition is smallest. If a drive
malfunctions, data from the volume can be recovered by replacing the failed drive.
Striped Volume - Partitions on 4 drives are combined into one array. Fast write performance makes
this one of the best performing types of volumes. No parity is stored, so if any drive fails, all data
on the volume is lost.
Spanning Volume - Unused partitions from multiple hard drives are combined in one usable volume,
allowing you to make better use of partitions that might not be usable otherwise. If any drive used
the the volume fails, all data on the volume is lost.
Simple Volumes - Drives are addressed separately in Windows. No array is used.
TeraStation WS Setup Manual
��
13
Log in to Windows Storage Server
To log in to Windows Storage Server, follow the procedure below.
1
Launch NAS Navigator2.
* In Windows, double-click the [BUFFALO NAS Navigator2] icon on your desktop.
* In OS X, click on the [NAS Navigator2] icon in the Dock.
2
Right-click on the TeraStation icon (in OS X,
hold control and click the icon), and select [Open
Remote Desktop] from the dropdown menu.
If two or more LinkStations and TeraStations are
on the network, multiple icons are displayed.
Click on your TeraStation’s icon.
Note: If the message "Cannot verify the
computer ID of the destination" is displayed,
click [Yes] or [Continue].
3
Screen on PC
Enter your user name and password, and click
[OK].
Default User name: Administrator
Default Password: password
After you log in, change the password for
security purposes.
4
Screen on Remote Desktop
Windows Storage Server will launch in the Remote
Desktop Screen.
To use an OS X Mac with the TeraStation, please download and install "Remote Desktop
Connection Client for Mac from Microsoft’s website. Use version 1.0.3 if you are using Mac
OS X 10.3.9, or version 2 for later versions of OS X. After installing the Remote Desktop
Connection Client for Mac, you will be able to open the remote desktop and change
TeraStation settings.
TeraStation WS Setup Manual
��
14
Optional Software
Chapter 2
Additional Information
Several optional software packages are included with your TeraStation. They can be installed
from the TeraNavigator DVD. When TeraNavigator opens, click [options] to install optional
software.
NAS Navigator2
NAS Navigator2 is the TeraStation’s client
utility. It lets you easily find and configure your
TeraStation on the network.
NAS Navigator2 is installed automatically when
you run the setup program in TeraNavigator.
From [options], you can easily install it on other
computers.
Screen on PC
Memeo Backup
Memeo Backup lets you easily back up data from your computer to the TeraStation. After
installing it, refer to [(All) Programs] - [BUFFALO] - [Memeo Backup] - [Memeo Backup ]
for instructions and documentation.
Back up your data!
No matter how secure the TeraStation is, there is always a chance that it will fail. An accident,
controller failure, or lightning strike could lose all data on the TeraStation. Always back up your
data on a regular basis!
One simple way to back up data is to connect a Buffalo external USB hard drive to the TeraStation
and configure the TeraStation to back up all important data to it regularly.
TeraStation WS Setup Manual
��
15
Chapter 2 Additional Information
Troubleshooting
Does the installation program not find your TeraStation on the network? Are you unable
to open the configuration utility? Here are some common causes of problems installing
TeraStations, with solutions.
Common Problems:
Problem 1 - Cables not connected properly.
The TeraStation is not physically connected or has a bad connection. Reconnect the AC and
Ethernet cables. Restart your computer and the TeraStation.
Problem 2 - Firewall software is enabled or running in the background.
Disable or uninstall the firewall and run the installer again.
Problem 3 - Both wireless and Ethernet networks are connected.
Disable any network connections on your computer besides the main wired Ethernet
connection.
Problem 4 - Defective Ethernet cable or the connection is not stable.
Replace the Ethernet cable. Use a different port on the hub to connect.
Problem 5 - Your NIC, card, or adapter is malfunctioning.
Replace the NIC, card, or adapter.
Problem 6 - Your network is experiencing low speed or connection problems.
Configure the NIC and hub in 10M half-duplex or 100M half-duplex mode. Some network
devices may have trouble connecting if the transfer mode is set to Auto Negotiation.
Problem 7 - There is a network bridge.
Delete any unused network bridges.
Problem 8 - You are searching from a different network.
To communicate with the TeraStation, your PC and the TeraStation must be on the same
subnet. Connect the TeraStation and your PC to the same router, hub, or network.
Problem 9 - TCP/IP does not work properly.
Reinstall the NIC drivers on your PC.
Problem 10 - Remote Desktop Connection Client for Mac is not installed on Mac.
Before using the TeraStation with an OS X Mac, download and install the Remote Desktop
Connection Client for Mac from Microsoft's web site. Use version 1.0.3 if you are using Mac
OS X 10.3.9, or version 2 for later versions of OS X.
TeraStation WS Setup Manual
��
16
Chapter 2 Additional Information
■ If shared folders on the TeraStation suddenly stop working
If IP addresses or workgroup names on your network change, you may be no longer able to
access network shares on the TeraStation. If this happens, use NAS Navigator2 to find the
TeraStation on the network and make new links to your shares.
■ If NAS Navigator2 finds the TeraStation but shared folders don’t open
Did you have a power outage? Was your TeraStation unplugged or turned off without being
shut down properly? The TeraStation’s firmware may be corrupted.
Use the TeraNavigator DVD included with your TeraStation to perform a system recovery.
Note that all data on drive 1 (and any array that uses it) will be erased by the system recovery
process.
TeraStation WS Setup Manual
��
17
Chapter 2 Additional Information
System Recovery
If Windows Storage Server stops working properly, use the TeraNavigator DVD included with
your TeraStation to perform a system recovery. Note that all data on drive 1 (and any array
that uses it) will be erased by the system recovery process.
1
Turn off the TeraStation.
Click [Start] – [Shut down] – [Yes] from the Windows Storage Server desktop. When
shutdown is complete, the green power button will turn off.
2
Attach an external USB DVD drive to the TeraStation. Insert the TeraNavigator DVD.
3
Hold in the Recovery Button on the TeraStation, and press the Power Button. The
recovery process will begin.
4
When the first part of the recovery process is complete, the TeraStation will automatically
shut down.
5
Remove the TeraNavigator DVD, disconnect the DVD drive, hold in the Recovery Button,
and press the Power Button again. The TeraStation will complete the recovery process
and restart automatically.
Note: During recovery, the green power button flashes and the message "TeraStation
Booting System" is displayed on the LCD panel.
After system recovery, your TeraStation will be configured as follows:
Drive 1 - One 30 GB basic partition. The remaining space is unallocated.
Drives 2 - 4 Partitions are not visible. In Windows Disk Management, they’re displayed as
“foreign”.
In Windows Disk Management, right-click on a “foreign” partition, and select [Import Foreign
Disks] from the menu. The partitions will become visible. Right-click a partition and click
[Reactivate Volume] to rebuild the RAID array.
To build a RAID array using Drive 1, you must convert the usable space on drive 1 from [Basic
Disk] to [Dynamic Disk]. Right-click the basic disk in the Windows Disk Management and
select [Convert to Dynamic Disk].
TeraStation WS Setup Manual
��
18
Appendix
Specifications
Check www.buffalotech.com for the latest specifications, manuals, and updates.
Operating System
Microsoft Windows Storage Server 2003 R2 Express Edition
A copy of the Microsoft End-User License Agreement “ms-license.doc” is
available on the TeraNavigator DVD. Please read it.
Interface (LAN)
Interface: Complies with IEEE802.3ab (1000BASE-T)
Complies with IEEE802.3u (100BASE-TX)
Complies with IEEE802.3 (10BASE-T)
Transfer Speed: 10/100/1000 Mbps
Number of ports: 1 (AUTO-MDX)
Connector type: RJ-45
Interface (USB)
Interface: USB Standard Revision 2.0
Data Transfer Speed: 480 Mbps (Logical value) Maximum
Connector: 2 x USB Series A
USB printers are not supported.
Interface (Serial)
Interface: UPS (D-SUB 9 pin) X 1
Hard Drives
Disk Structure: Drive C is a mirrored array accross drives 1 and 2, and Drive
D is a RAID 5 array accross drives 1, 2, 3 and 4.
If a hard drive malfunctions, replace it with another Buffalo OP-HD series
drive of the same capacity, or larger. Spare drives are available from Buffalo
Technology and selected retailers.
Power
AC 100 - 240 V 50/60Hz / ~75 W (Average)
Size / Weight
6.7” x 8.5” x 9.1” (170 mm × 215 mm × 230 mm) / ~8kg
Operating Environment Temperature 41° - 95° F (5° - 35° C) , Humidity 20 - 80% (no condensation)
Compatible Operating Windows 7 (32 bit/64 bit), Vista (32 bit/64 bit), Windows XP, Windows 2000
Systems
Windows Media Center Edition 2004/2005
Windows Server 2008, Windows Server 2003, Windows 2000 Server
Mac OS X 10.3.9 or later
TeraStation WS Setup Manual
��
19
Appendix
Compliance Information
FCC Information
This equipment has been tested and found to comply with the limits for a Class A digital
device, pursuant to Part 15 of the FCC Rules. These limits are designed to provide
reasonable protection against harmful interference when the equipment is operated
in a commercial environment. This equipment generates, uses, and can radiate radio
frequency energy and, if not installed and used in accordance with the instruction manual,
may cause harmful interference to radio communications. Operation of this equipment
in a residential area is likely to cause harmful interference in which case the user will be
required to correct the interference at his own expense.
CE Mark
This is a Class A product. In a domestic environment, this product may cause radio
interference, in which case the user may be required to take adequate measures.
Environmental Information
• The equipment that you have purchased required the extraction and use of natural
resources for its production.
• The equipment may contain hazardous substances that could impact health and the
environment.
• In order to avoid the dissemination of those substances in our environment and to
diminish the load on natural resources, we encourage you to use the appropriate takeback systems.
• The take-back systems will reuse or recycle most of the materials of your end of life
equipment appropriately.
• The crossed-out wheeled bin symbol invites you to use those systems.
• If you need more information on the collection, reuse and recycling systems, please
contact your local or regional waste administration.
TeraStation WS Setup Manual
��
20
Appendix
Contact Information
North America
North American Technical Support by phone is available 24 hours a day, 7 days a week.
(USA and Canada).
Toll-free: (866) 752-6210 | Email: [email protected]
Europe
Buffalo Technology provides technical support in English, German, French, Italian, and
Spanish.
UK
0845 3511005
Austria
08101 0251552
Belgium 0787 99917
Denmark 70150919
Finland 010802812
France 0811 650220
Germany 01801 003757
Ireland 1890 719901
Italy 848 782113
Netherlands 09000401256
Norway 81000050
Spain 9018 10750
Sweden 0771404105
Switzerland 0848 560374
For all other regions please contact +353 61 704617
www.buffalo-technology.com/contact
TeraStation WS Setup Manual
��
21
Appendix
Asia Pacific
Australia
China
TEL: 1300 761 310
TEL: 86-800-820-8262
email: [email protected]
e-mail: [email protected]
Hong Kong
India
TEL: 852-2345-0005
TEL: 1-8004256210
e-mail: [email protected]
e-mail: [email protected]
Indonesia
Malaysia
TEL: 021-6231-2893
TEL: 03-5032-0138
e-mail: [email protected]
Philippines
Republic of Korea
TEL: 2-688-3999
e-mail: [email protected]
TEL: 02-2057-2095
e-mail: [email protected]
Singapore
Taiwan
TEL: 65-6297-2085
TEL: 0800-660-886
e-mail: [email protected]
e-mail: [email protected]
Thailand
TEL: 02-716-6669
Other Areas
Please contact the shop or distributor where you purchased the unit, referring to the attached warranty card issued by the distributor.
TeraStation WS Setup Manual
��
22