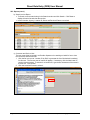
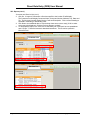
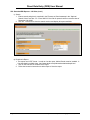
1
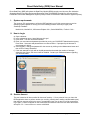
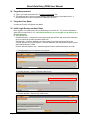
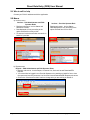
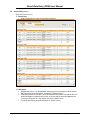
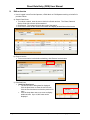
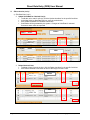
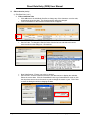
Direct Data Entry User Manual The Ohio Department of Aging 50 W. Broad Street, 9th floor Columbus, OH 43215 Direct Data Entry (DDE) User Manual Table of Contents I. II. III. IV. V. VI. System requirements ...........................................................................................................1 How to Login ........................................................................................................................1 Session timeout....................................................................................................................1 Forgotten password .............................................................................................................2 Forgotten User Name...........................................................................................................2 Initial Login Screen and User Roles.....................................................................................2 a) The four Role IDs .................................................................................................................... 2 VII. Who to call for help ..............................................................................................................3 VIII. Menus ..................................................................................................................................3 a) b) c) d) e) IX. Invoice Entry ........................................................................................................................6 a) b) c) X. Invoices menu ......................................................................................................................... 3 Reports menu .......................................................................................................................... 3 Maintenance menu.................................................................................................................. 4 Print ......................................................................................................................................... 5 Logout...................................................................................................................................... 5 Start New Invoice – PAA Administrator or PAA Operator Role .............................................. 6 Start New Invoice – Provider Operator Role ........................................................................... 8 Enter New Invoice ................................................................................................................... 9 Edit an Invoice....................................................................................................................13 a) b) Search Detail Lines ............................................................................................................... 13 Remove Invoice..................................................................................................................... 13 XI. Submit Invoice....................................................................................................................16 XII. Invoice Status Views ..........................................................................................................18 a) b) c) Invoices by Status ................................................................................................................. 18 Filter the List .......................................................................................................................... 18 Invoice Views Available......................................................................................................... 19 XIII. Reports...............................................................................................................................19 a) b) c) Invoice Report ....................................................................................................................... 19 Search Invoice Report........................................................................................................... 20 Consumer and Service Lists ................................................................................................. 20 XIV. Download EDI Reports – All Roles ....................................................................................22 a) b) c) d) Reports Available for Download ............................................................................................ 22 Select Provider Location ....................................................................................................... 22 Search ................................................................................................................................... 23 Download a Report................................................................................................................ 23 Created by The Ohio Department of Aging, Revised 01/04/2007, Rev. 2 Direct Data Entry (DDE) User Manual Date Updated 09/15/2006 01/04/2007 Version 1.0 2.0 Description Initial Version Program Changes Contributors ODA IT Dept. ODA IT Dept. Update Author C. Brickner C. Brickner Created by The Ohio Department of Aging, Revised 01/04/2007, Rev. 2 Direct Data Entry (DDE) User Manual Direct Data Entry (DDE) will replace the Data Entry Module (DEM) currently used by many Pre-Admission Screening System Providing Options and Resources Today (PASSPORT) providers to enter and submit PASSPORT Information Management System (PIMS) invoices to PASSPORT Administrative Agencies (PAAs). I. System requirements The minimum PC requirements to utilize the DDE application are 512mb system memory and an operating system capable of running one of the following browser versions (or higher) with JavaScript "enabled". Mozilla/4.0+, Mozilla/5.0+, MS Internet Explorer 6.0+, Gecko/20060728+, Firefox/1.5.0.6 + II. How to Login a) b) c) d) Open a browser. In the address bar enter: https://dde.age.ohio.gov/ Press enter. This site can be bookmarked. Enter your user name and password provided to you by your PASSPORT Administrative Agency. Press enter. Username and password are not case-sensitive. If prompted by the browser to save password, decline. e) Once logged in, change the password for the account by clicking on the Maintenance button and then click on Change Password. f) If the user attempts to login with an invalid password and exceeds the number of attempts allowed by the system, the account will be disabled. Contact your PAA administrator regarding your account status. III. Session timeout The user’s session will timeout after 60 minutes of inactivity. If, for a period of time, you leave the DDE application alone or perform actions (ex: scrolling, entering data, reading a downloaded report) that does not generate a call to the server, the application logs you out and you will be prompted to log in again. A timer will appear on the screen and count down to inform the user when the session will expire. Ex: YOUR SESSION WILL EXPIRE IN 00:59:48. Page 1 Created by The Ohio Department of Aging, 01/04/2007, Rev. 2 Direct Data Entry (DDE) User Manual IV. Forgotten password a) Type in your User Name then click, “Forgot my password” link. b) The password will be sent to the email address associated with the User Name profile. A deactivated account cannot request their password to be reset. V. Forgotten User Name Contact your PAA for a forgotten User Name. VI. Initial Login Screen and User Roles Once logged in, the initial screen will vary depending on your Role ID. The screen will indicate in green text your login Role ID. Ex: Welcome 6vkorteprov, you are logged on and working as a Provider Operator. a) The four Role IDs PAA Administrator – Controls accounts created under specific PAA and can perform data entry and view reports for provider operators within PAA PAA Operator – Performs data entry and view reports for provider operators within PAA Provider Operator Invoice and Reports – Performs data entry and can generate reports for their authorized locations in a PAA Provider Operator Reports only – Generates reports for their authorized locations in a PAA x PAA Administrator & PAA Operator Initial Screen x Provider Operator - Invoice & Reports Initial Screen x Provider Operator - Reports Only Initial Screen Page 2 Created by The Ohio Department of Aging, 01/04/2007, Rev. 2 Direct Data Entry (DDE) User Manual VII. Who to call for help Contact your PAA for assistance with the application. VIII.Menus a) Invoices menu Invoices – PAA Administrator and PAA Operator Roles x Displays sub-menus: Invoice Status and Work as a Provider. x Data displayed will vary according to the option selected from Invoice View. x To enter an invoice these Roles must work on behalf of a provider. Invoices – Provider Operator Role x Displays sub-menu: Invoice Status x Data displayed will vary according to the option selected from Invoice View. b) Reports menu Reports – PAA Administrator and PAA Operator Roles x Displays sub-menus: Invoice Report, Consumer List, Services List and Download EDI Reports. x You must either be logged in as a Provider Operator or be working on behalf of one to view the reports and use the Consumer List, Services List and Download EDI Reports sub-menus. x Click on the “Work as a Provider” button to change who you are working on behalf of. Page 3 Created by The Ohio Department of Aging, 01/04/2007, Rev. 2 Direct Data Entry (DDE) User Manual VIII. Menus (con’t.) b) Reports menu (con’t.) x Click the Work As Myself button to logout of the provider location you are working on behalf of. Reports – Provider Operator Role x Displays sub-menus: Invoice Report, Consumer List, Services List and Download EDI Reports. Reports – Provider Operator Reports Only Role x Displays sub-menu: Download EDI Reports. c) Maintenance menu Maintenance – PAA Administrator x Displays sub-menus: Change My Password and User Maintenance. Page 4 Maintenance – PAA Operator and Provider Operators Roles x Displays sub-menu: Change My Password. Created by The Ohio Department of Aging, 01/04/2007, Rev. 2 Direct Data Entry (DDE) User Manual VIII. Menus (con’t.) d) Print All Roles x The Print button converts the information on the page to a printer friendly view. Welcome 6dbrownadmin, you are logged on and working as a PAA Administrator x Click the browser’s back button to return to the application. Printer friendly view e) Logout All Roles x Click Logout to end the session. Welcome 6dbrownadmin, you are logged on and working as a PAA Administrator Page 5 Created by The Ohio Department of Aging, 01/04/2007, Rev. 2 Direct Data Entry (DDE) User Manual IX. Invoice Entry To enter an invoice you must be logged in as a Provider Operator, a PAA Administrator or PAA Operator working on behalf of a provider location. a) Start New Invoice – PAA Administrator or PAA Operator Role THE PAA SHALL ONLY ENTER AN INVOICE ON BEHALF OF A PROVIDER ONCE THE PROVIDER HAS SUBMITTED THE INVOICE TO THE PAA IN PAPER FORM. AT NO TIME SHALL A PAA ENTER AN INVOICE INTO THE DDE APPLICATION FOR A PROVIDER UNTIL RECEIPT OF THIS PAPER INVOICE. 1. From the Invoices screen, click Work as a Provider. Either button will bring you to the Username and provider location list. 2. In the Company column, look for the correct provider location, select the Username. If necessary, click a column heading to sort the information in ascending or descending order. [email protected] [email protected] [email protected] [email protected] [email protected] [email protected] [email protected] [email protected] [email protected] [email protected] [email protected] [email protected] [email protected] [email protected] 3. To Search, enter a search string in the Search Text text box and click Search. Click Reset to display the entire list and clear the text box. [email protected] [email protected] [email protected] [email protected] [email protected] [email protected] [email protected] Page 6 Created by The Ohio Department of Aging, 01/04/2007, Rev. 2 Direct Data Entry (DDE) User Manual IX. Invoice Entry (con’t.) Start New Invoice – PAA Administrator or PAA Operator Role (con’t.) 4. Once a Username is selected, the application will indicate the Username you a working on behalf of. Ex: Welcome 6dbrownadmin, you are registered as a PAA Administrator working on behalf of 6vkorteprov 5. Select the correct provider location ID. x Click the list icon next to “Select a Provider Location and PAA from the drop-down list” to generate the list of Authorized Location(s) for this user. The first ten rows of names will appear. If necessary, click the Next button to see the next ten names. x Or, in the text box, type any characters(s) of the provider or location ID. Select the location from the list that populates. List icon 6. To search for a Location ID, type the first characters of the name in the text box. Click Search. Click the Location ID name to select it. 7. Click Start a New Invoice. Proceed to Section IX. c) Enter New Invoice. Page 7 Created by The Ohio Department of Aging, 01/04/2007, Rev. 2 Direct Data Entry (DDE) User Manual IX. Invoice Entry (con’t.) b) Start New Invoice – Provider Operator Role 1. From the Invoices screen, click the list icon next to “Select a Provider Location and PAA from the drop-down list” to generate the list of authorized provider location(s). The first ten names will appear. Click the Next button to see the next ten names. If a Location ID is missing, contact your PAA to have it added. Or, in the text box, type any characters(s) of the provider or location ID. Select the location from the list that populates. 2. To search for a Location ID, type the first characters of the name in the text box. Click Search. Click the Location ID name to select it. 3. Click Start a New Invoice. Proceed to Section IX. c) Enter New Invoice. Page 8 Created by The Ohio Department of Aging, 01/04/2007, Rev. 2 Direct Data Entry (DDE) User Manual IX. Invoice Entry (con’t.) c) Enter New Invoice x User is logged in as a Provider Operator, a PAA Admin or PAA Operator working on behalf of a provider location. x An invoice draft is automatically saved in the system and added to the “Invoices in Progress” list, once the Add Service(s) button is clicked and remains in “Invoices in Progress” status until submitted x Data is saved every time an action/modification is made to the invoice. x To remove an entire invoice before submitting, click Remove Invoice button. x To submit an invoice click Submit Invoice button. Submitted invoices cannot be edited. 1. From the Invoices screen, select the correct authorized provider location. 2. Click Start a New Invoice. The blank Invoice Entry screen will appear. 3. Invoice #: Enter an invoice number. Character limit is 10 characters. 4. Invoice Comments: If necessary, enter a comment to describe the invoice. 5. Consumer: Click the Consumer list icon to populate a list of consumers. The consumers listed are specific to the Location ID selected. The letter “A” after a name is a consumer with an active Service Plan. These consumers are sorted first. The letter “D” after a name is a consumer with an Inactive Service Plan. Use CTRL to select individual consumer(s) or SHIFT to select a group of consumers. Click Submit to select the consumer(s). Or type any part of the consumers first or last name or consumer number. Select the consumer from the list that populates. Page 9 Created by The Ohio Department of Aging, 01/04/2007, Rev. 2 Direct Data Entry (DDE) User Manual IX. Invoice Entry (con’t.) Enter New Invoice (con’t.) 6. Service Code: Click the Service Code list icon to populate the list of available Service Codes. Select only One Service Code and click Submit. Or type the first characters(s) of the service code description or the service code number. Select the service code from the list that populates. Displayed will be a description of the service code, unit of measure, service code number and if it is a Passthru or not (@N or @Y). 7. Passthru: The user cannot change the Passthru code. The value is based on the Service Code selected. If you attempt to change the Passthru code, an error will appear. 8. Units/Amount: When the service code is a non-passthru (Passthru = N), then a whole number (positive or negative) is entered. Amounts do not appear for non-passthru services. Amounts will be applied when the PASSPORT agency receives the invoice. When the service code is a passthru (Passthru = Y), enter the appropriate dollar amount for the passthru services. If an incorrect value is entered, an error message will appear: Units/Amount must be entered as whole numbers (positive or negative). Partial units (decimals or fractions) are not permitted by rule. Please correct the "Units/Amount" field and then resubmit. HUDSON JACQUELINE• 455371 •,Hansard Minnie• 186319•, MCCRANEY BUSHRA• 593605•, ROSEBUD VIRGINIA• 285413 •,SABATINO GEORGE• 41953 •,WALKER BARBARA• 185331 •,KUTSCHBACH ELISH• 194568 •,MARTIN HELEN• 116421 •, Page 10 Created by The Ohio Department of Aging, 01/04/2007, Rev. 2 Direct Data Entry (DDE) User Manual IX. Invoice Entry (con’t.) Enter New Invoice (con’t.) 9. Service Date(s): At least one Service Date must be selected from the calendar. Click Previous to display the previous month, click Current to display the current month and click Next to display the next month. Date(s) can be selected by: Clicking the check box under the date to select an individual day or days Clicking the name of the week (Sun, Mon, etc.) to select all those days for the month Clicking the month to select all the days in that month Date(s) can be de-selected by: Clicking the checkmark on the individual date(s) Clicking the name of the week Clicking the month 10. Comment about this line item: If necessary, type a comment about this service code. Limit of 512 characters. 11. Add Service(s): After consumer(s), service code, date(s) and comments are selected/entered; click Add Service(s). This will populate the Detail Lines section and a confirmation will be generated by the system: Detail record(s) added successfully. BOLTON DAVE• 350078 •, SMITH Page 11 Created by The Ohio Department of Aging, 01/04/2007, Rev. 2 Direct Data Entry (DDE) User Manual IX. Invoice Entry (con’t.) Enter New Invoice (con’t.) 12. Detail Lines: Detail Lines section is group and sorted by consumer. 13. Next steps: Repeat steps 5 thru 11 to bill additional service(s) for a consumer(s) on same invoice. Edit the invoice before submitting. Proceed to X. Edit an Invoice. Stop and finish the invoice later. Once the Add Service(s) button is clicked or when an action/modification is made to the invoice, an invoice draft is saved and added to the “Invoices in Progress” list. See Section XII. Invoice Status Views. To submit the invoice, proceed to Section XI. Submit Invoice. Page 12 Created by The Ohio Department of Aging, 01/04/2007, Rev. 2 Direct Data Entry (DDE) User Manual X. Edit an Invoice x User is logged in as a Provider Operator, a PAA Admin or PAA Operator working on behalf of a provider location. a) Search Detail Lines x To conduct a search, enter the text or date in the Search text box. The Client, Date and Service Code Info columns will be searched. x Click Search. The system will return the result of the search. x Click Clear to clear out the results of the search and display all detail lines of the invoice. b) Remove Invoice x To remove an entire invoice before submitting, click Remove Invoice button. c) Edit Detail lines 1. Detail line Row Count: The first 20 rows of billing detail is displayed. Click the Next button to show the next 20 rows. Click the Previous button to show the previous 20 rows. Click the drop down next to row count to display additional rows. Up to 10,000 rows can be displayed. Page 13 Created by The Ohio Department of Aging, 01/04/2007, Rev. 2 Direct Data Entry (DDE) User Manual X. Edit an Invoice (con’t.) c) Edit Detail lines (con’t.) 2. Update Units/Rate for Checked Line(s) To edit the unit or rate for a line(s), click the Update checkbox for the specific line/client. In the New Unit(s) or New Rate text box, enter the revised value. Click Update Units/Rate for Checked Lines button. Confirmation will be generated by the system: Changes to Units/Rate for selected Consumers were made as requested. Before CECIL - 80515 PHILLIP P. - 2652 JUDITH - 36032 After CECIL - 80515 PHILLIP P. - 2652 JUDITH - 36032 3. Delete Checked Lines To delete a line(s) from the invoice, click the Delete checkbox for the specific line/client. Click Delete Checked Lines button to remove the line(s) from the invoice. CECIL - 80515 Before PHILLIP P. - 2652 PHILLIP P. - 2652 CECIL - 80515 After PHILLIP P. - 2652 PHILLIP P. - 2652 Page 14 Created by The Ohio Department of Aging, 01/04/2007, Rev. 2 Direct Data Entry (DDE) User Manual X. Edit an Invoice (con’t.) c) Edit Detail lines (con’t.) 4. Edit an Individual Line Click edit next to the individual client/line to change any of the elements––service code, units/amount or service date. The client/consumer cannot be changed. Invoice information for the individual consumer/line will appear. MARY - 875152 JULIE F. - 60783 Service Code: To change the Service Code, click the list icon and select the correct service code from the dialog box. Click submit. MARY ALTIERE – 875152 • New Units/Amount: Enter a new unit(s) or amount. Service Date: Click the Calendar icon next to the date text box to display the calendar. Select the correct date. Click the forward/back icons to go forward/back a month or click the drop down arrow next to the month or year to change the month or year. Click Close to close the dialog box without changing the date. MARY ALTIERE – 875152 • Page 15 Created by The Ohio Department of Aging, 01/04/2007, Rev. 2 Direct Data Entry (DDE) User Manual X. Edit an Invoice (con’t.) c) Edit Detail lines (con’t.) 4. Edit an Individual Line Click Cancel to cancel the updates. Click Apply Changes to apply the updates. The system will return a confirmation: Your changes were applied to the selected detail line. MARY ALTIERE – 875152 • ALTIERE, MARY – 875152 XI. Submit Invoice x User is logged in as a Provider Operator, a PAA Admin or PAA Operator working on behalf of a provider location. a) Once all charges are entered and edits/changes confirmed, click Submit Invoice b) A dialog box will appear asking the user to, “…certify that the information contained in this invoice is accurate…” Click Ok to submit the invoice or click Cancel to cancel the submit invoice process. The user will be brought back to the Invoice Information screen. Page 16 Created by The Ohio Department of Aging, 01/04/2007, Rev. 2 Direct Data Entry (DDE) User Manual XI. Submit Invoice (con’t.) c) The user will receive a confirmation from the system: The invoice has been successfully "Submitted" to the ODA PIMS system. The details of the invoice will be displayed. SMITH, EILEEN - 347890 BESSIE LARRY – 7191215 BESSIE LARRY – 7191215 d) Coversheet x Click Generate a Coversheet button to create the PASSPORT Invoice for Direct Services coversheet. x Click the browser’s print button to send to printer. x Click the browser’s back button to return to the submitted invoice details. Page 17 Created by The Ohio Department of Aging, 01/04/2007, Rev. 2 Direct Data Entry (DDE) User Manual XII. Invoice Status Views x Click the Invoices button to display the Invoice Status screen. x User is logged in as a Provider Operator, a PAA Administrator or PAA Operator or PAA Administrator or PAA Operator working on behalf of a provider location. x The PAA Administrator and PAA Operator Roles can view all invoices and view Provider invoices by working on behalf of a provider location. The Provider Operator’s view is limited to their Authorized Location(s). x Invoice Views Available: Invoices Received by ODA, Invoices Submitted to ODA, Invoices Under Review, Invoices Under Review with Remittance Advice, Invoices In Progress, Invoices with Remittance Advice and Rejected Invoices x Click on a column heading to sort data in ascending or descending order. x Click an invoice number to view the details or to finish an invoice in progress. a) Invoices by Status x The Invoices by Status score card is displayed at the bottom of every Invoice View. x The table will list the status of all invoices for the PAA Administrator and PAA Operator Roles. x The table for the Provider Operator Role will list the status of all invoices for their Authorized Location(s). b) Filter the List x The “Filter the List Below to Only Show Invoices Submitted After” a specified date is available with all Invoice Views except Invoices in Progress. x To filter the list, click the Calendar icon to display the calendar. x Select a date. Click the forward/back icons to go forward/back a month or click the drop down arrow next to the month or year to change the month or year. Click Close to close the dialog box without changing the date. x Click Go. A filtered list will display based on the date selected. Page 18 Created by The Ohio Department of Aging, 01/04/2007, Rev. 2 Direct Data Entry (DDE) User Manual XII. Invoice Status Views (con’t.) c) Invoice Views Available x Invoices Received by ODA – Displays invoices received by ODA PIMS/PASSPORT system. x Invoices Submitted to ODA – Displays invoices sent to ODA PIMS/PASSPORT, but not yet acknowledged as received. x Invoices Under Review – Displays invoice under review by an ODA agent or a process. No remittance available. x Invoices Under Review with Remittance Advice – Displays invoices under review by an ODA agent or a process. Remittance advice available for a portion of the invoice. x Invoices In Progress – Displays invoices in progress–not submitted to ODA. The user is able to select an invoice and make edits and changes. Invoices stay in progress until submitted. x Invoices with Remittance Advice – Displays invoices paid with remittance advice available in DDE. x Rejected Invoices – Displays invoices rejected in full by case manager. XIII.Reports x The PAA Administrator and PAA Operator Roles can display all invoices for their site and must work on behalf of a provider location to display the Provider’s consumer list, service list and to download EDI reports. The Provider Operator’s display is limited to their authorized location(s). x Click a column heading to sort data in ascending or descending order. a) Invoice Report x Click the Reports button to display Invoice Report. x The first 30 rows will be displayed. Click Next to see additional data or click the drop down arrow to select more rows to be displayed. Click the previous button to go back 30 rows. Page 19 Created by The Ohio Department of Aging, 01/04/2007, Rev. 2 Direct Data Entry (DDE) User Manual XIII. Reports (con’t.) b) Search Invoice Report x To Search, enter a search string in the Search text box and click Search. Click Reset to display the entire list and clear the text box. x Invoice Number, Agency, Location ID, Status and Received Date are searched. c) Consumer and Service Lists The user must either be logged in as Provider Operator or be working on behalf of one to view the Consumer and Service Lists. 1. Click the list icon next to “Location ID by PAA” to generate the list of Authorized Location(s) for this user. The first ten rows of names will appear. If necessary, click the Next button to see the next ten names. To search for a Location ID, type the first characters of the name in the text box. Click Search. 2. Click the Location ID name to select it. Page 20 Created by The Ohio Department of Aging, 01/04/2007, Rev. 2 Direct Data Entry (DDE) User Manual XIII. Reports (con’t.) Consumer and Service Lists (con’t.) 3. Click Go. A report of Consumers or Services specific to the location ID will display. The Consumer list will display Consumer Name, Consumer Number, Address, City, State and Zip. The Services Lists will display Service Code and Description. Click a column heading to sort data in ascending or descending order. 4. Click Next to see additional data or click the drop down arrow next to row(s) X-XX to select more rows to be displayed. Click the Previous button to go back. 5. To download the report, click “Click here to download your Consumer List to a spreadsheet as a CSV file.” Follow the browser’s download instructions. The file can be opened in Microsoft Excel. Consumer List Services List Page 21 Created by The Ohio Department of Aging, 01/04/2007, Rev. 2 Direct Data Entry (DDE) User Manual XIV. Download EDI Reports – All Roles x The PAA Administrator and PAA Operator Roles must work on behalf of a provider location to display the information on this page. x The Provider Operator Invoices and Reports and the Provider Operator Report’s Only Roles display is limited to their authorized location(s). x A table of reports available for download (for the last 90 days) will display. a) Reports Available for Download x Claims Acknowledgment – Report of rejected claims. Naming convention CA + invoice number entered in Invoice Entry section. Ex: CABest082006.pdf x Activity Summary – Status of report of invoice submitted. Naming convention AS + invoice number entered in Invoice Entry section. Ex: ASBest082006.pdf x Remittance Advice – Remittance Advice reported generated from PIMS. x Reports by Type (last 90 days) – Displays a score card of reports available for download for the last 90 days. b) Select Provider Location 1. In the text box, type any characters(s) of the provider or location ID. Select the location from the list that populates. Or click the list icon next to “Select a Provider Location and PAA from the drop-down list” to generate the list of Authorized Location(s). The first ten rows of names will appear. If necessary, click the Next button to see the next ten names. To search for a Location ID, type the first characters of the name in the text box. Click Search. 2. Click the Location ID name to select it. Click Go. Page 22 Created by The Ohio Department of Aging, 01/04/2007, Rev. 2 Direct Data Entry (DDE) User Manual XIV. Download EDI Reports – All Roles (con’t.) c) Search 1. Enter a search string that is contained in the Filename or Date timestamp in the “Optional Search Criteria” text box. Ex: Enter 2005/12/16 to find all reports that have a creation date of December 16th, 2005. 2. Click Go. Click Reset to clear the search text box and display all reports available. d) Download a Report x The reports are in PDF format. In order to view the report, Adobe Reader must be installed. A free download is available here: http://www.adobe.com/products/acrobat/readstep2.html 1. Click on the Filename or the Date of the report. 2. Follow the browser’s instructions to either Open or Save the report. Page 23 Created by The Ohio Department of Aging, 01/04/2007, Rev. 2