1
PJP-25UR
Conference Microphone Speaker
User's Manual
Contents
INTRODUCTION
INTRODUCTION
Introduction ................................................................................2
Controls and Functions..............................................................3
PREPARATION
Connection ..................................................................................5
PREPARATION
Check the following before connecting this unit to the
computer...................................................................................5
Step 1: Connecting this unit .....................................................5
Step 2: Checking the connection ..............................................6
Step 3: Installing this unit.........................................................7
OPERATIONS
Basic Operations.........................................................................8
Using the PJP-25UR Controller................................................9
OPERATIONS
Installing the PJP-25UR Controller..........................................9
Basic operations of the PJP-25UR Controller........................11
About the "PJP-25UR Controller" screen ..............................12
Checking the optimum installation method............................14
Configuring the shortcut key..................................................14
Saving the settings of this unit ...............................................15
Testing the audio ....................................................................16
Resetting the settings of this unit ...........................................16
ADDITIONAL
INFORMATION
Using the Latest Features ........................................................17
Software Licensing Agreement ..............................................17
Updating the firmware via a network.....................................18
Updating the firmware using a local file ................................19
Checking the firmware release note .......................................19
ADDITIONAL INFORMATION
Troubleshooting........................................................................20
Q1: LED indicator does not light up ......................................20
Q2: Have an audio problem....................................................20
Specifications ............................................................................21
General ...................................................................................21
Audio ......................................................................................21
1
Introduction
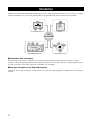
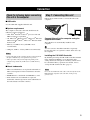
Thank you for purchasing Yamaha PJP-25UR. This product is a microphone/speaker unit to be connected to a computer
with the USB cable for use as its audio terminal. Before operating this unit, please read this manual carefully.
PJP-25UR (2 persons)
Headset
Web
conference
PJP-100UH (6 persons)
PJP-25UR (3 persons)
■Connection with a computer
This unit can be connected to a computer for use as the microphone/speaker unit of the web conference or VoIP
telephone system. Incorporating this unit as the microphone speaker into the web conference or VoIP telephone system
provides a smoother conferencing experience for both listeners and talkers.
■Arm-type microphones for high audio quality
Depending on the using environment, the microphones can control the audio pickup area so that the clear conversation is
assured.
2
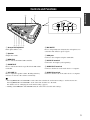
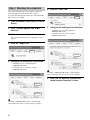
Controls and Functions
INTRODUCTION
2
1
7
8
9
0
3 4 5 1 6
1 Arrayed microphones
6 MIC MUTE
Picks up the talker's voice.
Press to temporarily turn off (mute) the microphones. To
cancel the mute function, press it again.
2 Speaker
Outputs the sounds.
7 USB port
Connect to the computer using the USB cable.
3 MENU/PC
Press to activate the PJP-25UR Controller.
8 DC IN 5V terminal
Connect the AC adapter (sold separately).
4 SHORTCUT
Press to activate the function specified in the PJP-25UR
Controller.
9 AUDIO OUT terminal
5 VOLUME +/–
0 AUDIO IN terminal
Press to adjust the speaker volume. Holding either key
increases or decreases the volume continuously.
Connect to the line-out on the audio device or computer.
Connect to the line-in on the audio device or computer.
y
• Pressing MENU/PC and VOLUME + at the same time switches the environment setting to "Conference Room".
Pressing MENU/PC and VOLUME – at the same time switches it to "Normal".
For details, refer to "Changing the environment setting" (page 8).
• Holding down MENU/PC and SHORTCUT at the same time resets this unit's settings.
3
■Other
1
2
1
1 Label
2 Tripod socket hole
Provides the following information.
• MODEL No.: Model number of this unit
Use to connect a commercially available tripod.
• SER.: Serial number of this unit
■Functions of the LEDs
1
1
3
1
2
1 Microphone LEDs
3 Information LED
• Mic&Speaker mode: light in orange
• Speaker mode: turn off
• Function assigned to SHORTCUT is being used:
lights in orange
• Maximum speaker volume: blink in orange five times
• Auto-attenuator is running: blinks in orange
• Changing "Environment" (Conference Room): blink
in orange for three seconds
Note
• Changing "Environment" (Normal): blink in orange
for three seconds (middle LED only)
• Reset operation: blink in orange twice (from left to right)
2 MIC MUTE LED
• Normal: turns off
• MIC mute: lights in orange
4
Since this unit works according to the USB standard, it may turn
on the attenuator or speaker mute function automatically to
protect the system in case the unit detects high audio levels. If this
happens repeatedly, turn down the volume or use the AC adapter
(sold separately).
Connection
Check the following before connecting
this unit to the computer
Step 1: Connecting this unit
Follow the procedure below to connect this unit to the
computer.
■USB cable
Use the USB cable supplied with this unit.
PREPARATION
■System requirement
The computer connected to this unit should meet the
following system requirement.
• CPU: Intel® Pentium®/Celeron® processor with 750
MHz or higher (or equivalent)
• OS: Microsoft® Windows Vista®, Microsoft® Windows
XP Professional®/Home®, Microsoft® Windows 2000
Professional®
• Memory: 128 MB or more (256 MB or more
recommended)
• USB port: USB 1.1 or later (USB 2.0 recommended)
Notes
• Connect this unit and the computer directly. Connecting them
through a USB hub may cause problems in operation.
• Audio reproduction may be interrupted depending on the
computer usage situations (workloads or available memory
space).
Connect this unit to the computer using the
supplied USB cable.
The USB driver is automatically installed on the
computer.
y
You do not need to install the USB driver separately
because this unit is recognized as a basic audio device by
the computer.
Installing the PJP-25UR Controller
By installing and using the PJP-25UR Controller included
in the supplied CD-ROM, you can adjust this unit's
settings such as the microphone sensitivity, which cannot
be controlled with key operations. For details, refer to
"Using the PJP-25UR Controller" (page 9).
■About trademarks
• Microsoft and Windows are registered trademarks of
Microsoft Corporation in the United States and other
countries.
• EUPHONYTM is a trademark of DiMAGIC Co., Ltd.
Note
Do not use both USB and audio cable connections (between the
PJP-25UR and computer) at the same time. Doing so may
generate noise.
• Intel and Celeron are trademarks or registered
trademarks of Intel Corporation and its subsidiaries in
the United States and other countries.
5
Step 2: Checking the connection
After connecting this unit to the computer, follow the
procedure below to check whether the computer
recognizes this unit properly. In this procedure, Windows
XP is used as an example.
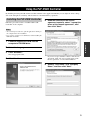
6 Click the "Voice" tab.
Click
1 From the taskbar. select [Start] - [Control
Panel].
2 Click "Sounds, Speech, and Audio
Devices".
3 Click "Sounds and Audio Devices".
The "Sounds and Audio Devices Properties" screen
appears.
7 Configure the settings as shown below.
• "Default device" in "Voice playback":
YAMAHA PJP-25UR
• "Default device" in "Voice recording":
YAMAHA PJP-25UR
4 Click the "Audio" tab.
Click
Change
5 Configure the settings as shown below.
• "Default device" in "Sound playback":
YAMAHA PJP-25UR
• "Default device" in "Sound recording":
YAMAHA PJP-25UR
Change
y
Normally, "YAMAHA PJP-25UR" is automatically
selected when this unit is connected to the computer.
8 Click "OK" to close the "Sounds and
Audio Devices Properties" screen.
Change
Change
y
Normally, "YAMAHA PJP-25UR" is automatically
selected when this unit is connected to the computer.
6
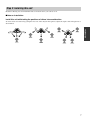
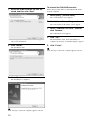
Step 3: Installing this unit
Read the following note and install this unit at a location where you want to use it.
■Note on installation
Install this unit while taking the positions of talkers into consideration.
To assure clear conversation by getting the most out of the arrayed microphones, adjust the angles of the microphones as
shown below.
PREPARATION
MENU PC SHOTRCUT
VOLUME
MIC MUTE
MENU PC SHOTRCUT
VOLUME
PJP RESET
MIC MUTE
PJP RESET
MENU PC SHOTRCUT
VOLUME
MIC MUTE
PJP RESET
7
Basic Operations
■Adjusting the speaker volume
Press VOLUME +/– to adjust the speaker volume. Holding either key increases or decreases the volume continuously.
■Turning off the microphones temporarily (MIC MUTE)
Press MIC MUTE to temporarily turn off (mute) the microphones. The MIC MUTE LED lights and the microphone
LEDs turn off during muting.
Pressing the key again cancels the mute function. (The MIC MUTE LED turns off and the microphone LEDs light.)
■Changing the environment setting
Change the setting, depending on the environment. When using in the normal environment, select "Normal". When using
in the quiet environment like a conference room, select "Conference Room".
• Press MENU/PC and VOLUME + at the same time to switch the setting to "Conference Room".
• Press MENU/PC and VOLUME – at the same time to switch the setting to "Normal".
■Activating the PJP-25UR Controller
Press MENU/PC to activate the PJP-25UR Controller.
■Activating the specified function
Press SHORTCUT to activate the function specified in the PJP-25UR Controller.
■Resetting the settings of this unit
Hold down MENU/PC and SHORTCUT at the same time to reset the settings of this unit.
8
Using the PJP-25UR Controller
By installing and using the PJP-25UR Controller included in the supplied CD-ROM, you can adjust the unit's settings
such as the microphone sensitivity, which cannot be controlled with key operations.
Installing the PJP-25UR Controller
Follow the procedure below to install the PJP-25UR
Controller on the computer.
5 Read the contents of the license
agreement carefully, select "I accept the
terms of the license agreement", and
then click "Next".
Notes
• To avoid unexpected data loss, quit all applications running on
the computer before the installation.
• Log on to the computer as an administrator when installing the
PJP-25UR Controller.
1 Load the supplied CD-ROM into the
computer's CD-ROM drive.
OPERATIONS
2 Select the language.
3 Click "Software".
The setup program starts.
4 Click "Next".
If you do not agree with the contents of the license
agreement, click "I do not accept the terms of the
license agreement" to cancel the installation.
6 Specify "User Name" and "Company
Name", and then click "Next".
9
To uninstall the PJP-25UR Controller
7 Select the folder to which the files are
saved, and then click "Next".
Follow the procedure below to uninstall the PJP-25UR
from the computer.
1 Select [Start] - [Control Panel].
The "Control Panel" screen appears.
2 Click "Add or Remove Programs".
The "Add or Remove Programs" screen appears.
3 Select "YAMAHA PJP-25UR", and then
click "Remove".
The confirmation screen appears.
4 Click "Yes".
To change the destination folder, click "Change" and
select a new destination.
8 Click "Install".
The installation starts.
9 Click "Finish".
The installation is completed.
y
If the message to reboot the computer appears, reboot it.
10
The uninstallation starts. If the uninstallation is
complete, the message "Uninstall Complete" appears.
5 Click "Finish".
y
If the message to reboot the computer appears, reboot it.
Basic operations of the PJP-25UR
Controller
This section explains about the basic operations of the
PJP-25UR Controller.
1 Connect this unit to the computer using
the supplied USB cable.
appears in the task tray (the lower right screen).
Note
To quit the PJP-25UR Controller
Follow the procedure below to quit the PJP-25UR
Controller.
1 Click
at the top right corner of the
"PJP-25UR Controller" screen.
The "PJP-25UR Controller" screen closes.
2 Right-click
in the task tray, and then
select "Exit".
The PJP-25UR Controller exits.
Do not connect more than one PJP-25UR to the computer at the
same time.
y
In the case that
does not appear after this unit is
connected to the computer, select [Start] - [All Programs]
- [YAMAHA PJP-25UR] - [PJP-25UR Controller] to start
the PJP-25UR Controller.
OPERATIONS
2 Press MENU/PC on this unit.
The "PJP-25UR Controller" screen appears.
3 Configure the settings.
Configure the settings of this unit according to the
use environment.
11
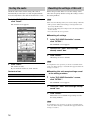
About the "PJP-25UR Controller" screen
HOME screen
1
DETAIL screen
2
A
B
3
4
C
D
5
E
6
7
8
F
G
9
H
I
@
y
To switch between HOME and DETAIL screens, click
"Speaker", the DETAIL screen is not available.
or
. When the operation mode is set to
■Items in the HOME screen
1 Check Update
6 Volume
Update the firmware of this unit. For details, refer to
"Using the Latest Features" (page 17).
Adjust the speaker volume of this unit using the slider bar.
2 Setup Wizard
Check the installation method suited to your purpose of
using this unit. For details, refer to "Checking the
optimum installation method" (page 14).
7 Power Indicator
Shows the electrical power which this unit can use for
audio output.
Shows the microphone status (speaker angles and audio
pickup area).
y
Since this unit works according to the USB standard, it
may turn on the attenuator or speaker mute function
automatically to protect the system in case the unit detects
high audio levels. If this happens repeatedly, turn down the
volume or use the AC adapter (sold separately).
4 MIC MUTE
8 Playback mode setting
3 Mic Zone
Turn off (mute) the microphones of this unit temporarily.
In this mode, the microphones of this unit do not pick up
any sounds.
To cancel the mute function, click MIC MUTE again.
y
During muting, the MIC MUTE LED (above the MIC
MUTE key on this unit) lights and the microphone LEDs
turn off. If the mute function is canceled, the MIC MUTE
LED turns off and the microphone LEDs light.
You can also operate the mute function using MIC MUTE
on this unit.
5 MUTE
Turn off (mute) the speaker of this unit temporarily. In this
mode, the speaker of this unit does not output sounds.
To cancel the mute function, click MUTE again.
12
Select "Wide", "Stereo" or "Mono" for the playback mode.
If "Wide" or "Stereo" is selected, the EUPHONY system
works. This setting is available only when the operation
mode is set to "Speaker".
Euphony is a revolutionary sound field reproduction
system implemented with state-of-the-art sound
technologies developed under the basic concept of
enjoying beautiful sound.
9 Shortcut Key
Select a function assigned to SHORTCUT on this unit. For
details, refer to "Configuring the shortcut key" (page 14).
0 Operation mode setting
Select the operation mode of this unit. To enable both the
microphones and speaker (as in the case of a conference),
click "Mic&Speaker". To enable only the speaker (as in
the case of listening to music), click "Speaker".
■Items in the DETAIL screen
A Environment
Note
Switch between "Normal" and "Conference Room",
depending on the environment.
• Normal (default): when using in the normal
environment
If the operation mode is set to "Mic&Speaker", this unit outputs
left-channel audio only regardless of audio signal type.
• Conference Room: when using in the quiet
environment like a conference room
B Mic Voice Band
Configure the microphone's voice band setting. Select a
microphone's voice band mode ("Wide", "Normal", or
"Narrow") suitable for your Web conference application.
C Mic Level
Adjust the microphone sensitivity using the slider bar.
D Input Level
E Output Level
Adjust the audio output level (amplification) in the range
of -12.0 to +12.0 dB using the slider bar. This setting is
applied to outputs to another device through the audio
cable.
F Mic & Speaker Control via USB
Enable or disable the interlocking volume control between
the PJP-25UR and PC. Set this item to "ON" or "OFF"
depending on the specification of your communication
application.
Note
You need to restart the PJP-25UR if this setting is changed.
Follow the instructions on the screen to restart it.
G Audio Test
Check the audio in the current setting. For details, refer to
"Testing the audio" (page 16).
H Save/Restore Settings
Save the settings of this unit. For details, refer to "Saving
the settings of this unit" (page 15).
I Reset
Reset the settings of this unit. For details, refer to
"Resetting the settings of this unit" (page 16).
Note
To complete the reset operation, you need to restart this unit in
some cases. If the message to restart this unit appears, follow the
message to restart it.
13
OPERATIONS
Adjust the audio input level (amplification) in the range of
-12.0 to +12.0 dB using the slider bar. This setting is
applied to inputs from another device through the audio
cable.
Checking the optimum installation
method
You can check the installation method suited to your
purpose of using this unit. In this procedure, we will check
the installation method suited to a web conference for
example.
1 In the "PJP-25UR Controller" screen,
Configuring the shortcut key
Follow the procedure below to select a function to be
activated by pressing SHORTCUT on this unit.
1 In the "PJP-25UR Controller" screen,
click "Select".
2 Select a function.
click "Setup Wizard".
The "SETTING WIZARD" screen appears.
2 Click "Have a meeting".
Disable
Select this if you want to disable SHORTCUT.
Speaker Mute:
Select this if you want to assign the speaker mute function
to SHORTCUT.
MIC & Speaker / Speaker:
Select this if you want to switch the operation mode by
pressing SHORTCUT.
Select Application:
Select this if you want to activate the specified application.
3 Click "Apply".
3 Select the number of conference
participants.
4 Select the relative position between the
participants and this unit.
If you selected "One" in step 3, this step is not
available. Skip to step 5.
5 Follow the on-screen instructions to
install this unit.
14
y
If you have selected "Select Application" in step 2, select
an application assigned to SHORTCUT.
Saving the settings of this unit
Follow the procedure below to save the settings currently
configured on this unit.
To restore the settings
1 In the "PJP-25UR Controller" screen,
click "DETAIL".
The "DETAIL" screen appears.
1 In the "PJP-25UR Controller" screen,
click "DETAIL".
2 Click "Restore".
The "DETAIL" screen appears.
2 Click "Save".
3 Select the setting number of which you
want to restore the settings.
settings are saved.
4 Click "Restore".
This unit automatically restarts to restore the settings.
4 Enter a name and memo.
Enter a given name and comment applied to the
settings to be saved.
5 Click "Save".
The settings are saved.
Note
If the number you selected in step 3 has already been used, the
confirmation message appears before executing the overwriting
process.
15
OPERATIONS
3 Select the setting number to which the
Testing the audio
Resetting the settings of this unit
Check the audio in the current setting. The audio is
automatically recorded (five seconds) and played back.
You can easily listen to the audio from this unit as a test.
Follow the procedure below to reset the settings of this
unit. You can specify whether to keep the settings saved to
the setting numbers.
1 In the "PJP-25UR Controller" screen,
Note
click "Detail".
Please note the followings when you reset the settings of this unit.
The "Detail" screen appears.
• This operation will clear all settings you changed and restore
the factory default values.
• If you reset all settings, the settings saved to the setting numbers
are also cleared.
• You cannot undo the reset operation.
■Resetting all settings
1 In the "PJP-25UR Controller" screen,
click "DETAIL".
The "DETAIL" screen appears.
2 Uncheck the "Don't reset settings
already saved" box.
3 Click "Reset".
All settings are reset to default.
Note
2 Click "Start".
The audio test starts.
If you cancel the audio test, click "Cancel".
Contents of test
Alarm
Operation
First
Starts recording
Second
Starts playing back
Third
Finishes the test
To complete the reset operation, you need to restart this unit in
some cases. If the message to restart this unit appears, follow the
message to restart it.
■Resetting this unit except settings saved
to the setting numbers
1 In the "PJP-25UR Controller" screen,
click "DETAIL".
The "DETAIL" screen appears.
2 Check the "Don't reset settings already
saved" box.
3 Click "Reset".
This unit is reset to default except settings saved to
the setting numbers.
Note
To complete the reset operation, you need to restart this unit in
some cases. If the message to restart this unit appears, follow the
message to restart it.
16
Using the Latest Features
You can download the firmware (program to control the functions of this unit) to use the latest features.
Software Licensing Agreement
To use the revision upgrading function, you must accept
the following software licensing agreement.
1. Permission of use
5. Limitation of liabilities
The present Software Licensing Agreement is intended to
allow Yamaha Corporation (hereinafter referred to as
"Yamaha") to permit you to use the firmware (hereinafter
"this program") for Yamaha PJP-25UR (hereinafter "this
product"). You can download this program after having
accepted the terms and conditions of the present Software
Licensing Agreement.
The present Software Licensing Agreement is applicable
to the downloaded copy of this program as well as to its
duplicates produced in accordance with the present
Software Licensing Agreement.
Yamaha will not assume any liabilities on the damage to
the customers caused by the present Software Licensing
Agreement.
2. Inhibition of redistribution
This Software Licensing Agreement should be compliant
to the laws and regulations of Japan and your country, and
should be interpreted in accordance with the laws of
Japan.
You shall comply with all applicable export laws and
regulations of any relevant countries including but not
limited to Japan and your country. You shall not, directly
or indirectly, export or re-export this program except in
compliance with such laws and regulations.
7. Compliance to laws and regulations
3. Production of duplicates
You may only duplicate this program for the purpose of
backup or when upgrading multiple units of this product.
4. Inhibition of decompiling, reverse
engineering or disassembling
You may not decompile, reverse-engineer, disassemble,
alter, permit the use of, distribute or create any derivative
works of this program.
17
OPERATIONS
You are permitted to download this program only for the
purpose of upgrading the functions of this product.
Uploading or posting this program at a website accessible
by the general public is prohibited unless you have
permission from Yamaha.
6. Export control
Updating the firmware via a
network
Notes
• Firmware update is available only if the computer connecting to
this unit is connected to the Internet. To update the firmware
without connection to the Internet, follow "Updating the
firmware using a local file" (page 19).
• Once the firmware update is started, do not perform any other
operation until the update operation is completed. If the update
operation is interrupted, this unit may become unusable, in
which case you need to return this unit to the factory for repairs.
• Do not remove the USB cable or LAN cable during the
firmware update. Otherwise, this unit could become unusable,
in which case you need to return this unit to the factory for
repairs.
4 Check the latest firmware version, and
then click "OK" to start the firmware
update.
The firmware update starts.
To specify the firmware download URL
This feature is useful in managing the firmware versions
of multiple PJPs.
1 In the "PJP-25UR Firmware Update"
screen, click "Settings".
The "Settings" screen appears.
1 In the "PJP-25UR Controller" screen,
click "Check Update".
The "PJP-25UR License Agreement" screen appears.
2 Enter the URL from which to download
the firmware.
y
You can restore the default URL by clicking "Default".
3 Click "OK".
The firmware download URL is set.
2 Read the contents of license agreement
carefully, select "Accept all terms of the
license agreement", and then click "OK".
The "PJP-25UR Firmware Update" screen appears.
If you do not agree with the contents of the license
agreement, click "Don't accept the license agreement"
to cancel the firmware update.
3 Select "Download from the network",
and then click "Start".
The firmware version confirmation screen appears.
18
Updating the firmware using a
local file
If the computer connecting to the PJP-25UR cannot be
connected to the Internet, follow the procedure below to
update the firmware manually using a local file.
Checking the firmware release
note
You can check the firmware release note by clicking
"Release Note" in the "PJP-25UR Firmware Update"
screen.
Notes
• Once the firmware update is started, do not perform any other
operation until the update operation is completed. If the update
operation is interrupted, this unit may become unusable, in
which case you need to return this unit to the factory for repairs.
• Do not remove the USB cable during the firmware update.
Otherwise, this unit could become unusable, in which case you
need to return this unit to the factory for repairs.
1 In the "PJP-25UR Controller" screen,
click "Check Update".
OPERATIONS
The "PJP-25UR License Agreement" screen appears.
2 Read the contents of license agreement
carefully, select "Accept all terms of the
license agreement", and then click "OK".
The "PJP-25UR Firmware Update" screen appears.
If you do not agree with the contents of the license
agreement, click "Don't accept the license agreement"
to cancel the firmware update.
3 Select "Specify a local file", and then
click "Start".
The "Open" screen appears.
4 Select the firmware file, and then click
"Open".
The firmware version confirmation screen appears.
5 Check the latest firmware version, and
then click "OK" to start the firmware
update.
The firmware update starts.
19
Troubleshooting
Refer to the following tables when this unit does not function properly. If the problem you are experiencing is not listed
or if the instruction does not help, contact the nearest authorized YAMAHA dealer or service center (listed in the "Quick
Start Guide").
Q1: LED indicator does not light up
Problem
The power is not turned on.
Cause
The USB cable is not connected properly.
Remedy
Check that the USB cable is connected firmly.
Q2: Have an audio problem
Problem
Cause
Remedy
The audio from the other unit
cannot be heard.
The microphones are muted on the other unit.
The audio is interrupted.
The audio cable is not connected properly.
Check that the audio cable is connected firmly.
The voltage decreases due to high volume.
• Turn the volume down.
The playback volume goes
down suddenly.
The auto-attenuator function is working.
Turn the volume down.
The speaker volume cannot be
turned up.
The volume setting in Windows is too low.
Adjust the volume setting in Windows.
The unit generates feedback
noises.
This unit is placed near the wall.
Move this unit away from the wall.
An object is placed near this unit.
Avoid placing an object in front of the
microphones of this unit.
This unit is used in a room with high
reverberation.
• Place objects with high sound absorbance in
the room other than in front of the
microphones.
–
• Use the AC adapter (sold separately).
• Avoid talking at a loud voice to reduce
reverberations.
20
Specifications
General
Audio
Interface:
Arrayed microphones:
USB 2.0 (full), Analog I/O (stereo-mini),
AC adapter (DC 5V IN)
4 units x 3 lines
Speaker:
Power consumption (max):
USB bus power: 2.5 W or less, Self power: 3.0 W or less
2 units, monaural output, stereo output (when using the
speaker only)
Radio interference standard:
Frequency bandwidth:
FCC Part 15 (US)
EN55022 (EU)
300 to 20,000 Hz
Signal processing:
Operating environment:
Temperature: 0 to 40°C (32 to 104°F),
Humidity: 20 to 85%
Adaptive echo canceller, Microphone array control,
Stereo output
Dimensions (W x H x D):
229 x 34 x 152 mm (9-1/32" x 1-11/32" x 6")
ADDITIONAL
INFORMATION
Weight:
570 g (1.26 lbs)
Power source:
USB bus power, Self power
Accessories:
USB cable, CD-ROM, Quick Start Guide
Option:
AC adapter (sold separately)
Computer environment:
OS: Microsoft® Windows® Vista/XP Professional/
XP Home Edition/2000
CPU: 750 MHz or higher
(Intel® Pentium®/Celeron® equivalent processor)
Memory: 128 MB or more
(256 MB or more recommended)
Other:
Firmware revision upgrade
(transfer from PC through USB)
21
August 2008, 3rd edition