1
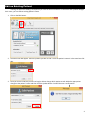
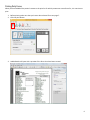
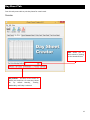
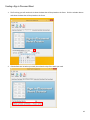
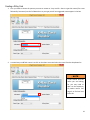
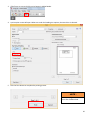
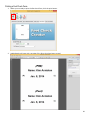
Chart Form Creator Version 4.0 User Guide Updated 01/16/2014 Chart Form Creator was design by Jeremy J. Leshko for Nordan Chiropractic Center. For information regarding this software please visit jeremyleshko.com. Current Version 4.0. Software last updated November 2013. No real patient names are used in this document. ©Copyright Jeremy J. Leshko 2011-2014 Contents Introduction ............................................................................................................................................................1 Interface Overview..............................................................................................................................................1 Starting the Application ...................................................................................................................................2 Add a New Patient ...............................................................................................................................................3 Edit an Existing Patient ....................................................................................................................................4 Delete a Patient ....................................................................................................................................................5 Daily Forms Tab ....................................................................................................................................................6 Overview .....................................................................................................................................................................6 Creating a Print List ......................................................................................................................................................7 Printing Daily Forms .....................................................................................................................................................9 Changing the Order of Patients in the Print List .............................................................................................................12 Day Sheet Tab .....................................................................................................................................................13 Overview ...................................................................................................................................................................13 Creating a Day Sheet .................................................................................................................................................14 Print a Day Sheet .......................................................................................................................................................15 Sign in Placement Sheet Tab ......................................................................................................................17 Overview ...................................................................................................................................................................17 Creating a Sign in Placement Sheet .............................................................................................................................18 Printing a Sign in Placement Sheet ..............................................................................................................................19 X-Ray Card Tab ...................................................................................................................................................21 Overview ...................................................................................................................................................................21 Creating a X-Ray Card ................................................................................................................................................22 Printing a X-Ray Card .................................................................................................................................................25 Feet Check Tab ...................................................................................................................................................27 Overview ...................................................................................................................................................................27 Creating a Feet Check Form........................................................................................................................................28 Printing a Feet Check Form .........................................................................................................................................29 Fax Cover Sheet Tab ........................................................................................................................................32 Importing a Patient List [Advance] ..........................................................................................................33 Introduction This software is intended to facilitate the creation of forms. So of which need be added to charts on a daily basis. The main objective of this software is to reduce the amount of time required to prepare forms for charts and to reduce the errors in preparing the forms. Interface Overview Print: Below is what you will see when you first launch the Chart Form Creator 4.0 application. When you are done adding name this prints the forms. Add New: Used to add a new patient to the repository of patients. Shortcut: Ctrl +N Edit: Used to modify an existing patient’s name. Shortcut: Ctrl +E Delete: Used to remove an existing patient’s from the repository of patients. Shortcut: Ctrl +D Shortcut: Ctrl + P Clear all Fields: Clears all the data fields on the currently selected form. Note: Not available on all forms. Shortcut: Ctrl +L Form Tabs: Used to navigate between forms. Click on the form you would like to create. Form Creation Area: This area will change depending on the form tab you have selected. 1 Starting the Application 1. To start the program simply double left click on the Chart From Creator 4.0 icon. This icon should be located on your desktop. 2. The program will start. 2 Add a New Patient If you cannot find the name you are looking for you may need to add it to the repository of patient names. 1. Click on the Add New button. 2. The Add New screen will appear. Type in the patient’s first and last name in the corresponding boxes. 3. Click the add button. You will see a confirmation that the patient has been added. 3 Edit an Existing Patient If during the process of adding a new patient you save the incorrect name or in the event that a patient changes their name, you can edit an existing patient’s name. 1. Click on the Edit button. 2. The Edit screen will appear. Select the patient you wish to edit. Once the patient’s name is in the name box click edit. 3. Once you click the edit but you will not long be able to change which patient to edit. Make the appropriate changes to the patient’s name and then click the Update button. You will then see a confirmation. 4 Delete a Patient 1. Click the Delete button. 2. The Delete screen will appear. Select the patient you wish to delete. This is done in the same way that you select a patient to add to the print list. (See page 3 for detail on how to do this) Once the patient’s name is in the name box click Delete. 3. A screen will appear asking you to confirm that you want to delete the selected patient. Click yes to delete the patient. You will then see a confirmation. 5 Daily Forms Tab From this tab you are able to create a super bill and daily note form. These are the forms that are to be added to a patient’s chart every time they come into the office for an appointment. Overview Add: Adds the name current in the name box to the print list. Print List: This is the area that show which patients will be part of the print batch. Up/Down Controls: Used to move patients in the list up or down. Remove Selected: Used to remove a selected patient from the print list. Date: Allows you to select a date by clicking on the calendared icon. Caution: You must select a date before you can print. Name: You can choose a patient’s name by typing in their name. For more information see page 3. Print List Count: The number of patients currently in the Print List. Total Name Count: The number of patients currently in the repository. 6 Creating a Print List 1. The first thing you will need to do is select the date that will be printed on the forms. Click the calendar button and select the date that will be printed on the forms. - NOTE The date you select will be the date printed on all the forms. 2. To add a patient to the Print List, simply start to type their name (first name followed by last name) into the Full Name box. As you type you will see suggested names appear in the box. a. When the correct name is displayed in the full name box you can hit the enter key on the keyboard to add them to the Print List, or you can click the plus button to add them to the print list. 7 3. A second way to add a name to the print list is to click on the down arrow and select the name from the drop down list. a. After you select the name you want, click the plus button to add them to the print list. - NOTE If you cannot find the name you are looking for you may need to add it to the repository of patient names. See page 3 to find out how to do this. 8 Printing Daily Forms When you have added all the patient’s names to the print list for which you want to create forms for, it is now time to print. 1. Before printing make sure that you have a date selected. If not see page 7. 2. Click the print button. 3. Adobe Reader will open with a preview of the forms that have been created. 9 4. If the forms are correct click the print button in Adobe Reader. 5. A print option screen will open. Make sure under the heading size options, that actual size is selected. 6. Click the Print button to complete the printing process. - NOTE After printing make sure to close out of Adobe Read. 10 Removing a Patient from the Print List If during the process you add a name to the Print List that you did not intend to, you can remove it from the Print List. 1. Click on the name you want to remove from the Print List. 2. Click the Remove Selected button to remove this name from the print list. 3. You will see the name has been removed. 11 Changing the Order of Patients in the Print List You can change the order of the Patients in the Print List. This may be desirable since, the order the Patients are in the Print List is the order the forms will be printed in. 1. Start by selecting the Patient in the Print List that needs to be moved. This is done by simply clicking on the Patient’s name. 2. Now use the Up or Down buttons to change the position of the Patient. In this example we moved the patient Bobby Allen, up one position. 12 Day Sheet Tab From this tab you are able to print day sheets for a work week. Overview Date: Allows you to select a date by clicking on the calendared icon. Day Selector: The days of the week for which you would like to create day sheets for. By default Monday, Tuesday, Wednesday, and Friday is selected. 13 Creating a Day Sheet 1. The first thing you will need to do is select the date that will be printed on the forms. Click the calendar button and select the date that will be printed on the forms. 2. If the defaults are not what you need, then select the day of the week you need. 14 Print a Day Sheet 1. When you are ready to print your day sheets click the print button. 2. Adobe Reader will open with a preview of the forms that have been created. 3. If the forms are correct click the print button in Adobe Reader. 15 4. A print option screen will open. Make sure under the heading size options, that actual size is selected. 5. Click the Print button to complete the printing process. - NOTE After printing make sure to close out of Adobe Read. 16 Sign in Placement Sheet Tab From this tab you are able to print sign in placement sheets for a work week. Overview Date: Allows you to select a date by clicking on the calendared icon. Day Selector: The days of the week for which you would like to create day sheets for. By default Monday, Tuesday, Wednesday, and Friday is selected. 17 Creating a Sign in Placement Sheet 1. The first thing you will need to do is select the date that will be printed on the forms. Click the calendar button and select the date that will be printed on the forms. 2. If the defaults are not what you need, then select the day of the week you need. 18 Printing a Sign in Placement Sheet 1. When you are ready to print your day sheets click the print button. 2. Adobe Reader will open with a preview of the forms that have been created. 3. If the forms are correct click the print button in Adobe Reader. 19 4. A print option screen will open. Make sure under the heading size options, that actual size is selected. 5. Click the Print button to complete the printing process. - NOTE After printing make sure to close out of Adobe Read. 20 X-Ray Card Tab From this tab you can create and print an X-Ray Card. Overview Date of Birth: Type the patient’s date of birth. Format ex: 11/13/1988 X-Ray Date: Allows you to select a date by clicking on the calendared icon. Exam Type: Selected the exam type, pre. or post Name: You can choose a patient’s name by typing in their name. For more information see page 3. 21 Creating a X-Ray Card 1. First you need to choose the patient you want to create an X-ray card for. Start to type their name (first name followed by last name) into the Full Name box. As you type you will see suggested names appear in the box. 2. A second way to add find a name is to click on the down arrow and select the name from the drop down list. - NOTE If you cannot find the name you are looking for you may need to add it to the repository of patient names. See page 3 to find out how to do this. 22 3. Type in the patient’s data of birth mm/dd/yyyyy 4. Select the type of X-Ray exam type. 23 5. Now select the data the X-Rays are to be taken on. Click the calendar button and select the date that will be printed on the forms. 24 Printing a X-Ray Card 1. When you are ready to print the X-Ray card, click the print button. 2. Adobe Reader will open with a preview of the forms that have been created. 25 3. If the forms are correct click the print button in Adobe Reader. 4. A print option screen will open. Make sure under the heading size options, that actual size is selected. 5. Click the Print button to complete the printing process. - NOTE After printing make sure to close out of Adobe Read. 26 Feet Check Tab From this tab you can create a feet check form Overview Date: Allows you to select a date by clicking on the calendared icon. Name: You can choose a patient’s name by typing in their name. For more information see page 3. 27 Creating a Feet Check Form 1. First select the date that needs to be printed on the form this is done by clicking on the calendar button and clicking on the needed date. 2. After you select the date you then need to select the patient. Start to type their name (first name followed by last name) into the Full Name box. As you type you will see suggested names appear in the box. 28 3. A second way to add find a name is to click on the down arrow and select the name from the drop down list. - NOTE If you cannot find the name you are looking for you may need to add it to the repository of patient names. See page 8 to find out how to do this. 29 Printing a Feet Check Form 1. When you are ready to print the feet check form, click the print button. 2. Adobe Reader will open with a preview of the forms that have been created. 30 3. If the forms are correct click the print button in Adobe Reader. 4. A print option screen will open. Make sure under the heading size options, that actual size is selected. 5. Click the Print button to complete the printing process. - NOTE After printing make sure to close out of Adobe Read. 31 Fax Cover Sheet Tab This tab is currently in development. Using this tab may result in errors on the fax cover sheet. This tab will be full released in version 4.1. 32 Importing a Patient List [Advance] The first time you run the program, after installation, there will be no patients in the Repository. If you have a large number of names to add you can use the importer to import a comma delimited list. Below is the format that the data needs to be in. (firstName,Lastname) - NOTE The capitalization of the names does not matter. When the names are imported they will be change to the correct capitalization. - IMPORTANT The first line of the date file must be blank. 1. Click on File on the menu bar and then click on Import List. 2. A confirmation box will appear warning you that importing a new patient list will replace all the current names in the repository. Click Yes. 33 3. In the window that opens find and select your data file and click open. 4. The importing process has started. This process may take between 1 – 10 minutes depending on the size of the data file that you are importing. You will see a confirmation when the process has been completed. 34