1
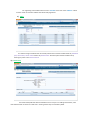
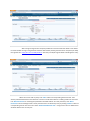
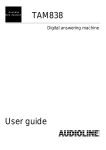
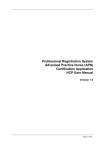
Student Registration
(User Manual)
1. Login
All Principals of each college can login by entering their username and password.
2. Student Registration
For registering new students take sub menu “Student” form main menu “Master”. Menu
contains 7 tabs. First shows students that we already registered.
a) View
This tab for listing all students that we already entered .We can filter student details by admission
year, course level, course name and also by student name. Another option to filter students list by
entering key value in the search text box.
b) Basic Entry
This tab for Add /Edit basic details of Students of current year .For adding new student, enter
basic details shown in the form. Fields with * marking means they are mandatory fields.
After saving message shows Temporary Student ID and also shows that details in the below
list. Each Student can login using these ID and their date of birth (initially password set as Temporary ID itself)
through the site” http://117.211.112.130/student”. Also they can add/change all details excluding basic entry.
When we want to edit any entry click “Edit” button of corresponding student record. Then
already entered details filled in the above form and we can edit those details. In editing mode have one extra
link “Reset Password “for resetting the password of selected student. For reset password, click “Reset
Password “link and message shows current password. Also can delete any entry by clicking “Delete” button of
corresponding record. One more link is there “Download Admission List”. Using this link we can download all
students details in the current year.
c) Personal
This menu used for adding personal details of all students in the college. We can filter students by
admission year, course level, course name and also by student name. Adding personal details we must select
any student from student name list box and enter corresponding data (already entered details will shows in
the corresponding fields, we can change that values also), then save it by clicking “save “button. Personal
details tab have one extra link “Reset Password “for resetting the password of selected student. For reset
password, click “Reset Password “link and message shows current password.
d) Manage Photo
This menu used for adding or changing profile photo of each student in the college. We can
filter students by admission year, course level, course name and also by student name. Select any student from
the list and click file browse button, select an image and click “Upload” button to save. If already saved then
image shows in the default image location.
e) Entrance Exam
This menu used for entering entrance exam details. We can filter students by admission year, course
level, course name and also by student name. Select any student from the select box. Enter exam details. Fields
with * are mandatory. Then save that detail. When we select any student from the list which have already
saved, that details will shows in the corresponding fields, we can change that values also.
f)
Qualifying Exam
This menu used for entering qualifying exam details. We can filter students by admission year, course
level, course name and also by student name. Select any student from the select box. Enter Qualifying exam
details. Fields with * are mandatory. Then save that detail. When we select any student from the list which
have already saved ,that details will shows in the corresponding fields, we can change that values also.
g) Other
This menu used for entering other details such as certificate details(Migration, Equivalance,Other
Relevant details) and Internship Details. We can filter students by admission year, course level, course name
and also by student name. Select any student from the select box. Enter other details if any. Fields with * are
mandatory. Then save that detail. When we select any student from the list which have already saved, that
details will shows in the corresponding fields, we can change that values also.