1
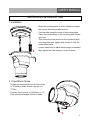
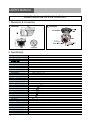
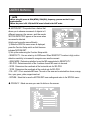
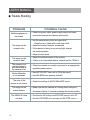
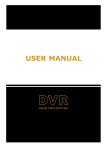
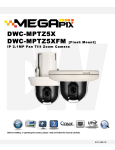
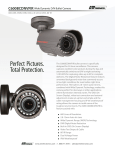
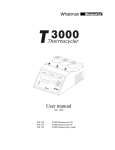
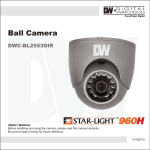
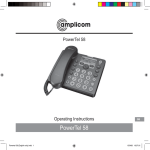
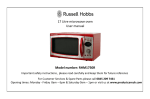
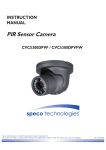
Operating Manual
USER'S INSTRUCTIONS
High Resolution
DNR Day/Night
Color Camera
USER’S MANUAL
In USA and Canada, Use Class 2 Power Supply Only
2
USER’S MANUAL
Contents
◑ General Features
4
◑ Installing & Adjusting
5
◑ Dimension & Specification
6
◑ OSD Control Button
7
◑ Camera Menu Set Up
1. Menu Set Up
8
2. Lens Setting
8
3. Exposure Setting
9
4. White Balance Setting
10
5. SSDR Setting
11
6. Backlight Setting
12
7. DNR3 Setting
13
8. Day/Night Setting
14
9. Special Setting
15
10. Exit Setting
19
◑ Trouble Shooting
20
3
USER’S MANUAL
General Features
◑ Ultra High Sensitivity
- The built-in high sensitivity COLOR CCD produces a clear image even in 0Lux(B/W, IR-LED ON)
or lower illumination.
◑ 600TV Lines
- By adopting a diagonal 6mm(1/3") 410,000 (NTSC) pixel, 470,000(PAL) pixel SONY CCD,
the camera produces clear picture quality with a horizontal resolution of 600 TV lines for
color and a horizontal resolution of 700TV lines for BW mode.
◑ DNR3
- The high-performance W-V DSP chip effectively removes low-light gain noise and ghosting to
provide clear images even in dark environments.
◑ Day & Night
- This camera has a function that automatically selects the mode that is appropriate for
daytime or night-time conditions. The COLOR mode operates in daytime conditions to
provide optimum colors, and BW mode operates in night-time conditions to enhance the
definition of the image.
◑ SSDR
- For images with high contrast between bright and dark Areas from difficult lighting conditions
such as backlighting, this camera selectively illuminates darker Areas while retaining the same
light level for brighter Areas to even out the overall brightness.
◑ Miscellaneous Functions
- HLC(High Light Compensation), SENS-UP, FLIP(H/V-REV), D-ZOOM, SHARPNESS, MOTION
DETECTION and PRIVACY functions are provided.
◑ Disk Saving Effects
- Up-most and advanced DNR technology camera picture quality has a disk saving effects due to
Image sizes are smaller than standard CCTV camera image.
◑ Controlled by OSD Menu
- The camera can be controlled by selecting the menu text displayed on the monitor screen.
◑ IP66 Approved / Vandal Proof / RoHS Compliance
- IP66 compliant for water and dust ingress prevention, die cast aluminum body with vandal resistant
plastic bubble and compliant with RoHS specifications to reduce hazardous materials in electronic
components.
4
USER’S MANUAL
INSTALLING & ADJUSTING
1. Installation
- Place the mounting plate on a flat installation surface
and mount with the provided screws.
- Feed the cable through the center of the mounting plate.
- Place the camera body in the mounting plate socket and hold.
- Then place the outer plate over the camera body &
mounting plate and tighten side screws to lock the
camera into place.
- Loosen side screws to adjust camera angle as needed,
then tighten the side screws to lock into place.
2. Focus/Zoom Screw
- To widen the viewing angle turn the Zoom screw
to "W"(Wide) to obtain a closer view turn it to
"T"(Tele)
- Turn the Focus screw to "N"(Near) or "∞"
(Far) untill the sharpest Focus is made.
5
USER’S MANUAL
DIMENSION & SPECIFICATION
1. Dimension & Connection
Dimension
Connection
2. Specification
Image Pick-Up Device
TV System
Total Pixels
Scanning Frequency
Scanning System
Synchronization
Resolution
Minimum Illumination
S/N Ratio
Video Output
Electronic Shutter Speed
OSD
SSDR
BLC
Day & Night
Gain Control
White Balance
SENS-UP
Motion Detection
Privacy Masking
DNR3 (Digital Noise Reduction)
Digital Zoom
DIS (Digital Image Stabilizadion)
Sharpness
Filp / Mirror
Power Supply
Power Consumption
Lens
Operational Temp.
Storage Temp.
Dimension
Weight
Environmental
6
1/3” Sony Super HAD CCD
NTSC
811(H) * 508(V )
768(H) * 494(V )
15.734KHz(H) & 59.94Hz(V )
2:1 Interlace
Internal / Line-Lock
600TV Lines
IR LED OFF: 0.15 Lux, IR LED ON: 0 Lux
More than 52dB
CVBS: 1.0Vp-p / 75Ω
1/ 60sec~1/120,000sec
Available
On / O Level adjustable)
BLC / HLC / OFF
Color / BW / AUTO
Low / High /
ATW / Outdoor / Indoor / Manual / AWC (1,700°K ~ 11,000°K)
Auto / O Selectable x2 ~ x512)
On / O
Programmable Zones)
On / O
Programmable Zones)
On / O Level adjustable)
On / O x1 ~ x16)
On /
On / O Level adjustable)
On /
DC 12V / AC 24V Dual Voltage
IR LED OFF 200mA(DC), IR LED OFF 70mA(AC) / IR LED ON 670mA(DC), IR LED ON 240mA(AC)
DC Auto Iris Varifocal Lens
-35 ~ +50 Deg C. RH95% MAX.
-35 ~ +60 Deg C. RH95% MAX.
140mm(W ) * 111mm(H) * 180mm(D)
1800g
IP66 Weatherproof
USER’S MANUAL
OSD Control Button
1. O
SD button could be used when it needs to OSD control.
▲ Up button: Moves the cursor upwards. Use this button to select an item
or adjust the parameters.
▼ Down button: Moves the cursor downwards. Use this button to select an
item or adjust the parameters.
◀ Left button: Moves the cursor to the left. Use this button to select or
adjust the parameters of the selected item. The parameter changes
each time this button is pressed.
▶ Right button: Moves the cursor to the right. Use this button to select or
adjust the parameters of the selected item. The parameter changes each
time this button is pressed.
◎ Set button: Executes selections and displays a submenu for an item with
the
mark.
7
USER’S MANUAL
●
Menu Setup
1. Press the Function Setup switch.
- Main setup menu is displayed on the monitor screen.
MAIN SETUP
1.LENS
2.EXPOSURE
3.WHITE BAL
4.SSDR
5.BACKLIGHT
6.DNR3
7.DAY/NIGHT
8.SPECIAL
9.EXIT
DC
ATW
OFF
OFF
ON
AUTO
SAVE
2. Select a desired function using the Function Setup switch.
- Place the cursor over a desired item.
3. Set up a selected item by using the Function Setup switch.
4. To finish the setting, select 'EXIT' and press the Function Setup switch.
☞ NOTE
■ An item with the ◀ icon also has sub menus. To select a sub menu, select an item
with the icon and press the Function Setup switch.
■ An item with the - - - icon is unavailable due to function settings.
●
Lens Setting
Using this function, you can control the screen brightness.
1. When the SETUP menu screen is displayed, select 'LENS' by using
the Function Setup switch so that the arrow indicates 'LENS'.
2. DC : You can adjust the minimum shutter and maximum value of ESC
shutter mode.
MAIN SETUP
1.LENS
2.EXPOSURE
3.WHITE BAL
DC
ATW
3. THE Lens mode has sub menu items as listed below.
- BRIGHTNESS : Adjusts the video brightness.
8
USER’S MANUAL
- FOCUS ADJ : To adjust the DC lens focus correctly, you must activate the Focus Settings
mode under each lens menu. Activate the Focus Settings mode, adjust the lens focus, and
then deactivate the settings mode.
☞ NOTE
■ If color rolling occurs when using a DC lens, set Shutter to Fixed (---).
●
Exposure Setting
MAIN SETUP
1.LENS
2.EXPOSURE
3.WHITE BAL
DC
ATW
1. When the SETUP menu screen is displayed, select 'EXPOSURE' by using the
Function Setup Switch.
2. Select a desired mode using the Function Setup switch.
EXPOSURE SETUP
1.BRIGHTNESS
2.SHUTTER
3.AGC
4.SENS-UP
5.RETURN
25
--HIGH
OFF
◆ SHUTTER : You can select either auto or manual shutter.
* --- : Shutter speed is fixed at 1/60sec(1/50sec)
* ESC : Select this to control the shutter speed automatically. If ESC is selected, the shutter
speed is automatically controlled depending on the ambient illumination of the subject.
* MANUAL : You can control shutter speed manually.
(NTSC MODEL : 1/60~1/120,000, PAL MODEL : 1/50~1/120,000)
* A.FLK : Select this when you see picture flicker, this can happen when the frequency of the
local lighting clashes with the camera.
☞ NOTE
■ When the SHUTTER is set to MANUAL or A.FLK mode, SENS-UP will be disabled.
9
USER’S MANUAL
◆ AGC(AUTO GAIN CONTROL) : The higher the gain level, the brighter the screen
but the higher the noise.
* OFF : Deactivates the AGC function.
* LOW : Allows automatic gain control from 5.3dB to 32dB.
* HIGH : Allows automatic gain control from 5.3dB to 37dB.
◆ SENS-UP : When it is night or dark, the camera automatically detects the light
level and maintains a clear picture if this mode is activated.
* OFF : Deactivates the SENS-UP function.
* AUTO : Activates the SENS-UP function.
◆ RETURN : Select this to save the changes in the EXPOSURE menu and
return to the SETUP menu.
☞ NOTE
■ If you press the Function Setup switch to ‘AUTO’ mode, you can adjust brightness by
increasing or decreasing the shutter speed. (x2 ~ x512)
■ Note that the higher the zoom level, the brighter the screen, but the more likely there
will be a ghosting effect.
■ It is normal for Noise, Spots and Whitish symptoms to appear in SENS-UP mode when
the D-ZOOM level is increased.
●
White Balance (White Bal) Setting
Use the White Balance function to adjust the screen color.
1. When the SETUP menu screen is displayed, select 'White Bal' by using the Function
Setup switch so that the arrow indicates 'White Bal'.
2. Select a desired mode using the Function Setup switch.
MAIN SETUP
1.LENS
2.EXPOSURE
3.WHITE BAL
10
DC
ATW
USER’S MANUAL
※ Select one of the following 5 modes, as appropriate for your purpose.
◆ ATW : Select this when the color temperature is between 1,700˚K and 11,000˚K.
◆ OUTDOOR : Select this when the color temperature is between 1,700˚K and 11,000˚K.
(sodium light inclusion)
◆ INDOOR : Select this when the color temperature is between 4,500˚K and 8,500˚K.
◆ MANUAL : Select this to fine-tune White Balance manually. Set White Balance first by using the
ATW or AWC mode. After that switch to MANUAL mode, fine-tune the White Balance and then press
the Function Setup switch.
◆ AWC→SET : To find the optimal luminance level for the current environment, point the
camera towards a sheet of white paper and press the Function Setup switch. If the environment changes,
readjust it.
☞ NOTE
■ White Balance may not work properly under the following conditions. In this case
select the AWC mode.
① When the color temperature of the environment surrounding the subject is out of the
control range (e.g. clear sky or sunset).
② When the ambient illumination of the subject is dim.
③ If the camera is directed towards a fluorescent light or is installed in a place where
illumination changes dramatically, the White Balance operation may become unstable.
●
SSDR Setting
SSDR illuminates darker spots of an image while retaining the same light level for brighter
spots to even out the overall brightness of images with high contrast between bright and
dark spots.
MAIN SETUP
1.LENS
2.EXPOSURE
3.WHITE BAL
4.SSDR
DC
ATW
OFF
1. When the SETUP menu screen is displayed, select 'SSDR' by using the switch so
that the arrow indicates 'SSDR'.
2. Use the switch to change the SSDR level according to the contrast between bright
and dark areas.
11
USER’S MANUAL
●
Backlight Setting
Unlike conventional cameras, W-V chip camera is designed to deliver a distinctive subject
and background at the same time, even when the subject is backlight, by using the features
of the proprietary W-V DSP chip.
1. When the SETUP menu screen is displayed, select 'BACKLIGHT' by using the Function
Setup switch so that the arrow indicates 'BACKLIGHT'.
MAIN SETUP
1.LENS
2.EXPOSURE
3.WHITE BAL
4.SSDR
5.BACKLIGHT
6.DNR3
7.DAY/NIGHT
8.SPECIAL
9.EXIT
DC
ATW
OFF
OFF
ON
AUTO
SAVE
2. Select a desired mode using the Function Setup switch.
◆ BLC : Enables a user to directly select a desired area from a picture, and to view
the area more clearly.
◆ HLC (High Light Compensation) : If the scene contains extremely bright light areas
such as; from car headlights, the light can mask out much of the on-screen detail
- LEVEL : Adjust level of the HLC function.
- LIMIT : Enable to change the operating condition.
- MASK COLOR/TONE : Change the color / transparency of the masking area.
(Black, Red, Blue, Cyan, Magenta)
- TOP/BOTTOM/LEFT/RIGHT : Adjust the area to be enhanced
◆ OFF : Not being used
2. Select a desired mode using the Function Setup switch and press the Function Setup switch.
◆ Select 'BLC' to adjust the area to be
enhanced then adjust the level.
12
◆ Select 'BLC' to adjust the area to be
enhanced then adjust the level.
USER’S MANUAL
BLC SETUP
LEVEL
TOP
BOTTOM
LEFT
RIGHT
HLC SETUP
LOW
38
109
54
121
LEVEL
MIDDLE
LIMITS
NIGHT ONLY
MASK COLOR
BLACK
MASK TONE
1
TOP
5
BOTTOM
120
LEFT
5
RIGHT
172
Press Set to Return
Press Set to Return
☞ NOTE
■ Because there can be a difference in the effectiveness of HLC according to the amount
of light area in the screen, optimize the installation angle for the best HLC performance.
■ When dark, the HLC is only activated when a bright light exceeding a specific size in
NIGHT ONLY mode.
■ The HLC is not activated in day light or when bright light is not present at night in NIGHT
ONLY mode.
■ BLC Function doesn't work in the B/W mode of the DAY/NIGHT menu.
●
DNR3 Setting
This function reduces the background noise in a low luminance environment.
1. When the SETUP menu screen is displayed, select 'DNR3' by using the Function
Setup switch so that the arrow indicates 'DNR3'.
MAIN SETUP
1.LENS
2.EXPOSURE
3.WHITE BAL
4.SSDR
5.BACKLIGHT
6.DNR3
7.DAY/NIGHT
8.SPECIAL
9.EXIT
DC
ATW
OFF
OFF
ON
AUTO
SAVE
2. Select a desired mode using the Function Setup switch.
◆ OFF : Deactivates DNR3. Noise is not reduced.
◆ ON : Activates DNR3 so that noise is reduced.
13
USER’S MANUAL
3. Set the DNR3 mode to 'ON' and press the Function Setup switch. Then you
can adjust the noise reduction level.
☞ NOTE
■ You cannot set the DNR3 to ‘ON’ or ‘OFF’ when the AGC mode of the EXPOSURE menu is ‘OFF’.
■ When adjusting the noise reduction level in the DNR3 mode, remember that the higher the
level set, the more the noise level will be reduced, as will the brightness of the image.
●
Day/Night Setting
You can display pictures in color or black and white.
1. When the SETUP menu screen is displayed, select 'DAY/NIGHT'by using the Function
Setup switch so that the arrow indicates 'DAY/NIGHT'.
MAIN SETUP
1.LENS
2.EXPOSURE
3.WHITE BAL
4.SSDR
5.BACKLIGHT
6.DNR3
7.DAY/NIGHT
8.SPECIAL
9.EXIT
DC
ATW
OFF
OFF
ON
AUTO
SAVE
2. Select a desired mode using the Function Setup Switch according to the picture
display you want.
◆ COLOR : The picture is always displayed in color.
◆ B/W : The picture is always displayed in black and white.
- BURST MODE : You can turn on or off the burst signal on B/W mode.
B/W MODE SETUP
1.BURST MODE
2.RETURN
14
ON
USER’S MANUAL
◆ AUTO : The mode is switched to 'Color' in a normal environment, but switches to 'B/W' mode
when ambient illumination is low. To set up the switching time for AUTO mode, press the Function
Setup switch. You can turn on or off the burst signal on B/W mode.
- BURST MODE : You can turn on or off the burst signal
AUTO SETUP
on B/W mode.
1.BURST MODE
ON
- DURATION : You can select brightness of illumination
2.COLOR→B/W
DURATION
FAST
about changing the day/night mode.
DWELL TIME
3SEC
- DWELLTIME : You can select the duration time about
3.B/W→COLOR
changing the day/night mode.
DURATION
FAST
DWELL TIME
10SEC
→3s, 5s, 7s, 10s, 15s, 20s, 30s, 40, 60s
4.RETURN
FAST
SLOW
COLOR→B/W
2.5 lux
1 lux
B/W→COLOR
5 lux
10 lux
* The day/night switching point of the
camera can be adjusted.
☞ NOTE
■ When AGC in the EXPOSURE menu is 'OFF', '---' mode operates as like selecting 'COLOR'
mode and 'AUTO' mode can not be selected.
●
Special Setting
1. When the SETUP menu screen is displayed, select 'SPECIAL' by using the Function Setup
switch so that the arrow indicates 'SPECIAL'.
MAIN SETUP
1.LENS
2.EXPOSURE
3.WHITE BAL
4.SSDR
5.BACKLIGHT
6.DNR3
7.DAY/NIGHT
8.SPECIAL
9.EXIT
DC
ATW
OFF
OFF
ON
AUTO
SAVE
15
USER’S MANUAL
2. Select a desired mode using the Function Setup switch.
SPECIAL
1.IMAGE ADJ
2.MONITOR
3.CAM TITLE
4.SYNC
5.MOTION DET
6.PRIVACY
7.LANGUAGE
9.RETRUN
LCD
OFF
INT
OFF
OFF
ENGLISH
◆ IMAGE ADJ. :
1) When the SETUP menu screen is displayed, select 'IMAGE ADJ' by using the
Function Setup switch so that the arrow indicates 'IMAGE ADJ'.
2) Select a desired mode using the Function Setup switch.
IMAGE SETUP
1.V-REV
2.H-REV
3.D-ZOOM
4.DIS
5.FONT COLOR
6.SHARPNESS
7.RETURN
OFF
OFF
OFF
WHITE
ON
* V-REV : You can flip the picture vertically on the screen.
* H-REV : You can flip the picture horizontally on the screen.
* D-ZOOM : You can use a digital zoom of x1 ~ x16.
* FONT COLOR : You can change the OSD font color. (White, Yellow, Green, Red, Blue)
* SHARPNESS : As you increase this value, the picture outline becomes stronger and clearer.
Adjust this value appropriately depending on the sharpness of the picture.
* DIS (Digital Image Stabilizer) :
This function mitigates any picture movement due to external factors such as wind.
☞ NOTE
■ As the DIS function uses the digital zoom the camera's resolution will decrease.
■ DIS doesn’t operate when background illumination is too low.
■ DIS doesn’t operate when object pattern is monotonic as like sky or white wall.
* RETURN : Select this to save the settings for the IMAGE ADJ menu and to return to the SETUP
menu.
16
USER’S MANUAL
☞ NOTE
■ When the V-REV or H-REV mode is enabled, the text on the screen does not flip.
■ If you increase the SHARPNESS level too high, the picture may become distorted or noise
may appear.
◆ CAM TITLE : If you enter a title, the title will appear on the monitor.
1) If the SPECIAL menu screen is displayed, use the Function Setup switch so that the
arrow indicates 'CAM TITLE'.
CAMERA TITLE SETUP
2) Set it to 'ON' by using the Function Setup switch.
ABCDEFGHIJKLM
3) Press the Function Setup switch.
NOPQRSTUVWXYZ
4) Use the Function Setup switch to move to a
a b c d e f g h i j k l m
n o p q r s t u v w x y z
desired letter and select the letter by pressing
- . 0 1 2 3 4 5 6 7 8 9
the Function Setup switch. Repeat this to enter
←→CLR
POS
END
multiple letters. You can enter up to 15 letters.
5) Enter a title, move the cursor to 'POS' and
SHOP
press the Function Setup switch. The entered
title appears on the screen. Select the position
to display the title on the screen by using the
Function Setup switch and press the Function
Setup switch. When the position is determined,
select 'END' and press the Function Setup switch
to return to the SPECIAL menu.
☞ NOTE
■ When the CAM TITLE menu is ‘OFF’, no title will be displayed on the monitor screen even if
you enter one.
■ Only English is available in this mode.
■ If you move the cursor to CLR and press the Function Setup switch, all the letters are
deleted. To edit a letter, change the cursor to the bottom left arrow and press the Function
Setup switch. Move the cursor over the letter to be edited, move the cursor to the letter to be
inserted and then press the Function Setup switch.
◆ SYNC : In areas where the supply is at 60Hz(NTSC), 50Hz(PAL), you can synchronize the
output phase of multiple cameras using the power synchronization function (Line-Lock) without
using a synchronization signal generator.
- INT : Internal Synchronization Type
- L/L : Power Synchronization Type, Line-lock(AC24V Power)
* Press the Function Setup switch.
* You can select a desired phase from 0 to 359 when select 'phase'.
17
USER’S MANUAL
☞ NOTE
■ When using AC power at 60Hz(NTSC), 50Hz(PAL), frequency, you can use the L/L type
synchronization.
■ When the power is DC 12V, the SYNC menu is fixed to the ‘INT’ mode.
◆ MOTION DET :This product has a feature that
MOTION DET
allows you to observe movement of objects in 8
1.SENSITIVITY
AREA1
different areas on the screen, and the words
2.AREA MODE
ON
'MOTION DETECTED' appear on the screen when
3.SEL POS
L-TOP
4.XPOS
3
movement is detected.
5.YPOS
5
Activity can be monitor more efficiently.
6.FILL → SET
7.RETRUN
1) When the SPECIAL menu screen is displayed,
press the Function Setup switch so that the arrow
indicates‘MOTION DET’.
2) Set up the mode using the Function Setup switch.
- SENSITIVITY : You can select up to 8 MD areas. When SENSITIVITY number is high, motion
detection sensitivity is increased to recognize even small movement.
- AREA MODE : Determines whether to use the MD area selected in SENSITIVITY.
- SEL POS : Determines which of the 4 vertices of each MD area is to be used.
- XPOS : Determines the coordinate of the horizontal axis for SEL POS.
- YPOS : Determines the coordinate of the vertical axis for SEL POS.
- FILL→SET : Fills in a selected MD area. The color of the area can be selected from brown, orange,
blue, cyan, green, yellow, magenta and red.
- RETURN : Select this to save the MOTION DET menu settings and return to the SPECIAL menu.
◆ PRIVACY : Mask an area you want to hide on the screen.
PRIVACY AREA SETUP
1.AREA
2.MODE
3.MASK COLOR
4.MASK TONE
5.TOP
6.BOTTOM
7.LEFT
8.RIGHT
9.RETURN
18
AREA1
OFF
GREEN
1
39
79
13
52
USER’S MANUAL
1) When the SPECIAL menu screen is displayed, press the Function Setup switch so
that the arrow indicates 'PRIVACY'.
2) Set up the mode using the Function Setup switch.
- AREA : You can select up to 12 PRIVACY areas.
- MODE : Determines whether to use the area selected in the AREA.
- MASK COLOR : Determine area color. You can select Green, Red, Blue, Black, White, Gray.
- MASK TONE : Adjust the brightness of MASK COLOR.
- TOP/BOTTOM/LEFT/RIGHT :Adjust the size and position of the selected area.
- RETURN : Select this to save the PRIVACY menu settings and return to the SPECIAL menu.
◆ MONITOR :
Please change the settings value of video appropriate to your monitor.
- LCD : Please select this menu item when using a LCD monitor.
- CRT : Please select this menu item when using a CRT monitor.
- USER : Please use this menu item when using a monitor other than standard ones. You can
change the gamma, PED level, and color gain in the sub menus.
◆ LANGUAGE : You can select the menu language according to your requirements.
◆ RETURN : Select this to save the SPECIAL menu settings and return to the MAIN SETUP menu.
●
Exit Setting
Select a desired EXIT mode using the Function Setup Switch.
- SAVE : Save the current settings and exit the MAIN SETUP menu.
- NOT SAVE : Do not save the current settings and exit the MAIN SETUP menu.
- RESET : Resets the camera settings to the factory defaults. Language, Communication and
Monitor Settings are not initialized.
19
USER’S MANUAL
Trouble Shooting
●
PROBLEM
Northing appears on
the screen.
POSSIBLE CAUSE
☞Check the power cable, power supply output and video
connection between the camera and monitor.
☞Are the camera lens or the lens glass dirty?
The image on the
screen is dim.
Clean the lens / glass with a soft clean cloth.
☞Adjust the monitor controls, as required.
☞If the camera is facing a very strong light, change
the camera position.
☞Adjust the lens focus.
The image on the
screen is dark.
☞Adjust the contrast control of the monitor.
The camera is not
working properly
and the surface of
the camera is hot.
☞Check the camera is correctly connected to an appropriate
Motion Detection
is not activated.
☞Has MOTION DET been set to ON in the menu?
The color of the
picture is not correct.
☞If there is an intermediate device, correctly set the 75Ω/Hi-z.
regulated power source.
☞Has MD AREA been properly defined?
☞Check the settings in WHITE BALANCE menu.
The image on the
screen flickers.
☞Make sure that the camera isn’t facing direct sunlight or
The SENS-UP does
not work.
☞Check that the AGC setting in the EXPOSURE menu is’t set to OFF.
20
fluorescent lighting. If necessary,change the camera position.
☞Check the EXPOSURE menu and make sure SHUTTER is set to------.
USER’S MANUAL
21