1
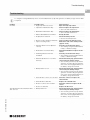
Maintenance
Manual
Instandhaltungsanleitung
Manuel d‘entretien
Istruzioni per la manutenzione
Table of Content
Table of Content
Table of Content ........................................................................................................................................................................ 2
Target group.............................................................................................................................................................................. 2
Explanation of symbols .............................................................................................................................................................. 2
Safety notes .............................................................................................................................................................................. 2
Product classification ................................................................................................................................................................. 2
Structure ................................................................................................................................................................................... 3
Functional principle ................................................................................................................................................................... 4
Troubleshooting......................................................................................................................................................................... 4
Settings using the Geberit Service Handy .................................................................................................................................. 8
Manual settings ....................................................................................................................................................................... 11
Activating manual mode ........................................................................................................................................................12
A – Enabling cleaning ............................................................................................................................................................13
B – Setting the flush time to the factory setting ......................................................................................................................13
C – Setting the water saver ....................................................................................................................................................13
D – Setting the run-on time to 120 seconds ..........................................................................................................................13
E – Setting the detection range ..............................................................................................................................................14
Reset all settings ...................................................................................................................................................................14
Care and maintenance............................................................................................................................................................. 15
Cleaning the surface (cleaning function) .................................................................................................................................15
Cleaning the tap aerator ........................................................................................................................................................15
Cleaning the basket filter .......................................................................................................................................................15
Disposal................................................................................................................................................................................... 17
Target group
This document is intended for use by skilled persons as defined by EN IEC 62079:2001.
Explanation of symbols
Symbol
Meaning
CAUTION
Refers to a potentially dangerous situation that may cause slight or moderate injury or material damage.
Refers to important information.
Safety notes
– Repairs may only be carried out by a skilled person using original spare parts and accessories
– Do not modify the lavatory tap or add any additional modules
Product classification
This document describes the maintenance work for the following Geberit products:
– 116.335.21.1, Geberit lavatory tap type 185, generator, without mixer
– 116.365.21.1, Geberit lavatory tap type 185, generator, with below-desk mixer
– 116.336.21.1, Geberit lavatory tap type 186, generator, without mixer
– 116.366.21.1, Geberit lavatory tap type 186, generator, with below-desk mixer
– 116.450.00.1, generator conversion set for Geberit lavatory tap
D54883-001 © 06-2012
2
Structure
EN
Structure
EN
FR
2
IT
8
1
NL
ES
9
PT
3
10
4
DK
11
NO
6
24
18
SE
7
5
FI
12
23
IS
PL
22
18
HU
21
19
SK
13
20
CZ
17
11
16
15
SL
14
HR
D54883-001 © 06-2012
15
1 Tap housing
2 Shut-off screw
3 Tap aerator
4 IR sensor
5 Battery holder
6 Power adapter, resource-saving
7 Generator unit control
8 Adapter for reinforced braided hose
9 Clamping device
10 Generator
11 Bracket
12 Cover
13 Below-desk mixer
14 Adapter for angle stop valve
15 Basket filter
16 Reinforced braided hose
17 Reinforced braided hose
18 Check valve
19 Long nut
20 Threaded rod
21 Fastening sleeve
22 Flat gasket
23 Valve block
24 Solenoid valve
SR
EE
LV
LT
BG
RO
GR
TR
RU
AE
CN
JP
3
Functional principle
Functional principle
When water flows from the angle stop valve (1) to the lavatory tap (2), the generator (3) generates an electric current. The current is
stored in the rechargeable battery (4). The rechargeable battery then provides the lavatory tap with electricity so that it can be used.
2
3
4
1
Functional diagram of lavatory tap with generator
The lavatory tap can be operated for at least ten years, if it is used for at least 80 seconds per day (20 uses for a duration of
4 seconds each). In the case of prolonged use, surplus energy is produced, thus increasing the charge level of the battery. Due to
minimal self-discharge and its large storage capacity, the battery remains charged for downtimes of several months. In the case of
shorter usage times, the charge level of the battery is gradually reduced.
3
4
D
Y
1 2
X
Battery charge level
Legend
4
Time axis
Charge level axis
Self-discharge of rechargeable battery and standby power consumption of lavatory tap
Solenoid valve of lavatory tap opens, water flow starts
Water flows, charging current is generated
Solenoid valve of lavatory tap closes, water flow stops
Energy surplus
D54883-001 © 06-2012
X
Y
1
2
3
4
D
Troubleshooting
EN
Troubleshooting
EN
FR
To charge the rechargeable battery and to check the Geberit lavatory taps with generator, the battery charger 116.452.00.0
is required.
Problem
No water
Possible cause
• Angle stop valves are closed
• Tap aerator is blocked or dirty
• Basket filter is blocked or dirty
• Reinforced braided hose is kinked
• No pressure in water net
• Shut-off screw is missing or defective
• Tap is in cleaning mode
• Detection distance is not adjusted
correctly
• IR window is scratched or dirty
• Interfering reflections from the
washbasin
• Generator produces no or too little
electricity
• Battery level is too low
• Solenoid valve contacts are corroded
• Solenoid valve is defective
• IR sensor contacts are corroded
D54883-001 © 06-2012
The LED in the IR sensor flashes 6 times
after each use
• IR sensor is defective
• Battery level is low
Fault clearance
Open the angle stop valves
Clean or replace the tap aerator
• See "Care and maintenance"
Clean or replace the basket filter
• See "Care and maintenance"
Rectify the kink
Check the water pressure
• Restore the water pressure
Insert or replace the shut-off screw
Wait for the end of the cleaning mode
(approx. 2 min)
Correctly set the detection range
• See "Settings using the Geberit Service
Handy" or "Manual settings"
Clean the IR window or replace the IR
sensor
Correctly set the detection range
• See "Settings using the Geberit Service
Handy" or "Manual settings"
Check the lavatory tap, generator and
control using the battery charger
• See "Checking the lavatory tap and the
generator" and "Checking the generator
unit control and charging the battery" in
the battery charger user manual.
Check the lavatory tap, generator and
control using the battery charger
• See "Checking the lavatory tap and the
generator" and "Checking the generator
unit control and charging the battery" in
the battery charger user manual.
Clean the contacts or replace the
solenoid valve
Replace the solenoid valve
Clean the contacts or replace the IR
sensor
Replace the IR sensor
Check the lavatory tap, generator and
control using the battery charger
• See "Checking the lavatory tap and the
generator" and "Checking the generator
unit control and charging the battery" in
the battery charger user manual.
IT
NL
ES
PT
DK
NO
SE
FI
IS
PL
HU
SK
CZ
SL
HR
SR
EE
LV
LT
BG
RO
GR
TR
RU
AE
CN
JP
5
Troubleshooting
Problem
The LED in the IR sensor flashes
continuously and the tap does not work
Possible cause
• Battery level is too low
The LED in the IR sensor does not flash
and the tap does not work
• Battery level is too low
Water runs constantly and stops if an
object appears in the detection range
• Spring contact probes between IR
sensor and solenoid valve connected
the wrong way round
• Interfering objects in the detection range Remove objects from the detection
range
• Then, remove the shut-off screw and
insert it again Do not disturb the
detection process (wait until the water
flow stops and the LED in the IR window
is no longer lit)
• IR sensor is defective
Replace the IR sensor
• Incorrect sensor mode
Change the sensor mode or reset the
sensor
• See "Settings using the Geberit Service
Handy" or "Manual settings"
• Pressure in water net is too high
Check the pressure in the water net
• Set the net water pressure to
0,5–8,0 bar
• Solenoid valve is defective
Replace the solenoid valve
• IR sensor is defective
Replace the IR sensor
Continuous flow (water does not stop)
Water runs although shut-off screw has
been removed
Water starts to run by itself
• IR window is scratched or dirty
•
Tap is leaky, water dripping from tap
Fault clearance
Check the lavatory tap, generator and
control using the battery charger
• See "Checking the lavatory tap and the
generator" and "Checking the generator
unit control and charging the battery" in
the battery charger user manual.
Check the lavatory tap, generator and
control using the battery charger
• See "Checking the lavatory tap and the
generator" and "Checking the generator
unit control and charging the battery" in
the battery charger user manual.
Connect the plug connection correctly
•
•
•
Clean the IR window or replace the IR
sensor
Tap is being adversely affected by
Reset the sensor
• See "Settings using the Geberit Service
influences in the room (mirrors, metal
surfaces, glass washbasins, etc.)
Handy" or "Manual settings"
Pressure fluctuations in the water net
Install a suitable pressure regulator
Leaks in water way, defective seals
Check the connections in the water way
• Replace the seals, if defective
Water drops out of water outlet, solenoid Clean or replace the solenoid valve
valve does not close properly
D54883-001 © 06-2012
6
Troubleshooting
EN
Problem
Possible cause
Temperature cannot be adjusted properly • No or not enough hot or cold water.
Angle stop valves are not completely
open
• Basket filter in water supply valve is
blocked or dirty
• Differentiated pressure of the hot and
cold water pipe is higher than 1,5 bar
•
•
•
•
Fault clearance
Open the angle stop valves completely
EN
FR
Clean or replace the basket filter
• See "Maintenance"
Adapt the differentiated pressure of the
two pipes
• Lightly close the angle stop valve at the
pipe with the higher pressure
• Install a flow regulator or a water
pressure reducing valve
Reinforced braided hose is kinked
Rectify the kink
Check valve in tap housing or on
Rectify the blocking or replace the
reinforced braided hose is blocked
check valve
Water temperature is too low or too high Check the temperature of the water net
or storage water heater
Reinforced braided hoses are not
Connect the reinforced braided hoses
connected correctly (cold with hot and correctly
hot with cold)
IT
NL
ES
PT
DK
NO
SE
FI
IS
PL
HU
SK
CZ
SL
HR
SR
EE
LV
LT
BG
RO
GR
D54883-001 © 06-2012
TR
RU
AE
CN
JP
7
Settings using the Geberit Service Handy
Settings using the Geberit Service Handy
The numbers and terms in the column "Menu item" correspond to what can be seen on the display of the Geberit Service Handy.
Further information can be found in the operating instructions of the Geberit Service Handy.
The Geberit Service Handy must be set to bidirectional mode.
Information given in [ ] corresponds to the text displayed on the Geberit Service Handy.
Information given in < > refers to buttons on the Geberit Service Handy.
Commands
Menu item
[EN]
[DE]
Description
Application
20
[Valve]
[Ventil]
Switch solenoid valve.
Flushes until it is switched off again
(stops automatically after 10 min)
a) Function test for the valve
On = <OK>
b) Flushing of standing water
Off = <OK>
(stagnation)
c) Disinfection of the pipe section and
the tap (minimum 3 min at a minimum of
70 °C)
d) Winter emptying
Check detection range.
Problems with user detection
21
[RangeTest] Red LED in IR window
[TestErfas] lights up if an object comes into the
detection range. No flush is initiated
(switches off automatically after 90 s)
Adjustment range Factory setting
On = <OK>
Off = <OK>
Off
Off
Reset sensor.
22
[ResetSens] IR sensor recalibrates itself
[ResetSens]
a) In the event of detection malfunctions Start = <OK>
b) Environment has changed (e.g. new
washbasin)
–
23
Factory settings.
[FactrySet] All functions are reset to the factory
[Werkseinst] setting
In the case of malfunctions
Start = <OK>
–
24
Switch cleaning function.
[CleanMode] The tap is inactive for 90 s
[Reinigung]
Cleaning the tap and the washbasin
without the water running
Start = <OK>
–
Programs
Menu item
[EN]
[DE]
Description
Application
Adjustment range Factory setting
Selecting one of the three programs Presence = [A]
Water saver = [B]
Run-on = [C]
[A]
31
[Esaver]
[E Sparen]
Select energy saver.
Reduces the reaction speed of the IR
sensor after the time from menu item
40 [ESaverT] has elapsed after the last
use
Extension of the battery lifetime
On = [ON]
Off = [OFF]
[OFF]
32
[CleanEn]
[FreiReini]
Enable cleaning.
Prerequisite for starting the manual On = [ON]
Off = [OFF]
Enables one person to manually start the cleaning function
cleaning function (see "Care and
maintenance")
[OFF]
8
D54883-001 © 06-2012
Select main menu.
30
[MainProgr] Presence: Flushes as long as an object
[Hauptmenü] is in the detection range
Water saver: see menu item 44
Run-on time: see menu item 43
Settings using the Geberit Service Handy
EN
Programs
Menu item
[EN]
[DE]
Description
Application
33
[IntFlush]
[IntervSp]
Select interval flush.
a) Hygiene
Starts the interval flush program. The tap b) Flushing out of stagnant water
flushes automatically at the interval
dictated by the entered value from menu
item 42 [IntervalT] for the duration of the
entered value from menu item
41 [IntFlushT] after the last use
Adjustment range Factory setting
EN
FR
On = [ON]
Off = [OFF]
[OFF]
IT
NL
ES
PT
Parameters
Menu item
[EN]
[DE]
Description
Application
Adjustment range Factory setting
40
[ESaverT]
[EnerSparZ]
Set start time energy saver.
Is active if 31 [Esaver] is selected in
menu item [ON]
–
6–48 h [...]
41
[IntFlushT]
[IntervSpZ]
Set interval flush – flush time.
Is active if 33 [IntFlush] is selected in
menu item [ON]
–
3–180 s [...]
3 s [3]
42
[IntervalT]
[IntervalZ]
Set interval flush – flush interval.
Is active if 33 [IntFlush] is selected in
menu item [ON]
–
1–168 h [...]
168 h [168]
24 h [24]
SE
FI
IS
PL
1–180 s [...]
Select running time water saver.
44
a) Water saver
Is active if 30 [MainProgr] is selected in b) Extracting a certain amount of
[WSaverT]
[TWSparenZ] menu item [B]. The tap flushes as long water
as an object is in the detection range but
not longer than the input value
3–180 s [...]
46
[SensorUp]
[SensOben]
D54883-001 © 06-2012
NO
43
Set run-on time.
a) Hygiene
[RunOnTime] Is active if 30 [MainProgr] is selected in b) Cleaning of implements
[NachlaufZ] menu item [C]. The tap continues to
flush with the input value after the object
has been removed from the detection
range
45
[DetectRng]
[Erfassdis]
DK
Set detection range.
Individual adjustment of the
Manual setting [0]: Place your hand in
detection distance
the detection range until the LED in the
IR window flashes. Hold your hand in the
desired detection distance until the LED
lights up for one second and a water
impulse follows
120 s [120]
HU
SK
CZ
10 s [10]
SL
HR
Manual
5–33 cm = [0]
SR
16–19 cm [2]
EE
11–14 cm = [1]
16–19 cm = [2]
21–24 cm = [3]
26–29 cm = [4]
31–33 cm = [5]
Set upper sensor operation.
Off: IR sensor is switched off. (It is not
possible for both IR sensors to be
switched off at the same time)
Auto: IR sensor switches automatically
to "Dynamic" if required.
Dynamic: IR sensor only reacts to
moving objects
Improvement of the detection safety Off = [0]
in case of external influences (e.g. Auto = [1]
Dynamic = [2]
strongly reflecting objects in the
room)
47
Set lower sensor operation.
[SensorLow] Off: IR sensor is switched off. (It is not
[SensUnten] possible for both IR sensors to be
switched off at the same time)
Auto: IR sensor switches automatically
to "Dynamic" if required.
Dynamic: IR sensor only reacts to
moving objects
Improvement of the detection safety Off = [0]
in case of external influences (e.g. Auto = [1]
strongly reflecting washbasins)
Dynamic = [2]
LV
LT
Auto [1]
BG
RO
GR
TR
Auto [1]
RU
AE
CN
JP
9
Settings using the Geberit Service Handy
Counters
Menu item
[EN]
[DE]
Description
Output
50
[Days?]
[SumBetrT?]
Total number of days of operation.
Displays the number of days of operation since commissioning
[...] days
51
[Uses?]
[SumBenut?]
Total number of uses.
Displays the number of uses since commissioning
[...] uses
52
[IntFlush?]
[SumIntSp?]
Total number of interval flushes.
Displays the number of interval flushes since commissioning
[...] flushes
53
[ Days]
[ SumBetrT]
Number of days of operation power-on.
Displays the number of days of operation since the unit was last switched on
[...] days of
operation
54
Number of uses power-on.
[ Uses]
Displays the number of uses since the unit was last switched on
[ SumBenut]
[...] uses
55
[ IntFlush]
[ SumIntSp]
Number of interval flushes power-on.
Displays the number of interval flushes since the unit was last switched on
[...] flushes
Menu item
[EN]
[DE]
Description
Output
60
[TypeNo]
[Modell-Nr]
Type number.
Indicates the article number of the tap (does not apply if the IR sensor has been replaced)
[...]
61
[SWVersion]
[SWVersion]
Software version.
Indicates the software version of the IR sensor (e.g. [0312] = version 3.12)
[...] XXZZ
62
[SerialNo]
[Serien-Nr]
Serial number.
Indicates the serial number of the current IR sensor
[...]
63
[ManufDate]
[ProdDatum]
Manufacturing date tap.
[...] WWYY
Indicates the manufacturing date of the tap. Does not apply if the IR sensor has been replaced
(e.g. [1007] = calendar week 10, 2007)
64
[TypePower]
[Netz/Batt]
Type of power supply.
Indicates whether it is a mains-operated (AC) or a battery-operated (DC) tap
DC = [0]
AC = [1]
65
[Battery%]
[Batterie%]
Battery capacity.
Indicates the current battery capacity in %. The battery must be replaced at 00 %
[...] %
Unit info
D54883-001 © 06-2012
10
Manual settings
EN
Manual settings
EN
The tap allows to set a limited number of functions manually without using the Geberit Service Handy. The setting is performed with
the infrared sensor.
The manual mode must be activated before the functions A–E can be set (see "Activating manual mode").
FR
Overview of functions
NL
Functions A–E
Description
A
Enable cleaning
Enables one person to manually start the cleaning function (see "Care and
maintenance"). The function remains continuously activated.
See "A – Enabling cleaning" on the following pages
B
Set flush time to factory setting
The flush time is set to the factory setting. The tap flushes as long as an object is in
the detection range.
See "B – Setting the flush time to the factory setting" on the following pages
C Set water saver
The tap flushes as long as an object is in the detection range but no longer than
10 s.
See "C – Setting the water saver" on the following pages
D
Set run-on time to 120 seconds
Once you have removed your hand, the tap will continue to flush for 120 s.
See "D – Setting the run-on time to 120 seconds" on the following pages
E
Set the detection distance
The detection distance from the IR sensor to the hand is set.
See "E – Setting the detection distance" on the following pages
ES
PT
DK
NO
SE
FI
IS
Further functions
Reset all settings
IT
All settings are reset to the factory settings and manual mode is deactivated.
See "Resetting all settings" on the following pages
PL
HU
SK
CZ
SL
HR
SR
EE
LV
LT
BG
RO
GR
D54883-001 © 06-2012
TR
RU
AE
CN
JP
11
Manual settings
Activating manual mode
3
The following instructions show a battery-operated tap. The
same procedure applies to mains-operated and generatoroperated taps.
The manual mode is active for 30 min. All functions can be
set within this period.
Steps a–c must be performed four times in a row. (a)
Press the tap housing onto the contacts until (b) LED
lights up for 1 s then (c) push the tap housing back up
immediately by 3 cm.
a
Prerequisites
–
–
–
–
c
Tap is operable
Water supply valve is open
Battery is fully charged (LED in the IR window does not flash)
Mains current is present
CAUTION
Short-circuiting the spring contact probes and
battery terminals can result in burns or damage to
property.
` Ensure that the tap housing is only ever pushed
onto the valve block in the correct position.
` Only connect the battery to the contacts in the
battery holder.
1
b
4
1
2
2
5
2
1
3
D54883-001 © 06-2012
12
Manual settings
EN
A – Enabling cleaning
Enables one person to manually start the cleaning function
(see "Care and maintenance"). The function remains
continuously activated.
1
Activate manual mode (see "Activating manual
mode"). Manual mode will remain active for 30 min.
Set the function within this period.
2
Cover the IR window completely with your hand.
Water will stop after 5 s.
C – Setting the water saver
EN
The tap flushes as long as an object is in the detection range
but no longer than 10 s.
1
Activate manual mode (see "Activating manual
mode"). Manual mode will remain active for 30 min.
Set the function within this period.
2
Cover the IR window completely with your hand.
Water will stop after 5 s. Wait until 2 further water
impulses have occurred.
FR
IT
NL
ES
PT
DK
NO
SE
3
Remove your hand immediately.
FI
B – Setting the flush time to the factory setting
The flush time is set to the factory setting. The tap flushes as
long as an object is in the detection range.
1
2
Activate manual mode (see "Activating manual mode").
Manual mode will remain active for 30 min. Set the
function within this period.
Cover the IR window completely with your hand. Water
will stop after 5 s. Wait until a further water impulse has
occurred.
3
IS
Remove your hand immediately.
PL
D – Setting the run-on time to 120 seconds
Once you have removed your hand, the tap will continue to
flush for 120 s.
1
2
Activate manual mode (see "Activating manual
mode"). Manual mode will remain active for 30 min.
Set the function within this period.
Cover the IR window completely with your hand.
Water will stop after 5 s. Wait until 3 further water
impulses have occurred.
HU
SK
CZ
SL
HR
SR
EE
LV
LT
3
Remove your hand immediately.
BG
3
RO
Remove your hand immediately.
GR
D54883-001 © 06-2012
TR
RU
AE
CN
JP
13
Manual settings
E – Setting the detection range
The detection distance from the IR window to the hand is set.
1
Activate manual mode (see "Activating manual
mode"). Manual mode will remain active for 30 min.
Set the function within this period.
2
Remove all objects from the detection range.
3
Cover the IR window completely with your hand.
Water will stop after 5 s. Wait until 4 further water
impulses have occurred.
4
Remove your hand immediately. The function is now
activated.
5
Hold your hand at the current detection distance until
the LED in the IR window flashes. Then place your
hand at the desired detection distance until the LED is
constantly lit for 1 s and a water impulse follows for
1 s.
Reset all settings
All settings are reset to the factory settings and manual mode
is deactivated.
`
The process for resetting the control is the same as for
"Activating manual mode", but step 3 must be
repeated six times.
D54883-001 © 06-2012
14
Care and maintenance
EN
Care and maintenance
EN
The following maintenance work is required as needed but no
later than on the specified time interval:
1
– Cleaning the surface – weekly
– Cleaning the tap aerator – monthly
– Cleaning the basket filter – yearly
FR
Cleaning the basket filter
Close the angle stop valves.
IT
NL
Cleaning the surface (cleaning function)
The tap can be deactivated for 90 s for cleaning purposes.
ES
Prerequisites
The cleaning function is enabled (see "Settings using the
Geberit Service Handy", "Enabling cleaning").
CAUTION
Aggressive and scouring cleaning agents will
damage the surface.
` Never use aggressive cleaning agents that are
acidic, abrasive or corrosive or contain chlorine.
Only use water and a mild cleaning agent.
1
PT
DK
2
NO
SE
Cover the IR window completely with your hand. The
flow of water stops after 5 s.
FI
IS
PL
HU
SK
CZ
3
2
Remove your hand. The cleaning function is now
active.
3
Clean the tap with a soft, damp cloth.
4
Dry the tap with a soft, dry cloth.
SL
Remove the generator. (version with below-desk
mixer)
HR
SR
EE
Cleaning the tap aerator
`
LV
Remove the shut-off screw and the tap aerator using
the key provided. Clean the tap aerator and reinstall
the shut-off screw.
LT
BG
3
RO
2,5 mm
GR
1
D54883-001 © 06-2012
TR
2
RU
AE
CN
JP
15
Care and maintenance
(version without below-desk mixer)
4
Unscrew the screw connections.
19 mm
5
Clean the basket filter.
6
Reassemble everything by following the steps in
reverse order.
7
Open the angle stop valves.
D54883-001 © 06-2012
16
Disposal
EN
Disposal
EN
Constituents
FR
This product meets the requirements of the directive 2002/95/EC RoHS (Restriction of Hazardous Substances in electrical and
electronic equipment).
IT
Disposal
NL
ES
PT
In accordance with directive 2002/96/EC WEEE on waste electrical and electronic equipment, manufacturers of electrical
equipment are obliged to take back old equipment and to dispose of it correctly.
The symbol indicates that the product cannot be disposed of with non-recyclable waste. Old equipment should be returned directly
to Geberit where it will be disposed of appropriately.
Please contact your responsible Geberit sales company or visit www.geberit.com for collection point addresses.
DK
NO
SE
FI
IS
PL
HU
SK
CZ
SL
HR
SR
EE
LV
LT
BG
RO
GR
D54883-001 © 06-2012
TR
RU
AE
CN
JP
17
Geberit International AG
Schachenstrasse 77
CH-8645 Jona
[email protected]
➔ www.geberit.com
965.891.00.0 (00)
D54883-001 © 06-2012