1
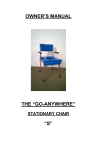
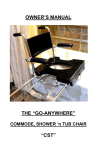
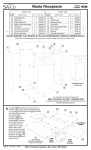
OWNER’S MANUAL
FOR
THE “GO-ANYWHERE”
COMMODE, SHOWER ‘n TUB
CHAIR
IMPORTANT - READ THIS CAREFULLY AND COMPLETELY!
Congratulations! Welcome to the GO! Mobility Solutions family
of innovative products and aids designed to assist physicallychallenged individuals to get out and GO! in ways never
thought of before. We are confident that this product will
change your life as it has for so many others. Please be
advised that as additions, deletions and modifications are
incorporated into this document as necessary, that this written
version of the Owner’s Manual supersedes any other formats
that may have been provided previously. Should you have any
questions or require any additional information not found within
this manual, please logon to www.GoesAnywhere.com and
click on the “Contact Us” link or phone us, toll free, at (866)
363-8244. We would also appreciate receiving any feedback
and comments that you may have to offer so that we may
continue to monitor and improve our customers’ quality of life.
CONVENTIONS USED IN THIS MANUAL:
Entries in boldface refer to parts of the “Go Anywhere”
Chair™.
Underlined entries refer to safety features.
Italicized entries indicate other important features.
WARRANTY NOTICE – WARNING AND DISCLAIMER
Please see LIMITED WARRANTY below. If this warranty is not
acceptable, return the chair for a full refund PRIOR TO USE.
Contact GO! Mobility Solutions for shipping instructions and a
Return Authorization BEFORE returning any product.
The “Go-Anywhere” Chair™ is not designed for use on
surfaces having more than one plane, i.e.: it is not intended to
be moved up or down steps or over curbs. This product has
been designed and tested only under conditions wherein all
four casters maintain coincidental contact with the horizontal
surface beneath it. If thresholds, shower curbs or barriers are
encountered that exceed ½” in height, the area in question
should be brought within the code for disability accessibility as
specified by the Americans with Disabilities Act (ADA). Use of
2
this product under conditions other than those specifically
described above shall void this warrantee in its entirety.
The “Go-Anywhere” Chair™ has been designed and
successfully tested for use by persons NOT exceeding 250
pounds. This product is NOT intended for use by persons
weighing more than 250 pounds. Should any individual
exceeding 250 pounds choose to use this product for any
reason, he or she does so entirely at his or her own risk and
contradictory to the recommendations and warnings of GO!
Mobility Solutions. Use by any person in excess of the 250pound weight limit shall void this warranty in its entirety.
The “Go-Anywhere” Chair™ may become damaged in its soft
carrying case should any heavy object be dropped on it. If any
aluminum tubing becomes dented, telescoping parts may be
affected rendering them dysfunctional.
Carefully follow the step-by-step unpacking, assembly,
operating and disassembly instructions as specified below.
PRODUCT OVERVIEW
Used correctly, the “Go-Anywhere” Commode, Shower ‘n Tub
Chair™ provides a safe, practical and convenient means for
disabled individuals to travel wherever and whenever they
want. You will be confident and secure knowing that commode
and bathing facilities are at your disposal. Uncomfortable,
sometimes even embarrassing, bathing and toileting
experiences away from home are now things of the past thanks
to this revolutionary new product.
3
Tub section legs: 15-1/2" to 20-1/2" (adjustable)
Weight-bearing capacity = 250 lbs maximum
Weight = 39 lbs + 6 lb carrying case
The “Go-Anywhere” Commode, Shower ‘n Tub Chair™
consists of two sections: The rolling frame is used to transport
the user from his or her bed to over a commode and/or into a
roll-in shower. Where a roll-in shower is unavailable, the
rolling frame may be connected to the tub frame which may
be set-up in most any bathtub, enabling the user to slide across
a bathtub and into a position beneath a showerhead. The “GoAnywhere” Commode, Shower ‘n Tub Chair™ is designed to
work with both left- and right-handed tubs.
Just as a wheelchair must be comfortable, so must a
commode/shower chair. That is why the “Go-Anywhere”
Chair™ was designed to be as versatile as possible. With a
maximum width of just 18”, the “Go-Anywhere” chair may pass
4
through even the narrowest of doorways. The seat height can
be adjusted to accommodate for varying bed heights by
shortening or extending the telescoping legs. Footrest heights
are adjustable as well to suit the needs of each individual. By
extending the front legs and shortening the rear legs, the seat
may be leaned back providing additional comfort and stability
for those having limited balance and/or upper body control.
The camber built into the legs helps to ensure the overall
stability of the chair even with rear lean. The telescoping legs
supplied with the fixed tub section allow for it to be set to a
height that matches the rolling section providing for a safe and
level glide back and forth.
•
•
•
•
•
•
•
•
It’s simple to assemble; no tools are required.
It’s safe and easy to use
The seat and footrest heights are adjustable
It’s lightweight and durable, constructed of high quality
aircraft-grade aluminum
It’s compact, convenient and it’s PORTABLE!
It’s small enough to qualify as “carry-on” luggage on
most airlines having a storage compartment between
first class and coach cabins. (If not permitted on board,
always request that your shower chair AND power or
manual wheelchair be “gate-checked” and that you see
each of them when boarding and deplaning each flight
and connection.
It won’t rust or corrode, is easy to clean and virtually
maintenance-free.
Seat and backrest cushions are constructed of durable,
waterproof foam providing for maximum comfort. Both
are attached to the chair frame with Velcro™ rendering
them easily removable for cleaning or replacement.
PRACTICE MAKES PERFECT!
PLEASE do not become discouraged if you have problems
either with the assembly or use of the “Go-Anywhere” Chair™
on your first try. Like with anything else, familiarity and practice
will serve to continually improve your experience with your new
chair. Additionally, as your chair is brand new, some of the
5
hinges or telescoping parts may, initially, be snug. They will
loosen up and operate more easily with each use. Of course,
should you have ANY problems, please log on to
www.goesanywhere.com,
e-mail
us
at
[email protected] or call us toll-free at 1-866-3638244.
UNPACKING INSTRUCTIONS AND PARTS INVENTORY
1.
Pay close attention to the order in which you unpack
the contents of the case so that you will be able to repack it
easily in the reverse order.
2.
The “Go-Anywhere” Commode, Shower ‘n Tub Chair™
is composed of thirteen components in addition to the carrying
case: a rolling frame, a tub frame, (2) push handles, (2)
bridge tubes, a bridge lock, (2) curved footrest supports, (2)
footrest adjustment tubes, a footrest, and a seat assembly.
Please note that, although they are delivered pre-assembled,
the seat assembly, the rolling frame and the (2) push
handles are separate parts.
Similarly, there are two
components to each of the footrest supports although they
are delivered assembled as well. Even though you should
only have to remove eight (8) pieces from the carrying case,
please make sure that all thirteen (13) components are
accounted for. Additionally there are two (2) upholstered foam
dividers included as part of the carrying case.
3.
The rolling frame has four (4) hinged legs as does the
tub frame. The rolling frame has cambered rear legs and
straight front legs. All four legs have total-locking swivel
casters. The wheels can neither turn nor swivel when the locks
are engaged. The tub frame has four cambered legs each
having adjustable non-skid swivel glides. The seat assembly
includes the seat base and the seat back, two armrests,
acceptor tubes for the two push handles, and acceptor
sockets for the two footrest supports. The two bridge tubes
and bridge lock are used in conjunction with the tub frame for
conveying the seat assembly from the rolling frame to the tub
frame in instances when in a roll-in shower is not available.
6
ASSEMBLY INSTRUCTIONS
1.
Unzip the carrying case in a location near to where the
occupant will transfer into the “Go-Anywhere” Chair™,
preferably on a raised, flat surface such as a bed or on a table.
With the chair still in the case, remove the through-pins (they
have pull-rings and are attached to the frame with nylon cables)
from each of the legs of the rolling frame. One at a time, raise
and lock each of the four legs by placing the through-pins into,
and through, each leg after inserting it in its corresponding
socket. If the through-pins try to pop themselves out of the
holes, install them from the opposite side. Ensure that the pins,
when inserted through the diameter of the leg, extend entirely
through the leg and lock firmly into place. To be safe, after
installing the through-pin, give a tug on the leg to see that it is
firmly locked in place.
2.
Remove the rolling frame from the carrying case and
set it down on the floor on its four casters. Apply each of the
four total-lock brakes by pressing down on them with your hand
or with the ball of your foot. Check the frame to ensure that it is
level and stable.
3.
When delivered, the seat assembly will already be
mounted on the rolling frame. Should, at any time, the seat
assembly become detached from the rolling frame and need
to be remounted, lay the rolling frame on its side and slide the
seat assembly on to the nylon rollers. The retractable spring
locks located on both front and rear of the seat assembly
should automatically lock when the seat is slid into the proper
position with the locks in “auto-lock” position (See #3 under
“Operating Instructions”, below).
a.
Raise the seatback of the seat assembly up
and away from the seat base until the seatback
and the seat base are perpendicular to one
another.
7
b.
Insert the seatback uprights into their respective
sockets on the seat base and push down on the
top of the seatback until it snaps into place.
c.
Place the upholstered foam divider that
separated the seat base and seat back, with the
carrying case.
d.
Lock the seatback into place using the two
through-pins (with pull-rings attached to the
frame with nylon cables) provided. Ensure that
the pins, when inserted through the diameter of
the tubes, extend entirely through the tubes and
lock firmly into place.
4.
Adjust the height of the rolling frame so that the
occupant may safely and comfortably transfer from his or her
bed into the “Go-Anywhere” Chair™ using the spring pin
buttons and adjustment holes in the telescoping legs. Do so by
comparing the seat height of the chair to the height of the bed.
This may involve some trial and error. Ensure that the frame
will fit over the commode as well, if necessary. Pull each
telescoping leg all the way out in order to locate the pushbuttons, then reinsert them to attain the desired seat height.
Make sure that each telescoping leg is secure with a spring pin
button protruding through one of the adjustment holes.
Please note that when all four legs are adjusted to the same
length that the front of the seat will be slightly higher than the
rear. This was intentionally incorporated into the design to
provide the user with additional stability and comfort. If
desired, the front legs may be extended to be even longer
resulting in additional rear lean. The camber built into the rear
legs provides added stability. (If you choose to add rear lean,
be sure to test the chair BEFORE USE to ensure that it will not
tip over backwards.)
Individuals having limited upper body strength and/or balance
will find themselves more comfortable with the additional rear
lean. Please note, however, that adding rear lean may result in
slightly more difficulty in pushing the chair on some surfaces,
8
especially carpet. This is a result of the redistribution of weight
away from the front wheels which may require additional effort
to turn them.
5.
Remove the upholstered foam divider that was beneath
the rolling frame from the carrying case and unpack the nowexposed accessory pouch.
6.
Rotate the push handles away from the seat back until
they are perpendicular to it and until the spring pin buttons pop
through their respective holes. If they did not arrive already
installed, insert the two push handles into the openings
located at the top of the seatback and turn until the spring pin
buttons pop into place through the holes provided. There are
left and right push handles. These are easily distinguishable
from one another by matching up the push-buttons with their
respective holes located on each side at the top of the
seatback. The push-buttons should be facing outward from the
chair.
7.
If they did not arrive already preassembled, attach the
two footrest adjustment tubes to the curved footrest
supports by inserting the spring pin buttons into the holes in
both of the footrest adjustment tubes. Attach the footrest to
the assembled footrest supports. Ensure that the footrest
support slides all the way down to the footrest and that the
spring pin buttons, when inserted through the diameter of each
tube, extend entirely through the tube and lock firmly into place.
Drop the cylindrical “plugs” protruding from the bottom of the
curved footrest supports into their respective tubular sockets
located on the front of the seat assembly. Adjust the height of
the footrests using the spring pins and adjustment holes
provided as required to maximize the comfort of the occupant.
Installation and adjustment of the footrest may be may be
performed before or after the occupant transfers into the chair.
8.
The armrests are part of the seat assembly. It is
recommended that the armrest on the opposite side of the
chair from where the occupant will be transferred be lowered
into position prior to performing the transfer.
9
The armrests are constructed of extra-thick aluminum tubing
designed to support the weight of users who wish to use them
to push up on without bending the armrests.
9.
If, at this point, there is roll-in shower available,
assembly is complete. Return the accessory pouch containing
the unused bridge tubes and bridge lock, along with both
upholstered foam divider, to the carrying case and proceed to
“OPERATING INSTRUCTIONS”.
Should a roll-in shower not be available to you, continue to
instruction “10”.
10.
The tub frame is required only when access to a roll-in
shower is not available. The tub frame may be used with a
standard bath tub, a sunken tub or with a stall shower having a
lip or ledge that cannot be “rolled over”. Should this be the
case, prepare the tub frame as follows (Complete this
BEFORE the user moves into the chair):
a.
After adjusting the rolling frame to its desired
height, roll the chair into position adjacent to the bathtub
facing the wall on which the shower head is located and
parallel to the location in the bathtub where either the
water will spray or within easy reach of a hand-held
shower device. Lock all four brakes.
b.
Remove the tub frame from the carrying case
and position it, legs up, on a raised, flat surface.
Remove the through-pins (attached to the frame with
nylon cables) from each of the legs. One at a time, tiltup and lock each of the four legs by placing the
through-pins into, and through, each hinge and leg. If
the through-pins try to pop themselves out of the holes,
install them from the opposite side. . Ensure that the
pins, when inserted through the diameter of the leg,
extend entirely through the leg and lock firmly into
place. To be safe, after installing the through-pin, give
a tug on the leg to see that it is firmly locked in place.
Leave the telescoping legs the way you found them,
that is, as short as possible. Do not, at this point, worry
10
about trying to match the height of the tub frame to that
of the rolling frame.
c.
Turn the tub frame over so it is standing upright
on its adjustable glides and insert the two bridge tubes
into the tub frame.
d.
Take the tub frame with attached bridge tubes
into the bathtub. While standing inside the tub or
straddling the tub wall, insert the remaining open end of
each bridge tube into its respective counterpart on the
rolling frame. Install the bridge lock by placing the
hook end on the rolling frame between the seat and
frame, midway between the bridge tubes, and lock it in
place using the latch at the tub frame. The tub frame
should now be firmly secured to the rolling frame and
the tub frame legs should be suspended above the
bathtub.
e.
Using the spring pin buttons and adjustment
holes in the telescoping legs of the tub frame, extend
each of the legs so that they are as close as possible to
the floor of the bathtub.
Make sure that each
telescoping leg is secure, having a push-button
protruding through one of the adjustment holes
f.
Using the adjustable non-skid swivel glides
located at the bottom of each leg of the tub frame, turn
the glides so that they raise or lower until the tub frame
is stable within the tub and does not wobble or rock.
Note: The swivel feet in the tub frame have a 1”
adjustment range. Make big adjustments with the spring
pins and fine adjustments with the swivel feet. ALWAYS
CHECK THE SWIVEL FEET BEFORE USING THE
CHAIR. Extending any too far out of its leg might cause
it to be unstable or, even worse, to dislodge from the
leg.
g.
Finally, test the entire “Go-Anywhere” assembly
by unlocking the seat assembly from the rolling
11
frame, using the two retractable spring locks located at
the front and rear of the seat assembly, respectively,
and slide the seat across the bridge tubes to the tub
frame. To release the retractable spring locks, pull the
rings outward, turn 90° and release. The rings will now
be extended away from the seat assembly further than
they were. Slide the seat towards the tub frame a few
inches or so, turn the rings back until they depress to
their original position and release. The rings are
returned to “auto-lock” position.
When the seat
assembly is slid either all the way across to the tub
frame or back to the rolling frame, both retractable
spring locks will lock automatically at the appropriate
location.
OPERATING INSTRUCTIONS
1.
IMPORTANT: ALWAYS ENGAGE ALL FOUR TOTALLOCK BRAKES BEFORE TRANSFERRING TO OR FROM
THE CHAIR AND WHEN SLIDING TO AND FROM THE TUB
FRAME. FOR MAXIMUM STABILITY AND SAFETY, ENSURE
THAT THE FRONT WHEELS AND THE REAR WHEELS ARE
LOCKED IN THE POSITION SUCH THAT THE WHEELBASE
IS AT ITS MAXIMUM, I.E.: THE WHEELS ARE NOT TURNED
IN, BENEATH THE CHAIR. Engage the brakes on the casters
by pushing down on the brake levers. Release them by lifting
up on the levers.
2.
IMPORTANT NOTE (ESPECIALLY FOR MALE
USERS!): Due to the importance of maximizing the
compactness of the Go-Anywhere Chair, the seat assembly
must pass in fairly close proximity to both frames and bridge
members as it slides back and forth. As such, any body part
protruding below the seat opening may make contact with the
front-to-rear-running support members of the frames or with
any portion of the bridge lock, especially the latch. TAKE
SPECIAL CARE TO ENSURE THAT NONE OF YOUR
“PARTS” GET CAUGHT ON ANY OF OUR PARTS ON
THEIR WAY ALONG THE BRIDGE.
12
3.
In order to use the tub frame, the footrest assembly
must be removed before attempting to slide the seat into the
bathtub. The occupant’s legs must be lifted over the tub wall
into the bathtub before the seat assembly can be slid across
the bridge tubes. Once the occupant is safely inside the
bathtub, the footrest assembly may be reinserted into the
tubular sockets located at the front of the seat assembly or his
or her legs may be left to dangle or to rest on the tub floor.
IMPORTANT: In order to release the seat assembly and
permit it to glide, pull out on the rings of the two seat locks
located on the front and rear of the seat and turn them 90° so
they stay in the “open” position. The seat assembly may then
be slid from the rolling frame along the bridge tubes to the
tub frame. The tub frame has a stop at its far end which will
prevent the seat assembly from sliding off its track. To return
the seat assembly to the rolling frame, pull the rings again to
the “open” position. As soon as the seat assembly is released
from the tub frame and slid a few inches toward the rolling
frame, pull and turn both seat locks 90°, returning them to their
“auto-lock” position. When the seat assembly is slid the
remainder of the way to the rolling frame, the locks will
automatically capture the seat assembly and prevent it from
sliding too far and possibly coming off the track. CAUTION:
THERE IS NO STOP AT THE END OF THE TRACK ON THE
ROLLING FRAME! BE SURE TO RETURN BOTH SEAT
LOCKS TO “AUTO-LOCK” BEFORE RETURNING FROM THE
TUB FRAME TO THE ROLLING FRAME.
4.
The seat and back cushions are constructed of highquality
closed-cell foam thoughtfully
designed and
manufactured to assure maximum comfort and protection.
Ensure that you do not place any heavy and/or pointed objects
on top of them or pack anything on top of them (such as any
other part of the chair). Because the foam is closed-cell, it will
not spring back after being compressed for extended periods of
time.
Any indentations in the foam caused by such
compression will become permanent. Do not place anything
sharp on top of the cushions as the vinyl surface can puncture
or tear.
13
5.
Following each use, towel dry all parts of the chair.
Occasionally, remove the seat and seatback cushions and dry
both the aluminum base and the backs of the cushions to
prevent the growth of any mold or mildew.
DISASSEMBLY & PACKING INSTRUCTIONS
1.
Lock all four brakes.
2.
Disconnect the tub frame by disengaging the bridge
lock and removing the bridge tubes from the rolling frame.
Place the bridge lock and bridge tubes in the accessory
pouch.
3.
Lift the footrest assembly from the tubular sockets
located at the front of the seat assembly. Detach the footrest
from the footrest supports by depressing the lower-most
spring pin buttons on the footrest supports. It is not
necessary to detach the footrest adjustment tubes from the
footrest supports to store them. They will fit comfortably into
the accessory pouch as one piece. Place the footrest into the
accessory pouch followed by the footrest supports. Close the
accessory pouch.
4.
Rotate the push handles inwardly such that they lie on
top of, and parallel to, the top edge of the seatback.
5.
Remove one of the two upholstered foam dividers from
the carrying case and place it on top of the seat cushion.
6.
While standing behind the chair, remove the locking
pins from the seatback. Pull-up on and fold the seatback down
over the seat base. Re-install the locking pins to prevent the
seatback from falling open in the next step. Until the chair is
broken-in, should the seatback fit too snugly, you may need to
give it a “pop” with the palm of your hand, beneath the
seatback, at its center. The fittings will relax with use.
14
7.
Place the carrying case on a raised, flat surface such as
a bed or table. Place the tub frame, with its legs pointing up,
into the open carrying case.
8.
Lay the accessory pouch containing the accessories on
top of the upside-down tub frame and between the four legs.
9.
One leg at a time, depress the spring pin buttons and
slide the telescoping legs into one another making all four legs
as short as possible. Remove each of the four locking pins
from the upper portion of each leg and fold the legs down on to
the frame. Place the locking pins back into the holes in each
leg to prevent them from flopping around during transport.
10.
Place the second of the two (2) upholstered foam
dividers on top of the tub frame / accessory pouch.
11.
Place the rolling frame (with the seat assembly still
attached), with its legs pointing up, into the open carrying case
on top of the previously placed upholstered foam divider. One
leg at a time, depress the spring pin buttons and slide the
telescoping legs into one another making all four legs as short
as possible. Remove each of the four locking pins from the
upper portion of each leg and fold the legs down on to the
frame. Place the locking pins back into the holes in each leg to
prevent them from flopping around during transport. Ensure
that the casters lay flat and inside the frame.
11.
Close the carrying case.
MAINTENANCE INSTRUCTIONS
1.
Following each use, towel dry all parts of the chair.
Occasionally, remove the seat and seatback cushions and dry
both the aluminum base and the backs of the cushions to
prevent the growth of any mold or mildew.
2.
Periodically apply silicone lubricant to the bolt threads at
the hinges.
15
3.
Seat and back cushions may be easily removed for
cleaning or replacement. Replacement cushions may be
ordered from GO! Mobility Solutions either on-line at
www.goesanywhere.com or by calling (866) 363-8244.
4.
If you use your “Go-Anywhere” Chair™ for every-day
use and not return it to its carrying case, lay the chair on its
side following its use to allow any accumulated water to drain
out the tubular legs. Moisture could cause the rubber stem at
the top of the caster assembly to loosen and become dislodged
from the tubular leg. Should this occur, follow the steps
delineated below under “Troubleshooting Tips”.
AIR TRAVEL WITH YOUR GO-ANYWHERE CHAIR®
When traveling with your Go-Anywhere Chair entails flying
and having to deal with airline personnel and airport security, be
prepared! You are, most assuredly, going to be confronted with
one or more potential obstacles. First of all, know your rights!
There are numerous resources available on-line from which you
may easily glean the specifics using a keyword search for
“airline and wheelchair”. For our purpose here, however,
suffice it to say that your Go-Anywhere Chair is a “fragile
medical device” which should be “gate-checked” and is not
chargeable as passenger baggage. Having your wheelchairs
“Gate-checked” means that you will take your Go-Anywhere
Chair through Security, to the gate, and into and down the jetway. From there, it may either be stored on-board in the closet
separating the first-class cabin from coach, or taken down
below and stored with your wheelchair in the cargo
compartment. The latter method is far more likely, these days,
as most airlines, in their efforts to maximize revenue, have
eliminated the aforementioned closet and replaced them with
more seating. Adequate on-board storage, however, may be
available on some of the larger aircraft utilized in international
flights. Let’s walk through the process of successfully gatechecking your Go-Anywhere Chair at no charge:
16
Before leaving home, take the liberty of stuffing your GoAnywhere Chair carrying case first, with all of your medical
supplies and second, with whatever clothing, or anything else,
you can squeeze in except for vessels containing liquids or gels.
As you will not be charged for this particular item of baggage,
you may as well save yourself a few more bucks by filling it up.
Upon arrival at the airline’s service desk, check-in with a
representative. Do not check-in electronically at a computer
kiosk. Check and, if required, pay for your regular baggage.
You can review a chart of all the airlines and their fees at http://
www.bestfares.com/news-newsID589Airline_Checked_Baggage_Fee_Chart.html. Note that
Southwest Airlines should be your preferred air carrier as, of
this writing, Southwest remains the only airline that does not
charge for your first checked bag.
Carefully label and tag all of your baggage and instruct the
agent at the counter to provide you with gate-check (pink) tags
for both your wheelchair and for your Go-Anywhere Chair.
When you are told, (and more likely than not, you will be told),
that you have to check your Go-Anywhere Chair as regular
baggage, pay for it or are given a hard time for any other reason,
it’s time to get assertive. First, tell the Agent that you have
always had your shower chair gate-checked. Second, inform
the Agent that the case contains “delicate medical equipment”
which, if dropped, or if something is dropped on it, will result in
damage requiring the airline to replace a $2,000 wheelchair. I
guarantee that you’ll be handed a pink gate-check tag very
quickly. Should you experience any further problem (which I
have not), demand to speak with a supervisor and take names.
Proceed to the TSA security checkpoint. Review TSA
regulations specific to travelers with disabilities at:
http://www.tsa.gov/travelers/airtravel/specialneeds/index.shtm.
Inform TSA security personnel that your case contains your
commode/shower wheelchair and that it will fit, (albeit snugly),
through the x-ray tunnel. To date, following many such
17
security checks, I have yet to have my carrying case opened for
inspection.
With the hard part behind you, proceed to your gate, check-in
with the Agent at the counter, make whatever seating changes
you want / they can make and arrange for an aisle chair to be
available, should one be required. When the Agent asks what’s
in the case, repeat yet again, “it’s a delicate shower chair”.
You will be boarded ahead of the other passengers. Airline
personnel, for the most part, well-trained in handling disabled
passengers, will assist you down the jet-way along with your
Go-Anywhere Chair, transfer board and laptop computer.
After they transfer you to the aisle chair and on to the aircraft,
they will stow both of your chairs. Make sure that you take
your wheelchair seat cushion on board as storing it in the nonpressurized cargo compartment could result in damage to the
cushion. The foam cushions on your Go-Anywhere Chair will
store in cargo without any problems. Finally, when making
connections, make certain that both wheelchair and GoAnywhere Chairs are brought up into the jet-way and that, one
way or another, that they accompany you to your connecting
flight where you will have to repeat the boarding process yet
again.
Air travel for people with disabilities is a hassle and can be
embarrassing and downright uncomfortable. Following the
steps in the aforementioned process will not change this fact,
unfortunately, though it will make it a little less miserable.
And, because your rights are protected by the
Air Carrier Access Act (14 CFR, Pt 382) if you
experience any sort of problem that is directed
solely to your disability, immediately ask for a
Complaint Resolution Official. The C.R.O. is
there to resolve problems that may arise due
to your disability and for no other purpose.
18
They are, by law, supposed to be available to
any departing or arriving flight. Do not be
forced into any "assistance" that you did not
ask for or do not want and on the other hand,
ask for assistance that is supposed to be there
but is not readily available. Go to the
following link for more information:
http://www.disabilitytravel.com/airlines/air_carrier_act_details.
htm
TROUBLESHOOTING TIPS
1.
PROBLEM: The rolling frame wobbles while the
brakes are on.
SOLUTION: Unlock the brakes and turn all four
wheels into positions in which the chair remains
stable before re-engaging the brakes. Also ensure
that the front legs are adjusted to the same height
and that the rear legs match one another as well.
Ensure that the rear casters are positioned such
that the wheels are behind the chair, maximizing the
wheelbase and stability before transferring to or
from the chair.
2.
PROBLEM: The foam sleeves on my armrests or
push handles slip off of the aluminum tubing.
SOLUTION: Wrap the aluminum tube in two or
three locations along the aluminum tube with some
electrical or duct tape in order to provide additional
friction.
3.
PROBLEM: A caster assembly
dislodged from its tubular leg.
19
has
become
SOLUTION: While holding the caster in one hand,
engage the total-lock brake with the other hand.
Tighten down the metal nut located at the top of the
caster stem just enough to compress the black
rubber bushing so that the caster stem will fit snugly
into the bottom of the tubular leg. Force the caster
stem into the aluminum tube and, with the brake still
engaged, spin the caster clockwise until it is as tight
as possible and until it begins to “click” as it turns.
4.
PROBLEM: I am concerned that the adjustable nonskid swivel glides located at the bottom of each of
the four legs on the tub section might slide or that
they could scratch or damage the surface of the
bathtub.
SOLUTION: Place a rubber bath mat on the floor of
the tub before placing the tub section down.
LIMITED WARRANTY AND RETURN POLICIES
Please read this BEFORE operating or using your “GoAnywhere” Commode, Shower ‘n Bath Chair™.
By operating or using the chair, you agree to the terms of
this warranty. If you do not agree, return the chair to GO!
Mobility Solutions BEFORE use to receive a full refund of the
price you paid. Thereafter, this product may be returned at
anytime within 30 days following delivery for a full refund,
less a 20% restocking fee and at your own shipping
expense.
What does GO! Mobility Solutions' limited warranty
cover?
The manufacturer of this GO! Mobility Solutions product, GO!
Mobility Solutions warrants to the holder of a valid proof of
purchase ("Consumer" or "you") that the product and all
accessories provided by GO! Mobility Solutions in sales
package ("Product") are free from material defects in
20
material and workmanship, pursuant to the following terms
and conditions, when used normally and in accordance with
operation instructions. This limited warranty extends only to
the Consumer for Products purchased and used in the United
States of America.
What will GO! Mobility Solutions do if the Product is
not free from material defects in materials and
workmanship during the limited warranty period
("Materially Defective Product")?
If the product is received within the warranty period and if
the product is found by to be defective within the terms of
this warranty GO! Mobility Solutions will repair or replace the
defective product at its option and cost. There is a twelve
month limited warranty extended for all parts except
cushions.
How long is the limited warranty period?
GO! Mobility Solutions warrants its products to be free from
defects in material and workmanship for up to one year
starting from the date of original purchase from GO!
Mobility. This limited warranty also applies to repaired or
replacement Products for a period of either (a) 90 days from
the date the repaired or replacement Product is shipped to
you or (b) the time remaining on the original one-year
limited warranty, whichever is longer.
What is not covered by this limited warranty?
This limited warranty does not cover:
1. Product that has been subjected to misuse, accidental
damage, shipping or other physical damage,
abnormal operation or handling, neglect, fire,
excessive heat, natural disaster; or
2. Product that has been damaged due to repair,
alteration or modification by anyone other than an
authorized service representative of GO! Mobility
Solutions; or
21
3. Product whose warranty/quality stickers, Product
serial numbers plates or electronic serial numbers
have been removed, altered or rendered illegible; or
4. Product purchased, used, serviced, or shipped for
repair from outside the United States, or used for
commercial or institutional purposes (including but
not limited to Products used for rental purposes); or
5. Product returned without valid proof of purchase (see
2 below); or
6. Foam and vinyl (cushions) due to their fragile nature.
7. SOFT CARRYING CASE – DAMAGE MAY OCCUR TO
THE ALUMINUM IF DROPPED OR IF OBJECTS ARE
DROPPED ON IT.
DO NOT CHECK LUGGAGE AT
AIRPORTS. TAKE IT ON BOARD
How do you get warranty service?
•
•
•
•
To obtain warranty service in the United States of
America. Call 1-866-363-8244 for instructions
regarding where to return the Product. Before calling
for service, please check the user's manual.
Please do not return the chair to GO! Mobility
Solutions without prior authorization from GO!
Mobility Solutions. Shipping and handling expense is
the customer’s responsibility unless otherwise
authorized by GO! Mobility Solutions.
Except as provided by applicable law, you assume the
risk of loss or damage during transit and
transportation and are responsible for delivery or
handling charges incurred in the transport of
Product(s) to the service location. GO! Mobility
Solutions will return repaired or replaced product
under this limited warranty to you, transportation,
delivery or handling charges prepaid. GO! Mobility
Solutions assumes no risk for damage or loss of the
Product in transit.
If the Product failure is not covered by this limited
warranty, or proof of purchase does not meet the
terms of this limited warranty, GO! Mobility Solutions
will notify you and will request that you authorize the
cost of repair and return shipping costs for the repair
of Products that not covered by this limited warranty.
22
What must you return with the Product
warranty service?
to get
1. Return the entire original package and contents
including the Product to the GO! Mobility Solutions
service location along with a description of the
malfunction or difficulty;
2. Include "valid proof of purchase" (sales receipt)
identifying the Product purchased (Product model)
and the date of purchase or receipt; and
3. Provide your name, compete and correct mailing
address, and telephone number.
Limitations and Exclusions: Implied warranties, including
those of fitness for a particular purpose and merchantability
(an unwritten warranty that the product is fit for ordinary
use) are limited to one year from date of purchase. Some
states do not allow limitations on how long an implied
warranty lasts, so the above limitation may not apply to you.
GO! Mobility Solutions is obligated to provide the purchaser
with repair or replacement as described above so long as the
warranty period is in force. This exclusive warranty remedy
will not have failed as long as GO! Mobility Solutions is
willing and able to repair or replace the product as
described. Should this remedy be held to have failed, the
only remaining warranty obligation of GO! Mobility Solutions
shall be to provide the customer with a full refund. In no
event shall GO! Mobility Solutions be liable for any indirect,
special, incidental, consequential, or similar damages
(including, but not limited to lost profits or revenue, inability
to use the product, or other associated equipment, the cost
of substitute equipment, and claims by third parties)
resulting from the use of this product. Some states do not
allow the exclusion or limitation of incidental or
consequential damages, so the above limitation or exclusion
may not apply to you.
This warranty is the complete and exclusive agreement
between you and GO! Mobility Solutions. It supersedes all
other written or oral communications related to this product.
GO! Mobility Solutions provides no other warranties for this
23
product. The warranty exclusively describes all of GO!
Mobility Solutions' responsibilities regarding the product.
There are no other expressed warranties. No one is
authorized to make modifications to this warranty and you
should not rely on any such modification.
State Law Rights: This warranty gives you specific legal
rights, and you also have other rights which vary from state
to state.
DISCLAIMER
Except for the warranty as provided herein, and the
acknowledgement by GO! Mobility Solutions that the chair,
as manufactured by it, is fit for the general purpose for
which most persons acquire a chair of its kind, GO! Mobility
Solutions provides that you accept the chair as is, without
warranties, either express or implied. GO! Mobility Solutions
makes no warranty of fitness for your particular purpose and
no warranty of merchantability beyond that already stated.
No warranties extend beyond the duration of the express
warranty stated above.
24