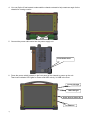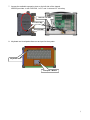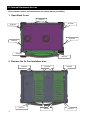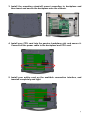
1
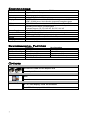
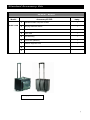
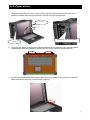
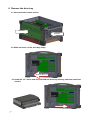
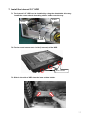
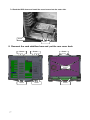
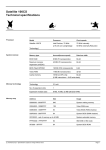
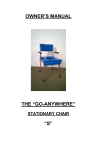
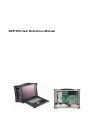
ARP 650 User Reference Manual
Specifications
Model No
Motherboard
ARP650
Support SBC with Backplane
Offer 11 expansion slots
1x slim DVD-RW, 2x 3.5” drive bay
15" TFT LCD Monitor, 1024x 768, 250 nits brightness, 16.2M,
MTBF: 50,000 hours, Anti-reflection tempered strengthen glass
ST GM5621 AD conversion board, VGA interface (Option DVI)
104-key Laptop type, multi-languages Keyboard/ touchpad
Operating Life of Keys: 8 million cycles
Keyboard Layout: CH, FR, GR, KR, RU, SP, UK, US
1U, 400W, 100~240VAC, Auto switch
Rugged Aluminum Construction with shock absorbing rubber corners
Built-in amplified 2x 3W speakers
412Wx 305Hx 228D mm (16.2”x 12”x 8.97”)
11 kgs
Padded carrying case with wheels
Slots
Drive bay
Display
VGA
KB/MS
Power Supply
Construction
Speaker
Dimension
Weight
Carrying Case
Environmental Factors
Temperature
Relative Humidity
Shock
Vibration
Approval
Operating
0°C~50°C
10%~90%
10g, 11ms, half-Sine
10-500Hz (0.4 Grms)
CE, FCC, RoHS
Non-Operating
-20°C~60°C
10%~95%
30g, 11ms, half-Sine
10-500Hz (1.12 Grms)
Options
VGA Interface
● DVI Interface cable for DVI Graphic card
D-sub 15pin VGA interface cable
Touch Screen
● None
Touch Screen
LCD Display
● 15” TFT LCD display, 1024x 768 resolution
15.4” TFT LCD display, 1920x 1200 resolution
2
Standard Accessory Kits
ARP 650
Model
Accessory Kit SKD
Qty
1
ARP650 Portable Computer Chassis
1
2
Carrying Case with wheels
1
3
User’s Manual
1
4
Power Cord
1
5
Anti-Static Bag
1
6
Screw Pack (stabilizer)
1
7
Stabilizer Supports Pack
1
ARP 650
8
9
Carrying Case with Wheels
3
1.0 Introduction
Version: 2010.12
ARP 650 features:
● Rugged Aluminum Construction with shock absorbing rubber corners
● Built-in 15” LCD display with tempered glass, 1024x 768, 16.2M,
250 nits brightness, MTBF: 50,000 hrs
● Designed for SBC with Backplane
● Offer 11 full length slots expansion capability
● Laptop type multi-languages keyboard with touchpad
● 1U, 400W power supply, 100~240VAC
● Offer 1x slim DVD-RW, 2x 3.5” drive bays
● Anti-reflection tempered glass protect LCD
● Carrying case to manage portable PC with ease
The ARP650 is a robust portable computer built using heavy duty metal to provide tough, goanywhere unit ideally suitable for test and measurement applications. Its compact size, supports
SBC with Backplane, add-in slots, and a 15” TFT LCD display make it a high performance field
solution. Functional practicality combined with the simple and polished design, the ARP650 with its
extra-rugged construction to sustain bumps and impacted blows is the most cost-effective, durable
and efficient portable solution for your needs.
Applications: Military, Industrial automation, Digital TV test & analysis, Mobile Computing,
Outdoor Computers, video conferencing, E-learning, Speech Technologies,
Portable Workstation, Telemedicine, Multimedia, Mission Critical Computing
4
2.0 Getting Started
2.0 Operation
1. Releasing Keyboard from main unit by pushing up the 2 taps located on both side of the
chassis to release the locking mechanism, and then pull out the keyboard.
Lift up
Lift up
Press to release
2. You have the option of leaving the keyboard attached to the chassis or they can be release
independently from the chassis by pushing the two levers inward to release the lock.
3. Connect the RJ-45 keyboard/touchpad cable to the front bottom right corner of the chassis.
Make sure the pin direction is correct when inserting.
5
4. You can flip the 2 feet located underneath the chassis outward to help create an angle for the
chassis for viewing comfort.
2 feet
5. Connect the power cable outlet into the power supply unit
Insert Power Cord
6. Press the power switch located on the front panel of the chassis to power up the unit.
There have indicator LED lights for Power and HDD activity, 2x USB in the front
Power LED light
HDD LED light
Press Once to Power On
2x USB Port
6
7. Access the available expansion slots on the left side of the chassis.
ARP650 provides 1x slim DVD-RW, 1x 3.5” and 1x internal 3.5” drive bay
Internal 3.5” HDD
3.5” Drive Bay
Slim DVD-RW
8. Keyboard and touchpad surface act as input for the system.
Keyboard LED
Touchpad + Button
7
3.0 Internal Hardware Access
Be sure power cable is not connected to the system before proceeding
1. Open Back Cover
Unscrew
Unscrew
Unscrew
Unscrew
Unscrew
Unscrew
Unscrew
2. Remove the 2x Card stabilizer bars
Unscrew
Unscrew
8
Unscrew
Unscrew
Unscrew
Unscrew
3. Install the mounting stand-off mount according to backplane and
then insert and secure the backplane onto the chassis.
4. Install your CPU card into the passive backplane slot and secure it.
Connect all the power cable to the backplane and CPU card.
5. Install your add-in card on the available connection interface, and
inserted completely and tight.
9
6. Remove the drive bay
6.1 Unscrew the 4x bottom screws
Unscrew
Unscrew
6.2 Slide and move out the drive bay slowly
Slide and Move out
6.3 Install the 3.5” device and slim DVD-RW into drive bay housing, and then install into
chassis
10
7. Install the internal 3.5” HDD
7.1 The internal 3.5” HDD can be installed by using the detachable drive tray.
Install the corner shock absorbing rubber holder onto the tray.
Rubber
Rubber
Rubber
7.2 Fix the round screws onto 1 side (3 screws) of the HDD
Round screw
7.3 Slide in the side of HDD into the inner rubber holder.
11
7.4 Push the HDD down and install the round screw into the outer side.
Screw
Screw
8. Remount the card stabilizer bars and put the rear cover back
Screw
Screw
Screw
Screw
Screw
12
Screw
Screw
Screw
4.0 Software Installation
You can use the built-in DVD-RW to load operating system and additional applications
software into the system. Available medium from USB or download can also be possible.
DOS Boot up: DOS boot up requires you to have a version of the DOS installed on hard
disk drive or floppy. Depending on the execution sequence you have set in the batch file,
you will usually get a DOS prompt after loading.
Window Boot up: Windows boot up requires you to have Windows installed in the hard disk
drive. During Windows boot up, you will see a sequence of access to your hard disk drive
which will eventually take you into a graphical user interface environment.
Other O/S description: Many other operating systems are available in the market, such as
Linux, Windows, Solaris and DOS. These operating systems will behave differently and you
should react accordingly.
13
5.0 Troubleshooting
1. Installation problem:
1. Normally problem with a fail start up is due to installation problem.
2. Double check all the peripheral cards or items you have added to the ARP.
3. Are all the items seated properly?
4. Are all the cables connected back to its original or correct position?
5. Are the items you have added compatible?
6. Before you check for these, turn the computer off and unplug the power cord.
7. Check for 1 thru 5 and then re-power up the computer.
8. Remove all items that were added and re-try system power up.
9. If the system starts now, try inserting 1 new item in at a time and try powering up.
10. Repeat this step until you get the desired result.
2. BIOS Beep Code:
The BIOS beep code indicates error in system initialization. The BIOS of the system board
will associate with video and memory error. Please check your video card is properly
seated and your memory is installed properly.
3. System Fails to power up:
1. Check you power connection first.
2. Check the main power switch is in the ON positions (I) *If cold switch is available.
3. Press the power button located on the machine.
4. No display (LCD):
1. Check all the proper power up procedure has been taken.
2. Hook up an external LCD to the VGA port, to check if video is present.
3. If video is present on external LCD, check the internal LCD cable connection.
4. Or check your VGA setting to make sure LCD video is enabled.
5. If there is no video on external, check your system to make sure everything is seated
properly.
6. If everything is seated properly and still no video, call us for further assistance.
5. External LCD no display:
1. Check to see if you have internal LCD video.
2. Check if your LCD is functioning properly.
3. Check your VGA setting to make sure external video is enabled.
6. Keyboard fails:
1. Make sure the keyboard plug is inserted completely into the portable.
2. Make sure you do not have another keyboard connected to the side I/O PS/2 port.
7. TOUCHPAD fails:
1. Make sure the keyboard plug is inserted completely into the portable.
2. If you have an external PS/2 mouse hook up on the side I/O PS/2 port, the touch pad
will not function simultaneously.
3. If your operating system requires and does not load the mouse driver automatically,
make sure you have the proper mouse driver loaded.
8. DVD-RW fails:
1. Make sure the CD/DVD is readable.
2. If DVD-RW fails to be recognized during POST, check internal cable fit.
14