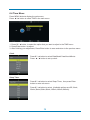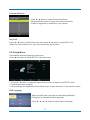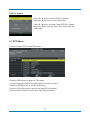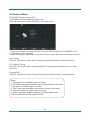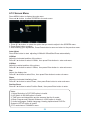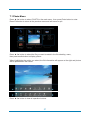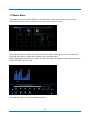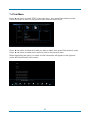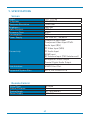
1
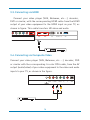
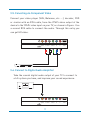
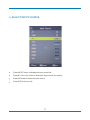
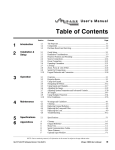
TLD-1111-40 40 Index 1. INTRODUCTION 4 1.1. Safety Information...........................................................4 2. General View .................................................................10 2.1. Front Panel ................................................................10 2.2. Connection Panel ......................................................11 2.3. Remote Control .........................................................12 3. INSTALLATION 15 3.1. Power Supply Connection .............................................15 3.2. RF Antenna Connection ................................................15 3.3. Connecting via Composite HDMI...................................16 3.4. Connecting via VIDEO ...................................................16 3.5. Conecting via Component Video ...................................17 3.6. Connect to Digital Audio Amplifier ................................17 3.7. Connecting to a PC........................................................18 3.8. Connecting Headphones ................................................18 4. INPUT SOURCE 19 5. FIRST TIME INSTALLATION 20 6. MAIN MENU OPERATION 22 6.1. DTV Channel Menu ........................................................22 6.2. Picture Menu ................................................................ 25 6.3. Sound Menu ...................................................................27 6.4. Time Menu ..................................................................... 28 6.5. Lock Menu ..................................................................... 30 6.6. Setup Menu ....................................................................31 6.7. EPG Menu ...................................................................... 32 2 6.8. Record .......................................................................... 33 6.9. ATV Channel Menu ....................................................... 34 6.10.Screen Menu ...............................................................35 7. PLAYING MULTIMEDIA FILES 36 7.1. Photo Menu .................................................................. 37 7.2. Music Menu .................................................................. 38 7.3. Movie Menu .................................................................. 39 7.4. Text Menu .....................................................................40 8. TROUBLESHOOTING 41 9. SPECIFICATIONS 42 3 1. INTRODUCTION 1.1. Safety Information To ensure reliable and safe operation of this equipment, please read carefully all the instructions in this user guide, especially the safety information below. CAUTION: TO REDUCE THE RISK OF ELECTRIC SHOCK, DO NOT REMOVE COVER (OR BACK). NO USER-SERVICEABLE PARTS INSIDE. REFER SERVICING TO QUALIFIED SERVICE PERSONNEL. The lightening flash with arrowhead symbol, within an equilateral triangle is intended to alert the user to the presence of un-insulated “dangerousvoltage”withintheproductsenclosure that may be of sufficient magnitude to constitute a risk of electric shock to the persons. The exclamation point within an equilateral triangle is intended to alert the user to the presence of important operating and maintenance (servicing) instructions in the literature accompanying the appliance. WARNING: TO REDUCE THE RISK OF FIRE OR ELECTRIC SHOCK, DO NOT EXPOSE THIS APPLIANCE TO RAIN OR MOISTURE. 4 CAUTION: Use of controls or adjustments or performance of procedures other than those specified herein may result in hazardous radiation exposure. Please, carefully study this manual and always keep it available. There are, however, some installation and operation precautions which you should be aware of: 1. READ INSTRUCTIONS: All the safety and operating instructions should be read before the product is operated. 2. RETAIN INSTRUCTIONS: The safety and operating instructions should be retained for future reference. 3. HEED WARNINGS: All warnings on the product and in the operating instructions should be adhered to. 4. FOLLOW INSTRUCTIONS: All operating and use instructions should be followed. 5. CLEANING: Unplug this product from the wall outlet before cleaning. Do not use liquid cleaners or aerosol cleaners. Use a damp cloth for cleaning. 6. ATTACHMENTS: Do not use attachments not recommended by the product manufacturer as they may cause hazards. 7. WATER AND MOISTURE: Do not use this product near water – for example, near a bath tub, wash bowl, kitchen sink, or laundry tub - in a wet basement or near a swimming pool and the like. 8. ACCESSORIES: Do not place this product on an unstable cart, stand, tripod, bracket or table. The product may fall, causing serious injury to a child or adult and serious damage to the product. Use only with a cart, stand, tripod, bracket or table recommended by the manufacturer or 5 sold with the product. Any mounting of the product should follow the manufacturer’s instructions and should use a mounting accessory recommended by the manufacturer. A product and cart combination should be moved with care: Quick steps, excessive force and uneven surfaces may cause the product and cart combination to overturn. 9. VENTILATION: Slots and openings in the cabinet are provided for ventilation and to ensure reliable operation of the product and to protect it from overheating, and these openings must not be blocked or covered. The openings should never be blocked by placing the product on a bed, sofa, rug, or other similar surface. This product should not be placed in a built-in installation such as a bookcase or rack unless proper ventilation is provided or the manufacturer’s instructions have been adhered to. 10. POWER SOURCES: This product should be operated only from the type of power source indicated on the marking label. If you are not sure of the type of power supply to your home, consult your product dealer or local power company. For products intended to operate from battery power, or other sources, refer to the operating instructions. 11. GROUNDING OR POLARIZATION: This product may be equipped with a polarized alternating-current line plug (a plug having one blade wider than the other).This plug will fit into the power outlet only one way. This is a safety feature .If you are unable to insert the plug fully into the outlet, try reversing the plug .If the plug should still fail to fit, contact your electrician to replace your obsolete outlet. Do not defeat the safety purpose of the polarized plug. 12. POWER-CORD PROTECTION: Power-supply cords should be routed so that they are not likely to be walked on or pinched by items placed upon or against them, paying particular attention to cords at 6 plugs, convenience receptacles, and the point where they exit from the product. 13. PERCEPTIVE ATTACHMENT PLUG: The product is equipped with an attachment plug having overload protection. This is a safety feature. See instruction manual for replacement or resetting of protective device. If replacement of the plug is required, be sure the technician service has used a replacement plug specified by the manufacturer that has the same overload protection as the original plug. 14. OUTDOOR ANTENNA GROUNDING: If an outside antenna or cable system is connected to the product, be sure the antenna or cable system is grounded so as to provide some protection against voltage surges and built-up static charges. Article 810 of the National Electrical Code, ANSI/NFPA 70, provides information with regard to proper grounding of the mast and supporting structure, grounding of the leadin wire to an antenna discharge unit, size of grounding conductors, location of antenna-discharge unit, connection to grounding electrodes, and requirements for the grounding electrode. 15. LIGHTNING: For added protection for this product during a lightning storm, or when it is left unattended and unused for long periods of time, unplug it from the wall outlet and disconnect the antenna or cable system. This will prevent damage to the product due to lightning and power-line surges. 7 16. POWER LINES: An outside antenna system should not be located in the vicinity of overhead power lines or other electric light or power circuits, or where it can fall into such power lines or circuits. When installing an outside antenna system, extreme care should be taken to keep from touching such power lines or circuits as contact with them might be fatal. 17. OVERLOADING: Do not overload wall outlets, extension cords, or integral convenience receptacles as this can result in a risk of fire or electric shock. 18. OBJECT AND LIQUID ENTRY: Never push objects of any kind into this product through openings as they may touch dangerous voltage points or short-out parts that could result in a fire or electric shock. Never spill liquid of any kind on the product. 19. SERVICING: Do not attempt to service this product yourself as opening or removing covers may expose you to dangerous voltage or other hazards. Refer all servicing to qualified service personnel. 20. DAMAGE REQUIRING SERVICE: Unplug this product from the wall outlet and refer servicing to qualified service personnel under the following conditions: When the power-supply cord or plug is damaged. If liquid has been spilled, or objects have fallen into the product. If the product has been exposed to rain or water. If the product does not operate normally by following the operating instructions. Adjust only those controls that are covered by the operating instructions as an improper adjustment of other controls may result in damage and will often require extensive work by a qualified technician to restore the product to its normal operation. If the product has been dropped or damaged in any way. 8 When the product exhibits a distinct change in performance – this indicates a need for service. 21. REPLACEMENT PARTS: When replacement parts are required, be sure the service technician has used replacement parts specified by the manufacturer or have the same characteristics as the original part. Unauthorized substitutions may result in fire, electric shock, or other hazards. 22. SAFETY CHECK: Upon completion of any service or repairs to this product, ask the service technician to perform safety checks to determine that theproduct is in proper operating condition. 23. WALL OR CEILING MOUNTING: The product should be mounted to a wall or ceiling only as recommended by the manufacturer. 24. HEAT: The product should be situated away from heat sources such as radiators, heat registers, stoves, or other products (including amplifiers) that produce heat. 9 2. GENERAL VIEW 2.1. Front Panel CH+ VOL+ MENU SOURCE CH+ VOL+ MENU POWER SOURCE POWER 10 2.2. Connection Panel USB 10 RF 9 PC AUDIO 8 VGA 7 CH+ VOL+ MENU SOURCE POWER HDMI3 6 HDMI2 1 COAXIAL R AUDIO L 2 3 VIDEO / Y 4 Pb 5 Pr HDMI1 6 1. Headphone Jack 7. VGA Input 2. COAXIAL Output 8. PC Input 3. Rear AV Input 9. 75 ohm Antenna Socket 4. VIDEO Jack 10. USB 5. Component Input 6. HDMI Input 11 2.3. Remote Control POWER: Turn on the TV/Standby : Mute the device P.MODE: Select the picture mode P.MODE S.MODE ASPECT MTS S.MODE: Select the sound mode ASPECT: Selects the screen size MTS: Audio language selection NUMBER KEYS: Change the channel directly Ɣ For direct access a digital TV channel. (For an example, when access a digital TV channel number 5-1, press button "5" + "Ɣ" + "1") REC SLEEP EPG : Return to the previous channel tuned SLEEP: Auto Power Off Timer EPG: Shows Eletronic Program Guide INFO SOURCE REC: In DTV mode, Press REC button to start recording, perss button to stop recording COLOR BUTTONS: Shortcut from the current page to other pages EXIT MENU V P SOURCE: Display the input source menu MENU: Show Menu REPEAT V INFO: Show information about the current programme P EXIT: Exit the Menu FAV FAV- FAV+ CC CH.LIST FREEZE UP: Up OK: Confirm LEFT: Left RIGHT: Right DOWN: Down V+: Increase volume V-: Decrease volume SUBTITLE: Subtitles selection REPEAT: Repeat play P+: Next Channel P-: Previous Channel 12 FAV: Show the list of favorite channels FAV-: Previous favorite channel FAV+: Next favorite channel CC: CC mode CH LIST: Displays channel lists on the screen FREEZE: Freeze the image : PLAY/PAUSE : Fast Rewind Playback : Fast Forward Playback : Stop playback : Previous file : Next file Install the Bateries Remove the lid of the battery compartment.on the back of the remote control unit by moving the lid. Place two AAA batteries, 1.5V battery compartment respecting the polarity. Do not mix new with old batteries or different types of batteries. Replace the battery compartment cover by moving it until it clicks. 13 Important: When replacing the batteries, take special care in disposing of used.respecting.the.rules.in.force. Please deposit used batteries in the place assigned to ensure they are recycled surely maintaining the environment. Do not burn or bury batteries. Using the Remote Control Unit Always point the remote control unit directly to the sensor on the front panel of the TV. It should be a maximum of 7 meters distance and 30 degrees to the right or left of the IR receiver to work properly. Important: Do not leave the remote control unit in extremely hot or humid places. 14 3. INSTALLATION 3.1. Power Supply Connection Connect the power cord to a home power outlet and to the connection panel in the back of the unit. 3.2. RF Antenna Connection Connect the antenna as shown in the figure to receive the.analog or digital (DTV) TV signal. HDMI2 HDMI3 VGA 15 PC AUDIO RF USB 3.3. Connecting via HDMI Connect your video player (VHS, Betamax, etc....), decoder, DVD or similar, with the corresponding HDMI cable from the HDMI output of your video equipment to the HDMI input on your TV, as shown in figure. This cable transfers HD video and audio. R AUDIO L VIDEO / Y Pb Pr HDMI1 HDMI2 HDMI3 VGA PC AUDIO USB RF 3.4. Connecting via Composite Video Connect your video player (VHS, Betamax, etc.. ...), decoder, DVD or similar with the corresponding tri-color RCA cable, from the AV output (audio/video) of your video equipment to the video and audio inputs to your TV, as shown in the figure. R Audio in COAXIAL 16 R AUDIO L VIDEO / Y Pb L Pr HDMI1 3.5. Conecting via Component Video Connect your video player (VHS, Betamax, etc.. ...), decoder, DVD or similar with an RCA cable, from the YPbPr video output of the device to the YPbPr video input on your TV, as shown in Figure. Use a second RCA cable to connect.the.audio. Through this entry you can get HD video. COAXIAL R AUDIO L VIDEO / Y Pb Pr HDMI1 3.6. Connect to Digital Audio Amplifier Take the coaxial digital audio output of your TV to connect to a hifi system you have, and improve your sound experience. COAXIAL R AUDIO L 17 VIDEO / Y Pb Pr HDMI1 3.7. Connecting to a PC Conect the VGA output (RGB) from your PC to the corresponding input on your TV, and the audio output from your computer to the PC AUDIO input of your television, as shown in figure. HDMI2 HDMI3 VGA PC AUDIO RF USB 3.8. Connecting Headphones Use the HEADPHONES output of your TV set to listen the audio of the unit through your own stereo headphones. When you connect headphones to the unit, the main speakers will be deactivated. COAXIAL 18 R AUDIO L VIDEO / Y Pb Pr HDMI1 4. SELECT INPUT SOURCE Press INPUT button to display the input source list, 3UHVVźŸRU2.EXWWRQWRVHOHFWWKHLQSXWVRXUFH\RXZDQWWR 3UHVV2.EXWWRQWRHQWHUWKHLQSXWVRXUFH Press EXIT button to quit. 19 5. First Time Installation Connect an RF cable from the Tv’s input called “RF-In” and to your TV Aerial socket. Select Language 3UHVVŻŹEXWWRQWRVHOHFWWKHODQJXDJHWREHXVHGIRUPHQXVDQGPHVVDJH Select Time Zone 3UHVVźŸEXWWRQWRKLJKOLJKWWLPH]RQHPHQX 3UHVVŻŹEXWWRQWRVHOHFWWKHWLPH]RQH\RXZDQWWR Auto OK 20 Auto Tuning Status First tuning Air DTV, press Menu and left arrow button to skip Air DTV tuning, Second tuning Air ATV, press Menu and left arrow button to skip Air ATV tuning. Finally tuning Cable TV, press Menu and left arrow button to skip Cable TV tuning. 21 6.Main Menu Operation 6.1 Channel Menu Press MENU button to display the main menu. 3UHVVŻŹEXWWRQWRVHOHFW&+$11(/LQWKHPDLQPHQX 3UHVVźŸEXWWRQWRVHOHFWWKHRSWLRQWKDW\RXZDQWWRDGMXVWLQWKH&+$11(/PHQX 2. Press Enter button to adjust. $IWHUILQLVKLQJ\RXUDGMXVWPHQW3UHVV(QWHUEXWWRQWRVDYHDQGUHWXUQWRWKHSUHYLRXVPHQX 1RWH7KHFKDQQHOPHQXLVDYDLODEOHRQO\DW$LUDQG&DEOHVRXUFH Auto Tuning 3UHVVźŸEXWWRQWRVHOHFW$XWR7XQLQJWKHQSUHVV(QWHUŹEXWWRQWRHQWHU ATV Manual Tuning &XUUHQW &+ 6HWWKHFKDQQHOQXPEHU &RORU6\VWHP 6HOHFWWKHFRORUV\VWHP $YDLODEOH6\VWHP$872176&3$/03$/1 Fine-Turn $GMXVWWKHIUHTXHQF\RIWKHFKDQQHOILQHO\ $)& $XWRPDWLF)LQHWXQLQJ 22 DTV Manual Tuning 3UHVVźŸEXWWRQWRVHOHFW'790DQXDO7XQLQJWKHQSUHVV(QWHUEXWWRQWRHQWHUVXEPHQX 3UHVVŻŹEXWWRQWRVHOHFWFKDQQHOWKHQSUHVV(QWHUEXWWRQWRVHDUFKSURJUDP Program Edit 3UHVVźŸEXWWRQWRVHOHFW3URJUDP(GLWWKHQSUHVV(QWHUEXWWRQWRHQWHUVXEPHQX 7KHWKUHHFRORUHGNH\LVWKHVKRUWFXWNH\ IRUSURJUDPPLQJWKHFKDQQHO )LUVWSUHVVźŸWRKLJKOLJKWWKHFKDQQHO\RXZDQWWR VHOHFWWKHQ 3UHVVWKHEXWWRQWRDGGRUUHPRWHWKHFKDQQHOWR\RXU IDYRULWHOLVW5HG 3UHVVWKHEXWWRQWRVNLSWKHVHOHFWFKDQQHO <RXU79VHWZLOOVNLSWKHFKDQQHODXWRPDWLFDOO\ ZKHQXVLQJ&+WRYLHZWKHFKDQQHOV%OXH 23 Schedule List 3UHVVźŸEXWWRQWRVHOHFW6FKHGXOH/LVWWKHQSUHVV(QWHUEXWWRQWRHQWHUVXEPHQX ,WLVDYDLODEOHLQVRXUFH :KHQWKHWLPHDSSRLQWPHQWLVFRQIOLFW LWZLOOSURGXFHDZDUQLQJPHVVDJH 3UHVVWKH<(//2:EXWWRQWRHQWHUWKH LQWHUIDFHEHORZ Signal Information 3UHVVźŸEXWWRQWRVHOHFW6LJQDO,QIRUPDWLRQSUHVVWKH(QWHUEXWWRQWRVHHWKHGHWDLO LQIRUPDWLRQDERXWWKHVLJQDO2QO\DYDLODEOHZKHQWKHUHLVVLJQDOLQ'79 24 6.2 Picture Menu Press MENU button to display the main menu. 3UHVVŻŹEXWWRQWRVHOHFW3,&785(LQWKHPDLQPHQX 3UHVVźŸEXWWRQWRVHOHFWWKHRSWLRQWKDW\RXZDQWWRDGMXVWLQWKH3,&785(PHQX 3UHVV2.EXWWRQWRDGMXVW $IWHUILQLVKLQJ\RXUDGMXVWPHQW3UHVV0(18EXWWRQWRVDYHDQGUHWXUQEDFNWRWKH SUHYLRXVPHQX Picture Mode 3UHVVźŸEXWWRQWRVHOHFW3LFWXUH0RGHWKHQSUHVV2.EXWWRQWRHQWHUVXEPHQX <RXFDQFKDQJHWKHYDOXHRIFRQWUDVWEULJKWQHVVFRORUVKDUSQHVVDQGWLQWZKHQWKH SLFWXUHLVLQ3HUVRQDOPRGH 7,36<RXFDQSUHVV302'(EXWWRQWRFKDQJHWKH3LFWXUH0RGHGLUHFWO\ Contrast/ Brightness/ Color/ Tint / Sharpness 3UHVVźŸEXWWRQWRVHOHFWRSWLRQWKHQSUHVVŻŹEXWWRQWRDGMXVW &RQWUDVW$GMXVWWKHKLJKOLJKWLQWHQVLW\RIWKHSLFWXUHEXWWKHVKDGRZRIWKHSLFWXUHLV LQYDULDEOH %ULJKWQHVV$GMXVWWKHRSWLFDOILEHURXWSXWRIWKHHQWLUHSLFWXUHLWZLOOHIIHFWWKHGDUNUHJLRQ RIWKHSLFWXUH &RORU$GMXVWWKHVDWXUDWLRQRIWKHFRORUEDVHGRQ\RXURZQOLNH 7LQW8VHLQFRPSHQVDWLQJFRORUFKDQJHGZLWKWKHWUDQVPLVVLRQLQWKH176&FRGH 6KDUSQHVV$DGMXVWWKHSHDNLQJLQWKHGHWDLORIWKHSLFWXUH 25 Color Temp Change the overall color cast of the picture. 3UHVVźŸEXWWRQWRVHOHFW&RORU7HPSHUDWXUHWKHQSUHVV2.EXWWRQWRHQWHUVXEPHQX 3UHVVŻŹEXWWRQWRVHOHFW$YDLODEOH3LFWXUHPRGH&RRO0HGLXP:DUP8VHU <RXFDQFKDQJHWKHYDOXHRIUHGJUHHQDQGEOXHZKHQWKHFRORUWHPSHUDWXUHLVLQ8VHUPRGH &ROG,QFUHDVHWKHEOXHWRQHIRUWKHZKLWH 1RUPDO,QFUHDVHWKHVH[OLQNHGFRORUVIRUWKHZKLWH :DUP,QFUHDVHWKHUHGFRORUIRUWKHZKLWH 3HUVRQDO6HWWKHZKLWHEDODQFH\RXOLNH Noise Reduction 7RILOWHURXWDQGUHGXFHVWKHLPDJHQRLVHDQGLPSURYHSLFWXUHTXDOLW\ 3UHVVźŸEXWWRQWRVHOHFW1RLVH5HGXFWLRQWKHQSUHVV2.EXWWRQWRHQWHUVXEPHQX 2II6HOHFWWRWXUQRIIYLGHRQRLVHGHWHFWLRQ /RZ'HWHFWDQGUHGXFHORZYLGHRQRLVH 0LGGOH'HWHFWDQGUHGXFHPRGHUDWHYLGHRQRLVH +LJK'HWHFWDQGUHGXFHHQKDQFHGYLGHRQRLVH 26 6.3 Sound Menu 3UHVV0(18EXWWRQWRGLVSOD\WKHPDLQPHQX 3UHVVŻŹEXWWRQWRVHOHFW6281'LQWKHPDLQPHQX 0XOWL7UDFN6RXQG 6WHUHR 3UHVVźŸEXWWRQWRVHOHFWWKHRSWLRQWKDW\RXZDQWWRDGMXVWLQWKH6281'PHQX 3UHVV(QWHUEXWWRQWRDGMXVW$IWHUILQLVKLQJ\RXUDGMXVWPHQW3UHVV(QWHUEXWWRQWR VDYHDQGUHWXUQWRWKHSUHYLRXVPHQX Sound Mode 3UHVVźŸEXWWRQWRVHOHFW6RXQG0RGH WKHQSUHVV(QWHUEXWWRQWRHQWHUVXEPHQX 3UHVVźŸEXWWRQWRVHOHFW Select Back Adjust <RXFDQFKDQJHWKHYDOXHRI7UHEOHDQG%DVVZKHQWKHVRXQGLVLQ3HUVRQDOPRGH 7,36<RXFDQSUHVV602'(EXWWRQRQWKHUHPRWHFRQWUROWRFKDQJHWKH6RXQG0RGHGLUHFWO\ 6WDQGDUG3URGXFHVDEDODQFHGVRXQGLQDOOHQYLURQPHQWV 0XVLF3UHVHUYHVWKHRULJLQDOVRXQG*RRGIRUPXVLFDOSURJUDPV 0RYLH(QKDQFHVWUHEOHDQGEDVVIRUDULFKVRXQGH[SHULHQFH 6SRUWV(QKDQFHVYRFDOVIRUVSRUWV 3HUVRQDO6HOHFWWRFXVWRPL]HSLFWXUHVHWWLQJV 1RWH7KHWUHEOHDQGEDVVDUHRQO\DYDLODEOHLQ8VHUPRGH\RXFDQDGMXVWWKHPDV\RXOLNH Balance 3UHVVźŸEXWWRQWRVHOHFWRSWLRQ3UHVVŻŹEXWWRQWRDGMXVW Auto Volume 3UHVVźŸEXWWRQWRVHOHFW$XWR9ROXPH/HYHOWKHQSUHVVŻŹEXWWRQWRVHOHFW2QRU2II SPDIF Mode 3UHVVźŸEXWWRQWRVHOHFW'LJLWDO2XWSXWWKHQSUHVVŻŹEXWWRQWRVHOHFW2II3&0$XWR 127( %DODQFH7KLVLWHPFDQDGMXVWWKHVSHDNHU¶VRXWSXWLWHQDEOHV\RXWROLVWHQWREHVWDW\RXU SRVLWLRQ $XWR9ROXPH7KLVLWHPLVXVHGIRUUHGXFLQJWKHGLIIHUHQFHEHWZHHQFKDQQHODQGSURJUDP¶V YROXPHDXWRPDWLFDOO\ 27 6.4 Time Menu Press MENU buttonto display the main menu. 3UHVVŻŹEXWWRQWRVHOHFW7,0(LQWKHPDLQPHQX 3UHVVźŸEXWWRQWRVHOHFWWKHRSWLRQWKDW\RXZDQWWRDGMXVWLQWKH7,0(PHQX 3UHVV(QWHUEXWWRQOWRDGMXVW $IWHUILQLVKLQJ\RXUDGMXVWPHQW3UHVV(QWHUEXWWRQWRVDYHDQGUHWXUQWRWKHSUHYLRXVPHQX Clock 3UHVVźŸEXWWRQWRVHOHFW'DWH0RQWK<HDU+RXU0LQXWH 3UHVVŻŹEXWWRQWRVHWXSFORFN Sleep Timer 3UHVVźŸEXWWRQWRVHOHFW6OHHS7LPHUWKHQSUHVV(QWHU button to enter sub-menu. 3UHVVźŸEXWWRQWRVHOHFW$YDLODEOHRSWLRQVDUH2IIPLQ PLQPLQPLQPLQPLQPLQPLQ 28 Auto Standby 3UHVVźŸEXWWRQWRVHOHFW$XWR6WDQGE\WKHQSUHVV(QWHU EXWWRQWRHQWHUVXEPHQX 3UHVVźŸEXWWRQWRVHOHFW 7LSV7KHUHPRWHFRQWUROGRHVQRWPDNHDQ\RSHUDWLRQLQWKH K\SRWKHVLVWLPHLWZLOOFORVHGRZQDXWRPDWLFDOO\,I\RXGRDQ\ RSHUDWLRQLWZLOOUHVHWWKHWLPH Time Zone 3UHVVźŸEXWWRQWRVHOHFW7LPH=RQH WKHQSUHVV(QWHUEXWWRQWRHQWHUVXEPHQX 3UHVVźŸŻŹEXWWRQWRVHOHFWWLPH]RQH OSD Timer 3UHVVźŸEXWWRQWRVHOHFW26'7LPHU WKHQSUHVV(QWHUEXWWRQWRHQWHUVXEPHQX 3UHVVŻŹEXWWRQWRVHOHFW NOTE: The Clock will change with the area which you have selected in the Time Zone. 29 6.5 Lock Menu 3UHVV0(18EXWWRQWRGLVSOD\WKHPDLQPHQX 3UHVVŻŹEXWWRQWRVHOHFW/RFNLQWKHPDLQPHQX 3UHVVźŸEXWWRQWRVHOHFWWKHRSWLRQWKDW\RXZDQWWRDGMXVWLQWKH/2&.6<67(0PHQX 3UHVV(QWHUŻŹEXWWRQWRDGMXVW $IWHUILQLVKLQJ\RXUDGMXVWPHQW3UHVV0(18EXWWRQWRUHWXUQEDFNWRWKHSUHYLRXVPHQX Lock System 3UHVVźŸEXWWRQWRVHOHFW/RFN6\VWHP WKHQSUHVV(QWHUEXWWRQWRPDNHWKHIROORZLQJRSWLRQVYDOLG 'HIDXOWSDVVZRUGLVDQGLIIRUJHWZKDW\RXVHWSOHDVH FDOOWKHVHUYLFHFHQWHU Set Password 3UHVVźŸEXWWRQWRVHOHFW6HW3DVVZRUG WKHQSUHVV(QWHUEXWWRQWRHQWHUVXEPHQXWRVHWQHZSDVVZRUG Block Program 3UHVVźŸEXWWRQWRVHOHFW%ORFN3URJUDP 3UHVVEXWWRQWRORFNRUXQORFNWKHSURJUDP WKHQSUHVV(QWHUEXWWRQWRHQWHUVXEPHQXWRVHOHFW*UHHQ 30 Parental Guidance 3UHVVźŸEXWWRQWRVHOHFW3DUHQWDO*XLGDQFH WKHQSUHVV(QWHUEXWWRQWRHQWHUVXEPHQXWRVHOHFWWKH QXPEHURIDJHZKLFKLVVXLWDEOHIRU\RXUFKLOGUHQ Key Lock 3UHVVźŸEXWWRQWRVHOHFW.H\/RFNWKHQSUHVVŻŹEXWWRQWRVHOHFW2IIRU2Q :KHQ.H\/RFN¶VVWDWXHLVRQ\RXFDQ¶WXVHWKH.H\SDQHOEXWWRQ 6.6 Setup Menu 3UHVV0(18EXWWRQWRGLVSOD\WKHPDLQPHQX 3UHVVŻŹEXWWRQWRVHOHFW6(783LQWKHPDLQPHQX OSD Language English PVR File System Aspect Ratio 16:9 Blue Sreen On First Time Installation Caption Off Reset Software Update(USB) 3UHVVźŸEXWWRQWRVHOHFWWKHRSWLRQWKDW\RXZDQWWRDGMXVWLQWKH6(783PHQX 3UHVV(QWHUEXWWRQWRDGMXVW $IWHUILQLVKLQJ\RXUDGMXVWPHQW3UHVV(QWHUEXWWRQWRVDYHDQGUHWXUQWRWKHSUHYLRXVPHQX OSD Language 6HOHFWDQ26'PHQXODQJXDJHFDQEHGLVSOD\HG'HIDXOW 3RUWXJXHVHLVVHOHFWHGDVPHQXODQJXDJH 3UHVVźŸŻŹEXWWRQWRVHOHFW0HQX/DQJXDJH 31 PVR File System 3UHVVźŸEXWWRQWRVHOHFW395)LOH6\VWHP then press Enter button to enter sub-menu. 3UHVVźŸEXWWRQWRVHOHFW&KHFN395)LOH6\VWHP WKHQSUHVV(QWHUEXWWRQWRHQWHU7KHQLWZLOOFKHFNWKH 86%VSHHG 6.7 EPG Menu Press the button EPG to enter EPG menu. Press the RED button to switch to PVR mode. You can choose the time of the appointment to record you want. Press the GREEN button to set the remind time. Press the YELLOW button to see the pre-day EPG information. Press the BLUE button to set the next.-day EPG information 32 6.8 Record 3UHVV5(&25'EXWWRQWRUHFRUGWKHFXUUHQW SURJUDP 3UHVV6723EXWWRQWRVWRSUHFRUGLQJ WKHQLWZLOOUHWXUQWRQRUPDOEURDGFDVWWHOHYLVLRQ ,I\RXSUHVVWKH32:(5EXWWRQZKHQ\RXDUHUHFRUGLQJ WKHPHQXRQWKHOHIWZLOOVKRZXS Aspect Ratio 3UHVVźŸEXWWRQWRVHOHFW$VSHFW5DWLR WKHQSUHVV(QWHUEXWWRQWRHQWHUVXEPHQX 3UHVVźŸEXWWRQWRVHOHFWWKHDYDLODEOHGLVSOD\IRUPDW Blue Screen 3UHVVźŸEXWWRQWRVHOHFW%OXH6FUHHQWKHQSUHVV(QWHUEXWWRQWRVHOHFW2QRU2II First Time Installation 3UHVVźŸEXWWRQWRVHOHFW)LUVWWLPHLQVWDOODWLRQWKHQSUHVV(QWHUEXWWRQWRHQWHU Caption 3UHVVźŸEXWWRQWRVHOHFW&DSWLRQWKHQSUHVV(QWHUEXWWRQWRHQWHU Reset 3UHVVźŸEXWWRQWRVHOHFW5HVHWWKHQSUHVV(QWHUEXWWRQWRHQWHUVXEPHQX 33 6.9 Channel Menu Press INPUT button to select ATV. Press MENU buttonto display the main menu. 3UHVVŻŹEXWWRQWRVHOHFW&+$11(/LQWKHPDLQPHQX 3UHVVźŸEXWWRQWRVHOHFWWKHRSWLRQWKDW\RXZDQWWRDGMXVWLQWKH&+$11(/PHQX 3UHVV(QWHUEXWWRQWRDGMXVW $IWHUILQLVKLQJ\RXUDGMXVWPHQW3UHVV(QWHUEXWWRQWRVDYHDQGUHWXUQWRWKHSUHYLRXVPHQX Auto Tuning 3UHVVźŸEXWWRQWRVHOHFW$XWR7XQLQJWKHQSUHVV(QWHUEXWWRQWRVWDUWDXWRVHDUFK ATV Manual Tuning 3UHVVźŸEXWWRQWRVHOHFW$QDORJXH0DQXDO7XQLQJWKHQSUHVV(QWHUEXWWRQWRHQWHU sub-menu. Program Edit 3UHVVźŸEXWWRQWRVHOHFW3URJUDP(GLWWKHQSUHVV(QWHUEXWWRQWRHQWHUVXEPHQX Notes: 6FKHGXOH/LVWLQ&+$11(/RSWLRQLVLQYDOLG 3,&785(PHQXDQGGHVFULSWLRQDUHWKHVDPHDVWKDWIRU$LUPRGH $'6ZLWFKLQ6281'RSWLRQLVLQYDOLG 4. TIME menu and description are the same as that for Air mode. 3DUHQWDO*XLGDQFHLQ/2&.RSWLRQLVLQYDOLG $XGLR/DQJXDJHV6XEWLWOH/DQJXDJH+HDULQJ,PSDLUHGDQG 395)LOH6\VWHPLQ6(783RSWLRQLVLQYDOLG 34 6.10 Screen Menu Press MENU button to display the main menu. 3UHVVŻŹEXWWRQWRVHOHFW6&5((1LQWKHPDLQPHQX 3UHVVźŸEXWWRQWRVHOHFWWKHRSWLRQWKDW\RXZDQWWRDGMXVWLQWKH6&5((1PHQX 3UHVV(QWHUEXWWRQWRDGMXVW $IWHUILQLVKLQJ\RXUDGMXVWPHQW3UHVV(QWHUEXWWRQWRVDYHDQGUHWXUQWRWKHSUHYLRXVPHQX Auto Adjust 3UHVV(QWHUEXWWRQWRVWDUWDGMXVWLQJ+2IIVHW92IIVHW6L]H3KDVHDXWRPDWLFDOO\ H-Offset $GMXVWWKHKRUL]RQWDOSRVLWLRQRIWKHSLFWXUH 3UHVVźŸEXWWRQWRVHOHFW+2IIVHWWKHQSUHVV(QWHUEXWWRQWRHQWHUVXEPHQX V-Offset $GMXVWWKHYHUWLFDOSRVLWLRQRIWKHSLFWXUH 3UHVVźŸEXWWRQWRVHOHFW92IIVHWWKHQSUHVV(QWHUEXWWRQWRHQWHUVXEPHQX Size $GMXVWWKHGLVSOD\VL]H 3UHVVźŸEXWWRQWRVHOHFW6L]HWKHQSUHVV(QWHUEXWWRQWRHQWHUVXEPHQX Phase $GMXVWWKHKRUL]RQWDOLQWHUIHULQJOLQHV 3UHVVźŸEXWWRQWRVHOHFW3KDVHWKHQSUHVV(QWHUEXWWRQWRHQWHUVXEPHQX Position Reset 3UHVVźŸEXWWRQWRVHOHFW3RVLWLRQ5HVHWWKHQSUHVV(QWHUEXWWRQWRHQWHU Notes: 1. Noise Reduction in PICTURE option is invalid. 2. AD Switch in SOUND option is invalid. 3. TIME menu and description are the same as that for Air mode. 4. Block Program and Parental Guidance in LOCK option is invalid. 5. Audio Languages, Subtitle Language, Hearing Impaired and PVR File System in SETUP option is invalid. 6. PC mode has no CHANNEL menu. 35 7. Media OPERATION Note: Before operating Media menu,Plug in USB device,then press INPUT button to set the ,QSXW6RXUFHWR0HGLD3UHVVEXWWRQWRVHOHFWźŸ0HGLDLQWKH6RXUFHPHQXWKHQ press Enter button to enter. 3UHVVŻŹEXWWRQWRVHOHFWWKHRSWLRQ\RXZDQWWRDGMXVWLQWKHPDLQ0HGLDPHQX then press Enter button to enter. 36 7.1 Photo Menu 3UHVVŻŹEXWWRQWRVHOHFW3+272LQWKHPDLQPHQXWKHQSUHVV(QWHUEXWWRQWRHQWHU 3UHVV([LWEXWWRQWRUHWXUQWRWKHSUHYLRXVPHQXDQGH[LWPHQXWRTXLW 3UHVVŻŹEXWWRQWRVHOHFWWKHILOH\RXZDQWWRZDWFKLQWKHILOHVHOHFWLQJPHQX WKHQSUHVVPHGLDEXWWRQWRGLVSOD\SLFWXUH :KHQKLJKOLJKWLQJWKHRSWLRQ\RXVHOHFWWKHILOHLQIRUPDWLRQZLOODSSHDURQWKHULJKWDQGSLFWXUH ZLOOEHSUHYLHZHGLQWKHFHQWHU 3UHVVŻŹEXWWRQWRYLHZDOORSHUDWLRQEXWWRQV 37 7.2 Music Menu 3UHVVŻŹEXWWRQWRVHOHFW086,&LQWKHPDLQPHQXWKHQSUHVV(QWHUEXWWRQWRHQWHU 3UHVV([LWEXWWRQWRUHWXUQWRWKHSUHYLRXVPHQXDQGH[LWPHQXWRTXLW 3UHVVŻŹEXWWRQWRVHOHFWGULYHGLVN\RXZDQWWRZDWFKWKHQSUHVVEXWWRQWRHQWHU(QWHU 3UHVVŻŹEXWWRQWRVHOHFWUHWXUQRSWLRQWRWKHSUHYLRXVPHQX :KHQKLJKOLJKWLQJWKHRSWLRQ\RXVHOHFWWKHILOHLQIRUPDWLRQZLOODSSHDURQWKHULJKWDQGPXVLF ZLOOEHSUHYLHZHGLQWKHFHQWHU 3UHVVŻŹEXWWRQWRYLHZDOORSHUDWLRQEXWWRQV 38 7.3 Movie Menu 3UHVVŻŹEXWWRQWRVHOHFW029,(LQWKHPDLQPHQXWKHQSUHVV(QWHUEXWWRQWRHQWHU 3UHVV([LWEXWWRQWRUHWXUQWRWKHSUHYLRXVPHQXDQGH[LWPHQXWRTXLW 3UHVVŻŹEXWWRQWRVHOHFWGULYHGLVN\RXZDQWWRZDWFKWKHQSUHVV(QWHUEXWWRQWRHQWHU :KHQKLJKOLJKWLQJWKHRSWLRQ\RXVHOHFWWKHILOHLQIRUPDWLRQZLOODSSHDURQWKHULJKWDQGPRYLH ZLOOEHSUHYLHZHGLQWKHFHQWHU 3UHVVPHGLDEXWWRQWRSOD\WKHVHOHFWHGPRYLH 3UHVVGLVSOD\EXWWRQWRVHOHFWPHQXLQWKHERWWRP\RXZDQWWRUXQWKHQSUHVV(QWHUEXWWRQ WRRSHUDWH 3UHVV([LWEXWWRQWREDFNWRWKHSUHYLRXVPHQXDQGH[LWEXWWRQWRTXLWWKHHQWLUHPHQX 3UHVVŻŹEXWWRQWRYLHZDOORSHUDWLRQEXWWRQV 39 7.4 Text Menu 3UHVVŻŹEXWWRQWRVHOHFW7(;7LQWKHPDLQPHQXWKHQSUHVV(QWHUEXWWRQWRHQWHU 3UHVV([LWEXWWRQWRUHWXUQWRWKHSUHYLRXVPHQXDQGH[LWPHQXWRTXLW 3UHVVŻŹEXWWRQWRVHOHFWGULYHGLVN\RXZDQWWRZDWFKWKHQSUHVV(QWHUEXWWRQWRHQWHU 3UHVVŻŹEXWWRQWRVHOHFWUHWXUQRSWLRQWREDFNWRWKHSUHYLRXVPHQX :KHQKLJKOLJKWLQJWKHRSWLRQ\RXVHOHFWWKHILOHLQIRUPDWLRQZLOODSSHDURQWKHULJKWDQG PRYLHZLOOEHSUHYLHZHGLQWKHFHQWHU 40 8. TROUBLESHOOTING If the device performance fails, check whether the detected problem is in the following table. If your device still fails, contact the customer service. SYMPTOM CAUSE SOLUTION Not work: The front The TV is not plugged Check all connections to LED does not shine. to power source. the TV. Not work: The LED The TV is still in Press both the POWER shine in red. Standby mode. key on the remote control like in the front panel. Blue screen. Noise, distortion, No signal. The selected Press A/V to select the input source is wrong. correct source. Poor antenna signal. If you are using a “ghosting” effect (TV). portable antenna, try moving the antenna. Check all antenna connections. No sound. “Mute” enable. Disable the “Mute”. Volume too low. Check the volume. External Amplifier Check the connection to disconnected (if you are the external amplifier. using). 41 9. SPECIFICATIONS Screen Model TV System Maximum Resolution Brightness Static Contrast Response Time Consumption Power Supply Connectivity TLD-1111-40 NTSC/ISDB-T 1920x1080 260cd/m2 5000:1 8.5ms 75W 100-240V AC, ~50/60Hz Composite Video Input Component Video Input YPbPr Audio Input (R/L) PC Video Input (VGA) PC Audio Input HDMI Input RF Antenna Input (75Ω Unbalanced) Headphones Audio Output Coaxial Digital Audio Output Data Interface USB2.0 Host Port Supported System Files NTFS, FAT32 and FAT16 Remote Control Signal Type Control Distance Control Angle Power Supply Infrared 7 meters 30º (Horizontal) AAA 1.5V 42