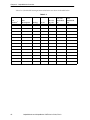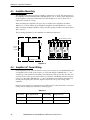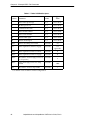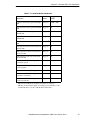
1
AdeptModules and
AdeptMotion VME
User’s Guide
030
VIS
VGB
SIO
DIO
VMI
FAIL
OK
1
1
2
2
3
3
4
OK
OK
1 2 3 4
ON
1 2 3 4 5 6 7 8
ON
4
V
I
D
E
O
V
I
D
E
O
B
U
S
B
U
S
D
R
I
V
E
F
P
/
M
C
P
HPE
F1
DE1
F2
DE2
F3
DE3
F4
DE4
E
N
C
O
D
E
R
A
R
S
4
2
2
/
4
8
5
ES
M
O
N
I
T
O
R
PASS
I
N
P
U
T
S
I
N
P
U
T
S
1
#1
2
3
R
S
2
3
2
/
T
E
R
M
M
A
C
H
I
N
E
4
1 2 3 4
ON
O
U
T
P
U
T
S
#2
P
O
I
N
T
E
R
C
A
M
E
R
A
S
/
S
T
R
O
B
E
S
S
E
R
V
O
O
U
T
P
U
T
S
KEYBOARD
®
adept
technology, inc.
AdeptModules and
AdeptMotion VME
User’s Guide
030
VIS
VGB
SIO
DIO
VMI
FAIL
OK
1
1
2
2
3
3
4
OK
1 2 3 4
ON
1 2 3 4 5 6 7 8
ON
4
OK
V
I
D
E
O
V
I
D
E
O
B
U
S
B
U
S
D
R
I
V
E
F
P
/
M
C
P
HPE
F1
DE1
F2
DE2
F3
DE3
F4
DE4
E
N
C
O
D
E
R
A
R
S
4
2
2
/
4
8
5
ES
M
O
N
I
T
O
R
PASS
I
N
P
U
T
S
I
N
P
U
T
S
1
#1
2
3
R
S
2
3
2
/
T
E
R
M
M
A
C
H
I
N
E
4
1 2 3 4
ON
O
U
T
P
U
T
S
#2
P
O
I
N
T
E
R
C
A
M
E
R
A
S
/
S
T
R
O
B
E
S
S
E
R
V
O
O
U
T
P
U
T
S
KEYBOARD
®
adept
technology, inc.
Part Number 90400-60300, Rev A
April 1996
®
150 Rose Orchard Way • San Jose, CA 95134 • USA • Phone (408) 432-0888 • Fax (408) 432-8707
Otto-Hahn-Strasse 23 • 44227 Dortmund • Germany • Phone 0231/75 89 40 • Fax 0231/75 89 450
adept
technology, inc.
11, Voie la Cardon • 91126 • Palaiseau • France • Phone (1) 69.19.16.16 • Fax (1) 69.32.04.62
Via don Luigi Sturzo 39/41 • 52100 Arezzo • Italy • Phone 575.3986 11 • Fax 575.3986 20
1-2, Aza Nakahara Mitsuya-Cho • Toyohashi, Aichi-Ken • 441-31 • Japan • (0532) 65-2391 • Fax (0532) 65-2390
The information contained herein is the property of Adept Technology, Inc., and shall not be
reproduced in whole or in part without prior written approval of Adept Technology, Inc. The
information herein is subject to change without notice and should not be construed as a
commitment by Adept Technology, Inc. This manual is periodically reviewed and revised.
Adept Technology, Inc., assumes no responsibility for any errors or omissions in this document.
Critical evaluation of this manual by the user is welcomed. Your comments assist us in
preparation of future documentation. A form is provided at the back of the book for submitting
your comments.
Copyright © 1996 by Adept Technology, Inc. All rights reserved.
The Adept logo is a registered trademark of Adept Technology, Inc.
Adept, AdeptOne, AdeptOne-MV, AdeptThree, AdeptThree-MV, PackOne, PackOne-MV,
HyperDrive, Adept 550, Adept 550 CleanRoom, Adept 1850, Adept 1850XP,
A-Series, S-Series, Adept MC, Adept CC, Adept IC, Adept OC, Adept MV,
AdeptVision, AIM, VisionWare, AdeptMotion, MotionWare, PalletWare,
AdeptNet, AdeptFTP, AdeptNFS, AdeptTCP/IP, AdeptForce, AdeptModules,
and V+ are trademarks of Adept Technology, Inc.
Any trademarks from other companies used in this publication
are the property of those respective companies.
Printed in the United States of America
Table of Contents
1
Introduction and Safety . . . . . . . . . . . . . . . . . . . . . . . . . . . . . . . . . . . . . . . 1
1.1 How to Use This Manual . . . . . . . . . . . . . . . . . . . . . . . . . . . . . . . . . . . . . . . . . . . . . 1
How This Manual is Organized . . . . . . . . . . . . . . . . . . . . . . .
Related Manuals . . . . . . . . . . . . . . . . . . . . . . . . . . . . . . . . . .
Standard Manuals. . . . . . . . . . . . . . . . . . . . . . . . . . .
Other Adept Product Manuals . . . . . . . . . . . . . . . .
Optional V+ Developer’s Manuals . . . . . . . . . . . . .
..............
..............
..............
..............
..............
.1
.2
.2
.2
.3
1.2 Warnings, Cautions, and Notes . . . . . . . . . . . . . . . . . . . . . . . . . . . . . . . . . . . . . . . 3
1.3 Safety . . . . . . . . . . . . . . . . . . . . . . . . . . . . . . . . . . . . . . . . . . . . . . . . . . . . . . . . . . . . 4
Reading and Training for Users and Operators . . . . . . . . . . . . . . . . . . . . . . . .4
System Safeguards. . . . . . . . . . . . . . . . . . . . . . . . . . . . . . . . . . . . . . . . . . . . . . . .5
Safety Features on External VME Front Panel (VFP) . . . . . . . . . . . . . .5
Computer Controlled Robots and Motion Devices . . . . . . . . . . . . . .5
Manually Controlled Robots and Motion Devices . . . . . . . . . . . . . . .5
Other Computer Controlled Devices . . . . . . . . . . . . . . . . . . . . . . . . . .5
Program Security . . . . . . . . . . . . . . . . . . . . . . . . . . . . . . . . . . . . . . . . . . . . . . . . .6
Overspeed Protection. . . . . . . . . . . . . . . . . . . . . . . . . . . . . . . . . . . . . . . . . . . . .6
Voltage Interruptions . . . . . . . . . . . . . . . . . . . . . . . . . . . . . . . . . . . . . . . . . . . . . .6
Inappropriate Uses of the Adept MV Controller . . . . . . . . . . . . . . . . . . . . . . .6
1.4 Standards Compliance . . . . . . . . . . . . . . . . . . . . . . . . . . . . . . . . . . . . . . . . . . . . . 6
1.5 How Can I Get Help? . . . . . . . . . . . . . . . . . . . . . . . . . . . . . . . . . . . . . . . . . . . . . . . 7
Within the Continental United States. . . . . . . . . . . . . . . . . . . . . . . . . . . . . . . . .7
Service Calls. . . . . . . . . . . . . . . . . . . . . . . . . . . . . . . . . . . . . . . . . . . . . . .7
Application Questions . . . . . . . . . . . . . . . . . . . . . . . . . . . . . . . . . . . . . .7
Applications Internet E-Mail Address . . . . . . . . . . . . . . . . . . . . . . . . . .7
Training Information . . . . . . . . . . . . . . . . . . . . . . . . . . . . . . . . . . . . . . . .7
Within Europe . . . . . . . . . . . . . . . . . . . . . . . . . . . . . . . . . . . . . . . . . . . . . . . . . . . .7
France . . . . . . . . . . . . . . . . . . . . . . . . . . . . . . . . . . . . . . . . . . . . . . . . . . .7
Outside Continental United States or Europe. . . . . . . . . . . . . . . . . . . . . . . . . .8
Adept Bulletin Board Service (BBS) . . . . . . . . . . . . . . . . . . . . . . . . . . . . . . . . . .8
2
AdeptModules Overview. . . . . . . . . . . . . . . . . . . . . . . . . . . . . . . . . . . . . . 9
2.1 Introduction . . . . . . . . . . . . . . . . . . . . . . . . . . . . . . . . . . . . . . . . . . . . . . . . . . . . . . . 9
Module Types . . . . . . . . . . . . . . . . . . . . . . .
H-Module . . . . . . . . . . . . . . . . . . . .
M-Module. . . . . . . . . . . . . . . . . . . .
S-Module . . . . . . . . . . . . . . . . . . . .
Sz-Module. . . . . . . . . . . . . . . . . . . .
Gantry Support Modules . . . . . . . . . . . . . .
..............
..............
..............
..............
..............
..............
. . . . . . . . . . . . . . .9
. . . . . . . . . . . . . . .9
. . . . . . . . . . . . . . .9
. . . . . . . . . . . . . . .9
. . . . . . . . . . . . . .10
. . . . . . . . . . . . . .10
AdeptModules and AdeptMotion VME User’s Guide, Rev A
v
Table of Contents
Class 10 Cleanroom Modules . . . . . . . . . . . . . . . . . . . . . . . . . . . . . . . . . . . . . 10
2.2 Modules Specifications . . . . . . . . . . . . . . . . . . . . . . . . . . . . . . . . . . . . . . . . . . . . . 11
Module Moment Capacity . . . . . . . . . . . . . . . . . . . . . . . . . . . . . . . . . . . . . . . 12
2.3 Calculating Yawing Moment on S- and Sz-Modules . . . . . . . . . . . . . . . . . . . . . 14
Calculating Static Yawing Moment . . . . . . . . . . . . . . . . . . . . . . . . . . . . . . . . 14
Calculating Dynamic Yawing Moment . . . . . . . . . . . . . . . . . . . . . . . . . . . . . 14
3
AdeptMotion VME Overview . . . . . . . . . . . . . . . . . . . . . . . . . . . . . . . . . . 17
3.1 AdeptMotion VME Overview. . . . . . . . . . . . . . . . . . . . . . . . . . . . . . . . . . . . . . . . . 17
Adept Supplied Components . . . . . . . . . . . . . . . .
AdeptMotion VME Components . . . . . . . . . . . . .
V+ Extensions License . . . . . . . . . . . . . . . . . . . . . . .
Customer Supplied Components . . . . . . . . . . . . .
4
..............
..............
..............
..............
.......
.......
.......
.......
17
18
18
18
Amplifier Installation . . . . . . . . . . . . . . . . . . . . . . . . . . . . . . . . . . . . . . . . . 19
4.1 Amplifier Interface Packages . . . . . . . . . . . . . . . . . . . . . . . . . . . . . . . . . . . . . . . . 19
4.2 AdeptModules Installation and Maintenance . . . . . . . . . . . . . . . . . . . . . . . . . . 20
Connection of Modules to Amplifiers . . . . . . . . . . . . . . . . . . . . . . . . . . . . . . . 20
Amplifier Dimensions . . . . . . . . . . . . . . . . . . . . . . . . . . . . . . . . . . . . . . . . . . . . . 21
4.3 Amplifier Mounting. . . . . . . . . . . . . . . . . . . . . . . . . . . . . . . . . . . . . . . . . . . . . . . . . 22
4.4 Amplifier AC Power Wiring . . . . . . . . . . . . . . . . . . . . . . . . . . . . . . . . . . . . . . . . . . 22
4.5 Amplifier Alarm Clear Signal. . . . . . . . . . . . . . . . . . . . . . . . . . . . . . . . . . . . . . . . . 23
Time Interval Relay Supplier . . . . . . . . . . . . . . . . . . . . . . . . . . . . . . . . . . . . . . . 24
4.6 VMP & VMI Configuration and Wiring . . . . . . . . . . . . . . . . . . . . . . . . . . . . . . . . . 26
Amplifier to VMP Wiring . . . . . . . . . . . . . . . . . . . . . . . . . . . . . . . . . . . . . . . . . . 26
4.7 MP6 and MI6/MI3 Configuration and Wiring . . . . . . . . . . . . . . . . . . . . . . . . . . . . 28
Configuration of the Boards . . . . . . . . . . . . . . . . . . . . . . . . . . . . . . . . . . . . . . 28
Amplifiers to MP6 Wiring . . . . . . . . . . . . . . . . . . . . . . . . . . . . . . . . . . . . . . . . . . 28
4.8 Home and Overtravel Sensors . . . . . . . . . . . . . . . . . . . . . . . . . . . . . . . . . . . . . . . 31
Overtravel Sensor Wiring for MI6/MI3 . . . . . . . . . . . . . . . . . . . . . . . . . . . . . . . 31
4.9 Changing Calibration Direction . . . . . . . . . . . . . . . . . . . . . . . . . . . . . . . . . . . . . . 32
4.10 Amplifier Faults . . . . . . . . . . . . . . . . . . . . . . . . . . . . . . . . . . . . . . . . . . . . . . . . . . . 33
5
Brake Release and Modules with Brakes . . . . . . . . . . . . . . . . . . . . . . . . 35
5.1 Installing Brake Release Button . . . . . . . . . . . . . . . . . . . . . . . . . . . . . . . . . . . . . . 35
5.2 H-Module/M-Module with Brake . . . . . . . . . . . . . . . . . . . . . . . . . . . . . . . . . . . . . 35
vi
AdeptModules and AdeptMotion VME User’s Guide, Rev A
Table of Contents
6
7
Example SPEC File Parameters . . . . . . . . . . . . . . . . . . . . . . . . . . . . . . . . 37
Modules Lubrication and Cable Hardware . . . . . . . . . . . . . . . . . . . . . . 45
7.1 Modules Lubrication . . . . . . . . . . . . . . . . . . . . . . . . . . . . . . . . . . . . . . . . . . . . . . . 45
Lubrication Schedule. . .
Lubrication Grease . . . .
Grease Adaptor Nozzle.
Lubrication Procedures .
..............
..............
..............
..............
..............
..............
..............
..............
. . . . . . . . . . . . . .45
. . . . . . . . . . . . . .46
. . . . . . . . . . . . . .47
. . . . . . . . . . . . . .48
7.2 Pins, Connectors, and Screws . . . . . . . . . . . . . . . . . . . . . . . . . . . . . . . . . . . . . . . 48
Connector Pins and Inserter/Extractor Tools . . . . . . . . . . . . . . . . . . . . . . . . . .48
DDK Compatible Connectors . . . . . . . . . . . . . . . . . . . . . . . . . . . . . . . . . . . . .49
JAE connectors and DDK Connector Cross Reference List . . . . . . . . . . . . .50
Robot Cable Mounting Screws . . . . . . . . . . . . . . . . . . . . . . . . . . . . . . . . . . . .50
8
Amplifier Information . . . . . . . . . . . . . . . . . . . . . . . . . . . . . . . . . . . . . . . . 51
8.1 Amplifier Specifications . . . . . . . . . . . . . . . . . . . . . . . . . . . . . . . . . . . . . . . . . . . . 51
8.2 Interface Connector/Signal Specifications . . . . . . . . . . . . . . . . . . . . . . . . . . . . 52
8.3 Signal Description . . . . . . . . . . . . . . . . . . . . . . . . . . . . . . . . . . . . . . . . . . . . . . . . . 53
AdeptModules and AdeptMotion VME User’s Guide, Rev A
vii
Introduction and Safety
1.1
1
How to Use This Manual
This manual provides information required to interface the AdeptModules product to one
of Adept Technology's motion control products. The AdeptModules can be interfaced to
the AdeptMotion VME product (4 axis), the AdeptMotion VME 3-Axis or the
AdeptMotion VME 6-axis products. The customer is required to build a power and
emergency stop circuitry including the AdeptModules amplifiers. The procedure is the
identical procedure required when interfacing third-party mechanisms to AdeptMotion
VME products.
This manual assumes that the customer has an Adept MV Controller with one of the
AdeptMotion VME products which includes the AdeptMotion VME Developer’s Guide (Part
Number 00961-00830, formerly titled the AdeptMotion VME User's Guide). The
AdeptMotion VME Developer's Guide is a required reference when interfacing the
AdeptModules to AdeptMotion VME.
There are four steps involved in interfacing an AdeptModules system to the MV
Controller and AdeptMotion VME.
1. Setup the Adept MV Controller and AdeptMotion VME.
2. Assemble the AdeptModules system.
3. Build the power and emergency stop circuitry including modules amplifiers.
4. Configure the AdeptModules system with the SPEC utility.
This manual covers steps #3 and #4 from the list above. The Adept MV Controller User's
Guide and AdeptMotion VME Developer’s Guide cover step #1 and the Module Main Unit
Instruction Manual shipped with each module covers step #2.
How This Manual is Organized
• Chapter 2 reviews the AdeptModules product including product part numbers
and specifications.
• Chapter 3 reviews the components of the different AdeptMotion VME products
and the additional components required to interface the amplifiers and build the
power and emergency stop circuitry. This chapter makes several references to the
AdeptMotion VME Developer's Guide.
• Chapter 4 provides a detailed explanation of amplifier mounting, wiring and
interfacing to the different AdeptMotion VME products. Specifically, the wiring
diagram for the power and emergency stop circuitry is explained. In addition,
Chapter 4 includes information on amplifier faults.
AdeptModules and AdeptMotion VME User’s Guide, Rev A
11
Chapter 1 - Introduction and Safety
• Chapter 5 explains special configuration issues for the AdeptModules system
including changing the calibration direction on a module, installing a brake release
button, and special considerations using an H- or M-Module with a brake.
• Chapter 6 provides a list of initial SPEC file parameters that should be used to
configure the AdeptModules system.
• Chapter 7 gives an explanation of the lubrication schedule and required
lubrication hardware for the AdeptModules. Chapter 7 also provides sourcing
information on special pins, screws and connectors used in the AdeptModules
product.
• Chapter 8 provides technical information on the amplifiers used to run the
AdeptModules. Amplifier specifications, signal specifications, and descriptions
are provided.
Related Manuals
Adept products come with a set of documentation that is defined by the products you
have ordered. In addition, there are optional manuals available if you are going to be
programming the Adept system. This manual refers to both the standard and optional
manuals. The following sections give a brief description of the contents and organization
of the Adept documentation set.
Standard Manuals
In addition to this AdeptModules and AdeptMotion VME User’s Guide the following manuals
are shipped with the system:
Manual
Material Covered
Adept MV Controller User's Guide
This manual details the installation, safety
features, configuration, and maintenance of
your Adept controller.
V+ Operating System User’s Guide
A description of the V+ operating system.
Loading, storing, and executing programs is
covered in this manual.
Instructions for Adept Utility Programs
Adept provides a series of programs for
configuring and calibrating various features
of your Adept system. These utility programs
are described in this manual.
V+ Release Notes
Descriptions of the changes to V+. These
documents are updated as each version of V+
is released.
Other Adept Product Manuals
When you order AdeptVision VME, AdeptForce VME, or any AIM software product, you
will receive manuals that cover those products. Also, optional hardware such as the
Manual Control Pendant will come with a manual. See the following partial list.
12
AdeptModules and AdeptMotion VME User’s Guide, Rev A
Warnings, Cautions, and Notes
Manual
Material Covered
AdeptVision VME User's Guide
Concepts and strategies for programming the
AdeptVision VME system. (see also the
optional AdeptVision Reference Guide below)
AdeptForce VME User’s Guide
Installation, operation, and programming of
the AdeptForce VME product.
Manual Control Pendant User’s Guide
Basic use and programming of the manual
control pendant.
Optional V+ Developer’s Manuals
If you will be programming V+ applications, you should order the optional V+ developer’s manuals (first three in the list below). These manuals contain a complete description of the commands, instructions, functions, and other features available in the V+
language and operating system. These manuals are essential for advanced applications
programming.
If you will be programming vision applications, you should order the AdeptVision Reference
Guide (in addition to the V+ developer’s manuals).
1.2
Manual
Material Covered
V+ Operating System Reference Guide
Descriptions of the V+ operating system
commands (known as monitor commands).
V+ Language User’s Guide
V+ is a complete high-level language as well
as an operating system. This manual covers
programming principles for creating V+
programs.
V+ Language Reference Guide
A complete description of the keywords in the
basic V+ language system.
AdeptVision Reference Guide
Descriptions of the additional V + keywords
available with the AdeptVision VME option.
Warnings, Cautions, and Notes
There are three levels of special notation used in this manual. They are:
WARNING: Injury or major equipment damage could result if the actions
indicated in a “WARNING” are not complied with. A warning statement
typically describes the hazard, its possible effect, and the measures that
must be taken to reduce the hazard.
AdeptModules and AdeptMotion VME User’s Guide, Rev A
13
Chapter 1 - Introduction and Safety
CAUTION: Damage to your equipment could result if the action specified
in the “CAUTION” is not complied with.
!
NOTE: A “NOTE” provides supplementary information, emphasizes a
point or procedure, or gives a tip for easier operation.
1.3
Safety
WARNING: See the Adept MV Controller User's Guide for additional safety
information.
Reading and Training for Users and Operators
Adept systems can include computer-controlled mechanisms that are capable of moving
at high speeds and exerting considerable force. Like all robot and motion systems, and
most industrial equipment, they must be treated with respect by the user and the operator.
This manual should be read by all personnel who operate or maintain Adept systems, or
who work within or near the workcell.
We recommend you read the American National Standard for Industrial Robot Systems - Safety
Requirements, published by the Robotic Industries Association(RIA), in conjunction with
the American National Standards Institute. The publication, ANSI/RIA R15.06 - 1992,
contains guidelines for robot system installation, safeguarding, maintenance, testing,
start-up, and operator training.
We also recommend you read the European Standard EN 60204, Safety of Machinery –
Electrical Equipment of Machines, particularly if the country of use requires a CE-certified
installation. (Seethe Adept MV Controller User's Guide for ordering information for national
and international standards.)
This manual assumes that the user has attended an Adept training course and has a basic
working knowledge of the system. The user should provide the necessary additional
training for all personnel who will be working with the system.
There are several warnings in this manual that say only skilled or instructed persons
should attempt certain procedures. These are defined as:
• Skilled persons have technical knowledge or sufficient experience to enable them
to avoid the dangers which electricity may create (engineers and technicians).
• Instructed persons are adequately advised or supervised by skilled persons to
enable them to avoid the dangers which electricity may create (operating and
maintenance staff).
14
AdeptModules and AdeptMotion VME User’s Guide, Rev A
Safety
System Safeguards
Safeguards should be an integral part of robot or motion workcell design, installation,
operator training, and operating procedures.
Adept systems have various communication features to aid in constructing system
safeguards. These include the emergency stop circuitry and digital input and output lines.
Some of these features are described in the Adept MV Controller User's Guide.
Safety Features on External VME Front Panel (VFP)
The optional external VME Front Panel (VFP) has four important safety features, the HIGH
POWER and PROGRAM RUNNING indicators, the TERMINAL/PENDANT keyswitch, and
the EMERGENCY STOP switch. If you choose not to use the VFP, you should provide
similar safety features by using the Front Panel/MCP and Digital I/O connectors on the
System I/O module. Refer to the Adept MV Controller User's Guide for more information,
or call Adept Customer Service at the numbers listed in section 1.5 on page 17.
WARNING: Entering the workcell when either the HIGH POWER or the
PROGRAM RUNNING light is on can result in severe injury. This warning
applies to each of the next three sections.
Computer Controlled Robots and Motion Devices
Adept systems are computer controlled, and the program that is currently running the
robot or motion device may cause it to move at times or along paths you may not
anticipate. When the HIGH POWER light and the PROGRAM RUNNING light on the
optional VFP are illuminated, do not enter the workcell because the robot or motion
device might move unexpectedly. (The LAMP TEST button on the VFP allows these lights
to be periodically checked.)
Manually Controlled Robots and Motion Devices
Adept robots and other motion devices can also be controlled manually when the HIGH
POWER light on the VFP is illuminated. When this light is lit, motion can be initiated from
the system keyboard or from the optional Manual Control Pendant (MCP). If you have to
enter the workcell when this light is lit, press the MAN/HALT button on the MCP. This will
prevent anyone else from initiating unexpected motion from the system keyboard.
Other Computer Controlled Devices
In addition, Adept systems can be programmed to control equipment or devices other
than the robot or main motion device. The program controlling these other devices may
cause them to operate unexpectedly. Make sure that safeguards are in place to prevent
personnel from entering the workcell when a program is running.
Adept Technology highly recommends the use of additional safety features such as light
curtains, safety gates, or safety floor mats to prevent entry to the workcell while HIGH
POWER is enabled. These devices can be connected using the emergency stop circuitry.
AdeptModules and AdeptMotion VME User’s Guide, Rev A
15
Chapter 1 - Introduction and Safety
Program Security
Programs and data stored in memory can be changed by trained personnel using the V+
commands and instructions documented in the V+ manuals. To prevent unauthorized
alteration of programs, you should restrict access to the keyboard. This can be done by
placing the keyboard in a locked cabinet. Alternatively, the V+ ATTACH and FSET
instructions can be used in your programs to restrict access to the V+ command prompt.
Overspeed Protection
Overspeed protection for a robot or motion system has to be taken into account during
system integration by the integrator or end-user. Overspeed protection is not guaranteed
by the controller hardware alone. The V+ system software offers some overspeed
protection capabilities.
Voltage Interruptions
If the AC supply to the controller is interrupted, the passive E-stop output will be
automatically turned on (opened). In addition, the High Power, Brake Release, and Drive
Enable signals will be turned off. You must ensure that these signals are used to prevent a
hazardous condition.
Inappropriate Uses of the Adept MV Controller
The Adept MV controller is intended for use as a component sub-assembly of a complete
industrial automation system. The Adept MV controller sub-assembly must be installed
inside a suitable enclosure. Installation and usage must comply with all safety instructions
and warnings in this manual. Installation and usage must also comply with all applicable
local or national statutory requirements and safety standards.The Adept MV controller
sub-assembly is not intended for use in any of the following situations:
• In hazardous (explosive) atmospheres
• In mobile, portable, marine, or aircraft systems
• In residential installations
• In situations where the Adept MV controller sub-assembly may come into contact
with liquids.
• In situations where the Adept MV controller sub-assembly will be subject to
extremes of heat or humidity. See specifications for allowable temperature and
humidity ranges.
1.4
Standards Compliance
See the Adept MV Controller User's Guide for information regarding compliance with
European and other standards.
16
AdeptModules and AdeptMotion VME User’s Guide, Rev A
How Can I Get Help?
1.5
How Can I Get Help?
Within the Continental United States
Adept Technology maintains a Customer Service Center at its headquarters in San Jose,
CA. The phone numbers are:
Service Calls
(800) 232-3378 (24 hours per day, 7 days a week)
(408) 433-9462 FAX
Application Questions
(800) 232-3378 (Monday to Friday, 8:00 a.m. to 5:00 p.m., Pacific time)
(408) 434-6248 FAX
Applications Internet E-Mail Address
If you have access to the Internet, you can send applications questions by e-mail to:
[email protected]
This method also enables you to attach a file, such as a portion of V+ program code, to
your message.
Training Information
For information regarding Adept Training Courses in the USA, please call (408) 434-5024.
Within Europe
For European customers outside of France, Adept Technology maintains a Customer Service Center in Dortmund, Germany. The phone numbers are:
(49) 231 / 75 89 40 from within Europe (Monday to Friday, 8:00 a.m. to 5:00 p.m., CET)
(49) 231/75 89 450 FAX
France
For customers in France, Adept Technology maintains a Customer Service Center in Paris,
France. The phone numbers are:
(33) 1 69 19 16 16 (Monday to Friday, 8:30 a.m. to 5:30 p.m., CET)
(33) 1 69 32 04 62 FAX
AdeptModules and AdeptMotion VME User’s Guide, Rev A
17
Chapter 1 - Introduction and Safety
Outside Continental United States or Europe
For service calls, application questions, and training information, call the Adept customer
service center in San Jose, California USA:
(408) 434-5000
(408) 433-9462 FAX (service requests)
(408) 434-6248 FAX (application questions)
NOTE: When calling with a controller related question, please have the
serial number of the controller. If your system includes an Adept robot,
also have the serial number of the robot. The serial numbers can be
determined by using the ID command (see the V+ Operating System User’s
Guide) .
Adept Bulletin Board Service (BBS)
Adept maintains a bulletin board service for Adept customers. Adept posts application
hints and utilities to this bulletin board and users may post their own hints and application notes. There is no charge for access to the bulletin board. The BBS number is (203)
264-5590. The first time you call you will be able to set up an account right from the BBS. If
you have any questions, call (800) 232-3378 and ask about the BBS.
18
AdeptModules and AdeptMotion VME User’s Guide, Rev A
AdeptModules Overview
2.1
2
Introduction
AdeptModules are a family of linear motion actuators which can be used separately or
combined into 15 unique 2- and 3-axis configurations. AdeptModules consist of a
precision ground ball-screw drive mechanism, high capacity linear guides and AC servo
motors. AdeptModules also include fully sealed belt covers to protect the module from
contaminants.
Module Types
AdeptModules are offered in the four module types described in the following sections.
H-Module
The H-module is the largest module with the highest payload and moment capacity. The
H-module is offered in standard stroke lengths between 300 mm (12") and 1000 (40") mm
and special order stroke lengths from 1200 mm (47") to 2000 mm (80").
The H-module consists of a 20 mm pitch ball screw, two 25 mm linear guides and a 300
watt motor without a holding brake.
The H-module is 180 mm (7") wide and 90 mm (3.5") in height. The overall length of the
H-module depends on the stroke length. The standard H-modules are supplied with
direct-mount motors. Extended stroke H-modules are supplied with side-mount motors.
M-Module
The M-Module is the mid-size module with the mid-range payload and moment capacity.
The M-Module is offered in standard stroke lengths between 250 mm (10") and 950 mm
(37") and special order stroke lengths from 1,150 mm to 1,550 mm.
The M-module consists of a 20 mm pitch ball screw, a single 50 mm linear guide and the
same 300 watt motor without a holding brake.
The M-module is 116 mm (4.6") wide and 85 mm (3.4") in height. The overall length of the
M-module depends on the stroke length. The standard M-modules are supplied with
direct-mount motors. Extended stroke M-modules are supplied with side-mount motors.
S-Module
The S-Module is the smallest profile module intended for horizontal applications. The
S-Module is offered in standard stroke lengths between 130 mm (5") and 530 mm (21") and
special order stroke length of 630 mm (24.8")
The S-module consists of a 10 mm pitch ball screw for 130 mm and 230 mm stroke lengths
and a 20 mm pitch ball screw for stroke from 330 mm to 630 mm. The S-module has a
single 25 mm linear guide and a 100 watt motor without a holding brake.
AdeptModules and AdeptMotion VME User’s Guide, Rev A
19
Chapter 2 - AdeptModules Overview
The S-module is 66 mm (2.6") wide and 66 mm (2.6") in height. The overall length of the
S-module depends on the stroke length. The standard S-modules are supplied with right
side mounted motors.
Sz-Module
The Sz-module has the same profile and design as the S-module, but has a left-side
mounted motor and a 100 watt motor with a holding brake for use in vertical applications.
Gantry Support Modules
Gantry Support Modules consist of a single 25 mm linear guide in a cross-section similar
to the S/Sz-module. The gantry support is intended to be used with a G-1 or P-1
configuration and therefore is available in stroke lengths to match the stroke length of an
H-Module. The gantry support module is provided with a bracket which mounts to the
end of the M-module and mates with a bracket affixed to the linear guide on the gantry
support bracket.
Class 10 Cleanroom Modules
All standard modules are offered in a Class 10 compatible cleanroom version. The
cleanroom modules have three differences from standard modules.
• cleanroom modules are assembled with a different belt material to greatly reduce
the generation of particles.
• cleanroom modules contain a special cleanroom grease.
• cleanroom modules have two air fittings to connect a vacuum supply for removing
particles from the internal cavity of the module.
20
AdeptModules and AdeptMotion VME User’s Guide, Rev A
Modules Specifications
2.2
Modules Specifications
Table 2-1. Standard
Module
Type
H-module
M-Module
S-Module
(horizontal)
Sz-Module
(vertical)
Part
Number
(9040x-)a
Stroke
(mm)
10030
300
10040
400
10050
500
10060
600
10080
800
10100
1000
17120
1200
20025
250
20035
350
20045
450
20055
550
20075
750
20095
950
30013
130
30023
230
30033
330
30043
430
30053
530
40013
130
40023
230
Max.
Speed
(mm/sec)
Repeatability
(± mm/±in)
and Cleanroom Modules
Ball
Screw
Pitch
(mm)
Max.
Payload
(kg/lb)
Motor
Mountb
Moment Capacity (n-m/lb-ft)c
Rated
Thrust
Force
(n/lb)
Roll
Pitch
Yaw
1200
0.01/0.0004
20
60/132
Direct
300/67
600/442
400/295
350/258
1200
0.01/0.0004
20
60/132
Direct
300/67
70/52
120/89
120/89
600
0.01/0.0004
10
20/44
Right
240/54
27/20
10/7.4
10/7.4
1200
0.01/0.0004
20
20/44
Right
120/27
27/20
10/7.4
10/7.4
600
0.01/0.0004
10
15/33
Left
240/54
27/20
10/7.4
10/7.4
a
Where x = 0 for Standard modules and x = 1 for Cleanroom modules.
See Figure 2-1.
c
See Figure 2-2.
b
AdeptModules and AdeptMotion VME User’s Guide, Rev A
21
Chapter 2 - AdeptModules Overview
Direct
Left
Right
Slider
Body
Figure 2-1. Motor Mount
Table 2-2.
Extended Stroke Modules
Extended Strokes
Module Type
Part Number
(90400-)
Stroke
(mm)
Speed (mm/sec)
H-Module
Right
40b
Right
1200
20
Right
600
10
Left (Standard)
1200
1200
11140
1400
1080
11160
1600
840
11180
1800
680
11200
2000
560
21115
1150
1200
21135
1350
1080
21155
1550
840
S-Module
31063
630
Sz-Module
41033
330
41043
430
41053
530
41063
630
a
b
Motor Mounta
40b
11120
M-Module
Ball Screw Pitch
(mm)
See Figure 2-1.
50% reduction due to timing belt.
Module Moment Capacity
Figure 2-2 shows the rolling, pitching and yawing moments of a module. Rolling, pitching
and yawing moment capacities are specified for each module in Table 2-1.
The rolling moment capacity is the torque capacity of the module around the x-axis. The
x-axis runs through the centerline of the ball screw.
22
AdeptModules and AdeptMotion VME User’s Guide, Rev A
Modules Specifications
The pitching moment capacity is the torque capacity of the module around the y-axis of
the module. The y-axis is the axis perpendicular to the x-axis and in the same plane as the
module top surface.
The yawing moment capacity is the torque capacity of the module around the z-axis of the
module. The z-axis is the axis perpendicular to both the x-axis and y-axis and
perpendicular to the top surface of the module.
Z-axis
Yawing
Pitching
Y-axis
Rolling
X-axis
Z-axis
Z-axis
Y-axis
X-axis
Rolling
Pitching
Y-axis
Moment Around
X-axis
Moment Around
Y-axis
X-axis
Yawing
Moment Around
Z-axis
Figure 2-2.
AdeptModules and AdeptMotion VME User’s Guide, Rev A
23
Chapter 2 - AdeptModules Overview
2.3
Calculating Yawing Moment on S- and Sz-Modules
When configuring a S- or Sz-Module it is very important that the yawing moment of the
module is not exceeded. Exceeding the yawing moment will result in a premature failure
of the linear guide within the S- or Sz-Module. In each case the mounting of the module,
the mass of the module, the mass of the payload and the acceleration of the module
determine the total static and dynamic yawing moment. The maximum yawing moment
of the S- and Sz-Module is 10 N-m.
Therefore:
Total Yawing Moment = Static Yawing Moment + Dynamic Yawing Moment < 10 N-m
Calculating Static Yawing Moment
For a Sz-Module in a vertical orientation, the static yawing moment is calculated with the
following formula:
Static Yawing Moment (vertical) = M1 x L3 x Ag
Where:
M1 = payload mounted on module (kilograms)
L3 = distance from the centerline of the flange to payload perpendicular to the
module centerline (meters)
Ag = gravitational acceleration constant (= 9.8 m/sec2)
For a S-module in a horizontal orientation with the flange plate perpendicular to the
ground, the static yawing moment is calculated with the following formula:
Static Yawing Moment (horizontal) = M1 x L1 x Ag
Where:
M1 = payload mounted module (kilograms)
L1 = distance from the centerline of the flange to payload along the module centerline
(meters)
Ag = gravitational acceleration constant (= 9.8 m/sec2)
For a S-module in a horizontal orientation with the flange plate parallel to the ground,
there is no yawing moment created by the payload.
Calculating Dynamic Yawing Moment
There are two typical S/Sz-Module configurations. Case #1 has a fixed module and
moving slider. Case #2 has a moving module and the slider is mounted to another module
or fixture.
24
AdeptModules and AdeptMotion VME User’s Guide, Rev A
Calculating Yawing Moment on S- and Sz-Modules
Case #1 - Fixed Module with Moving Slider
In this case the dynamic yawing moment is determined by the following formula:
Dynamic Yawing Moment = M1 x L1 x Ay + M1 x L3 x Az
where
M1 = payload mounted to the S- or Sz-Module (in kilograms)
L1 = Distance from flange center to center of mass of M1 along module axis (meters)
Ay = acceleration of the module carrying S/Sz-Module (in m/sec2).
L3 = Distance from flange center to center of mass of M1 perpendicular to module
axis (meters)
If M1 is inline with the module axis and not offset, the value of L1 is zero.
Az = acceleration of the S/Sz-Module (in m/sec2)
Case #2 - Moving Module with payload at end of module
In this case the dynamic yawing moment is determined by the following formula:
Dynamic Yawing Moment = [ M1 x (L1A + L1B) + M2 x L2] x Ay + M1 x L3 x Az
where
M1 = payload mounted to the S- or Sz-Module (in kilograms)
L1A = Worst-case distance from flange center to end of module where M1 is mounted,
along module axis (meters, see Table 2-3)
NOTE: This distance is dependent on the mounting of the payload. When
the payload M1 is mounted opposite the motor end, use the values in
column labeled “L1A non-motor end”. When the payload M1 is mounted
on the motor end of the module use the values in the column labeled
“L1A motor end”.
L1B = Distance from end of module closest to M1 to the center of mass of M1 along
module axis (meters)
M2 = mass of the S- or Sz-Module (in kilograms, see Table 2-3)
L2 = Worst-case distance from flange center to center of mass of M2 along module axis
(meters, see Table 2-3)
Ay = acceleration of the module carrying S/Sz-Module (in m/sec2).
L3 = Distance from flange center to center of mass of M1 perpendicular to module axis
(meters). If M1 is inline with the module axis and not offset, this value is zero.
Az = acceleration of the S/Sz-Module (in m/sec2).
Values for Ay and Az are obtained from the EXA, EXC or Adept MV Controller depending
on which controller is being used.
AdeptModules and AdeptMotion VME User’s Guide, Rev A
25
Chapter 2 - AdeptModules Overview
Values for S/Sz-Module Yawing moment calculations are shown in the table below.
Table 2-3.
L2 (m)
M2 x L2
(kg x m)
L1A, non
Motor-End
(m)
L1A,
Motor-End
(m)
5.3
0.065
0.34
0.222
0.268
230 mm S
6.0
0.115
0.69
0.322
0.368
9040x-30033
330 mm S
6.6
0.165
1.09
0.422
0.468
9040x-30043
430 mm S
7.3
0.215
1.57
0.522
0.568
9040x-30053
530 mm S
8.0
0.265
2.12
0.622
0.668
9040x-31063
630 mm S
8.7
0.315
2.74
0.722
0.768
9040x-40013
130 mm Sz
5.5
0.065
0.36
0.222
0.268
9040x-40023
230 mm Sz
6.2
0.115
0.71
0.322
0.368
9040x-41033
330 mm Sz
6.8
0.165
1.12
0.422
0.468
9040x-41043
430 mm Sz
7.5
0.215
1.61
0.522
0.568
9040x-41053
530 mm Sz
8.2
0.265
2.17
0.622
0.668
9040x-41063
630 mm Sz
8.9
0.315
2.80
0.722
0.768
Part
Numbera
Part
Description
M2 (kg)
9040x-30013
130 mm S
9040x-30023
a
26
Where x = 0 for Standard modules and x =1 for Cleanroom modules.
AdeptModules and AdeptMotion VME User’s Guide, Rev A
AdeptMotion VME Overview
3.1
3
AdeptMotion VME Overview
Adept Technology provides three motion control products. AdeptMotion VME controls
up to 4 axes per package. AdeptMotion VME 3-axis controls up to 3 axes per package and
AdeptMotion VME 6-Axis controls up to 6 axes per package. All three products are
provided with the X/Y/Z/Theta kinematics modules which is required to interface with
an AdeptModules system. With all three products, a maximum of 24 axes can be
controlled on a single MV Controller.
Table 3-1.
Product Name
Number of Axes/Package
Part Number
AdeptMotion VME (4-axis)
4
90330A00400
AdeptMotion VME 3-Axis
3
90332A00420
AdeptMotion VME 6-Axis
6
90332A00410
Adept Supplied Components
If you have purchased an Adept MV Controller solely to control an AdeptModules system
or multiple AdeptModules systems, you need the following items from Adept:
• MV Controller
• AdeptMotion VME package
• V+ Extensions License (required for controlling 2 or more Modules systems)
• External Front Panel
• Manual Control Pendant (required for running SPEC utility)
• AdeptModules with appropriate cables and brackets
• AdeptModules Amplifier Interface Package for each module
If you already have an Adept SCARA Robot system and plan to add an AdeptModules
system as a second robot, you require the following items:
• AdeptMotion VME package
• V+ Extensions License (required for controlling an Adept SCARA robot and one or
more Adept Modules systems.)
• AdeptModules with appropriate cables and brackets
• AdeptModules Amplifier Interface Package for each module
AdeptModules and AdeptMotion VME User’s Guide, Rev A
27
Chapter 3 - AdeptMotion VME Overview
AdeptMotion VME Components
Table 3-2.
VMI to VMP
Cables
Amp to
VMP/MP6
Cable
VMP Kit
90330-00450
90330-01000
90400-60200
MI3
10330-11400
MP6 Kit
90332-12400
90330-02000
90400-60200
MI6
10330-12400
MP6 Kit
90332-12400
90330-02000
90400-60200
Product Name
VME Board
Interface Panel Kit
AdeptMotion
VME (4-axis)
VMI
10330-00400
AdeptMotion
VME 3-Axis
AdeptMotion
VME 6-Axis
Note: Unless otherwise noted, every reference to the MI6 module in this document is
applicable to the MI3 module, except the number of channels. The MI6 supports up to six
servo channels, and the MI3 has three servo channels.
The MI6 and MI3 have functionality similar to the VMI whereas VMP has functionality
similar to the MP-6.
V+ Extensions License
The V+ Extensions Software License is required for multiple mechanism support. The Part
Number for the license is 09961-0002. If two or more AdeptModules devices are connected
to a single MV Controller or one or more AdeptModules devices are connected to an MV
Controller with an Adept SCARA robot, then the V+ Extensions Software License is
required.
If only one AdeptModules device (a single “robot” consisting of 1 or more axes) is
connected to the MV Controller, then the V + Extensions software license is not required.
Customer Supplied Components
You are required to supply the following items:
• 24 VDC power supply. This power supply is used to drive the modules amplifiers.
The current rating of the power supply is dependent on the number and type of
modules being powered. For modules without a brake, the required current rating
is 100 mA. For modules with a brake, the required current rating is 400 mA.
Therefore, a 3-axis system with an H-Module, M-Module, and Sz-Module requires
a power supply with a current rating of at least 600 mA.
• 24 VDC Time Interval Relay. This is used for the Amplifier Alarm Clear. Other
methods can be used to clear amplifiers. Please refer to section 4.5 on page 33 for
more details.
• 5VDC/12 VDC Power supply for VMP / MP6 panels. AdeptMotion VME is
shipped configured for 12 volts. Refer to section 3.9 of the AdeptMotion VME
Developer’s Guide for more detail.
• 9 pin D-sub connectors (two per module) for connecting Amplifier to VMP/MP6
cable to MP6-E and MP6-S panels.
28
AdeptModules and AdeptMotion VME User’s Guide, Rev A
4
Amplifier Installation
4.1
Amplifier Interface Packages
An Amplifier Interface package (AIP) is required for each module ordered. There is one
amplifier interface package compatible with the H- and M-Modules and a separate one
compatible with the S- and Sz-Modules. These AIPs must be ordered separately. The
components of the two AIPs are as follows:
Table 4-1.
Part Number: 90400A60130, MV Amplifier Interface Package for H- or M-Module,
includes:
Part Number
Description
Qty.
90400-60131
Amplifier for H- or M-Module
Part Model EXD1A30A00AD
1
90400-60200
Amplifier to VMP/MP6 Cable
1
24420-00002
OPTO22 G4IDC5D Input Module, 2.5-28 VDC
(required for AdeptMotion VME and VMP panels only)
3
24420-00003
OPTO22 G4ODC5D Output Module, 5-60 VDC
2
90400-60300
Manual, AdeptModules and AdeptMotion VME User’s
Guide (Optional)
1
Table 4-2.
Part Number: 90400A60110, MV Amplifier Interface Package for S- or Sz-Module,
includes:
Part Number
Description
Qty.
90400-60111
Amplifier for S- or Sz-Module
Part Model EXD1A10A00AD
1
90400-60200
Amplifier to VMP/MP6 Cable
1
24420-00002
OPTO22 G4IDC5D Input Module, 2.5-28 VDC
(required for AdeptMotion VME and VMP panels only)
3
24420-00003
OPTO22 G4ODC5D Output Module, 5-60 VDC
2
90400-60300
Manual, AdeptModules and AdeptMotion VME User’s
Guide (Optional)
1
AdeptModules and AdeptMotion VME User’s Guide, Rev A
29
Chapter 4 - Amplifier Installation
4.2
AdeptModules Installation and Maintenance
Connection of Modules to Amplifiers
It is very important that the modules are connected to the appropriate amplifier interface
packages.
The motor of the module must match the amplifier. The wattage of the amplifier is
marked to the left of the CN2 connector on the amplifier.
The following table lists the module, the motor type in the module and the compatible
amplifier interface package.
Table 4-3.
30
Module
Type
Module Part
Number
Motor in
Module
Amplifier
Interface
Package
Amplifier
H-Module
9040X-1XXXX
300 W
90400A60130
90400-60131
M-Module
9040X-2X0XX
300 W
90400A60130
90400-60131
S-Module
9040X-3X0XX
100 W
90400A60110
90400-60111
Sz-Module
9040X-4X0XX
100 W
90400A60110
90400-60111
AdeptModules and AdeptMotion VME User’s Guide, Rev A
AdeptModules Installation and Maintenance
Amplifier Dimensions
Figure 4-1 shows the dimensions of the 100 W and 300 W amplifiers. The 300 watt
amplifier (90400-60131) includes a heat sink which increases the depth of the amplifier to
245 mm.
P/N 90400-60131 : 245 mm
45 mm
80 mm
9 mm
P/N 90400-60111 : 220 mm
20
40
VR1
CN2
SENSOR
F1
MVE
ALARM OH
F2
CUV
OC
LOS
CN3
MOTOR
250 mm
215 mm
CN1
I/F
17.5 mm
MAIN CNTL
3 mm
4–5 mm
Figure 4-1.
AdeptModules and AdeptMotion VME User’s Guide, Rev A
31
Chapter 4 - Amplifier Installation
4.3
Amplifier Mounting
The amplifiers should be properly mounted for adequate air cooling. The temperature of
the amplifiers must remain between 0 and 50 degrees C (32° to 122° F). If the temperature
of the amplifiers cannot be maintained at less than 50 degrees C (122° F), then a fan is
required for forced air cooling.
When mounting the amplifiers, the space above and below the amplifiers should be
100 mm (4") or more and the space behind the amplifier should be 50 mm (2") or more.
When mounting multiple amplifiers side-by-side, the spacing should be more than 10 mm
(0.4") or more.
The mounting guidelines for the amplifiers are detailed in Figure 4-2.
100 mm (4 in.) or more
10 mm (0.5 in.) or more
VR1
C
N
2
50 mm
(2 in.)
or more
CN1
I/F
VR1
C
N
2
VR1
C
N
2
CN1
I/F
CN1
I/F
F1
MVE
ALARM OH
F2
CUV
OC
LOS
CN3
F1
MVE
ALARM OH
F2
CUV
OC
LOS
CN3
F1
MVE
ALARM OH
F2
CUV
OC
LOS
CN3
MAIN CNTL
MAIN CNTL
MAIN CNTL
100 mm (4 in.) or more
Figure 4-2.
4.4
Amplifier AC Power Wiring
Each amplifier has two screw terminals for AC power connection, one labeled MAIN and
one labeled CNTL. CNTL (with 3 screws) is connected directly to 200-220 VAC +/- 10%
with the top screw terminal as the field ground. Because CNTL powers the encoders and
overtravel sensors, this power must remain on at all times. The MAIN terminal (with two
screws) is connected to 200-220 VAC +/- 10%, but MAIN is controlled by the high power
circuitry developed by the customer. Figure 4-4 shows the AC power wiring of the
amplifiers.
Both AC power inputs have fused protection. Table 4-4 shows the information on the fuse
ratings and the Adept part numbers for ordering spares.
Table 4-4.
32
Fuse Label
AC input Fused
Fuse Rating
Adept Part No.
F1
CNTL
10A/250V
90400-04022
F2
MAIN
10A/250V
90400-04022
AdeptModules and AdeptMotion VME User’s Guide, Rev A
Amplifier Alarm Clear Signal
4.5
Amplifier Alarm Clear Signal
The amplifier experiences an MVE fault whenever high power is switched off. High
power can be switched on while the Drive Fault is set; however, high power will be
immediately switched off (Enable power instruction will fail) if the Drive Enable output is
set during a Drive Fault condition.
The amplifier has an Alarm Clear input that must be asserted whenever high power is
enabled. This can be done by including a device (i.e. time-interval relay) in parallel with
the high-power contactor used by the VMPM/MP6-M high power enable output. When
power is enabled to the robot, the time-interval relay automatically asserts a signal to clear
the amplifier Alarm Clear signal. The time-interval relay then drops the signal after the
specified period of time has elapsed. See the end of this section for a source for a time
interval relay.
!
WARNING: Permanently asserting the Alarm Clear input signal is not
recommended as this would disable protection from potentially
hazardous and expensive amplifier failures.
You can reset the Alarm Clear input signal by several alternative methods:
1. You may choose to use digital inputs from the SIO or DIO board and use a custom
program to enable power that includes instructions for clearing the Alarm Clear
signal.
2. If a PLC is being used for other digital I/O functions, the PLC can monitor the
Drive Enable signal and set the Alarm Clear signal for a specified period of time
when the Drive Enable signal is set.
When using a automatic device like a time-interval relay or one of the alternatives above,
the Alarm Clear input signal should be asserted at least for 20 milliseconds but no more
than 100 milliseconds to ensure fault-free operation. See Figure 4-3.
High Power
Enable signal
from MV
CLOSE
OPEN
High Power ON/CLOSE
Relay and
Contact (RLY2) OFF/OPEN
Alarm Clear
Relay (RLY1)
ON
OFF
20 msec to 100 msec time interval
Alarm Clear
Contact
CLOSE
OPEN
Figure 4-3. Alarm Clear Reset Timing
AdeptModules and AdeptMotion VME User’s Guide, Rev A
33
Chapter 4 - Amplifier Installation
Figure 4-4 shows the wiring of a time-interval relay in the Power and Emergency Stop
Circuitry. The Alarm Clear input signal is asserted by shorting CN1 connector Pin #8 to
the same 24VDC Ground Signal supplied to Pin #1 of the CN1 Connector.
Time Interval Relay Supplier
One source for a time interval relay is NTE Electronics, Inc. One source for these relays is
R & D Electronics. Their phone number is 408-262-7144. Ask for part number
R63-11AD10-24, which is a 24VAC/DC, DPDT relay.
34
AdeptModules and AdeptMotion VME User’s Guide, Rev A
HPE
VMPM
46
45
–
+
AdeptModules and AdeptMotion VME User’s Guide, Rev A
FG
200–220VAC
±10%
F1 - CNTL - 10A
F2 - MAIN - 10A
Fuse Ratings
PASSIVE
E-STOP
OUTPUT
.4A @ 24 VDC
HIGH
POWER +
ENABLE –
OUTPUT
LINE
FILTER
RLY2
HIGH
POWER
RELAY
RLY1
TIME INTERVAL
RELAY FOR
ALARM CLEAR
RLY2
HIGH
POWER
CONTACT
MAIN CNTL
F1
RESET
MVE
OH
CUV
F2
CN3 OC
LOS
C +24VDC C
N 24GND N
2
1
ALARM
VR1
24V GND
PIN 8
PIN 1
PIN 12
C
N
2
RESET
MVE
OH
CUV
F2
CN3 OC
LOS
F1
+24VDC C
24GND N
1
ALARM
VR1
PIN 8
PIN 1
PIN 12
RESET
MVE
OH
CUV
F2
CN3 OC
LOS
F1
+24VDC C
24GND N
1
ALARM
MAIN CNTL
C
N
2
VR1
PIN 8
PIN 1
PIN 12
1. User Supplied 24VDC Power Supply is used for
relays and amplifiers.
2. Use separate 5VDC or 12VDC for VMP Panels.
(refer to AdeptMotion Developer's Guide for details)
MAIN CNTL
USER SUPPLIED 24VDC POWER SUPPLY
+24VDC
RLY1
ALARM CLEAR
RESET
CONTACT
GND
200-220VAC
Amplifier Alarm Clear Signal
Figure 4-4.
35
Chapter 4 - Amplifier Installation
4.6
VMP & VMI Configuration and Wiring
Refer to the AdeptMotion VME Developer’s Guide Chapter 3 for more details.
Figure 4-5 shows the typical wiring of a single AdeptModules amplifier to the VMP panel.
The VMP-S and VMP-M require a 5 VDC or 12 VDC power supply. The AdeptMotion
VME product is shipped configured for 12 VDC.
Refer to the AdeptMotion VME Developer’s Guide section 3.3 for more details on configuring
the VMI 5 VDC logic.
NOTE: This selection of the resistors for proper voltage setting on the
VMI board should match with the power supply connected to the VMP-S
and VMP-M. The logic supply voltage is for OPTO22 Input and Output
Modules, and it should match the ‘Logic’ rating of the optical isolators.
The OPTO22 Input and Output modules are used on the VMP Panels.
The three inputs per axis are used as follows:
• Home Switch (VMP-M)
• Positive Overtravel (VMP-M)
• Drive Fault (VMP-S)
The 2 outputs per axis are used as follows:
• Drive Enable (VMP-S)
• Brake Release (VMP-M) (For vertical modules that include motor with brake)
NOTE: Each VMP panel set requires one output on the VMPM for High
Power Enable.
When you purchase a horizontal module, only one DC output module is required, leaving
an extra DC output module. The extra DC output can be used for the High Power Enable.
Amplifier to VMP Wiring
The amplifier to VMP cable (part number 90400-60200) is used to connect each amplifier
to the VMP interface panels. The amplifier end of the cable connects to connector CN1 on
the amplifier with a 34 pin Honda connector. The VMP end of the cable is provided with
unterminated wires to connect directly to the VMP screw terminals. See Table 4-5.
The VMPE panel does not require +Power and Power Com. from an external power
supply. Power to the encoders is provided by the AdeptModules amplifiers.
36
AdeptModules and AdeptMotion VME User’s Guide, Rev A
VMP & VMI Configuration and Wiring
+5VDC
or +12VDC
Power
Supply
*1
+24VDC
Power
Supply
Amplifier
*2
*1
Depends on
VMI Voltage
Setting.
Refer to
AdeptMotion
VME
Developer’s
Guide.
+24V
12 +24VDC
+24V
1 24VGND
VMPS
+PWR
PWR COM
24VGND
10 DE+
DE+
3.3K
9 DE-
DE-
+24V
24VGND
*2
24VDC±10%
22 DF+
DF+
21 DF-
DF-
24VGND
SHD
20K
6 CD+
CD+
20K
5, 7 CD-
CD-
A. GND
VMPM
+24V
20 PO+
PO+
19 PO-
PO-
+24V
*3
Required
Power for
Brake
24VDC
300mA
24VGND
18 NO+
HM+
17 NO-
HM-
+24V
*3
24VGND
SHD
Brake
3 BR+
BR+
2 BR-
BR+PWR
PWR COM
VMPE
A+
AB+
+24V
RLY1
*4
*4
Alarm Clear
Reset
Contact
24VGND
ALARM
8 CLEAR
31 A+
3.3K
*5
30 A29 B+
BI+
28 B27 I+
I-
26 I-
*5
Line Driver
TI SN75113N
Output
Current
< 40mA
Figure 4-5.
AdeptModules and AdeptMotion VME User’s Guide, Rev A
37
Chapter 4 - Amplifier Installation
4.7
MP6 and MI6/MI3 Configuration and Wiring
Refer to the AdeptMotion VME Developer’s Guide Chapter 4 for more details.
The MP6 interface panels differ from the VMP interface panels in that the MP6 panels do
not use the same number of OPTO22 modules. The MP6 interface panels do not require
input modules because the signals are optically isolated on the MI3/MI6 board. The
MP6-M interface panel requires one DC output module for High Power Enable and one
output module for Brake Release if the axis includes a brake.
Configuration of the Boards
Follow the procedure described in section 4.3 of AdeptMotion VME Developer’s Guide.
Special Considerations:
• If using AdeptModule amplifiers then DRIVE FAULT BLOCK DELAY TIME must
be set to 1.0 sec. Refer to the AdeptMotion VME Developer’s Guide for jumper
settings on MI3/MI6 boards.
• You must determine the voltage level of input signals such as DRIVE FAULT,
HOME SWITCH and OVERTRAVEL SWITCH before MI6 Logic Voltage
Configuration for Digital Input Signal is set. Refer to page 53 in the AdeptMotion
VME Developer’s Guide. This is critical because all the inputs go directly into the
board. There are no external OPTO 22 input modules.
NOTE: This selection of the resistors for proper voltage setting on
MI6/MI3 board should not be confused with the logic voltage supplied to
MP6-M. The logic supply voltage is for OPTO22 Output Modules and it
should match the logic rating of the optical isolators.
Amplifiers to MP6 Wiring
Follow the procedure described in section 4.9 of AdeptMotion VME Developer’s Guide.
Special Considerations:
• MP6-S wiring: You must supply 9 pin D-sub male connector and pins. Follow the
pin assignments in Table 4-6. There is only one pin (3) assigned to Shield (SHD).
Since there are two separate cables having two separate shields, the shields must
be tied together.
• MP6-E wiring: User must supply 9 pin D-sub male connector and pins. Follow the
pin assignments in Table 4-6. The MP6-E panel does not require +Power and
Power Com. from an external power supply. Power to the encoders is provided by
the AdeptModules amplifiers.
• MP6-M wiring: there is one overtravel connector and one home sensor on the
MP6-M. Therefore, one sensor is connected directly to the home sensor and the
other to the overtravel connector.
38
AdeptModules and AdeptMotion VME User’s Guide, Rev A
MP6 and MI6/MI3 Configuration and Wiring
Table 4-5. Amplifier to VMP Wiring
Description
From
Amplifier
CN1
Connector
Pin #
To VMP Panel
Wire Label
Wire
Color
Module
Screw
Terminal
#
Bundle
Label
Comments
Wire
#
Encoder Phase A+
P1-31
VMPE
01
Encoder
01
Red
Twisted Pair
Encoder Phase A-
P1-30
VMPE
02
Encoder
02
Black
Twisted Pair
Encoder Phase B+
P1-29
VMPE
03
Encoder
03
Green
Twisted Pair
Encoder Phase B-
P1-28
VMPE
04
Encoder
04
Black
Twisted Pair
Encoder Phase I+
P1-27
VMPE
05
Encoder
05
White
Twisted Pair
Encoder Phase I-
P1-26
VMPE
06
Encoder
06
Black
Twisted Pair
Shield Ground
NC
VMPE
09
Encoder
09
Drain
Single Wire
Positive Overtravel+
P1-20
VMPM
01
Machine
01
Red
Twisted Pair
Positive Overtravel-
P1-19
VMPM
02
Machine
02
Black
Twisted Pair
Home+
P1-18
VMPM
05
Machine
05
Green
Twisted Pair
Home-
P1-17
VMPM
06
Machine
06
Black
Twisted Pair
Brake+
P1-03
VMPM
07
Machine
07
White
Twisted Pair
Brake-
P1-02
VMPM
08
Machine
08
Black
Twisted Pair
Shield Ground
NC
VMPM
09
Machine
09
Drain
Single Wire
Drive Enable+
P1-10
VMPS
01
Servo
01
Red
Twisted Pair
Drive Enable-
P1-09
VMPS
02
Servo
02
Black
Twisted Pair
Drive Fault+
P1-22
VMPS
03
Servo
03
White
Twisted Pair
Drive Fault-
P1-21
VMPS
04
Servo
04
Black
Twisted Pair
Shield Ground
NC
VMPS
07
Servo
07
Drain
Single Wire
CD+
P1-06
VMPS
05
Servo
05
Red
Twisted Pair
CD-
P1-07
VMPS
06
Servo
06
Black
Twisted Pair
Shield Ground
NC
VMPS
07
Servo
07
Drain
Single Wire
+24VDC (PS)
P1-12
Red
Single Wire
24VDC Ground (PS)
P1-01
Black
Single Wire
Alarm Clear (Relay)
P1-08
Red
Single Wire
AdeptModules and AdeptMotion VME User’s Guide, Rev A
39
Chapter 4 - Amplifier Installation
Table 4-6. Amplifier to MP6 Wiring
From
Amplifier
CN1
Connector
To MP6 Panel
Wire Label
Wire
Color
Description
Pin #
Module
Screw
Terminal
or Pin
Numbera
Bundle
Label
Comments
Wire
#
Encoder Phase A+
P1-31
MP6-E
01
Encoder
01
Red
Twisted Pair
Encoder Phase A-
P1-30
MP6-E
02
Encoder
02
Black
Twisted Pair
Encoder Phase B+
P1-29
MP6-E
04
Encoder
03
Green
Twisted Pair
Encoder Phase B-
P1-28
MP6-E
05
Encoder
04
Black
Twisted Pair
Encoder Phase I+
P1-27
MP6-E
06
Encoder
05
White
Twisted Pair
Encoder Phase I-
P1-26
MP6-E
07
Encoder
06
Black
Twisted Pair
Shield Ground
NC
MP6-E
03
Encoder
09
Drain
Single Wire
Overtravel+
P1-20
MP6-M
01
Machine
01
Red
Twisted Pair
Overtravel-
P1-19
MP6-M
04
Machine
02
Black
Twisted Pair
Home+
P1-18
MP6-M
05
Machine
05
Green
Twisted Pair
Home-
P1-17
MP6-M
06
Machine
06
Black
Twisted Pair
Brake+
P1-03
MP6-M
07
Machine
07
White
Twisted Pair
Brake-
P1-02
MP6-M
08
Machine
08
Black
Twisted Pair
Shield Ground
NC
MP6-M
09
Machine
09
Drain
Single Wire
Drive Enable+
P1-10
MP6-S
01
Servo
01
Red
Twisted Pair
Drive Enable-
P1-09
MP6-S
02
Servo
02
Black
Twisted Pair
Drive Fault+
P1-22
MP6-S
04
Servo
03
White
Twisted Pair
Drive Fault-
P1-21
MP6-S
05
Servo
04
Black
Twisted Pair
Shield Ground
NC
MP6-S
03
Servo
07
Drain
Single Wire
CD+
P1-06
MP6-S
07
Servo
05
Red
Twisted Pair
CD-
P1-07
MP6-S
08
Servo
06
Black
Twisted Pair
Shield Ground
NC
MP6-S
03
Servo
07
Drain
Single Wire
+24VDC (PS)
P1-12
Red
Single Wire
24VDC Ground (PS)
P1-01
Black
Single Wire
Alarm Clear (Relay)
P1-08
Red
Single Wire
a
40
MP6-E and MP6-S numbers refer to pins on a DB-9 connector.
AdeptModules and AdeptMotion VME User’s Guide, Rev A
Home and Overtravel Sensors
4.8
Home and Overtravel Sensors
All AdeptModules are built with two internal sensors housed within each axis. One
sensor is located at each end of the travel. These sensors can be used as overtravel
switches. The Adept MV controller supports several different methods of calibrating each
axis. One of the most common methods is to use a dedicated home sensor. This sensor is
not provided in the AdeptModule axis. You have two options to address the Adept MV
Controller's requirements for calibration.
1. Provide an external home switch and use the two internal sensors as overtravel
switches. Wire each of these sensors into the overtravel switch’s input terminals
provided on the VMPM/MP6-M field wiring panel. Then supply an externally
mounted home sensor for each axis. Wire this home sensor to the home sensor
inputs provided on the VMPM/MP6-M. Refer to the AdeptMotion VME
Developer’s Guide for details on wiring.
2. Use one of the overtravel sensors for the home sensor function. You can wire one
of the internal overtravel sensors to the Home sensor input terminals provided on
the VMPM/MP6-M. Refer to Figure 4-5 in this manual for a wiring diagram. The
other internal sensor can be used as a overtravel switch.
!
WARNING: This method protects only one end of the module with an
overtravel sensor. The other end is protected only by properly set soft
limit parameters. Soft limits are not invoked until after the axis has been
successfully calibrated. This method may not meet generally accepted
safety standards.
Overtravel Sensor Wiring for MI6/MI3
MI6/MI3 has only one input per channel for overtravel sensors. You can still have two
separate switches on each axis of the mechanism. Typically, one switch would be at each
end of the axis. These should be connected in series or parallel as described below. Refer
to the AdeptMotion VME Developer’s Guide for more detail.
Overtravel switches can be either normally closed or normally open. Adept strongly
recommends using normally closed switches for fail-safe operation.
If the switches are normally closed (N/C), wire the switches in series. Terminals 2 and 3
on each channel of the MP6-M are provided to help wire the switches in series. If the
switches are normally open (N/O), wire them in parallel. Connect both the switches to
same input terminals, terminals 1 and 4, on the MP6-M. Terminals 2 and 3 are not required
for wiring overtravel switches in parallel.
AdeptModules and AdeptMotion VME User’s Guide, Rev A
41
Chapter 4 - Amplifier Installation
4.9
Changing Calibration Direction
The calibration direction of each module can be changed by switching the wiring of the
home switch sensor and the positive overtravel sensor. Changing the calibration of a
Z-axis module is recommended so that the module moves up out of the workspace during
calibration.
The default wiring diagram for the amplifier to VMP/MP6 cable shows the connection of
the negative overtravel sensor to the home switch input and the connection of the positive
overtravel sensor to the positive overtravel input.
With the default wiring configuration, H-Modules and M-Modules (and other direct
mount motor modules) have the home switch near the motor. For S-Module and
Sz-Module (and other side mount motors) the home switch is opposite the motor end.
In order to change the calibration direction of the module, the home switch and positive
overtravel inputs on the VMPM (Machine) must be switched, and the calibration direction
in the SPEC utility must be changed.
42
AdeptModules and AdeptMotion VME User’s Guide, Rev A
Amplifier Faults
4.10 Amplifier Faults
LEDs on the amplifier’s front panel indicate the fault state of the amplifier. When the
amplifier is wired according to the wire lists in Table 4-5 and Table 4-6, any of the faults
listed above assert the Drive Fault input to the VMPS/MP6-S panel. The Drive Fault input
causes machine high power and motor servo power to be switched off and/or prevented
from being switched on until the fault is cleared.
The table below summarizes the amplifier alarm codes, their causes and solutions.
Table 4-7.
Alarms
LED
Causes
Solutions
Main Voltage Error
(motor power)
MVE
- No main AC power
- Supplied power is not 180-240VAC.
- Excessive regenerative voltage
- Supply proper voltage
and assert Alarm Clear.
- Check Duty Cycle
Amplifier Overheat
OH
- Heavy duty on motor
- Temperature around Amp is high
- Check Duty Cycle
- Cool around the Amp
- Alarm Clear after cooling
down
Control power low
voltage (Internal
5/12/24 VDC)
CUV
- Control power supply voltage is low
or unstable.
- Verify power supply and
wires
- Supply proper power and
Alarm Clear
Motor Over current
OC
- Excessive motor acceleration
- Motor coil or wire short circuited.
- Check Duty Cycle
- Fix short circuit
Encoder cable break
LOS
- Encoder cable break
- Encoder cable not connected
- Encoder breakage
- Verify encoder and
encoder cable
- cycle power, this alarm
cannot be reset by Alarm
Clear.
After the condition that caused the amplifier to assert the Drive Fault signal is remedied,
the amplifier Alarm Clear input signal must be asserted to clear the Drive Fault output
signal.
AdeptModules and AdeptMotion VME User’s Guide, Rev A
43
Brake Release and
Modules with Brakes
5.1
5
Installing Brake Release Button
When using AdeptModules with a brake mechanism, Adept recommends that a brake
release button be installed so that the brake can be disabled to move the Z-axis manually.
The most straightforward method of installing a brake release is to connect a momentary
contact switch across pins 7 and 8 on the VMPM/MP6-M for each axis with a brake. See
Figure 5-1.
BR+
SW
BR–
Brake Release
on VMPM/MP6-M
Figure 5-1.
5.2
H-Module/M-Module with Brake
H-Module and M-Modules can be special ordered with brake mechanisms.
These modules include 300 watt motors with holding brakes and a 10 mm pitch for the
internal ballscrew. Table 5-1 shows the specifications of H- and M-modules with brakes.
Depending on the module used and the payload on the module, you may need to install
an external dumping resistor on the amplifier to dissipate the excess energy from the
motor. Without a dumping resistor the module may exhibit an Amplifier Overheat OH
Alarm if there is excessive energy from the motor.
An upfront method to determine if a dumping resistor is required is to multiply the
payload (in kg) attached to the module by the module stroke (in mm). If the answer is
greater than 4000, then an external dumping resistor is required.
For example, a 750 mm M-Module with a 7 kg payload requires a dumping resistor
because the product of 7 x 750 is 5250.
Please contact Adept Technology Customer Service for more information on installing a
dumping resistor on an H- or M-module with a brake mechanism.
AdeptModules and AdeptMotion VME User’s Guide, Rev A
45
Chapter 5 - Brake Release and Modules with Brakes
Table 5-1.
Brake Mechanism
Module Type
H-Module
M-Module
Sz-Module
46
Part Number
(90400-)
Payload (kg)
Motor Mount
Stroke
(mm)
Speed
(mm/sec)
600
Ball Screw
Pitch (mm)
300
14040
400
18
14050
500
16
14060
600
14
14080
800
10
14100
1000
6
24025
250
24035
350
27
24045
450
26
24055
550
25
24075
750
23
24095
950
20
40013
130
40023
230
9.0
41033
330
8.0
41043
430
7.5
41053
530
7.0
41063
630
6.0
600
10
10
Direct
Direct
Left
40
Moving
Module
14030
600
10
Moving
Slider
40
15
AdeptModules and AdeptMotion VME User’s Guide, Rev A
20
28
9.5
Example SPEC File
Parameters
6
This section lists example SPEC file values generated for a 3-axis, J-Style configuration
consisting of:
600 mm H-Module
450 mm M-Module
130 mm Sz-Module
The last four values in Table 6-6, Joint Motion Parameters, are specific to stroke length and
must be set based on the stroke length of the modules used.
NOTE: These parameters are for guideline and may not be optimal for
your application.
Please refer to Chapter 7 and 8 of the AdeptMotion VME Developer’s Guide for more details
on using the SPEC utility to configure the AdeptModules with AdeptMotion VME
product.
AdeptModules and AdeptMotion VME User’s Guide, Rev A
47
Chapter 6 - Example SPEC File Parameters
Table 6-1. Robot Initialization Specs
Data
Section
Suggested
Value
Parameter
Units
Robot start-up message
n/a
see footnotea
Module password
n/a
see footnotea
Calibration file name
n/a
see footnotea
Robot model number
n/a
see footnotea
Robot serial number
n/a
see footnotea
20
Hand OPEN signal
n/a
see footnotea
20
Hand CLOSE signal
n/a
see footnotea
220/1
*Time-out nulling error* limit
Seconds
5.5
221
Time required for clutch to engage
Seconds
not
applicable
220/4
Time required for brakes to release
Seconds
0
220/5
Time required for brakes to engage
Seconds
0
220/2
Max time to wait for high power (not
on all systems)
Seconds
220/3
Delay from high power on to amp
enable
Seconds
222
Max time to wait for amp enable
Seconds
17
a
48
3
3.008
1
Use default values in SPEC for initial configuration.
AdeptModules and AdeptMotion VME User’s Guide, Rev A
Chapter 6 - Example SPEC File Parameters
Table 6-2. Encoder Parameters
Data
Section
Parameter
Units
H-Module
M-Module
Sz-Module
61
Encoder scale factor
counts/rev
or
counts/mm
400
400
400
1017
Encoder counts per zero
index
counts
8000
8000
4000
1016
Encoder configuration
n/a
2
2
1 or 2a
1015
Encoder sign
n/a
-1
-1
-1
a
With some S- and Sz-Modules a zero index value of 1 results in *Unexpected zero index* or
*No zero index*. If so, try a value of 2.
Table 6-3. Motor/Amplifier Parameters
Data
Section
Parameter
Units
1009
Motor sign
1010
H-Module
M-Module
Sz-Module
n/a
-1
-1
-1
Maximum DAC
value
DAC
counts
32767
32767
15000
1012
*Duty-cycle
exceeded* DAC limit
DAC
counts
15000
15000
10920
1013
*Duty-cycle
exceeded* filter
parameter
n/a
13
13
13
1014
*Motor stalled*
timeout
seconds
0.5
0.5
0.5
1018
*Envelope error*
limit
enc.
counts
10000
10000
5000
1032
Machine Input
Polarity
n/a
4
4
4
AdeptModules and AdeptMotion VME User’s Guide, Rev A
49
Chapter 6 - Example SPEC File Parameters
Table 6-4. Servo Tuning Parameters
Data
Section
Parameter
Units
H-Module
M-Module
Sz-Module
1048
Proportional Gain
(DC Gain)
DAC_counts
enc_cnt
35
30
70
1049
Proportional zero
none
0.95
0.94
0.85
1050
Proportional pole
none
0
0
0
1003
Integral gain
DAC_counts
enc_cnts * ms
1
0.93
3
1005
Max. integrator value
DAC counts
6000
6000
2000
1004
Max. integrator step
enc_cnts/ms
20
20
10
1006
Velocity feedforward
DAC_counts
enc_cnts/ms
0
0
0
1007
Acceleration feedforward
DAC_counts
enc_cnts/ms2
0
0
0
1022
DAC Output filter
none
0
0
0
50
AdeptModules and AdeptMotion VME User’s Guide, Rev A
Chapter 6 - Example SPEC File Parameters
Table 6-5. Calibration Parameters
Data
Section
Parameter
Units
H-Module
M-Module
Sz-Module
1023
Homing
configuration
n/a
0
0
0
1040
Speed and direction
counts/
msec
-5
-5
-5
1041
Speed for fine search
counts/
msec
3
3
2
1044
‘Motor stalled’
timeout during cal
msec
100
100
100
1034
Maximum search
distance
counts
see footnotea
see footnotea
see footnotea
1036
Max home switch
width
counts
400
400
1000
‘Hard stop found’
position error
counts
see footnoteb
see footnoteb
see footnoteb
1037
Distance from edge
of home switch
(or hard stop or
current position) to
first zero index
counts
see footnotec
see footnotec
see footnotec
1035
Motor position at
zero index (or home
switch or hard stop
or current position)
counts
0
0
0
Calibration groups
n/a
1
2
3
Park position after
calibration
counts
0
0
0
1038
a
Should be set to a value that is slightly larger than the total stroke length for the module.
This parameter is not applicable, modules are calibrated to an overtravel sensor, not a
hardstop.
c
Must be measured for each axis.
b
AdeptModules and AdeptMotion VME User’s Guide, Rev A
51
Chapter 6 - Example SPEC File Parameters
Table 6-6. Joint Motion Parameters
Data
Section
Parameter
Units
H-Module
M-Module
Sz-Module
1080
FINE nulling tolerance
encoder
counts
4
4
4
1081
COARSE nulling tolerance
encoder
counts
400
400
400
1019
Time required to be in
tolerance
seconds
0.016
0.016
0.016
202
READY position
mm or
degrees
0
0
0
163
Joint speed at SPEED 100
mm/sec or
degrees/sec
1200
1200
600
165
Joint accel at ACCEL 100
mm/sec2 or
degrees/sec2
20000
30000
35000
141
Minimum JOINT pendant
increment
mm or
degrees
0.001
0.001
0.001
142
Maximum JOINT pendant
speed
mm/sec or
degrees/sec
50
50
25
240
FREE mode
Enabled or
Disabled
Enabled
Enabled
Enabled
22
FREE mode digital signal
(clutch)
n/a
0
0
0
Velocity Servo
Enabled or
Disabled
Enabled
Enabled
Enabled
123
Minimum lower joint limit
mm or
degrees
see footnotea
120
Lower joint limit
mm or
degrees
see footnotea
121
Upper joint limit
mm or
degrees
see footnotea
124
Maximum upper joint limit
mm or
degrees
see footnotea
a
52
These values depend on stroke length of each module.
AdeptModules and AdeptMotion VME User’s Guide, Rev A
Chapter 6 - Example SPEC File Parameters
Table 6-7. Cartesian Motion Parameters
Parameter
Units
Suggested
Value
Cartesian translation speed at SPEED
100
mm/sec
1200 or 600a
1st Cartesian rotation speed at SPEED
100
deg/sec
0
2nd Cartesian rotation speed at
SPEED 100
deg/sec
0
3rd Cartesian rotation speed at
SPEED 100
deg/sec
0
Translational acceleration at ACCEL
100
mm/sec2
20000
1st Cartesian rotational acceleration at
ACCEL 100
deg/sec2
0
2nd Cartesian rotational acceleration
at ACCEL 100
deg/sec2
0
3rd Cartesian rotational acceleration
at ACCEL 100
deg/sec2
0
Maximum WORLD/TOOL pendant
translation speed
mm/sec
50
Maximum WORLD/TOOL pendant
rotation speed
deg/sec
0
Time to reach max pendant speed
seconds
0.16
Minimum WORLD/TOOL pendant
translation increment
mm
0.001
Minimum WORLD/TOOL pendant
rotation increment
degrees
0.001
a
Must be set to 600 if any modules in system are rated for
600 mm/sec maximum speed (for example, an Sz-Module, a 130
or 230 S-Module, or an H- or M-Module with brake.)
AdeptModules and AdeptMotion VME User’s Guide, Rev A
53
Chapter 6 - Example SPEC File Parameters
Table 6-8. General Motion Specifications
Data Section
Parameter
Units
Suggested
Value
168
Maximum allowable acceleration
%
100
173
Maximum allowable deceleration
%
100
169
Maximum allowable program speed
%
100
170
Maximum rate of change of monitor
speed
%/sec
25
162
Minimum execution time for joint
motions
sec
0
162
Minimum execution time for
Cartesian motions
sec
0
171
Default S-curve profile at system
startup
1
172
Default acceleration at system startup
100
172
Default deceleration at system startup
100
174
Upper speed limit for SCALE.ACCEL
54
%
1E+16
AdeptModules and AdeptMotion VME User’s Guide, Rev A
Modules Lubrication and
Cable Hardware
7.1
7
Modules Lubrication
Lubrication Schedule
Each Module should be lubricated after 5000 kilometers, 3,100 miles, or 16,400,000 feet of
travel.
In order to calculate the estimated elapsed time in hours to achieve this module travel
distance use the following equation:
Number of Hours =
Travel Distance to Lubricate x Seconds/Cycle
Travel Distance/Cycle x 3600 seconds/hour
For example, if a module performs a 2 meter travel in 4 seconds the recommended
number of elapsed hours between lubrication is:
Number of Hours =
5,000,000 meters x 4 seconds/cycle
2 meters/cycle x 3600 seconds/hour
= 2,778 hours
2,778 hours could translate to a different lubrication interval (in weeks) depending on the
production schedule of the modules equipment.
Production Schedule
Lubrication Interval
1 shift/day
2 shifts/day
3 shifts/day
5 days/week
6 days/week
7 days/week
40 hours/week
96 hours/week
168 hours/week
70 weeks
29 weeks
17 weeks
The table below provides a estimated lubrication schedule (in actual production weeks)
based on the length of the module and an assumption of the travel distance and time
required to perform the cycle. If your system includes two or more modules, all modules
should be lubricated at the same time and the time should be determined by the module
that requires the most frequent lubrication.
AdeptModules and AdeptMotion VME User’s Guide, Rev A
55
Chapter 7 - Modules Lubrication and Cable Hardware
Table 7-1.
Cycle
Time
(seconds)
Total
number of
hours
(hours)
Lubrication
Interval for
1 Shift/day
5 days/week
40 hrs/week
(weeks)
Lubrication
Interval for
2 Shift/day
6 days/week
96 hrs/week
(weeks)
Lubrication
Interval for
3 Shift/day
7days/week
168 hrs/week
(weeks)
0.13
1.0
10,684
267
111
64
230,250
0.24
1.5
8,680
217
91
52
300,330,350
0.325
2.0
8,550
214
89
51
400,430,450
0.425
2.5
8,170
204
85
49
500,530,550,600
0.55
3.0
7,576
189
79
45
750,800
0.78
3.5
6,232
156
65
37
950,1000,1200
1.0
4.0
5,555
139
59
33
1400 to 2000
1.4
4.5
4,464
112
47
27
Module Stroke
Length (mm)
Estimated
Module
travel
distance
(meters)
130
Lubrication Grease
For standard non-cleanroom modules (module part numbers that begin with
90400-xxxxx), Shell Alvania No. 2 grease is recommended. Adept recommends that the
customer purchase this grease from a third-party. Adept does not offer this grease for the
modules product.
For cleanroom modules (module part numbers that begin with 90401-xxxxx) a special
cleanroom grease is required. This grease is supplied by Adept Technology. The Adept
part number is 90401-04029 and is a single tube with 50 cc of grease. Please contact Adept
Customer Service to order this grease.
56
AdeptModules and AdeptMotion VME User’s Guide, Rev A
Modules Lubrication
Grease Adaptor Nozzle
The grease zerk fittings on the modules are very special with a 4.5 mm diameter and a
small ballcheck in the center.
There are two compatible grease gun nozzles manufactured by Yamada Corporation of
Japan for this size zerk fitting. Nozzle HSP-1 is 120 mm in length and HSP-2 is 240 mm in
length. As of May 1996, Yamada America does not stock these items in the United States.
Adept Technology is still investigating a United States and European supplier for a
compatible grease nozzle.
AdeptModules and AdeptMotion VME User’s Guide, Rev A
57
Chapter 7 - Modules Lubrication and Cable Hardware
Lubrication Procedures
1. Remove the plastic black circular cap(s) from the module. The cap is
approximately 10 mm (0.5") diameter.
• The H-Module has two black caps located on each side of the module at the
end of the module opposite the motor.
• The M-Module has a single black cap located on the same side of the module
as the cable connections and near the motor end of the module.
• The S and Sz-Modules have a single black cap located on the same side as the
motor housing at the end of the module opposite the motor.
2. Move the module slider until the grease nipple(s) can be seen through the access
hole(s).
• The slider of the H-Module must be moved to the end of the module travel.
• The slider of the M-Module must be moved to a position 10 mm (0.5") from
the motor end.
• The slider of the S- and Sz-Module must be moved to a position 35 mm (1.5")
from the end opposite the motor.
3. Fill the module with the appropriate amount of grease
• The H-Module requires 20 cc (2/3 oz.) of grease. It is recommended to fill
each side with approximately 10 cc (1/3 oz.).
• The M-Module requires 10 cc (1/3 oz.).
• The S- and Sz-Module require 2.0 cc (0.1 oz.)
4. Replace the black plastic cap(s) on the modules.
7.2
Pins, Connectors, and Screws
Connector Pins and Inserter/Extractor Tools
The modules and spare motors are supplied with JAE connectors with crimp style pins. If
these pins need to be repaired or replaced, additional pins and an inserter/extractor tool
are required.
Description
JAE Part Number
Encoder Pins
030-51906-800
Motor Pins
030-51928-800
The motor pins are the larger of the two pins. Adept Technology-San Jose has a limited
supply of these pins to send to customers upon request. Please contact Adept Technology
Customer Service.
58
AdeptModules and AdeptMotion VME User’s Guide, Rev A
Pins, Connectors, and Screws
In order to replace encoder or motor pins an inserter/extractor tool is required.
Description
Part Number
Color
Encoder Pin
Inserter/Extractor Tool
JIET-D*C-20
Red/White
Contact JAE directly for this Inserter/Extractor Tool
JAE Electronics
142 Technology Drive
Irvine, CA 92718-2401
Phone (714) 753-2600
Fax (714) 753-2699
A different tool is required for replacing motor pins.
Description
Part Number
Color
Motor Pin
Inserter/Extractor Tool
CIET-16
Blue/White
This tool is provided with each spare motor shipped by Adept. Contact JAE for
additional tools.
Another source for this tool is Aiconics USA. The Aiconics part number is:
M81969 14-03. Contact the following company for this Aiconics tool:
Connector MicroTooling Systems
14500 Trinity Blvd. Suite 110
Fort Worth, Texas 76155
Phone (817) 283-4882
Fax (817) 354-0790
DDK Compatible Connectors
JAE connectors have 12 to 14 week lead times. An alternative source for JAE compatible
connectors is DDK Electronics. DDK can generally offer much shorter lead times. The
DDK JM Series of connectors are compatible with JAE SRCD connectors. However, the
DDK connectors are solder style connectors while the JAE connectors are crimp style.
Contact DDK directly for these connectors:
DDK Electronics, Inc. (USA).
3001 Oakmead Village Drive
Santa Clara, CA 95051
Phone (408) 980-8344
Fax (408) 980-9750
DDK Electronics (Europe), LTD
Grange Lodge, Market Square
Westerham, Kent TN16 1AR, U.K.
Phone 0959-5-61224
Fax
0959-5-61034
AdeptModules and AdeptMotion VME User’s Guide, Rev A
59
Chapter 7 - Modules Lubrication and Cable Hardware
JAE connectors and DDK Connector Cross Reference List
The following table lists the compatible DDK connectors.
Table 7-2.
Part No.
Cable
JAE Connector
DDK Connector
90400-0300x
(x = 3, 6, 9, …)
Controller to Module
Cable (Module End)
SRCD6A21-16SC-A-FO
JMSP2116F
90400-0300x
(x = 3, 6, 9, …)
Controller to Module
Cable (Module End)
SRCD6A21-10SC-A-FO
JMSP2110F
90400-03100
Cable Inside cable track
(Cable end)
SRCD1A21-16PC-A-FO
JMCR2116M
90400-03100
Cable Inside cable track
(Cable end)
SRCD1A21-10PC-A-FO
JMCR2110M
All Modules
Flanged Connector inside
Module unit
SRCD2A21-16PC-A-FO
JMR2116M
All Modules
Flanged Connector inside
Module unit
SRCD2A21-10PC-A-FO
JMR2110M
Robot Cable Mounting Screws
The Robot Cables require a special metric mounting screw of size M3 x 57. These screws
cannot be purchased “off-the-shelf” in the United States. Adept Technology can provide
these screws to customers at no charge. Please contact Adept Customer Service to obtain
these screws.
60
AdeptModules and AdeptMotion VME User’s Guide, Rev A
Amplifier Information
8.1
8
Amplifier Specifications
Table 8-1.
Control Input
Torque command
Rated torque at 3.3v
Maximum torque = 3x rated torque
Motor
90400-60111:
Tamagawa Seiki 125w AC servo motor
TS3275N504E29
TS3275N563E29 (with brake)
90400-60131:
Tamagawa Seiki 300w AC servo motor
TS4073N9E31
TS4073N27E31 (with brake)
Position Feedback
90400-60111: 1000 lines/revolution
90400-60131: 2000 lines/revolution
Maximum frequency: 150 KHz
Maximum Motor Speed
3600 r.p.m.
I/O
Input:
Drive Enable
Alarm Clear
Brake Release
Output:
Drive Fault
Positive/Negative Overtravel
Alarms
Main Voltage Error (MVE)
Overheat (OH)
Control Power Under Voltage (CUV)
Motor Over Current (OC)
Encoder Cable Break (LOS)
Power
Single phase 180-240VAC
Required power:
90400-60111: 510VA max. (at maximum torque)
90400-60131: 1170VA max. (at maximum torque)
Operational Conditions
Temperature: 0 - 50° C. (32 - 122° F.)
Humidity: 20 - 85% (Non-Condensing)
Storage Conditions
Temperature: -20 - 70° C. (-4-158° F.)
Humidity: less than 90%
AdeptModules and AdeptMotion VME User’s Guide, Rev A
61
Chapter 8 - Amplifier Information
8.2
Interface Connector/Signal Specifications
The connector used in the VMP/MP6 to amplifier cable (part number 90400-60200) is
manufactured by Honda. This connector interfaces to the CN1 connector on the amplifier.
Table 8-2.
Adept Part Number
Honda Part Number
Connector
90400-04062
MR-34M
Connector Cover
90400-04066
MR-34L
Table 8-3. CN1 Pinouts
Pin Number
Signal Type
Signal Label
Signal Description
P1-1
Input
24V GND
24VDC Ground
P1-2
Input
BR-
Brake Release (-)
P1-3
Input
BR+
Brake Release (+)
P1-5
Input
CD-
Torque Command Ground
P1-6
Input
CD+
Torque Command
P1-7
Input
CD-
Torque Command Ground
P1-8
Input
Alarm Clear
Alarm Clear
P1-9
Input
DE-
Drive Enable (-)
P1-10
Input
DE+
Drive Enable (+)
P1-4
Not connected
P1-11
P1-12
Not connected
Input
P1-13, 14, 15,16
24VDC
Not connected
P1-17
Output
NO-
Negative Overtravel (-)
P1-18
Output
NO+
Negative Overtravel (+)
P1-19
Output
PO-
Positive Overtravel (-)
P1-20
Output
PO+
Positive Overtravel (+)
P1-21
Output
DF-
Driver Fault (-)
P1-22
Output
DF+
Driver Fault (+)
P1-23
S GND
Signal (Line Driver) Ground
P1-24
S GND
Signal (Line Driver) Ground
P1-25
Not connected
P1-26
Output
I-
Encoder Phase I (-)
P1-27
Output
I+
Encoder Phase I (+)
P1-28
Output
B-
Encoder Phase B (-)
P1-29
Output
B+
Encoder Phase B (+)
P1-30
Output
A-
Encoder Phase A (-)
P1-31
Output
A+
Encoder Phase A (+)
P1-32, 33, 34
62
+24VDC
Not connected
AdeptModules and AdeptMotion VME User’s Guide, Rev A
Signal Description
8.3
DE+
DE-
Signal Description
Input
10
9
Drive Enable/Servo On input
• Enabling DE following DF output closure turns on motor.
DF Output
Close
Open
DE Input
Close
Open
Servo
Alarm
Clear
Input
8
On
Off
Alarm Clear input
• All alarms except LOS can be reset by this input.
• Alarm Clear should be a one-shot input; if Alarm Clear is always on, alarm
function is inoperative.
• Before clearing alarm output, alarm cause should be removed to prevent fatal
error.
20 msec. min.
100 msec. max.
Alarm Clear input Close
Open
DF output
Close
Open
No DF output during
this period
BR+
BR-
Input
3
2
Brake Release input
• Enabling BR releases motor brake.
• 24VDC must be supplied to Pin 12 (+24VDC) and referenced to Pin 1 (24V
GND) to release brake.
BR input
Close
Open
Brake
Lock
Release
AdeptModules and AdeptMotion VME User’s Guide, Rev A
63
Chapter 8 - Amplifier Information
DF+
DF-
Output
22
21
Drive Fault/Alarm output
• In alarm condition, DF contact is in open state and motor servo is turned off.
Control
power
On
Off
Main
power
On
Off
DF
output
Close
Open
DE
input
Close
Open
Alarm Clear
input
Close
Open
Servo
On
Off
0.3 sec. max.
Fault occurs
Invalid
NO+
NOPO+
PO-
Output
18
17
20
19
Overtravel Sensor output
• Slider moves into overtravel position and NO (PO) contact is in open state.
• If modules are not connected to amplifier or sensor cables are broken, NO
(PO) contacts are in open state.
NO Sensor
Direct Motor
Mounting
(H, M)
Left/Right
Side Motor
Mounting
(Sz)
Sensor
output
64
PO Sensor
Motor
Slider
NO Sensor
PO Sensor
Motor
Slider
Close
Open
AdeptModules and AdeptMotion VME User’s Guide, Rev A
Signal Description
CD+
CD-
Analog
Input
6
5
Torque Command input
• Analog voltage input proportional to motor output torque.
Command input voltage: ±10VDC
Input impedance: 20K ohms
3xT
Output torque
T: Rated torque
T
Command input (V)
-10
-3.3
3.3
10
-T
-3 x T
A+
AB+
BI+
I-
Output
31
30
29
28
27
26
Encoder outputs
• A+, A-, B+, B90400-60111: 1000 lines/revolution
90400-60131: 2000 lines/revolution
• I+, I1 lines/revolution
• Maximum frequency: 150 KHz for phase A and B
Phase A
Phase B
Phase I
CCW rotation
AdeptModules and AdeptMotion VME User’s Guide, Rev A
65
Adept User’s Manual
Comment Form
We have provided this form to allow you to make comments about this manual, to point
out any mistakes you may find, or to offer suggestions about information you want to see
added to the manual. We review and revise user’s manuals on a regular basis, and any
comments or feedback you send us will be given serious consideration. Thank you for
your input.
NAME__________________________________________ DATE______________________
COMPANY _________________________________________________________________
ADDRESS___________________________________________________________________
PHONE_____________________________________________________________________
MANUAL TITLE: ____________________________________________________________
PART NUMBER and REV level:________________________________________________
COMMENTS:
______________________________________________________________________________
______________________________________________________________________________
______________________________________________________________________________
______________________________________________________________________________
______________________________________________________________________________
______________________________________________________________________________
______________________________________________________________________________
______________________________________________________________________________
______________________________________________________________________________
MAIL TO: Adept Technology, Inc.
Technical Publications Dept.
150 Rose Orchard Way
San Jose, CA 95134
FAX: (408) 432-8707
Index
A
Adept Bulletin Board 16
C
compliance
with international standards 14
Customer Service 15
E
EN 60204 12, 14
M
manuals
related 10
R
related manuals 10
Robotic Industries Association 12
Robotic safety 12
S
Safety 12
standards compliance 14
system safeguards 13
T
technical support 15
V
V+ developer’s manuals 11
69
70