1
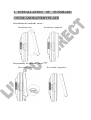
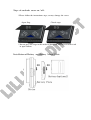
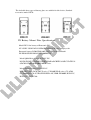
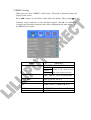
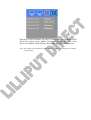
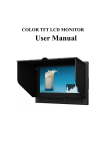
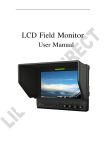
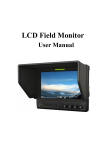
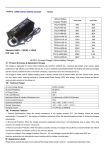
COLOR TFT LCD MONITOR
User Manual
IMPORTANT SAFETY INSTRUCTIONS:
Please read manual before using this product.
Please keep manual for future reference.
Please read the cautions to prevent possible danger and loss of property
Please enjoy the benefits of convenience, safety, and space-saving from this
TFT LCD monitor in different ways.
CAUTIONS:
1. Please do not place the display screen toward the ground.
2. Please avoid heavy impact or drop onto the ground.
3. It should avoid the humidity and extreme temperature
4. Do not place with your equipment or accessory and other inflammable liquid,
the gas or other explosive articles place together, to avoid happening
dangerous.
5. The LCD screen is very easy to shave a wound, avoid crashing please. Be sure
not to use other sharp article to bump against touch screen.
6. Please do NOT use chemical solutions to clean this product. Please wipe with
a clean soft cloth to maintain the brightness of the surface.
7. Please do not block any vent hole.
8. Please follow the instructions and trouble-shootings to adjust the product.
Other improper adjustment may result in damage. Any further adjustment
must be performed or conducted by a qualified technician.
9. Please unplug the power or remove the battery if long-term no-use, or thunder
weather.
Contents
1 PRODUCT DESCRIPTION .......................................................................... 2
2 INSTALLATION OF SUNSHADE COVER AND BATTERY PLATE ....... 4
3 MENU SETTING ........................................................................................... 7
4 ACCESSORIES: ........................................................................................... 11
5 PARAMETERS: ........................................................................................... 12
6 TROUBLE SHOOTING............................................................................... 13
1PRODUCT DESCRIPTION
Positive:
1. Speaker.
2.
Power indicator light:Light turns red when powered.
3. ◄ Left selection key, to select items on OSD menu and value option
adjustment; Press to adjust the brightness, sharpness, contrast, saturation,
volume and Tint value decrease (Tint adjustment is only available under
VIDEO and NTSC mode).
4. ► Right selection key, to select items on OSD menu, value option
adjustment and confirmation; Press to adjust the brightness, sharpness,
contrast, saturation, volume and Tint value increase (Tint adjustment is only
available under VIDEO and NTSC mode).
5. MENU:To activate OSD (on-screen display) menu. Select switch the
brightness, sharpness, contrast, saturation, volume, MENU and Exit.
6. ▲/5D-Ⅱ:Up selection key, to select items on OSD menu; Press to switch ON/
OFF 5D-Ⅱor 5D-Ⅲ mode.
7.
/
:Down selection key, to select items on OSD menu; Press to
switch ON/OFF pixel-to-pixel mode.
8.
F1-F4:4 user-definable buttons:
Default function:
9.
F1: Peaking
F2: False Colors
F3: Exposure
F4: Histogram
Earphone jack.
Back:
10. Mini USB input. (Only for program upgrades, do NOT use if
non-professionals).
11. Battery plate slot.
12. HDMI signal input.
13. HDMI signal loop output. (Optional)
14. DC 12V power input.
15. Battery power on/off switch: “‖” is battery power; “O” is power off; “|” is DC
power.
16. VESA Mounting interface
2 INSTALLATION OF SUNSHADE
COVER ANDBATTERY PLATE
Installation of sunshade cover:
Installation steps
Installation completed
Disassembly of sunshade cover:
Disassembly steps:
Disassembly completed:
Steps of sunshade cover on / off:
* Please follow the instructions steps, or may damage the cover.
Open Step:
Closed steps:
* Do not press the edge in the under of the cover, otherwise it will result
in open failure.
Installation of Battery and Battery Mount Plate
The included three types of battery plate are suitable for this device, Standard
accessories model: F970.
DV Battery Mount Plate Specification:
Model DU21 for battery of Panasonic DV:
NV-GS/PV-GS/DZ-MV/GS/H28/H258/H288GK series, comply with
Panasonic battery DU06/VBD140/SANYO DZhs301sw/Hitachi
DZ-HS303SW/BZ-BP14S/DZ3200/BP07W.
Model QM91D for battery of SONY DV:
DSCR1/F/S/MVCCD/E/HC15E/HC1E/AE1u/DCRTRV828/E/CCD-TRV11
6/DCR-DVD/PS105K/300K/10P/1E series.
Model F970 for battery of SONY DV:
DCR-TRV series, DCR-TRV E series, VX2100E PD P series, GV-A700,
GV-D800 FD/CCD-SC/TR3/FX1E/HVR-AIC, HDR-FX1000E, HVR-Z1C,
HVR-V1C, FX7E F330.
3MENUSETTING
*Before setting the functions, please make sure the device is connected
correctly.
1. Shortcut keys:
1-1. the image menu
When power on, press “◄/►” key on the device, Will appear at the bottom of
the screen display of the brightness, Then press the MENU button to select
brightness, sharpness, contrast, saturation, volume, MENU and Exit. Required
by the user according to personal to User can adjust the parameters of the
selected menu with ◄ / ► button, according to their requirements.
1-2. Switch on / off 5D-Ⅱor 5D-Ⅲ camera mode
Connecting the HDMI input interface with Canon5D-Ⅱor 5D-Ⅲcamera, and
check whether camera mode in the menu setup as 480P(5D-II mode)/1080I(5DⅢ mode ) or not, according to camera's mode1 NO.. Power on, then press
the▲ / 5D-Ⅱ button to switch on/off 5D-Ⅱor 5D-Ⅲ camera mode.
1-3. Pixel-to-Pixel
Turn on the power, press the
function.
/
button to switch on/off pixel-to-pixel
1-4. F1-F4 4 user-definable function buttons:
Functions of F1-F4 buttons can also be customized: Aspect Ratio, Check
Field, Freeze Input, Center Marker, Underscan, H/V delay, Color Bar, Screen
Marker, Zoom, Peaking, False color, Exposure and Histogram.
F1-F4:4 user-definable function buttons.
Default function:
F1: Peaking
F2: False color
F3: Exposure
F4: Histogram
2. MENU Setting
When power on, press “MENU” on the device. The menu of function setting will
display on the screen.
Press ◄/► buttons on the choose main menu the display. Then press▲/
key,
Selection screen displayed on the sub-menu options; then ► to confirm the
selection and adjustment of option value. After confirmation the main menu press
the MENU key to return.
ITEMS
Color Temp
Check Field
OPTIONS
6500ºK/7500 ºK/9300 ºK/User
Red
Note: Only can available
under “User” mode to meet
Green
the color value you need.
Blue
OFF,MONO,Red, Green and Blue
Aspect Ratio
Pixel-to-Pixel
Camera
Full Screen,4:3 and 16:9
ON/OFF
H/V delay
Underscan
OFF,H&V Delay, V Delay and H Delay
ON/OFF
480P (5D-II Mode) / 1080I (5D-Ⅲ Mode)
ITEMS
Center Marker
Screen Markers
ITEMS E
Language
Input Format OSD
LOGO
Freeze Input
Image Flip
Peaking
Assistant Func.
Manufacturer Default
ISP
OPTIONS
ON/OFF
OFF, 95%,93%,90%,88%,85% and80%
OPTIONS
English /Chinese
5S、10S、15S
ON/OFF
ON/OFF
ON/OFF
Color / Mono
Manual/Auto
OK/Cancel
For program upgrades (such as accidentally
press to reboot your computer)
Functions of F1-F4 buttons can also be customized: Aspect Ratio, Check
Field, Freeze Input, Center Marker, Underscan/Overscan, H/V delay, Color
Bar, Screen Marker, Zoom, Peaking, False color, Exposure and Histogram.
Note: Off, camera, X2, X4 and X8 options can be set when zoom function customized
as shortcut key.
4ACCESSORIES:
Standard accessories:
1. Flexible folding sun shade cover
2. DC adapter
3. HDMI Type A-C
4. Manual
5. Battery Plate: F-970
6. Shoe mount (for camera only)
1 piece
1 piece
1 piece
1 piece
1 piece
1 piece
Optional accessories:
1. Battery Plate: DU21
2. Battery Plate: QM91D
3. Li-ion battery
4. VESA 75mm rail slot
1piece
1piece
1piece
1piece
5PARAMETERS:
Panel Size
7’’ TFT LCD
Resolution
1024×600, up to 1920×1080
Brightness
250cd/㎡
Contrast
800:1
Viewing Angle
160°/ 150°(H/V)
Input Voltage
DC 12V
Input Signal
HDMI
Output Signal
HDMI (optional)
DV Battery
F970/DU21/QM91D(optional)
Battery Plate
F970, DU21/QM91D(optional)
Current
800mA
Power Consumption
≤10W
Working Temperature
-20℃〜60℃
Storage Temperature
-30℃〜70℃
196.5×145×31mm
Size:(LWD)
196.5×145×41mm (with sun shade closed)
196.5×145×151.3mm (with sun shade open)
Weight
505g
655g (with cover)
6TROUBLE SHOOTING
1. Only black-and-white display:
Check whether the color saturation is properly setup.
2. Power on but no pictures:
Check whether the cables of HDMI correctly connected. Please use the standard
power adapter coming with the product package. Improper power input may
cause the device.
3. Wrong or abnormal colors:
Check whether the cables are correctly and properly connected. Broken or loose
pins of the cables may cause a bad connection.
4. According to the ISP, the machine can not function properly
ISP for program upgrades, non-professionals do not use. If accidentally press
this key, restart the system.
Note:
It’s a normal phenomenon to see bright stripe when power off.
Due to constant effort to improve products and product features,
specifications may change without notice.