1
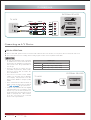
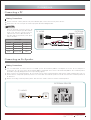
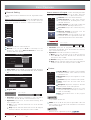
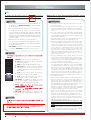
Preface
Dear Hisense Customer,
We appreciate for your buying Hisense products, and believe that this wholly new product can bring you
infinite pleasure. Before using the TV, Please read this manual thoroughly, retain it for future reference.
Our company does not assume any liability for any accident arising from violation of the matters of
attention and instruction on use in this manual.
海信香港客服热线:00852-27811789
海信集团服务质量监督电话:0086-0532-83091111
WARNING
CAUTION
This product involves high voltage. The user may not open the cabinet without authorization. Any person other than the repairer may not repair and replace parts without authorization to avoid shock and fire accidents.
Please clean and maintain the entire TV set with clean and soft cotton cloths, and repeated forcible cleanings are prohibited. The screen may not be scribed, tapped, impacted with hard objects or rubbed with any grinding materials. During placement and use, the product should be kept from water droplet and splash. In case of adverse weather e.g. thunderstorm, the power plug and cable TV (or outdoor antenna) plug shall be rapidly pulled off to avoid damage due to lightning strike.
The TV set is a Type II equipment, and used without requiring grounding.
Attention:
Still images can result in permanent damage to TV screen. 1. The time for displaying static images on the LCD TV screen may not exceed 2 hours, or otherwise it will result in residual image on the screen. To avoid this, you need to lower the screen brightness and contrast when displaying the still images.
2. When viewing 4:3 format program over long time, different traces will be left on the left and right sides of the screen and the edge of margin. So the user is advised not to use such pattern over long time. 3. Long-time display of electronic games and computer static images may result in local residual image, and the screen may get burnt and result in residual image on the screen. To avoid this, you need to lower the screen brightness and contrast during use. For any image residual shadow, local residual image and trace problems with the TV screen due to the
said reasons, the display screen is not within the range of warranty.
Tips for energy saving:
1. Please choose AC power off (turn off the TV through the power switch) when not viewing TV program to minimize energy consumption.
2. Under condition that the view quality is not impacted, reduce the brightness of display screen to minimize the energy consumption of TV during use. Check the Symbol
Triangle enclosing a lightning arrow is a warning symbol, reminding you of the high voltage danger in the product. √
The correct way.
Triangle enclosing an exclamation mark is a warning symbol, reminding you of the important notes related to the product. ×
The wrong way.
General notes. ->
Next step. I
Characteristics
3D Display
Apply latest 3D process technology and new 3D display technology,giving you ultra-comfortable 3D visual enjoyment.
Cloud Share
Apply cloud technology, own cloud background resource, share platform and rich application, provide each Hisense TV user with magnitude Internet video resource, and make it easy to share and broadcast user side.
Dual Operating System
The device bases on Hisense self-developed HITV-OS and Android dual intelligence system, making it more stable and more intelligent. 2D/3D Compatible Display
Use menu to turn on or turn off 3D function, switch between 2D and 3D freely.
3D UI Interface
Use 3D UI technology to solid dynamic menus, provide with you more magnificent and personalized operating experiences.
请确定大传小还是
High Quality LED Backlight 3D Liquid Screen
小传大
New generation backlight source with the 4 cutting edges of magnificence, New generation backlight source with the 4 cutting edges of magnificence, Built-in WiFi wireless network function
Capable to connect to wireless router directly for surfing on Internet.
Small to Big/Big to Small
Capable to interconnect between TV and mobile, Hisense I’TV, meet family entertainment sharing needs.
Family share
Easy to share picture, music and video display with extern mobile terminal Easy to share picture, music and video display with extern mobile terminal Hisense Community
Hisense “envelope” special forum consists of how to use the device, experiences exchange, resource sharing, happiness interchange and enjoy deposit.
Magnitude Application
The device carries Hisense App store and gfan market, provide magnitude Apps for users to download.
SRS TruSurround XT sound effect
Make TV audio more real and more shocking.
Multi-Mode Widescreen Display
Provide with multiple aspect ratio choice: full screen, normal, zoom in one, zoom in two, intelligence panorama, point to point.
Power Saving Mode
The device will enter sleep or standby mode after there is no input signal 15 minutes later, thus extending the device lifetime and saving power.
Multimedia Port
There are several ports for antenna, VGA, HDMI, Video, Component, USB, head-sets, network interface and SD card.
is trademarks registered by SRS Labs,Inc..SRS Labs,Inc.have approved the product to apply TruSurround XT technology.
Special Statement:
The pictures and instructions in the user manual are only for reference, and may be different from appearance of actual products. Please make the object as the standard. (This statement is applicable throughout this user manual)
Any change to quality upgrade, product design and specification will not be subject to any prior notice.
II
Specifications
Model
Dimension
(W × H × D) (mm)
Weight (kg)
LTDN32K560HK3D
LTDN42K560HK3D
LTDN47K560HK3D
LTDN55K560HK3D
738×450×63
971×582×61
1081×644.5×61
1255×744×62
738×501×200
971×639×250
1081×701.5×250
1255×802×330
Without stand
With stand
8
13.5
15.5
23
9.3
16
18
27
80
106
119
138
1920×1080
1920×1080
1920×1080
1920×1080
~ 50Hz 220V
~ 50Hz 220V
~ 50Hz 220V
~ 50Hz 220V
50W
75W
100W
130W
6W+6W
8W+8W
8W+8W
10W+10W
Without stand
With stand
LCD Panel
Minimum size (Diagonal)
Screen resolution
Power supply
Power consumption
Audio power
Standard
Receiving
systems
Q/0202RSR 591-2011
RF
PAL/I, DTMB
AV
PAL, NTSC
Channel range
C1 ~ C57 Z1 ~ Z35
Environmental conditions
Temperature 5℃~ 35℃ Humidity 20% ~ 80%RH Atmospheric pressure 86kPa ~ 106kPa
Antenna input
75Ω
DTV specification
Frequency:474MHz ̄874MHz Transmission channel bandwidt:8MHz Modulation:
64QAM,16QAM,4QAM Frame Header:Pn945 Symbol Interleaving:720 Code Rate:0.4, 0.6 Video decode Formate:H.264, MPEG-2 Audio decode Formate:MPEG-1, AC-3
Analogue Tune
VHF-L:48.25  ̄ 168.25MHz VHF-H:175.25  ̄ 463.25MHz UHF:471.25  ̄ 863.25MHz
Component Input
480i, 480p, 576i, 576p
720p/60Hz, 1080i/50Hz, 1080i/60Hz, 1080p/50Hz, 1080p/60Hz
Below is the list of video format compatible:
Encapsulation
Video decoding
Audio decoding
Type
Resolution (max)
Bit rate (max)
.avi
Xvid
1280×720
8Mbps
AC3, MPEG1(Layer1,2,3)
.avi .mpg .ts
MPEG2
1920×1080
25Mbps
AC3, MPEG1(Layer1,2,3)
.ts .mkv .avi
H.264 HP
1920×1080
25Mbps
AC3, AAC, MPEG1(Layer1,2,3)
.avi .mpg .mov
MPEG4 ASP
1920×1080
8Mbps
AC3, MPEG1(Layer1,2,3)
.dat
MPEG1
720×576
1.5Mbps
MPEG1(Layer1,2,3)
.rm .rmvb
Real 8/9/10
1280×720
1.5Mbps
Cooker
.flv
H.264 HP
720×576
1.0Mbps
MPEG1(Layer1,2,3)
The level charactaristics of terminals:
Interface name
Interface type
Input signal
Level
Impedance
AV input
Composite video
video
1.0Vp-p
75Ω
Component input
Analogue component video
Y
1.0Vp-p
75Ω
PB、PR
0.7Vp-p
75Ω
VGA Input
VGA
R、G、B
0.7Vp-p
75Ω
HS、VS
TTL
High impedance
Audio input
Analogue audio
L、R
1Vrms
> 10 kΩ
III
确认此处有无问题
Important Safety Instructions
Alerts: Before using the product, please read the following clauses carefully.
Power and signal
Please do not cover or block the heat-radiating holes in order not to hamper the unit to give off heat.
Please do not stick the sharp objects, metal, or liquid into or use them to touch the signal interface or heat-radiating holes in case of short circuit or damage to the product.
When it is rainy, please pull out the power plug, CATV plug or outside antenna plug to avoid any possible damage to the TV set. Do not touch the inducting wire of the antenna.
If you do not use the product for a long time, please pull out the power plug.
Please do not press the power line and signal line with other things.
Please do not make the power outlet overloaded, or it will result in the danger of fire.
Keep the power line away from high temperature and heating things.
There are some changes for the outdoor antenna if it stays outside for a long time, which may affect the picture quality of the TV, so please check the antenna or replace it regularly.
Method of placement
√ Even and steady occasions. × Places under direct sunshine or close to heating devices. × Places with poor ventilation. × Places close to furnace or places to which water, oil or smoke is easy to enter. × Places where ventilating openings are closed. × Unsteady places. × Places suffering from easy vibration.
× Places of lot of dust or moist places. × Places of high temperatures.
Maintenance
Do not clean this unit with volatile oils or dilution, which may cause cabinet deterioration or damage its coating surface.
If the cabinet becomes dirty, please clean it with a soft cloth which has neutral detergent wet with water.
In the case where such substances that are painted with paint or organic solvent and grease, etc. on the surface of the TV cabinet, the chemical reaction may be occurred in between the rubber cushion on the base and such substances hereinbefore, which may cause a slight corrosion on the surface of the TV cabinet. Therefore, users are recommended to firstly put a layer of protective material (such as pressboard or glass sheet, etc.) on the TV cabinet and then place the TV set.
Watching TV
Watch TV at a proper distance, and the best distance is 3 to 4 times the length of the vertical distance of LCD.
Keep the lighting indoors bright enough to read newspaper.
The volume should be properly set in order not to disturb your neighbors, esp. when it is during the night.
Others
It is recommended that 2 or more people should load, unload and carry the unit; try to avoid any crash when carrying the unit, and protect the LCD screen in particular.
If you touch the LCD screen when turning on or off the TV, you can feel the slight electric shock, which is the so-called electrostatic and does no harm to your health.
LCD display instruction and maintenance
LCD display panel is the advanced S&T product, composed of several millions of Movie transistors inside. There can be dark or bright spots appearing on the panel. please note that this is a normal phenomenon, which does not affect the overall performance.
The incorrect maintenance will lead to damage to the LCD screen,
which will affect the image effect, so you must pay attention to the
following items:
Don't clean the screen with the organic solvents, such as alcohol, gasoline, etc. or chemical reagents ,such as acid, alkali, etc.
Do not clean the screen with any kind of detergent.
After the TV is turned off, you, when necessary, can clean the screen with a clean and soft cotton cloth to properly safeguard it, but repeatedly cleaning with force is prohibited.
Please do not directly touch the screen with your fingers, which may damage the screen surface. What's more, the oil and fat on the screen is difficult to remove.
Please do not put pressure on the LCD, for the LCD screen is delicate and vulnerable. The hard object is not allowed to touch the LCD screen, for it is easily scratched.
Antenna isolator
As the difference between the power cord/ground cord and wired cable, It may cause the heat in the connection ports and may lead to serious accidents.
The professional technicians will detect the situation when installing the TV set to decide whether to install the isolator, if installed, please never remove it.
How to install:
Plug1
Plug2
1. Connect the plug1 to cable signal.
2. Connect the plug2 to the antenna port in the rear of the TV. If the cable signal is connected with STB, please con-
nect plug2 to the antenna input port in the rear of the STB.
Product
NOTE
Please do not try to decompose any part of the product, which may cause damage to the product as well as harm to the human. And it will also make you face the product warranty failure.
If you find abnormal sound or smell, or there is sound but no image, please turn off the TV and pull out the plug immediately and contact the professional technicians.
The isolator is not a accessary with the TV set. If there is heating for your signal cable, please contact with us and we will provide the service for detecting and installing.
IV
Contents
Getting
Started
1
Accessories List................................................................................................. 2
Installing the Stand............................................................................................ 3
Securing the Installation Space......................................................................... 4
Control Pane...................................................................................................... 5
Remote Control................................................................................................. 6
Connections
TV Terminal....................................................................................................... 9
Connecting an Antenna or Cable.................................................................... 10
Connecting a USB Device............................................................................... 10
Connecting a SD Device................................................................................. 10
Connecting a Headphone................................................................................ 11
Connecting an A/V Device............................................................................... 11
9
With theAV Cable / With the Component Cable / With the HDMI Cable
Connecting a PC............................................................................................. 13
Connecting an Ex-Speake.............................................................................. 13
Connecting a TV Monitor or VCR.................................................................... 14
Selecting the Input Source.............................................................................. 14
Basic Features
15
Advanced
Features
21
Other Information
Using the TV for the First Time........................................................................ 15
Turning the TV On or Off / Changing the Channel and Volume
Using the Menu............................................................................................... 15
Programme Edit / Picture / Sound / Screen / Zoom / 3D / EPG/ PwSave
主页................................................................................................................. 20
我的媒体.......................................................................................................... 20
播放音乐文件 / 播放图片文件 / 播放视频文件
我的应用.......................................................................................................... 22
设置................................................................................................................. 23
系统升级.......................................................................................................... 24
此页可暂不确认,
流览网站.......................................................................................................... 25
到时会合版
应用商店..........................................................................................................
26
机锋市场.......................................................................................................... 26
传屏功能.......................................................................................................... 27
家庭分享.......................................................................................................... 27
微博快享.......................................................................................................... 28
我的网盘.......................................................................................................... 29
围观................................................................................................................. 30
游戏大厅.......................................................................................................... 30
海信社区.......................................................................................................... 31
互联网电视...................................................................................................... 31
简单故障的排除方法........................................................................................ 32
33
1 | Contents USER MANUAL
Getting Started
Accessories List
Please make sure the following items are included with your TV. If any items are missing, contact your dealer.
保 修 卡
Manual Book×1 Warranty card×1 Remote Control×1 3D Glasses×2 AV Adapter×2 HD Adapter×1 Audio Adapter ×1 RF Cable×1
"AAA" Battery×2 Screws (M5×12)×12 USER MANUAL Getting Started | 2
Getting Started
Installing the Stand
To install the base stand
1. Secure the stand column to the base plate with the four provided Screws. as figure 1.
2. Secure the stand cover to the stand column with the four provided Screws. as figure 2. 1
2
To install the stand
1. Lay the soft froth on the table which can hold enough weight of the whole TV in case of causing damage to TV or person.
2. Put the TV on the froth, with its back upwards and the LCD downwards.
3. To install the base stand, slide in the base stand until the screw holes are aligned. Secure the base stand to the TV with the four provided screws. 3
NOTES
・ To install the base stand with the provided screws in the accessory bag is in case of causing damage to TV
・ You need not install the base stand of 32 inches 3 | Getting Started USER MANUAL
Getting Started
Securing the Installation Space
Never cover or block the heat-radiating holes.
Avoid operating the TV at temperatures below Inadequate air 5 ℃ .
Make sure that your TV has adequate air circulation. Allow enough space around the TV as shown below.
Install with stand:
Install on the wall:
Leave at least this
much space around
the set.
Leave at least this much space around the set.
Never install the TV set as follows:
Air circulation is blocked.
Wall
Wall
Inadequate air circulation can lead to overheating of the TV and
may cause damage to your TV or cause a fire.
USER MANUAL Getting Started | 4
Getting Started
Control Panel
MENU
VOL Λ
VOL V
CH Λ
CH V
SOURCE
Menu button
Volume up/Enter
Volume down
Channel up
Channel down
Source button
Standby button
Standby indicator
Remote receiver
Power button Light-emitting LOGO
Item/Operations
Description
Power button Turn on or off the TV set.
Standby indicator
Light up in standby mode.
Remote receiver
Receive remote signals from the remote control.
MENU
VOL Λ / V
Side
CH Λ / V
button
SOURCE
Open , close or return to the previous menu.
Adjust the volume.
Select the channel.
Open the source interface.
ENTER
Confirm the selections.
Standby button
Keep the button for three seconds to turn on the TV or put the TV in standby mode. NOTES
・ As power down and system processing require certain time, do not rapidly turn on/off in continuous way, or otherwise the TV set can be resulted in abnormal operation.
・ Illustrations for reference only.
5 | Getting Started USER MANUAL
Getting Started
Remote Control
Remote sensor
Standby button
Standby/on switch
Mute
Mute button
Weibo button
Source
Input Source button
Numeric button
Program selecting/Type characters
Display button
Weibo
E.S
3D button
Display 3D menu
Energy saving button
Display PwSave menu
3D
1
2
3
4
5
6
7
8
9
Display
0
Recall
Recall button
Go to the previous channel in ATV
Special function buttons
Menu button
Open/close menu
▲
▲
OK
Home button
Display HOME desk
VOL
Picture button
The unit does not support
Network and DMP(digital multimedia)
function buttons
(For more information, see "Advanced Features")
The unit does not support
Subtitle button
Favorite button
Display favorite program diagram in DTV
EPG button
Program guide in DTV
Sound/Track button
+
-
Sound button
Sound
CH
Picture
>
VOL + Increase Volume
VOL – Decrease Volume
Home
>
▲
▲/ / /
Up/down/left/right button
OK button
Confirm selections/Display program diagram in DTV; Display current signal source information
Return button
Return to previous menu
Return
Menu
Zoom
CH
CH
Select next program
Select previous program
Zoom button
Zoom mode selecting
The unit does not support
FAV
Subtitle
Sleep
Still
Sleep button
Still button
EPG
Sound Track
Audio
Radio
Radio button
®
Audio I/II button
Display the Audio menu in DTV
EN-32958A
Change the batteries
Notes
Effective range
1. Open the battery cover on the back of the remote control.
1. If the remote control doesn't work normally, unstable, or cannot control the TV, change the batteries.
1. The remote control distance: 8 me-
ters in front of the TV set.
2. Install two AAA size (1.5V) batteries. Match the "+" and "-" signs on the batteries to the signs on the battery compartment.
3. Close the battery cover.
USER MANUAL Getting Started | 6
2. If you do not use the remote control for a long time, remove the batter-
ies.
2. The remote control angle: taking the TV infrared light receiver window as an apex, 6 meters away, its con-
trolled horizontal angle is within 30 degrees, while the vertical angle is within 15 degrees.
Getting Started
Remote Control
Sound button
Mute button
Press to mute the sound and again to restore the sound. The function is used to temporarily turn off the sound.
Input Source button
Set the sound mode among Standard, Live1, Live2, Theater, Music, Speech and User. The User achieves the specific sound effect by setting EQ.
Picture button
Input Source
DTV
ATV
Set the picture mode among Standard, Stadium, Game, Cinema, Concert, Studio and User. The User achieve the certain image effect by setting brightness, contrast, color and so on.
AV1
AV2
COMPONENT
HDMI1
HDMI2
HDMI3
Subtitle button
This unit only supports the add-on subtitle of .srt. In DTV, Press the button repeatedly to switch among different subtitles if the movie has multi subtitles.
VGA
Sleep button
►
Press to display the Input Source menu, including DTV, ATV, AV1, AV2, Component, HDMI1, HDMI2, HDMI3 and VGA.
Press / button to select input mode. then press OK to confirm operation.
▼
NOTE
If you want to enjoy programs from external devices, select the connections corresponding to the device, and then select correct Input source with remote control. (For more information, see "Connections")
Display button
In DTV, press the button to display the program information including the channel number, the channel name, the current system time, the current/next program information, sound track and so on. Press Display/Return
button to exit. In other source, press Display button to display the information about the current source. When OSD is on the screen, you can press Display button close the OSD.
You can set the TV to enter the standby mode automatically. Press the button repeatedly to set the time when the TV enters standby made among Off-10min-20min-...-
240min.
Still button
Press the button to keep the image still in DTV, ATV, AV1, AV2 source.
Special function buttons
Please operate as the OSD prompts.
Weibo button
Press the button to open application program of Micro-
Blog in any source (For more information, see "Applications" -> "Micro-Blog")
1 CCTV-1 13:48 2012/03/16 Fri
Current Play:13:59-16:00 News 576i HD
Next Program:14:04-16:00 TV program guide
7 | Getting Started USER MANUAL
Getting Started
Sound/Track button
Favorite List
In DTV mode, press the button to display the sound track information. Press the button repeatedly to switch among different sound track if the movie has multi sound tracks.
Audio Track
Language 1
Language 2
Functions: Your favorite channels are stored in this list, you can use this list of favorite channels for quick switching.
Operations:
Enter the List: In DTV mode, You can press FAV
button enter this list.
Common Channels
All Channels
Favorite Channels
1 CCTV-1
2 CCTV-2
3 CCTV-10
NOTE
If you want to add/delete favorite channel, please enter the Programme Edit.
Channel List
In DTV/ATV mode, press OK to display Channel List menu.
Press ▲/ button to select the channel and press /
button to turn to previous/next page, then press OK to confirm.
▲
▲
All Channels
▲
Common Channels
Favorite Channels
1 CCTV-1
2 CCTV-2
3 CCTV-3
4 CCTV-4
5 CCTV-5
6 CCTV-6
USER MANUAL Getting Started | 8
Connections
AUDIO/L
AUDIO/L
VIDEO
AUDIO/R
AV
DC 5V 0.5A(MAX) DC 5V 0.5A(MAX)
HEADPHONE
USB 2
USB 1
AV 1
AUDIO/R
TV Terminal
SD
HDMI
HDMI
COAXIAL
VGA
VGA
AUDIO IN
COMP
AUDIO IN
AV 2
AV
COMPONENT
DC 5V 0.5A(MAX)
COAXIAL
USB 3
HDMI 3
USB
ANT 75Ω
ETHERNET AV OUT
HDMI 2
Antenna
HDMI 1
AV OUT
USB
HEADPHONE
Power input
ETHERNET
USB
HDMI
NOTES
・ Some external devices impossible insert to this set for individual difference. Please replace with appropriate external signal cable or increase the adapter to match with the port in such case. ・ Illustrations for reference only.
Item
Description
Antenna
Connect an antenna or cable TV to this jack.
USB
This set has the USB standard interface, which can be connected to standard equipment with USB1.1, USB2.0 , including hard disk, U-disk and so on.
VGA
Connect to a PC or other devices with a VGA interface.
HDMI
HDMI (High-Definition Multimedia Interface) provides an uncompressed signal, all digital audio/ video interface between this TV and any HDMI-device, such as a set-top box, Blu- ray disc player, and A/V receiver.
COMPONENT
Connect to a DVD player, Digital Set-Top-Box, or other devices with component video jacks. ETHERNET
AV OUT
Connect to a router to surf the Internet. (For more information, see "Applications" -> "network settings")
Connect to external devices with audio / video input function, and transmit the video signals being played to these devices.
COAXIAL
Connect to external speakers. It can provide digital audio signal transmission. HEADPHONE
Connect to headphone.
SD
Insert the SD card (The supported maximum capacity is 32G)
AV1/AV2
Connect to a DVD player, Digital Set-Top-Box, or other A/V devices with audio output jacks or composite video and audio (L/R) output jacks. 9 | Connections USER MANUAL
Connections
Connecting an Antenna or Cable
Making Connections
The TV must receive the signal from one of the following Sources: antenna or CATV network.
Antenna should be placed away from roads, power distribution lines, neon signs and other places, so as to avoid disruption of television signals, this can prevent accidents from happening. In addition, as long-term exposure outside, antenna prone to degradation, if the image is not clear, you should first turn off the power, and then check the antenna.
NOTES
・
・
・
・
When using the outdoor antenna, please unplug the cord of the indoor antenna (if any) from the antenna terminal outlet.
It is recommended that coaxial cable (75Ω) be used to eliminate the interference caused by the mismatched impedance.
The antenna cable should not be bound together with the power cord.
When using the CATV or closed circuit TV, please insert the plug of the coaxial cable (75Ω).
TV JACK
ANT 75Ω
EXTERNAL DEVICES
ANT OUT
or
Connecting a USB Device
Making Connections
All the set's USB jacks to connect external devices while the total current is not more than 1200 mA. If more than the output current limit, causing the unit to malfunction, not covered under warranty.(The USB3.0 device is not support)
EXTERNAL DEVICES
USB
0.5A(MAX)
WARNING
TV JACK
DC5V
Connect to the USB jack in the TV with USB cable or directly USB port.
Connecting a SD Device
Making Connections
Connect to the SD jack in the TV with SD card(According to illustration: keep breach up and toward the jack. USER MANUAL Connections | 10
TV JACK
EXTERNAL DEVICES
SD
Card
Connections
Connecting a Headphone
Making Connections
TV JACK
While the headphone is connected, the sound from the built-in speakers will be disabled.
Headphones can be connected to the HEADPHONE output on the TV.
EXTERNAL DEVICES
HEADPHONE
Connecting an A/V Device
With the AV Cable
Connect the TV's AV1/AV2 jack to video output jack of the external A/V devices (VCD, DVD, VCR or Camcorder). Connect the TV's AV1/AV2 jack to audio output jacks (Audio Left/Right) of the external A/V devices. NOTE
AV2 signal are connected to external devices with AV Adapter provided.
AUDIO/L
VIDEO
AV 1
AUDIO/R
TV JACK
AV 2
EXTERNAL DEVICES
Audio R
Audio L
Video
Audio R
Audio R
Audio L
Audio L
Video
Red
Audio R
White
Audio L
Yellow
Video
Video
VCR
DVD/VCD
Video
Camera
Set-top box
A/V OUT
Satellite Receiver
With the Component Cable
Connect the TV's COMPONENT jack to component video output jack (Y, PB, PR) of the external A/V devices (VCD, DVD, VCR or Camcorder). Connect the TV's AUDIO IN jack to audio output jacks (Audio Left/Right) of the external A/V devices. Component output jacks in VCD/DVD may be marked with Y, B-Y, R-Y or Y, CB, CR.
NOTES
・ The component video signal are connected to external devices with HD Adapter provided. Please make sure that the audio connects, otherwise the sound will be abnormal.
・ The audio signal are connected to external devices with AV Adapter provided. Component Input
480i, 480p, 576i, 576p
720p/60Hz, 1080i/50Hz, 1080i/60Hz, 1080p/50Hz, 1080p/60Hz
・ For video format supported by component input, refer to the form.
11 | Connections USER MANUAL
Connections
EXTERNAL DEVICES
COMP
AUDIO IN
TV JACK
VCR
Audio R
Audio R
Audio L
Audio L
White
Red
PR
PR
Red
PB
PB
Blue
Y
Y
Green
R
DVD/VCD
L
PR
PB
Video
Camera
Y
Set-top box
Satellite Receiver
Component
Connecting an A/V Device
With the HDMI Cable
The set has HDMI jack. It can be connected with other devices such as DVD, Set-top Box, AV Receiver, DTV and so on.
The connection between sending and receiving equipment don't need separate audio cable.
NOTES
USER MANUAL Connections | 12
HDMI Input
RGB/60Hz
640×480, 800×600, 1024×768
YUV/50Hz
576i, 576p, 720p, 1080i, 1080p
YUV/60Hz
480i, 480p, 720p, 1080i, 1080p
EXTERNAL DEVICES
HDMI
TV JACK
HDMI
・ Be sure the signal format are supported by HDMI when connected with other devices(see the table above). otherwise it may lead to the image distortion or non-image.
・ Devices with lower version may be compatible supported by this machine, but it may not be able to achieve the best visual effects.
・ Some lower versions of the HDMI cables may result in screen flashing or no display, it is proposed to use the latest version (HDMI 1.3) high-quality cables.
・ If the external devices lack of HDCP or HDCP poorly designed, it may disturb the high-defination image presented.
・ HDMI is compatible with DVI (Digital Visual Interface). In accordance with HDCP copy-protected requirement: Both HDMI and DVI should support HDCP to properly view video content. So make sure DVI in the external devices can support HDCP.
DVD
Set-top Box
Connections
Connecting a PC
Making Connections
The TV set has D-sub15 pin RGB computer standard jack, connect the TV VGA jack to the PC.
Connect the TV's AV OUT jack to audio output jacks (Audio Left/Right) of PC.
NOTES
EXTERNAL
DEVICES
VGA
TV JACKS
VGA
・ The VGA signal are connected to PC with AV/Component Adapter provided. Please make sure that the audio connects, otherwise the sound will be abnormal.
・ For video format supported by VGA input, refer to the form.
VGA Input
Resolution
Frequency
VGA
640×480
60Hz
SVGA
800×600
60Hz
XGA
1024×768
60Hz
SXGA
1280×1024
60Hz
AUDIO IN
Audio R
Format
Audio R
Audio L
Audio L
Connecting an Ex-Speaker
Making Connections
Use a coaxial cable to connect the TV's COAXIAL jack to the Audio Amplifier's coaxial jack, or use the AV Out Adapter to connect the TV's AV OUT jack to the Audio Amplifier's coaxial jack, then connect the Audio Amplifier to the external speaker. (COAXIAL output digital signal, AV OUT output analog signal.)
When connect an external speaker, the TV sound send to other external speakers through the audio cable (recommend you for the Hisense Strip audio products), There's no sound from the built-in speaker. So make sure that the external speakers is switched on.
Before connecting external speaker, please turn down the volume of the TV and the external speaker. EXTERNAL DEVICES
TV JACKS
Audio Amplifier
COAXIAL
COAXIAL
Powerless
Bass Speaker
Speaker
13 | Connections USER MANUAL
Connections
Connecting a TV Monitor or VCR
Making Connections
Connect the TV's AV OUT jack to video input jack of the external A/V devices (VCR or TV Monitor). Connect the TV's AV OUT jack to audio input jacks (Audio Left/Right) of the external A/V devices. NOTES
・ The signal are connected to external devices with AV Out Adapter provided. ・ When used as TV monitor, please carefully read the Attention on still images of the TV.
EXTERNAL DEVICES
TV JACK
AV OUT
Audio R
Audio L
Video
Audio R
Red
Audio R
Audio L
White
Audio L
Video
Yellow
Video
VCR
TV Monitor
A/V IN
Selecting the Input Source
You should connect to the corresponding equipment and select the right input source with remote control when you want to watch the program from external devices. (For more information, see "Remote Control" -> Input Source button)
Input Jacks
Input Source
Antenna
ATV
Antenna
DTV
VGA/Audio in (COMP/AV1/AV2)
VGA
HDMI1/2/3
HDMI1/2/3
AV1/Audio in 1 (COMP/AV1/AV2)
AV1
AV2/Audio in 2 (COMP/AV1/AV2)
AV2
Component/Audio in (COMP/AV1/AV2)
Component
USER MANUAL Connections | 14
Basic Features
Using the TV for the First Time
・ In order to save power consumption, set the TV in Standby mode if you do not watch TV for a short time, if you do not watch TV for a very long time, shut down the main power of the TV.
・ If the TV is turned off , to turn it on again, please wait 5 seconds at least in case the abnormal phenomena occurred.
<
<
NOTES
1. Press the CH / (or CH +/-) on the TV/remote control to change the channel.
2. Press the VOL / (or VOL +/-) on the TV/remote control to adjust the volume.
3. Press 0~9 buttons on the remote control directly to select the channel.
<
1. Use an AC cord to connect the TV's Power input jack to AC outlet.
2. Press the Power button on the TV set. When the TV is on, press the Standby button on the remote control, and the TV will enter Standby mode. Press this button again, and you can watch TV normally.
3. Press the Power button again to turn off the TV.
Changing the Channel and Volume
<
Turning the TV On or Off
NOTE
Changing the channels can also be achieved by directly pressing the programme No. If you want to choose the programme No. from 1 ̄9, press numeric buttons directly. If you want to select a programme No. that double-digit or three-figure, the time between twice pressing the numbers should not be more than 3 seconds.
Using the Menu
Menu is a easy interactive window to achieving most of the basic functions of the TV.
1
2
Press Menu button to open the main menu.
3
In each level of menu, you can select the following operations according to different menus: ▲
▲
▲
▲
Sharpness
Color
Contrast
or ▲/ to select an item
to confirm operation or enter the sub-
▲
▲
▲
Color Temperature
▲
Press /
Press OK
menu. Press /
Press▲/
▲
4
▲
Press ▲/ / / to select a menu option, then press OK to enter the menu.
Brightness
Picture Mode
to adjust the value
to select the item
Press Menu/Return button to return back the previous menu, re-press Menu button to exit the menu.
3D Setting
Picture Setting Sound Setting Channel Setting Zoom Setting
Screen
15 | Basic Features USER MANUAL
Basic Features
Channel Setting
Search channel in ATV signal-Search for analog television Search channel can be divided into in DTV signal and in ATV signal.
Search channel in DTV signal-Search for digital television signal before the Input Source is set up as "DTV". (For more information, see "Remote Control" -> "Input Source button")
Program Edit
Auto Install
Manual Tuning
Channel
signal before the Input Source is set up as "ATV". (For more information, see "Remote Control" -> "Input Source button")
Channel: Select the channel number.
▲
Video System: Set the video pattern Auto Install
for local channels, including PAL, NTSC, Manual Tuning
SECAM and AUTO
Channel
Audio System: Set the audio pattern for Fine-Tune
local channels, including D/K, B/G, M, I.
Audio System
Fine-Tune: Adjust the current frequency Video System
band.
M a n u a l Tu n i n g : M a n u a l l y s c a n f o r channels in current frequency.
Auto Install: Automatically scan for Channels that have signals and store the Channel Setting
channels information in the channel list.
Program Edit:
Channel Setting
Program Edit
Channel: Select the channel number.
Manual: You can press ▲/▼ to manually set the frequency, then press Start to Search to scan for channels that have signals.
Manual Tune
Frequency
554MHz
RF Level
Quality
0
Channel Number
001 TV Program 002 TV Program Move Rename Skip 1 Functions: Edit your TV programmes. You can add a channel into favorite list, move the location of a channel, skip a channel in ATV mode.
2 Operations: Press Menu button to enter menu.
Move: Move the location of the selected channel. Press ▲ /▼ to select the location to be inserted, and then press OK to confirm. Rename: Change the name of the selected channel. Skip: Skip the selected channel. To recover the skipped channel, select the icon and press OK to confirm.
Start to Search
Auto Install: Automatically scan for Channels that have signals and store the channels information in the channel list.
Sharpness
Channel
Frequency
0
50.0MHz
50%
It will cover original channels, are you sure to search? ?
Color
Contrast
Brightness
Picture Mode
No
Program Edit:
Program Edit
▲
Color Temp
Auto Install
Yes
Picture
Picture Setting
001 TV Program Tint: Adjust flesh tones so they appear natural.
002 TV Program Skip Favorite 1 Functions: Edit your TV programmes. You can add a channel into favorite list, skip a channel in DTV mode.
2 Operations: Press Menu to enter channel setting, then select program edit.
Fav.: Set the selected channel as one of the favorite programmes. Skip: Skip the selected channel. To recover the skipped channel, select the icon and press OK to confirm.
Picture Mode: The picture modes including Standard, Stadium, Game Cinema, Concert, Studio and User.
Brightness: Adjust the brightness of the picture.
Contrast: Adjust the contrast of the picture.
Color: Adjust the level of color in the picture.
Sharpness: Adjust the sharpness level for clearer picture or smoother picture.
Color Temperature: Adjusts the color components independently to achieve a warm or cool feeling. NOTE
Only available in 3D mode.
3DNR: It can optimize the picture signal from time and space; reduce the outside noise interference and return the pure initial signal. NOTE
If the TV has no signal, this option is unadjustable.
USER MANUAL Basic Features | 16
Basic Features
Sound
SRS Effect
Auto Volume
EQ
Balance
Sound Mode
Sound Setting
Zoom
Sound Mode: The sound modes including Standard, Live1, Live2, Music, Theater, Speech and User.
Balance: Adjust the relative volume of the speakers in a multiple speaker system.
E Q : A d j u s t e a c h s o u n d c o m p o n e n t . Press◄/► to select the frequency, then press▲/▼ to adjust the values.
Auto Volume: According to different audio signal, it can adjust volume automatically.
SRS Effect: Enhance the surround sound and bass sound effects.
NOTES
・ Only Display Area is available in HDMI.
・ When no signal or DVI/RGB signal in HDMI, the Screen menu is not available.
・ The Screen menu is not available in 3D mode.
・ Phase/Clock/Auto Adjust is only available in VGA.
V.Position
H Size
V Size
Screen
Zoom 1
Normal
Full screen
Zoom Setting
Functions: Press Zoom button to set the zoom mode: Full Screen, Normal, Zoom1, Zoom2, Smart Zoom and Dot To Dot.
Screen
H.Position
Zoom 2
H.Position: Adjust the horizontal position of image.
V.Position: Adjust the vertical position of image.
H Size: Adjust the horizontal amplitude of image.
V Size: Adjust the vertical amplitude of image.
Display Area: Control the repetition rate of HDMI, including Full and Zoom.
Phase: Control the signal phase, which can improve focus clarity and image stability.
Clock: Control the signal clock, which can improve the image stability.
Auto Adjust: Adjust the position and size of picture automatically.
NOTE
H Size/V Size menus are not available in VGA mode.
Full screen: This selection will allow you to adjust the picture horizontally, in linear proportion, to fill the entire screen.
Normal: This selection will allow you to view a picture with anoriginal 4:3 aspect ratio, black bars will appear on both the left and right of the screen.
Zoom 1: This selection will a l l o w y o u t o v i e w a 1 6 : 9 picture with a 14:9 aspect ratio. Black bars will appear on both the left and right of the screen and clips off part from the top and bottom.
Zoom 2: This selection will allow you to view the picture without any alteration, while f i l l i n g t h e e n t i r e s c r e e n . However, the top and bottom of the picture will be cropped.
Smart Zoom: This selection is similar to 16:9 mode, but shows more of the horizontal sides and clips off a little from the top and bottom.
Dot To Dot: This selection will detect the resolution of the HDMI signal and display an image with the same number of pixels. NOTE
The options of the Zoom varies with different source.
17 | Basic Features USER MANUAL
Basic Features
3D
To enjoy the 3D effect, the TV set needs to use in
combination with the Hisense special PR 3D glasses
WARNING
NOTES
1. Some picture functions may not be available in 3D mode, such as E.S/Zoom button is not applicable In the 3D mode.
2. Other brands active 3D glasses may not support.
3. If there are other 3D product or TV set nearby such as PDP/LCD TV/wireless telecommunication equipment, but for mutual interference, active 3D spectacle may in abnormal service. If there is such problem, please put these devices as far from 3D TV as possible.
4. If lie on the side, there may not be 3D effect.
5. The set supports automatic identification of com-
mon 3D format in HDMI1.4. Other 3D signal format needs manual setup.
6. 3D button is added to the remote control of this set. Press 3D button into 3D menu in any source.
NOTE
According to signal, the set can select the corresponding format. 3D to 2D
Deep
Convergence
LR Swap
3D Mode
3D Setting
Before you or your child uses 3D function, please
read the following alarm:
3D Mode: You can set the 3D format.
Off: When viewing 2D video, this option must be selected.
Auto: Automatically identify 3D mode.
2D to 3D: The TV can convert ordinary 2D program to 3D program. When wearing 3D glasses, you can view the 3D video effect.
L - R : S e l e c t l e f t - r i g h t 3 D f o r m a t according to video source signal.
T-B: Select top-bottom 3D format according to video source signal.
LR Swap: To different signal, you can you may feel dizzy. Make left/right eyes exchange on 3D video source signals.
Deep: Adjust the focus depth hierarchy sense of picture in 3D mode.
Convergence: Adjust the presence effect of picture in 3D mode.
3D to 2D: If the option is set up as On, the TV can display all 3D format signals in 2D form.
NOTES
・ LR Swap,Deep and Convergence is unavailable in HDMI1.4 format.
・ Convergence is unavailable in 3D mode.
・ LR Swap,Deep and Convergence is unavailable when 3D switch is Off or “3D to 2D” is enable.
USER MANUAL Basic Features | 18
1. Watching TV at short range for a long time may weak-
en your eyesight.
2. Watch TV by wearing active 3D spectacle for a long time may cause headache or fatigue. If you feel head-
ache, tired or dizzy, please stop watching TV and have a rest.
3. Some 3D pictures may be stimulating and frightening the looker-on. The pregnant, young child, epileptic and unhealthy people are suggested avoiding using 3D function of this device.
4. The unhealthy people, sleep insufficient people or drinker are suggested not watching 3D picture.
5. When watching 3D picture, please ensure the safety of the surrounding environment for the design prin-
ciple of this product may make you feel personally on the scene. Please don't use this product between open staircases, cable wires, balcony or near other matters which may be turned over, knocked into, knocked down, broken or falling down. If you are frightened or think 3D image is true, it may make you crash the matters nearby or injured when you are try-
ing moving your body.
6. Except watching 3D video, please don't apply active spectacle in other usages. Wearing active 3D spec-
tacle (such as common glasses, sunglasses and vision protective glasses) in other situations may damage your body or reduce your eyesight.
7. The video frequency making you immersed may ex-
ert potential negative influence on the users including motility disorders, orientation obstacle, eye fatigue and decreased stature stability. Please have a rest frequently to reduce the liability of these influences. If the above any symptom is occurring, please stop using this device at once and consider continuing to use af-
ter the symptom is decreased at least for 30 minutes.
8. The ideal viewing distance shall be above 3 times over the height of screen.
9. Photosensitive epilepsy alarm and other healthy risks.
・Some watcher may catch unexpected epilepsy or stroke when they are watching some flicker image or light of video picture or video games. If you have fam-
ily medical history of epilepsy or stroke, please consult the medical experts before using 3D functions.
・Even those persons without personal or family medical history of epilepsy or stroke may have the possibility to induce undiagnosed photosensitive epilepsy.
・If any one of the following symptoms is occurring, please stop watching and have a rest at once. (If the symptom is continued, please consult the doctor.)
Eyesight change, a dizzy head and blurred eyes, invol-
untary movement, eyes or muscle twitches), uncon-
scious movement, mental confusion, psychic disarray, direction problem or feeling sick.
The parents shall watch and consult whether the child
has the above symptoms for the children and youth
may be easier to have those symptoms than the
adults.
10. When the children or youth are watching TV, the parents shall pay special attention that children below 6 years old shall not watch 3D video.
Basic Features
EPG
Functions: You will get to know the programs of different channels by using this menu, then you can book these programs.
NOTE
The E-program guide information is provided by the broadcasting company. Because the broadcasting information is provided on the specified channel, the program entries are possibly displayed as null or the date fails to be displayed. The display will automatically renew when new information are available for use.
Book Manage
Book Manage: Press OK to display the Book menu after selected program. Select Book Manage then press OK to enter the Book Manage menu. You can check and manage the reserved program in this menu.
Return: Complete booking or reservation management, select the icon, press the OK or Return to return to the program.
NOTE
The only way to booking the program successfully is the start time of the program you have booked must be later than the Current time. The same time period can only respond to one program. When booking conflicts, it responds the highest priority program, according to the priority you have chosen.
PwSave (Power Save)
Program Weekly
User
Dynamic
Auto2
EGP
Auto1
Enter the EPG: You can press EPG button or select the EPG option of main menu to enter this menu.
Book Manage: You can browse and manage the book program in this menu.
Program Weekly: Browse the TV program in the day or the next six day.
E
P
G
Play Time Program Name 10 CCTV-1
16:38 Business
11 CCTV-2
19:00 News Broadcast
2012/03/28 Thursday Book
Book Man Return
12 CCTV-7
13 CCTV-10
1
2
14 CCTV-11
3
Today
Interface Instructions:
1 Channel List
2 Program List
3 Date List: Select day of the week, the day's program SoftLight
BrightLight
Energy Setting
Bright Light: Maximum backlight brightness, with optimum picture expression.
Soft Light: Minimum backlight brightness, suitable for use in night time.
Auto 1: Backlight brightens with the brightening of the external environment; and becomes dim with the darkening of external environment. Auto 2: The backlight brightness increases with the increase of picture image brightness. The backlight brightness decreases with the decrease of picture image brightness.
Dynamic: The backlight brightness decreases with the increase of picture image brightness. The backlight brightness increases with the decrease of picture image brightness.
User: The function enables any adjustment of backlight brightness
information will display on the Program List.
Operations:
Select Channel: press ▲/ to select the Channel.
Select Program: Press / to select the Program List, press ▲/ to select the Program.
Select the day: After entering program list, Press /
to select the Week, and then press Return to return channel list.
Book: Select the program then press OK to display the Book menu. Select then Book option then press OK to confirm. ▲
▲
▲
▲
▲
19 | Basic Features USER MANUAL
▲