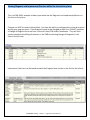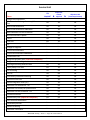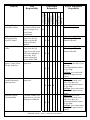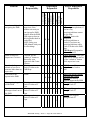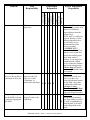
1
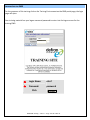
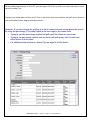
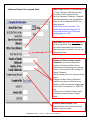
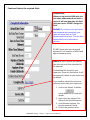
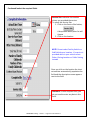
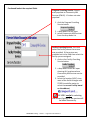
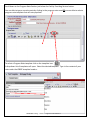
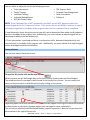
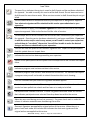
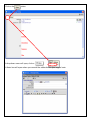
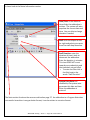
 SBHG EMR Training Phase I User’s Guide PART I – EVOLV SYSTEM CONVENTIONS PART II – ENTERING A SERVICE Volume IV Release Date 2.8.09 TABLE OF CONTENTS Part I – Evolv System Conventions learning objectives………………………………….………………………… 3 System Log‐ On………………………………………………………………………………………………………….. 3 Home Use………………………………………………………………………………………………………………….. 3 Checking the Latest News and Update Link………………………………………………………..………. 4 Logging into the EMR…………………………………………………………………………………………………. 5 My Evolv Page……………………………………………………………………………………………………………. 6 Basic Navigation………………………………………………………………………………………………….……… 6 Modules………………………………………………………………………………………………………….…………. 7 Documenting Non‐Billable services on a Referral…………………………………………….………… 8 Part II – Opening a Client Record………………………………………………………………………………………….. 10 Selecting a Client………………………………………………………………………………………………………. 12 Determining if a Treatment Plan and/or Collaterals are on file in the EMR…………….…. 12 Entering a Service with the Client Module………………………………………………………………… 13 List of services under Service Management Navigation…………………………………………….. 14 Details of the Service Entry Screen………………………………………………………………………….... 15 Filtering “From and To” date………………………………………………………………………….…. 15 Filtering by Service Type…………………………………………………………………………………... 16 Entering a New Service…………………………………………………………………………………………..... 17 A closer look at the Service Entry Form……………………………………………………………………. 19 Progress Note Templates…………………………………………………………………………………………. 28 Entering Collateral/Participants present………………………………………………………………….. 29 Selecting Objectives Addressed / Treatment Context………………………………………….…… 30 Saving a Service……………………………………………………………………………………………………….. 31 Submitting a Service vs. Electronically Signing a Service………………………………………….. 32 Service Entry Icon Table…………………………………………………………………………………………… 33 Adding an Addendum………………………………………………………………………………………………. 34 History Button………………………………………………………………………………………………….…..…. 38 System Time Out – Saving Data……………………………………………………………..…………….….. 39 System Log Out…………………………………………………………………………………………….…………. 39 Search Tips………………………………………………………………………………………………………………. 40 Service Grid………………………………………………………………………………………………………….….. 42 EMR Decision Tree……………………………………………………………………………………………….….. 44 SBHG EMR Training ~ Phase I ~ Page 2 of 50 volume IV
PART I – EVOLV SYSTEM CONVENTIONS After completing this section, you will be able to: 1.
2.
3.
4.
Login to the System Understand the Browser Interface Identify Components of the Evolv‐CS Workspace Navigate through Modules in the Evolv‐CS System SYSTEM LOG‐ON As with all database systems, you will have to log on to the system to identify yourself. To open the EMR portal page from within a SBHG location, type “EMR” into an Internet Explorer browser window. HOME USE To open the EMR portal page outside the SBHG network (i.e. working from home) type into an Internet Explorer browser window https://icmsweb.starsinc.com **If you have difficulties logging into the EMR from a computer that is not an SBHG/Starview computer you will need to reference the Home User’s Guide located in your EMR Manual. The EMR and IT team is not allowed to help staff with computer issues outside the SBHG network. Live Environment
Training Environment
NOTE: After you are finished with training and begin using the EMR to document actual services, make sure you are logged in the live environment. SBHG EMR Training ~ Phase I ~ Page 3 of 50 volume IV
CHECKING THE EMR LATEST NEWS AND UPDATE LINK Click on the link listed below. Check this link often for the latest news and updates with the EMR. This is the EMR Teams way to communicate with all staff. When you click on the link a new Internet Explorer page will open. Scroll down the page and review the information. There are three sections to the Update Page: EMR Tips & Tricks
EMR Myths
EMR Enhancements
To return to the EMR portal page click the Internet Brower back button. SBHG EMR Training ~ Phase I ~ Page 4 of 50 volume IV
LOGGING INTO THE EMR For the purposes of this training click on the Training Environment on the EMR portal page; the login page will open. Your training material has your logon name and password to enter into the logon screen for the training EMR. mhs?
********
Login Name: mhs? Password: Click password SBHG EMR Training ~ Phase I ~ Page 5 of 50 volume IV
When you login, you’ll immediately see your “My Evolv” page. This will be your site navigation short cut page. For more information regarding “My Evolv” page please reference the “Other EMR Functions Manual”. But first let’s get familiar with the components of the Evolv‐CS Workspace. Look at the top of the page and click on “Return to Main”. BASIC NAVIGATION This section will demonstrate how to move around the system. It will introduce some basic terminology essential to the operation by all levels of users including administrators through intake workers. Modules
Parent Selection
Task Bar
Navigation
Bar
Main
SBHG EMR Training ~ Phase I ~ Page 6 of 50 volume IV
MODULES Each MODULE represents a point of entry for a separate business function. Some of the information may be repeated from one module to another, i.e. Referral personal demographics would be the same information in Client personal demographics. Updating one area will filter to other areas. The module you are currently working in will appear in gray with a slightly larger font: Active Module: All inactive modules will have a black background and slightly smaller font: Module: When you first login to the main interface you will be defaulted to the REFERRAL MODULE (tab) on the Parent Selection Bar. You could locate your client in the referral module however you will not be able to capture billable services provided. The PARENT SELECTION BAR indicates the client’s name and demographic information. Beneath the Parent Selection Bar in the Main section will be information regarding the client, family, incident, etc. Click on the CLIENT MODULE (tab). Notice the client module (tab) is now grey and bigger font. The CLIENT MODULE is used to access and track information about people who are clients. Some of the following pieces of information can be accessed through this module. • Client Personal Information • Treatment History • Worker Assignments • Enrollment Information • Document Billable and Non‐Billable Services • Complete Forms NOTE: notice that under the Referral Module it states “Select Referral” vs. under the Client Module it states “Select Client” SBHG EMR Training ~ Phase I ~ Page 7 of 50 volume IV
DOCUMENTING NON‐BILLABLE SERVICES ON A REFERRAL To document a NON‐BILLABLE N/C note on a Referral (someone who is NOT a client) click on the Referral Module Click “Select Referral” A Search box will open. Type in the name of the Referral Click “Search” The name of the Referral will show on the bottom of the search box Click on the Name of the Referral SBHG EMR Training ~ Phase I ~ Page 8 of 50 volume IV
Notice the Referral name in the Parent Selection Bar Under Agency Referral click the + sign next to Testing/Screening Click on Pre‐
Client Documentation Follow instructions on page 16 on how to fill out a service NOTE: Documenting NON‐Billable services on a Referral should be done ONLY if the Referral is NOT an active client. If the Referral IS an active client review the next section on how to find and complete a service on a client
SBHG EMR Training ~ Phase I ~ Page 9 of 50 volume IV
PART II ‐ OPENING A CLIENT RECORD First click the select client button The following screen appears: This is how and where you’re going to locate your client and their information. SBHG EMR Training ~ Phase I ~ Page 10 of 50 volume IV
When conducting searches in Evolv‐CS, you can type in full criteria, such as an entire last name, social security number, etc. Typing in just a few letters of the client’s first or last name (not case sensitive) will pull up all clients on your team whose name begins with those letters. However, if you don’t know the spelling of a client’s name you can narrow down the search by using the percentage (%) symbol typed in the last name or first name field. • Typing in just the percentage symbol will pull up all the clients on your team. • Typing in the percentage symbol and any letter will pull up any client’s who have those letters in their name. • For additional information see Search Tips on page 31 of this Guide. SBHG EMR Training ~ Phase I ~ Page 11 of 50 volume IV
SELECTING A CLIENT Locate your training client and click on their name. Notice the client’s name and demographic information now populates in the parent selection bar within the main interface. DETERMINING IF TREATMENT PLAN AND/OR COLLATERALS ARE ON FILE IN THE EMR Determining if there is a Treatment Plan: 1. On the navigation bar under Case Management click on Plan Development 2. Click on Treatment Plan 3. If there is not a Treatment Plan you will see <Start New Plan>, if there is a Treatment Plan you will see either CMHS Initial or CMHS Review 4. This indicates that there is at least one objective on file. Determining if there is Collateral Information: 1. On the navigation bar under Client Information click on Relationships 2. Click on Collaterals 3. If there is not Collateral Information you will see No Information Found, if there is Collateral Information you will see a list of Collateral name(s) 4. Verify the Collateral you will be referencing in your progress note is listed Knowing if this information is on file will impact which format you will use when writing a progress note. SBHG EMR Training ~ Phase I ~ Page 12 of 50 volume IV
PART II – ENTERING A SERVICE / PROGRESS NOTES After completing this section, you will be able to: 1. Navigate through the Client Module 2. Understand the navigation bar 3. Enter a simple service on a client ENTERING A SERVICE WITHIN THE CLIENT MODULE Now that you have selected your client you are to ready enter a service. All services provided for any client are housed under the Client Module and are located within Service Management in the Navigation Bar. The service entry is the equivalent of the progress note section of a chart. Under Case Management click the + sign next to Service Management Click on Service Entry SBHG EMR Training ~ Phase I ~ Page 13 of 50 volume IV
A closer Look at Navigation access within Service Management. Here is a list of forms/services under Service Management for MHS II access: NOTE: MHS I and Support Counselor level access will differ based on Scope of Practice. Service Entry
SVCS Admission I
SVCS Admission II
SVCS 6 month update
SVCS Annual update
SVCS Discharge
SBHG EMR Training ~ Phase I ~ Page 14 of 50 volume IV
Details of the service entry screen. Start with “From and To” dates which act like a filter only showing services provided during the time period specified. The list of services provided for the client within the previous six months will show. To find a service older than six months change the “from and to” dates to list more services. Then click the refresh button. To change the “from or to” date, click in the field and manually change the date by month, day and year. The date needs to be entered numerically. If you want to view services prior to the last 6‐months you need to change the “from” so that it will encompass those dates of service. Example, if a service was provided on 11/17/2006 the “from” date must be on or before that date. SBHG EMR Training ~ Phase I ~ Page 15 of 50 volume IV
You have the ability to filter the service entry screen by service type. This is accomplished by clicking on the Service drop down menu and then selecting the service desired for review. If you would like to view specific services click the Service drop down box and select the type of service. You must click the refresh button. To show all services again you must select “All Services” from the service filter and click refresh. SBHG EMR Training ~ Phase I ~ Page 16 of 50 volume IV
ENTERING A NEW SERVICE This is where you will document ALL services provided for your client’s (except the Treatment Plan which is explained in the Phase II manual). First, click on Enter New Service This will open a drop down list of services within the scope of practice of the staff. For this training, each login has the same scope as a Mental Health Specialist II or III. As mentioned on page 14, if you are an MHS I or a Support Counselor your Enter New Service drop down list will contain those services within your scope of practice. However all staff no matter their title will be able to view every service that has been entered by everyone working with the client. Next Select SBHG EMR Training ~ Phase I ~ Page 17 of 50 volume IV
A Service Entry form will open where the service and billing information will be entered. User Help File: Items in BOLD are required fields. You will not be able to save the service until all bolded fields have been filled in. SBHG EMR Training ~ Phase I ~ Page 18 of 50 volume IV
A Closer Look: User Help File is an EPSDT service glossary that includes definitions and key elements of the various types of services used for writing progress notes. Click on the User Help File button A separate internet explorer window will open. To close the window click on the red button. SBHG EMR Training ~ Phase I ~ Page 19 of 50 volume IV
Details of the Service Entry form. County ID: all clients receiving Mental Health Services are given an identification number by the County. This field is pre‐populated and you cannot enter or change the number. Exempt from Billing and No Show: DO NOT click in either box unless instructed by your supervisor and/or the Finance Department. BEWARE if either box is checked the service will not be billed. Entered With: identifies the First Date of Service (FDOS). Pre‐populated and cannot be modified. Type: based on your service selection from the drop down list the “type” of service is auto populated. Activity Type and Encounter With: are not required fields, do not enter any data. Client Involved: indicates client’s involvement in the service. The system checks this field by default. You must un‐check this field if client is not involved in the service. SBHG EMR Training ~ Phase I ~ Page 20 of 50 volume IV
A closer look at the required fields. Actual Date/Time is the date and time you provided the service. Date can entered numerically either by hand (can use / or ‐) or by clicking on the calendar Time is actual time service started. Time is entered numerically (i.e. 1:42 pm or 9:34 am). NOTE: the EMR will not allow a future Date OR Time to be entered. End Date/Time is automatically generated by the system when you save the service. NOTE: the End Date/Time field is automatic and will not allow you to enter any information. Face‐to‐Face Time: In order to claim Face‐to‐Face time the client MUST be present. NOTE: Enter time in minutes. The system automatically changes it to hours and minutes (ex. 63 minutes would appear as 1:03). SBHG EMR Training ~ Phase I ~ Page 21 of 50 volume IV
Continued look at the required fields. Other Time is Service + Documentation + Travel. Service is defined any time the client is NOT present for the service. Examples: Collateral, Targeted Case Management, Case Consultation, services etc. provided WITHOUT the client present. NOTE: Enter time in minutes. The system automatically changes it to hours and minutes (ex. 63 minutes would appear as 1:03).
Total Time: the system Auto Adds Face‐
to‐Face and Other Time and populates this field automatically with the total when the service is saved. You can not change this time. Number of Family and Non‐Family Collaterals: you must indicate the number of Family and Non‐Family collaterals present during your session. Client is not counted in the number of Family Collateral. Staff providing service is not part of any count. Examples of Non‐Family Collaterals would be any person that the client, family or staff considers an integral part of the client’s treatment (i.e. CSW, PO, etc). If there are no Family or Non‐Family Collaterals present enter 0 in both fields. Evidence Based Practice: not a required field, at this time you do not need to enter any data. SBHG EMR Training ~ Phase I ~ Page 22 of 50 volume IV
Continued look at the required fields. Completed By: When you log into the EMR with your user name and password and enter a service it will auto populate this field with your name. DO NOT change this field. BEWARE: If you share your user name and password with somebody your name will show here as if you documented the service. You are then responsible for any information entered. DO NOT share your user name and password; it’s a violation of HIPAA and against company policy.
Submit To: this is where you identify who this service will be submitted to for approval. If submitting this service to your supervisor, leave this field alone, it will automatically submit to your supervisor by default. If you need to submit this service to someone other than your supervisor, 1. click on the Submit To button a drop down list of names will appear 2. type in the last name or first name of the identified person 3. click the search button, the persons name will show 4. click on the persons name SBHG EMR Training ~ Phase I ~ Page 23 of 50 volume IV
Continued look at the required fields. Service Site: Indicates the location where you provided the service. To select the Service Site: 1. Click on the Service Site button, A drop down description list will Appear 2. Click on the location
NOTE: Do not select Facility Vehicle or Staff Vehicle as a location. If a service is provided while in your vehicle select Other, Outing Location or Public Setting instead. Once you click on the location the short cut number automatically populates the field and the description name appears next to the field. Outcome: is not a required field, you do not need to enter any data in this field. SBHG EMR Training ~ Phase I ~ Page 24 of 50 volume IV
Viewing Diagnosis and Impairments/Barriers within the Service Entry form. This is a VIEW ONLY example of where you would see the Diagnosis and Impairments/Barriers in the Service Entry form. Changes can NOT be made to these fields. You have the ability to reference this information when writing your progress notes. If the Diagnosis needs to be changed an MHS II or III MUST complete a Change of Diagnosis form and turn it into the Center/TM Intake Coordinator. They will then need to complete the billing information in the EMR by selecting Change of Diagnosis in the Service Entry Screen. Impairments / Barriers can be found beneath the Progress Note section in the Service Entry form. SBHG EMR Training ~ Phase I ~ Page 25 of 50 volume IV
Continued look at the required fields. Program Providing Service: Should auto populate to Community MH Services (CMHS). If it does not auto‐
populate: 1. click the Program Providing Service button 2. a drop down list will open 3. select Community MH Services from the drop down list Facility Providing Service: You must select the Facility where the service was provided. If the service was provided out in the field then select the facility you are assigned. 1. click on the Facility Providing Service button 2. a drop down menu will open showing ALL locations where Community MH Services can be provided 3. select the location (HINT, since most of the facilities begin with STARS it would be easier to select the correct Facility based on the address) BE VERY careful in selecting the correct Facility or the service will be billed incorrectly. SBHG EMR Training ~ Phase I ~ Page 26 of 50 volume IV
Scroll down to the Progress Note Section just below the Facility Providing Service button. You are able to type a narrative note by clicking in the progress note area OR you are able to select a progress note template that will auto populate. To select a Progress Note template click on the template icon. A drop down list of templates will open. Select the desired template. Type in the content of your note under the IGBIRP template headers: SBHG EMR Training ~ Phase I ~ Page 27 of 50 volume IV
PROGRESS NOTE TEMPLATES If the client’s collateral information and/or Treatment Plan are already in the system it impacts your choice between IGBIRP, BIRP, IBIRP or GBIRP format. IGBIRP: You use the IGBIRP format when the collateral information and Treatment objectives are NOT entered into the EMR. BIRP: You use the BIRP format when the collateral information AND objectives in the Treatment Plan have been entered into the EMR. NOTE: To get collateral information entered into the EMR, staff MUST submit Collateral Information form and submit it to the Center Coordinator at their site or the Wrap MH Intake Coordinator. IBIRP: You use IBIRP format if the collateral information is NOT in the EMR but the objectives are entered into the EMR. GBIRP: You use GBIRP format if the collateral information IS in the EMR but the objectives are not entered into the EMR. The following services require a progress note: • Crisis Intervention • Collateral • Family Therapy • Care Plan • Individual Therapy • Change of Diagnosis • Individual Rehabilitation • Dangerous Behavior Safety Plan • N/C (No Contact) Note • Family Safety Crisis Plan • TBS Progress Note • Suicide Safety Plan • Targeted Case Management • TBS Monthly Review • Case Consultation You WILL NOT be able to submit the above services without a progress note.
For services not needing a progress note refer to the Service Grid located in the back of this manual starting on page 37. SBHG EMR Training ~ Phase I ~ Page 28 of 50 volume IV
COLLATERALS/PARTICIPANTS PRESENTS Now that you are done with the body of your note you MUST identify who was present during the session. If you indicate there was Family and/or Non‐Family Collateral Present during the session you MUST identify who they are. The EMR allows you to select collateral information from a drop down box instead of typing the information in the body of the progress note. The Participants Section is the place where the Relatives/Collaterals are identified and selected. When selecting a participant(s)/collateral(s) utilize the following steps: 1. At the bottom of the service click the Participants tab 2. Click the ellipses under Participants Role and select the description 3. Click the ellipses under Participant and select the name of the participant Step 1
Step 2
Step 3
VERY IMPORTANT: in order to select a collateral from within the Participants dropdown box the collaterals MUST first be entered into the EMR. Contact your Center Coordinator to have the collaterals entered into the EMR. IF the collateral information is not entered into the EMR yet, document in the body of the note the collateral present during the session, complete a Collateral Information sheet (attached) and give it to your Center Coordinator. SBHG EMR Training ~ Phase I ~ Page 29 of 50 volume IV
SELECTING OBJECTIVE ADDRESSED / TREATMENT CONTEXT Now that the participants have been selected you need to select which objective was being addressed during the session. The EMR allows you to select an objective from a drop down box instead of typing the information in the body of the progress note. 1. At the bottom of the service click the Treatment Context tab 2. Click the ellipses within the Treatment Context tab 3. Click the current objective/goal on file you worked on during the session. The result will look like this: Step 3
Step 1
Step 2
4. The result will look like this: SBHG EMR Training ~ Phase I ~ Page 30 of 50 volume IV
You can select an objective link for the following services: •
•
•
•
•
Crisis Intervention Family Therapy Individual Therapy Individual Rehabilitation N/C (No Contact) Note •
•
•
•
TBS Progress Note Targeted Case Management Case Consultation Collateral NOTE: If the Treatment Plan is NOT completed in the EMR, you will NOT be able to select the objective/goal within the Treatment Context. If this is the case you will NEED to continue to type in the objective/goal within the body of the progress note until the Treatment Plan is completed. IF new behavior(s) occur during the session you will need to document them under the B (behavior) section in the body of the progress note. Additionally, you must indicate an objective/goal will be developed to address the new behavior(s). IF Crisis Intervention is provided and there is no objective on file, document the behavior(s) and intervention(s) in the body of the progress note. Additionally, you must indicate if an objective/goal will be developed to address the behavior. SAVING A SERVICE You are now ready to Save this service. To save the this service click on the save button When you save you will be brought back to the Service Entry Screen under the Client Module. The saved service will now show in draft format in the Service Entry Screen. You can modify this service at any time while in draft format by simply clicking on the service. Depending upon the service provided one of two icons will appear to the right of the service entered, a submit button or electronic signature button (see next page for more explanation). The service you selected (Individual Rehabilitation) requires supervisor’s approval so you must click the envelope to the right of the service. SBHG EMR Training ~ Phase I ~ Page 31 of 50 volume IV
SUBMITTING A SERVICE VS. ELECTRONICALLY SIGNING A SERVICE To forward a service for approval simply click the submit button located to the right of the service entered. Your electronic signature will be attached to this service upon submission to your supervisor. To electronically sign a service that does not require your supervisors approval, simply click the pencil icon located to the right of the service entered. For the list of forms/services that require submitting to your supervisor vs. an electronic signature from you refer to the Service Grid beginning on page 37. NOTE: if a service is left in draft form (not submitted to your supervisor for approval OR not electronically signed) it will NOT be billed. All Services must either be submitted and approved by your supervisor or electronically signed by you to be billed. Leaving a service in draft form is the equivalent of having an un‐signed progress note in the client’s chart which is a recoupment risk. ***Creating “skeleton services” (saving a service where only the required fields are complete) and leaving them in draft for the purpose of increasing your productivity is considered FRAUD. If you create a service with the intention of returning at another time to finish the service, keep in mind that per DMH policy ALL services are to be documented and signed (submitted) within 24 business hours of the date of the service. Creating services and leaving them in draft is against DMH policy. So let’s review the icons that will appear next to the services entered. Service has been electronically signed by staff
Service has been submitted and approved by supervisor
Service has been submitted to supervisor for approval
Service has NOT been submitted to supervisor (in draft)
Service has NOT been electronically signed by staff (in draft)
See Icon Table on next page for more detailed information on what each icon indicates. SBHG EMR Training ~ Phase I ~ Page 32 of 50 volume IV
Icon Table The pencil icon indicates the service is saved in draft format and has not been submitted for approval. You able to modify this service while draft format. Do not leave services in draft format for more than a week. When services remain in draft format they do not get billed. Use the Submit Button to forward services to your supervisor or designee for approval. Your electronic signature will be attached to this service upon submission to your supervisor. Click this button to apply your Electronic Signature for those services that do not require supervisor approval. Refer to the Service Grid for a list of services. The envelope with an arrow indicates the service has been submitted to your supervisor for approval. Once the service has been submitted it is no longer modifiable. If you need to edit the service and/or note for any reason you will need to contact your supervisor and ask them to “un‐submit” the service. You will then be able to make the desired changes and then re‐submit back to your supervisor. This icon will take the place of the Electronic Signature icon. Explain to the participants that this symbol does not impact them. Indicates the services has been approved by your supervisor Explain to the participants that the symbol of an envelope with a red line does not impact them. Indicates a progress note has been written in this service. Indicates a progress note has NOT been written for this service. For services that require a progress note you will not be able to submit them when this icon is showing. This icon indicates that your Electronic Signature has been applied. Service has pulled into a batch. If there is a green check mark under this column the service has been pulled into a batch and has been or is ready to be billed. Participants were involved in service. If there is a green check mark under this column that indicates participants were selected from drop down box within the service. Materials were used during service (not common). If a green check mark is under this column it indicates materials were used during the service. Electronic Signature was applied by original author of the service. When there is a green check mark under this column that indicates the electronic signature of the original author was applied to this service. SBHG EMR Training ~ Phase I ~ Page 33 of 50 volume IV
ADDING AN ADDENDUM TO A PROGRESS NOTE If, for whatever reason, you or your supervisor feels the progress note needs additional information in the body of the note, instead of your supervisor un‐approving / un‐approving the note back to you, you are able to add an addendum to the body of the note while the Progress Note is in Submitted or Approved status. If the Progress Note is in draft you are able to edit the content of the Progress Note from within the Service. To add an addendum click on the progress note icon to the far right of the service. A Notes box will open where you can view the original note documented. SBHG EMR Training ~ Phase I ~ Page 34 of 50 volume IV
Click on the button. A drop down menu will open, click on A Notes box will open where you can add the addendum to your original note. SBHG EMR Training ~ Phase I ~ Page 35 of 50 volume IV
A closer look at the Notes Information section. Date/Time: is the date and time of day the addendum is written. The system will auto‐
populate the current date and time. You are able to change the data if needed. Staff: click the ellipses to the far right and select your name from the staff drop down box. Staff Duration: enter the duration of time it took to document the addendum. Enter the duration in minutes. This time DOES NOT count toward your productivity and the time does not get billed. ●
To enter the time click in the field next to the words “Staff Duration” System Entry Date: not modifiable, the system auto‐
generates this date and time when the addendum is entered. The Note section functions the same as outlined on page 27. An addendum to a Progress Note does not need to be written in any particular format, it can be written in narrative format. SBHG EMR Training ~ Phase I ~ Page 36 of 50 volume IV
When you have completed the Notes Information section and the Progress Note documentation click The Progress Note will close and you will be brought back to the Notes box. The addendum Progress Note will show under the original Progress Note. Notice the Main Note column. The original note is the main note and the addendum is not the main note. Click and you will be returned to the Service Entry Screen. SBHG EMR Training ~ Phase I ~ Page 37 of 50 volume IV
HISTORY BUTTON Everything you do in the EMR leaves an electronic trail / foot print. State and County Auditors will use this trail in their audits to determine when and who provided what services and when those services were documented. Be careful with the number of times you are in and out of a service. Each time you go into a service you leave a “foot print”. Here are the steps for viewing the history within each of the services. 1.
2.
3.
4.
Click into a service The Simple Service Entry Screen will open Click on the History button A box containing the History of the specific service will open SBHG EMR Training ~ Phase I ~ Page 38 of 50 volume
volume IV
SYSTEM TIME‐OUT ‐ SAVING DATA A SYSTEM TIME OUT occurs when the system automatically logs a user off because of inactivity or an unexpected disconnection from database. If you leave the EMR open without saving for more than 30 minutes the server will log you out of the EMR. You will be see the following message when you return, prompting you to login again. If this occurs you will loose any UNSAVED data. Neither the EMR nor the IT Team will be able to recover lost data that was not saved. Saving your services periodically will help prevent the loss of services/data. The EMR team recommends saving services every 10 mins particularly when you are working on Assessments and the Treatment Plan. To save a service you will have to complete all required fields first and then click save. SYSTEM LOG OUT When you are ready to end your EMR session, click on the log‐out button right of your screen. located in the upper‐
Do not click the Red X to close the EMR; doing so will only close your internet browser NOT your EMR session. You MUST “close the door” by clicking the log‐out icon. SBHG EMR Training ~ Phase I ~ Page 39 of 50 volume IV
SEARCH TIPS
Topic: Look‐Up Tables with over 100 records Problem: Users frequently believe that a record they are looking for does not exist or can not be found, failing to realize that pick‐lists only list the first 100 records out of the total amount (if there are over 100). This is a system convention that is used in Evolv‐CS to prevent potential performance issues. Solution: If the user does not know the first few letters of a field to search on, the user can utilize different combinations of SQL keywords to filter the list. Attempt #1: [0‐Z] (the number zero through the letter “z”; equivalent to using the % character as a wildcard) Records
may begin
with #s
SBHG EMR Training ~ Phase I ~ Page 40 of 50 volume IV
Attempt #2: [H‐Z] (“find all values that start with H, I, J…X, Y, or Z”, i.e. “h” through “z”) Records
begin with H
Attempt #3: [R‐Z], etc. This makes it possible for users to filter through all possible ranges of listed records. SBHG EMR Training ~ Phase I ~ Page 41 of 50 volume IV
Service Grid Supervisor PN review Needed? ► required Yes No
Forms 1 3‐page Child Assessment Administrative Discharge Summary/Aftercare 2 Plan No
Yes ►
Objective Link (Treatment Context) No No 3 Adult Initial Assessment No
Yes No 4 Adult Initial Assessment Addendum No
Yes No 5 Adult Substance Use Self Evaluation No
No No 6 Annual Assessment Update No
Yes No 7 CAFAS No
No No 8 Care Plan Yes Yes No 9 CFE No Yes No 10 Change of Diagnosis Yes Yes No 11 Child Initial Assessment No
Yes No 12 Child Initial Assessment Addendum No
Yes No 13 Coordination Plan No
Yes No 14 Dangerous Bx Safety Plan (supervisor completes) Yes No No 15 Dangerous Bx Screening No
Yes No 16 Discharge Summary/Aftercare Plan No
Yes No 17 Family Safety Crisis Plan Yes Yes No 18 ILSS Screening No
No
No 19 PECFAS No
No
No 20 Permanency Placement Screening No
No
No 21 Provisional Care Plan No
Yes No 22 Service Integration Team (SIT) No
Yes No 23 Substance Use Assessment ‐ DD No
No
No 24 Substance Use Parent/CG Questionnaire No
No
No 25 Substance Use Self Evaluation ‐ DD No
No
No 26 Suicide Assessment No
Yes No 27 Suicide Safety Plan (supervisor completes) Yes No No 28 TBS Functional Assessment No Yes No 29 TBS Monthly Review Yes Yes No 30 Trauma Screening No
Yes No 31 Treatment Team Note No
Yes No SBHG EMR Training ~ Phase I ~ Page 42 of 50 volume IV
Supervisor Services 32 Case Consultation Progress Note PN review Needed? ► required Yes Yes ►
Objective Link (Treatment Context) Yes
33 Collateral Progress Note Yes Yes Yes
34 Crisis Intervention Progress Note Yes Yes Yes
35 Family Therapy Progress Note Yes Yes Yes
36 Individual Therapy Progress Note Yes Yes Yes
37 Individual Rehabilitation Progress Note Yes Yes Yes
38 N/C (No Contact) Note Yes No Yes
39 Targeted Case Management Progress Note Yes Yes Yes
40 TBS Progress Note Yes Yes Yes
SBHG EMR Training ~ Phase I ~ Page 43 of 50 volume IV
Who do I contact if I have EMR problems? Review the EMR Decision Tree below. The “Department Responsible” columns should be read from left to right as far as who to contact first when a problem arises. If you still need to contact the EMR Department notify your supervisor first then submit a Track‐IT ticket. NOTE: Be descriptive of your problem in the Track‐IT ticket and include details such as name of the client, date of service, name of the service, number of minutes billed, etc. The more information we receive when the problem is first reported the quicker our ability to problem solve. EMR Decision Tree
Collateral not in the
EMR
Change a diagnosis for
my client
I am working with a
client from a different
team and need access
to that client
Clinician complete a
“Collateral Information
Sheet” and give it to
your Center
Coordinator
Clinician complete a
“Change of Diagnosis”
form and give it to the
Center Coordinator,
then trigger a “Change
of Diagnosis” service
in the EMR, notify
Psych of Diagnosis
change
Supervisor notifies the
Center Coordinator
EMR Team
Note to Department
Responsible
Finance Team
IT Dept.
Medical Records
Center Director
Supervisor
Department
Responsible
Quality Assurance
Staff
Responsibility
Center Coordinator
Problem
X
Center Coordinators
change Diagnosis in the
EMR AND the IS system
X
X
Adding work groups
Center Coordinators enter
Collateral Information in the
EMR
NONE
X
SBHG EMR Training ~ Phase I ~ Page 44 of 50 volume IV
Center Coordinators add
staff as a “Direct Worker” to
the client in the EMR, if the
staff needs access to more
than one client on a
particular team contact the
EMR team to have the staff
added to that teams
workgroup
Center Coordinators add
work groups to clients
Adding School
Information Entry
Allotted time for
billing particular
services/ forms?
Appropriate billing
codes
Audit issues – my
packet / forms are on
the QA Audit list
Clinician complete a
“Collateral Information
Sheet” and give it to
your Center
Coordinator
Clinician, contact your
supervisor, the QA
Dept or review the
Scope of Practice
Manual
Clinician, contact your
supervisor, the QA
Dept, review the Scope
of Practice Manual or
review the “help”
button within each
service in the EMR
Clinician, contact your
supervisor
EMR Team
Note to Department
Responsible
Finance Team
IT Dept.
Medical Records
Center Director
Supervisor
Department
Responsible
Quality Assurance
Staff
Responsibility
Center Coordinator
Problem
Center Coordinators add
School information
X
X X
Supervisor or QA Dept.
review Scope of Practice
Manual with staff
X X
X X
Packet questions – I am Clinician, contact your
supervisor
confused about the
packet process
X X X X
Problem with the
Treatment Plan
Supervisor or QA Dept.
review Scope of Practice
Manual with staff
Clinician, contact your
Supervisor or your QA
Manager/Coordinator
X X
SBHG EMR Training ~ Phase I ~ Page 45 of 50 volume IV
Supervisor review the audit
issues with your staff, if you
have any
questions/problems contact
the QA Dept.
QA Dept. review the audit
report with supervisors as
needed
Supervisor review the
packet process with your
staff, if you have any
questions/problems contact
the QA Dept.
QA Dept. review the packet
process with supervisors as
needed
Supervisor review the
packet process with your
staff, if you have any
questions/problems contact
the QA Dept.
QA Dept. review the packet
process with supervisors as
needed
I need more help with
navigating the EMR
EMR coverage for
Supervisor’s on leave
I accidently forgot to
submit my service to
someone other than my
supervisor
I am need to run
reports in the EMR
I keep getting logged
off the EMR
I get Internet error
messages when I am in
the EMR
EMR is running slow
Clinician, contact your
supervisor, if the
problem can wait you
can sign-up for EMR
Support from the EMR
Dept (sign-up sheet at
the receptionist desk in
each office)
NOTE: Bring your
EMR Manual with your
for all trainings
Clinician, use the
“submit to” button as
directed by your
Supervisor and Center
Director
Clinician, send a
Track-IT ticket to the
EMR Dept.
EMR Team
Note to Department
Responsible
Finance Team
IT Dept.
Medical Records
Center Director
Supervisor
Department
Responsible
Quality Assurance
Staff
Responsibility
Center Coordinator
Problem
Supervisor assist your staff
with navigation questions, if
you have any
questions/problems contact
the QA Dept.
QA Dept. assist with
navigation
X
questions/problems as
needed, if you have any
questions/problems send a
Track-IT ticket to the EMR
Dept.
EMR Dept will respond to
ticket in Track-IT
Center Directors work with
supervisor to instruct staff to
use the “submit to” button
while supervisor is out
X X
X
EMR Team will “unsubmit” service back to
X
staff.
NONE
X
Supervisor work with the
QA Dept and Center
Directors to identify
relevant reports in the EMR
IT Dept will respond
through Track-IT
X
IT Dept will respond
through Track-IT
X X X
Clinician, send a
Track-IT ticket to IT
Dept.
Clinician, send a
Track-IT ticket to IT
Dept.
Clinician, send a
Track-IT ticket to IT
Dept.
IT Dept will respond
through Track-IT
X
SBHG EMR Training ~ Phase I ~ Page 46 of 50 volume IV
Forgot my password
for the EMR or having
a problem signing into
the EMR
Clinician, send a
Track-IT ticket to the
EMR Dept.
X
X X X X X
X
EMR Team
Note to Department
Responsible
Finance Team
IT Dept.
Clinician, contact your
supervisor, the QA
Dept., the Center
Coordinator, or
Medical Records Dept
Medical Records
Scanning packets, who
do I give the packets to
and when are they due
Center Director
Clinician, contact your
Supervisor
Supervisor
I need a service deleted
Department
Responsible
Quality Assurance
Staff
Responsibility
Center Coordinator
Problem
Supervisor follow the
Deletion Policy and/or your
Supervisor Handbook,
request deletion from the
Finance Dept
NOTE: there is a difference
between deleting a Claim
(billing information for a
service) and a service
(documentation of the
service provided)
** IMPORTANT **
Supervisors – DO NOT unapprove services that have
already been billed (green
check mark under $
column), if you need to do
something with a billed
service contact the Finance
Dept before un-approving
Finance Dept will delete
the service AND/OR Claim
as requested
Supervisor review the
packet process with your
staff, if you have any
questions/problems contact
the QA Dept., the Center
Coordinator or MR Dept.
QA Dept., Center
Coordinator or MR Dept
review the packet process
with supervisors as needed
EMR team will change
your password and notify
you of the change in TrackX IT, staff is responsible for
checking back in Track-IT
for the disposition of the
ticket
SBHG EMR Training ~ Phase I ~ Page 47 of 50 volume IV
I need to delete a
scanned packet
(only requested by
Center Coordinators or
MR dept.)
I have promoted to an
MHS II. I need access
to the appropriate
scope of practice in the
EMR.
EMR Team
Finance Team
IT Dept.
Medical Records
Center Director
Note to Department
Responsible
NONE
X
Clinician, contact your
I have moved to a
different team and need new supervisor
access to my new team
Unable to save a
service/form, I keep
getting an error
message
Supervisor
Department
Responsible
Quality Assurance
Staff
Responsibility
Center Coordinator
Problem
Clinician, troubleshoot
that all required fields
are complete, make
sure there is not any
symbols (&, %, #, etc.)
in the text fields, make
sure that you DID NOT
cut and paste from
word or that you
completely added
information in the
participants field, etc.
X
X
X
X
X X
X
X
X
Clinician, when
requested provide
another signature to the
EMR dept with new
title/degree
SBHG EMR Training ~ Phase I ~ Page 48 of 50 volume IV
Center Coordinator /
Medical Records Dept
completes a Scan Packet
Deletion request form and
submits it to the EMR Dept.
EMR Dept. will delete the
scanned packet upon receipt
of the deletion request form
Supervisor needs to send a
Track-IT ticket to the EMR
team
EMR Team will assign the
staff to the new team
Supervisor assists staff with
trouble shooting problems
with saving/submitting. If
you have any
problems/questions contact
the QA Dept.
QA Dept. assists supervisor
and staff with trouble
shooting problems
saving/submitting. If you
have any problems
/questions send a Track-IT
ticket to the EMR Dept.
EMR Dept will respond to
ticket in Track-IT
Supervisor submits
required paperwork to HR.
HR will notify the EMR
Dept when required
paperwork has been
received
EMR Dept. will schedule a
time to capture another
signature with new
title/degree with staff
EMR Team
Note to Department
Responsible
Finance Team
IT Dept.
Medical Records
Center Director
Clinician, refer to your
Home User Guide, the
EMR team and IT team
can not help with your
home computer issues
Supervisor
I am having problems
with the EMR on my
home computer / I
can’t save a service or I
lost forms in the EMR
on my home computer
or when I click the box
will not open
I can’t see/find my
client in the EMR
Department
Responsible
Quality Assurance
Staff
Responsibility
Center Coordinator
Problem
Clinician, contact your
Center Coordinator
X
I am a supervisor and
need more support in
the EMR
Supervisor, contact
your Supervisor/Center
Director
X
X
X
SBHG EMR Training ~ Phase I ~ Page 49 of 50 volume IV
Center Coordinator review
Enrollment information and
add staff either as Direct
Worker or add workgroup to
the client
Center Director assist
supervisors with navigation
questions, if you have any
questions/problems contact
the QA Dept.
QA Dept. assist supervisors
with navigation questions, if
you have any
questions/problems send a
Track-IT ticket to the EMR
Dept.
EMR Dept will respond to
ticket in Track-IT
I noticed an error in
one of the documents
scanned in the EMR
Clinician, show up ON
TIME for scheduled
initial EMR training
X
X
EMR Team
Note to Department
Responsible
Finance Team
IT Dept.
Medical Records
Center Director
Clinician, contact your
supervisor
X
I need Initial EMR
Training
Supervisor
Department
Responsible
Quality Assurance
Staff
Responsibility
Center Coordinator
Problem
Supervisor contact the
Center Coordinator or
Medical Records
Department
Center Coordinator or
Medical Records Dept.
follow the process outlined
for deleting a scanned
packet
NOTE: the Center
Coordinators and Medical
Records Dept should be
auditing the packets PRIOR
to scanning, this will help
reduce the number of errors
and the need for deleting
packets
EMR Team / Training
X Dept provide Initial EMR
training
SBHG EMR Training ~ Phase I ~ Page 50 of 50 volume IV