1
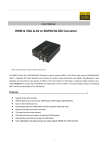
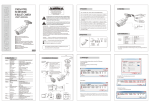
IR HD-SDI 1080p outdoor camera Version 02/2012 TVHD40000 Translation of the original German operating manual. Keep safe for future reference! 15 Ŝ Introduction Dear customer, Thank you for purchasing this product. This product complies with current domestic and European regulations. Conformity has been proven, and all related certifications are available from the manufacturer on request (www.abus-sc.com). To maintain this status and to guarantee safe operation, it is your obligation to observe these operating instructions! Read the entire operating manual carefully before putting the product into operation and pay attention to all operating and safety information! All company names and product descriptions are trademarks of the corresponding owner. All rights reserved. In the event of questions, please contact your local maintenance specialist or dealer. Disclaimer These operating instructions have been produced with the greatest care. If you discover that information is missing or inaccurate, please let us know. ABUS Security-Center GmbH does not accept any liability for technical and typographical errors, and reserves the right to make changes to the product and operating instructions at any time and without prior warning. ABUS Security-Center GmbH is not liable or responsible for direct or indirect damage resulting from the equipment, performance and use of this product. No forms of guarantee are accepted for the contents of this document. 16 Important safety information All guarantee claims become invalid if damage is caused by non-compliance with these operating instructions. We cannot be held liable for any resulting damage. We cannot be held liable in the event of material or personal damage caused by improper operation or non-compliance with the safety information. All guarantee claims are invalid in such cases. The following safety information and hazard notes are not only intended to protect your health, but also to protect the device from damage. Please read the following points carefully: x x x x There are no components inside the product that require servicing. Opening or dismantling the product invalidates the CE certification and guarantee claims / warranty. The product can be damaged if it is dropped, even from a low height. This device is intended for both outdoor and indoor use (protection class IP66). Install the device so that the image sensor is not subjected to direct sunlight. Pay attention to the installation instructions in the corresponding chapter of these operating instructions. Avoid the following adverse conditions during operation: x x x x x x x Excessive humidity Extreme heat or cold Direct sunlight Dust or flammable gases, vapours or solvents Strong vibrations Strong magnetic fields (e.g. next to machines or loudspeakers) The camera must not be installed on unstable surfaces General safety information: x x x x x x x Do not leave packaging material lying around. Plastic bags, sheeting, polystyrene packaging etc. can pose a danger to children if played with. The surveillance camera contains small parts which could be swallowed, and should be kept out of reach of children for safety reasons. Do not insert any objects into the device through the openings. Only use replacement devices and accessories that are approved by the manufacturer. Do not connect any non-compatible products. Please pay attention to the safety information and operating instructions for the other connected devices. Check the device for damage before commissioning. Do not put the device into operation if you detect any damage. Adhere to the operating voltage limits specified in the technical data. Higher voltages could destroy the device and/or the IR LEDs and pose a health risk (electric shock). When installing the device in an existing video surveillance system, ensure that all devices are disconnected from the mains power supply and low-voltage circuit. If in doubt, have a specialist technician carry out assembly, installation and connection of the device. Improper or unprofessional work on the mains power supply or domestic installation puts both you and other persons at risk. Connect the installations so that the mains power circuit and low-voltage circuit always run separately from each other. They should not be connected at any point or become connected as a result of a malfunction. 17 Contents 1. Intended use .......................................................................................................................... 18 2. Explanation of symbols ....................................................................................................... 19 3. Scope of delivery .................................................................................................................. 19 4. Features and functions ........................................................................................................ 19 5. Device description ................................................................................................................ 20 5.1 Overview – Model number ............................................................................................ 20 5.2 Unpacking the device .................................................................................................... 20 5.3 Camera description ....................................................................................................... 20 6. Installation ............................................................................................................................. 21 6.1 Cable layout .................................................................................................................. 21 6.2 Installing the camera ..................................................................................................... 21 6.3 Power supply................................................................................................................. 22 6.4 Connection the video cable ........................................................................................... 22 6.5 Aligning the camera ...................................................................................................... 22 6.6 Description of the function buttons ................................................................................ 23 7. Maintenance and cleaning ................................................................................................... 24 7.1 Function test.................................................................................................................. 24 7.2 Cleaning ........................................................................................................................ 24 8. Disposal ................................................................................................................................. 24 9. Technical data ....................................................................................................................... 25 1. Intended use The IR Mini HD-SDI 1080p MPx outdoor camera is equipped with a high-quality image sensor. It is used for video surveillance in conjunction with a recording device or surveillance monitor. A detailed function description can be found in chapter 4 on “Features and functions”. Use of this product for other than the described purpose may lead to damage to the product and other dangers. All other uses are not in accordance with regulations, and result in the invalidation of the product guarantee and warranty. No liability can be accepted as a result. This also applies to any alterations or modifications made to the product. Please read the entire manual thoroughly and carefully before putting the product into operation. The manual contains important information on installation and operation. 18 2. Explanation of symbols The triangular high voltage symbol is used to warn of the risk of injury or health hazards (e.g. caused by electric shock). The triangular warning symbol indicates important notes in these operating instructions which must be observed. This symbol indicates special hints and notes on the operation of the unit. 3. Scope of delivery x x x x IR Mini HD-SDI 1080p MPx outdoor camera Wall / ceiling mount (pre-installed) Installation material (screws, wall plugs, hexagon socket key) User manual 4. Features and functions x x x x x x x HD-SDI – high definition serial digital interface Full HD resolution (1080p, 2.0 MPx) Transmission via standard CCTV infrastructure (coaxial cables) Compact mini housing for outdoor use Switches from day to night mode with electro-mechanical IR swivel filter IR LEDs for night vision with different intensity settings WDR function to balance strong contrast 19 5. Device description 5.1 Overview – model number Item number Resolution Lens IR IR swivel filter (ICR) Operating voltage TVHD40000 1080p / 2.0 MPx 4.0 mm 12 VDC 5.2 Unpacking the device Handle the device with extreme care when unpacking it. If the original packaging has been damaged, inspect the device. If the device shows signs of damage, then return it in the original packaging and contact the delivery service. 5.3 Camera description 5 4 2 6 3 1 7 (1) (2) (3) (4) 8 Camera Sunshield Camera mount Connection cable (5) (6) (7) (8) 20 Connection for video signal (BNC) Connection for power supply (circular connector, 5.5 x 2.1 mm) WDR control IR LED control 6. Installation 6.1 Cable layout Two different cable layouts are possible: Concealed cabling If you wish to conceal the connection cable, drill a hole of appropriate size at the location where the camera will be mounted. Now pull the connection cable through the opening; the camera mount will conceal the cable opening. Surface cabling If you wish to lay the connection cable along the surface, you can use the cable opening on the base plate of the camera mount. 6.2 Installing the camera IMPORTANT! The camera must be disconnected from the mains power during installation. Note You can remove the sunshield by releasing the fastening screw at the top of the camera. 6.2.1. Position the camera in a suitable place, and lay the cabling as described under 6.1. Mark and then drill the holes required to install the camera. Use the installation material provided to fasten the camera in place. 21 6.3 Power supply Before starting installation, ensure that the mains voltage and the rated voltage on the camera are identical. 1 2 (1) Video signal (BNC) (2) Power supply 12 VDC (5.5 x 2.1 mm) TVHD40000 The camera is equipped with a 12 VDC power supply. Please observe the polarity when connecting it. It should be connected by means of a mains adapter (circular connector, 5.5 mm x 2.1 mm). 6.4 Connection the video cable In order to transmit the video signal from the HD-SDI camera to an HD-SDI converter/monitor or HD-SDI recorder, you have to connect a type RG6 or RG59 coaxial cable with a BNC plug (male) to the "Video-OUT" connection. The cable length to the next device may not exceed 80 metres (RG59) / 150 metres (RG6). You can use appropriate HD-SDI repeaters to increase the range. 6.5 Aligning the camera To align the camera, use the spanner provided to loosen the fixing nut on the base plate of the camera mount. To do this, turn the fixing screw in anti-clockwise direction. You can now align the camera along 3 axes. When aligning the camera, make sure to fasten the fixing nut using the wrench provided. 22 6.6 Description of the function buttons The key lock is activated approx. 10 minutes after button 7/8 was last used To deactivate the key lock, press and hold a button for about 5 seconds. Once you have deactivated the key lock, the blue LED at the front of the camera will flash 5 times. Use the function buttons at the back to adjust the WDR performance and IR-LED intensity. Press the appropriate buttons repeatedly to select different levels. The buttons are operated as follows: Button Left (7) Right (8) Function WDR adjustment IR LED intensity Operation 4 levels are available: 1x: WDR active / sharpness high 2x: WDR active / sharpness low 3x: WDR deactivated / sharpness high 4x: WDR deactivated / sharpness low The selected setting will appear in the video image for approx. 2 seconds. The status LED at the front of the camera will flash to confirm the selected level. 4 levels are available: 1x: IR LED 50% 2x: IR LED 75% 3x: IR LED 100% 4x: IR deactivated The selected setting will appear in the video image for approx. 2 seconds. The status LED at the front of the camera will flash to confirm the selected level. 8 7 23 7. Maintenance and cleaning 7.1 Function test Regularly check the technical safety of the product, e.g. check the housing for damage. If safe operation is no longer possible, cease operating the product and safeguard it against accidental operation. Safe operation is no longer possible in the following circumstances: x x x x The device shows visible damage. The device no longer works correctly. The device has been stored in adverse conditions for a long period of time. The device has been subjected to stress during transportation. Please note: This product is maintenance-free for you. There are no components to service or anything inside the product to check. Never open it. 7.2 Cleaning Clean the device with a clean, dry cloth. In the event of heavy contamination, the cloth can be dampened with lukewarm water. Make sure that liquid does not get into the inside of the device, as this will destroy it. Do not use any chemical cleaning products, as this could damage the surface of the housing. 8. Disposal Devices that have been marked accordingly may not be disposed of as domestic waste. At the end of its service life, dispose of the product according to the applicable legal requirements. Please contact your dealer or dispose of the products at the local collection point for electronic waste. 24 9. Technical data Model number TVHD40000 1/2.8" progressive scan Sony Exmore CMOS Sony IT-N HD-SDI outdoor camera 1080p 2000 x 1241 1920 x 1080 4.0 mm, fixed lens 80,4° AES IR swivel filter (ICR), colour / B/W 1 lux @ F1.2 0 lux @ F1.2 2D DNR Rolling shutter ATW, 1800~10000 K Auto Soft WDR 50 dB SMPTE292M (HD-SDI) Internal 21 IR LEDs 15 metres Image sensor DSP Camera type Resolution Pixels (total) Pixels (effective) Lens Horizontal angle of view Lens control Day/night switching Minimum illumination (colour) Minimum illumination (IR) Noise suppression Electronic shutter White balance Gain control Backlight compensation Dynamic range (WDR) Video system Synchronization IR LEDs IR range 1 x BNC (HD-SDI), 1 x DC (5.5 x 2.1 mm) 12 VDC 500 mA (max.) -10 °C ~ +50 °C 0 ~ 85%, non-condensing IP66 67.7 x 64.6 x 181 mm 400 g CE, C-Tick, RoHS, Reach Connections Power supply Power consumption Operating temperature Humidity Protection class Dimensions (W x H x D) Weight Certifications 26.2mm 66mm 183.6mm 67.7mm 12 mm 97mm 25