1
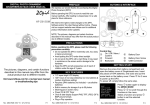
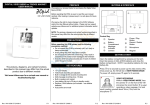
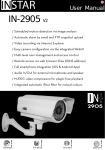
2.4Ghz WIRELESS BABY MONITOR
DIGITAL CAMERA USER MANUAL
FCC Notice to Users
This equipment has been tested and found to comply with the limits
for a Class B digital device, pursuant to Part 15 of the FCC Rules.
These limits are designed to provide reasonable protection against
harmful interference in a residential installation. This equipment
generates, uses and can radiate radio frequency energy and, if not
installed and used in accordance with the instructions, may cause
harmful interference to radio communications. However, there is no
guarantee that interference will not occur in a particular installation.
If this equipment does cause harmful interference to radio or
television reception, which can be determined by turning the
equipment off and on, the user is encouraged to try to correct the
interference by one or more of the following measures:
-- Reorient or relocate the receiving antenna
-- Increase the separation between the equipment and receiver.
-- Connect the equipment into an outlet on a circuit different from that
to which the receiver is connected.
-- Consult the dealer or an experienced radio/TV technician for help.
This device complies with Part 15 of the FCC Rules. Operation is
subject to the following two conditions:(1)this device may not cause
harmful interference, and (2) this device must accept any interference
received, including interference that may cause undesired operation.
The manufacturer is not responsible for any radio or TV interference
caused by unauthorized modifications to this equipment. Such modifications could void the user's authority to operate the equipment.
1
CAMERA
① Only for firmware upgrade
② Camera Lens
③ RESET button
④ Mini USB connection
8
⑤ On/Off/PAIR button
⑥ Power and charging
status indicator LED
⑦ Microphone
⑧ Mount hole
NOTE:ON/OFF: Press and hold button for 3 to 5seconds.
PAIR:Press and quickly release button.
1. NIGHT-VISION(IR)OPERATION:
The camera is equipped with eight(8) Infrared LEDS for nightvision operation. In low light situation the Infrared LEDS turn-on
automatically, to activate night-vision.
NOTE: The night-vision picture is always black & white and
ot that sharp. This camera has up to 10 feet night-vision range.
2. USING CAMERA STAND/MOUNT
● Screw the camera on the stand /mount and setup as shown
or screw it to a wall or ceiling(screws no included).
2
3. CHARGING RECHARGEABLE BATTERY IN TRANSMITTER
(CAMERA)
The rechargeable battery supplied with the transmitter (camera)
must be fully charged before it is used for the first time on battery
power.
Warning: Only qualified technicians or our technical staff is
authorized to change the rechargeable battery in the transmitter!
NOTE:The transmitter automatically turns on and the battery
starts getting charged when AC adapter or a USB cable
connected to a computer is plugged into the MINI USB
socket on the transmitter .
● When the transmitter is turned o n and the battery is getting
charged , the power status LED flashes green , and once the
battery is fully charged the LED become s solid .
When the transmitter is turned o ff and the battery is getting
charged the power status LED flashes red and once the battery is
fully charged the LED turn s off .
● The charging time for a fully discharged rechargeable battery when
the device is turned off is approximately 5 hours. The charging time
double s if the transmitter is turned on whil e the battery is gett ing
charged.
3
4. USING THE TRANSMITTER(CAMERA)
● For optimal transmission, place the camera in the room to be
monitored in such a way as to ensure the optimal surveillance of
your baby or the elderly.
You can also mount the camera using the stand included as
described in section 2 (hardware to mount the stand to a wall
or ceiling not included) .
Note:For safety reasons and for optimum sound transmission we
recommend that you keep the transmitter at least 1 meter(3 feet)
form the baby.
IMPORTANT:Never place camera in the baby's cot, bed or playpen!
NOTE:The transmitter will automatically turn on when plugged
into AC adapter or computer.
● The transmitter can be powered with the AC adapter, the rechargeable battery, or via computer 's USB port using a USB cable.
● To use the rechargeable battery, the device shall be turned on
without the AC adapter plugged in.
● The transmitter turns on when the ON/OFF/PAIR button is pressed
for 5 seconds. As soon as the camera is powered on the LED
indicator turns solid green or flash es green to indicate the
camera is powered on .
To turn camera off , p ress ON/OFF/PAIR button for 5 seconds.
● When the battery voltage falls below 3. 6V the Power Indicator
LED turns red from green, indicating the battery needs to be
charged.
The receiver displays "Camera battery is low" on the screen.
IMPORTANT: In case of audio or video interference press and
release RESET button to switch transmitter to a different channel .
4
5.REGISTER/PAIR CAMERA WITH 3.2" SCREEN BABY MONITOR:
● Turn camera power ON
● Turn Monitor ON
Menu/OK → Main Menu→ Register Camera → Camera 1
→ Register Camera 1? → Yes
On transmitter/camera → On/Off
Note:Press and quickly release the ON/OFF/PAIR button on the
CAMERA to complete pairing process.
● Press"OK/MENU"button on the monitor to display Main Menu.
● Use "UP"or "DOWN"button to highlight "Register Camera" and press
"OK/MENU"button to complete the selection
● From "Register Camera" Menu highlight one of the available(not used)
camera number you want to assign to this new camera and press
"OK/MENU" button to complete the selection.
NOTE:Camera numbers which have already been allocated (used to register
existing cameras) have "thumbs up" sign next to the camera number.
● Use "UP" or "DOWN" button to select "Yes" and press "OK/MENU"
button to complete the selection;the screen will display "register camera
#" where # is the camera number you selected.
● Press and quickly release ON/OFF button on the CAMERA to complete
pairing process
● If pairing is successful, the screen will display "Camera # Registered",
where # is the camera number you selected in previous step. "Thumbs
up" sign will appear next to the camera #.
NOTE:If the pairing/registration process is not successful, repeat this
process again.
● Press "ESC" button twice to exit from the Menus and view the camera.
5
Limited 1 Year Warranty
Coverage: Hi-Tech Trading (USA), Inc. (“HiTT”) warrants this
product (“Product”) against defects in materials and workmanship
under normal consumer use for 1 year from the date of purchase.
HiTT, at its option, will at no charge repair, replace or refund the
purchase price of this Product should it not conform to this warranty.
This limited warranty is a consumer's exclusive remedy, extends
only to the first consumer purchaser, is not transferable and is valid
only on Products purchased by consumers in the United States or
Canada.
Exclusions:
Normal Wear and Tear: Periodic maintenance, repair and
replacement of parts due to normal wear and tear are excluded from
coverage.
Batteries: Only batteries whose fully charged capacity falls below
60% of their rated capacity and batteries that leak are covered by
this limited warranty. Battery usage estimates are only based upon
our engineering testing. Actual performance will vary based on
product settings, environmental conditions, and usage. Battery
capacity decreases over time and use
Miscellaneous: This warranty does NOT cover defects or damage
that result from: (a) improper operation, storage, misuse or abuse,
accident or neglect, such as physical damage (cracks, scratches,
etc.) to the surface of the Product resulting from misuse; (b) contact
with liquid, water, rain, extreme humidity or heavy perspiration, sand,
dirt or the like, extreme heat, or food; (c) use of the Product for
commercial purposes or subjecting the Product to abnormal usage
or conditions; (d) service, installation, alteration, or modification in
any way by someone other than HiTT and, (e) other acts which are
not the fault of HiTT.
Obtaining Service: To obtain service or information, please send
email to help @hittusa.com. You will receive instructions on how to
ship the Product, at your expense, to a HiTT Service Center. To
obtain service, you must include a copy of your receipt.
6
ZOpid and the Stylized Logo are registered in the US Patent &
Trademark Office. All other product or service names are the
property of their respective owners.
© 2011 Hi-Tech Trading USA Inc
The information contained in this User Manual is believed to be
correct at the time of printing. HiTT reserves the right to change or
modify any information or specifications without notice. The
contents of this User Manual are provided “as is.” Except as required
by applicable law, no warranties of any kind, either express or
implied, including, but not limited to, the implied warranties of
merchantability and fitness for a particular purpose, are made in
relation to the accuracy, reliability, or contents of this guide.
Hi-Tech Trading (USA); Inc.
P.O. Box 179
Woodbury, New York 11797
Contact Information:
Email: [email protected]
Web: www.hittusa.com
7