1
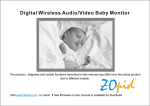
BLUETOOTH HEADSET with MP3 PLAYER & FM RADIO USER MANUAL 1. PREFACE Thanks for purchasing ZOpid Multi-function Headset! This Headset features Bluetooth, MP3 Player and FM Radio functions with built-in rechargeable battery and 4GB memory to store & play songs or use as a USB drive for data storage. Before operating the headset, make sure to read this user manual carefully. After reading it, please keep it in a safe place for future reference. We reserve the right to make changes to this Headset, Software and/or this User Manual without notice. Please visit our company’s website www.hittusa.com for additional product information and/or updates. NOTE: The pictures, diagrams and certain functions described in this manual may differ from the actual product due to different models. Please see product packaging for included and optional features and accessories. 1 2. SAFETY AND GENERAL INFORMATION READ THIS INFORMATION BEFORE USING THIS HEADSET Loud music may harm your hearing if you listen to it for a long time. New battery can reach its best performance after it has completely charged and discharged for two or three times. Please charge the new battery for no less than 6 hours for the first three times you charge the Headset, and from then on, charge it until the Red LED becomes solid Red indicating battery is fully charged. Do not operate this Headset in extremely cold, hot, dusty or damp environment. Avoid leaving the Headset under direct sunlight for an extended period. Do not scrub this Headset with a hard object; it may result in scratches on the surface and/or damage to the hardware. Use a damp cotton cloth to gently wipe the shell of the Headset. Using other chemical cleaning solutions is strictly prohibited. Keep this Headset and all accessories out of children’s reach under 3 years old. Charge the Headset when: o The Headset powers off automatically, immediately after it is turned 2 on, or the Red LED flashes fast (about 2 times per second), indicating low battery charge level. Avoid operating this Headset under very dry environment to prevent damage from static-shock. Do not disconnect the USB cable while formatting, uploading or downloading files; disconnecting USB cable will result in file corruption and may require reformatting – resulting in data loss. When used as a removable disk, users should backup important data. Our company is not responsible for loss of data. This Headset does not have any user-serviceable parts or accessories. DO NOT TRY TO DISASSEMBLE THIS HEADSET. Use an AC charger with 5V & between 300mA to 500mA output. Use battery charger and accessories permitted by the manufacturer. Using other accessories or charger may be a safety hazard or affect product performance and/or void product warranty. Please properly dispose of the obsolete player and its accessories following your local environmental laws. If you have any problem using this player, please visit www.hittusa.com or email [email protected] for help 3 3. NOTES REGARDING FCC COMPLIANCE Users are not permitted to make changes or modify the device in any way. Changes or modifications that are not authorized by the party responsible for compliance could void the user’s authority to operate the equipment. This device complies with part 15 of the FCC Rules. Operation is subject to the following two conditions: This device many not cause harmful interference, and This device must accept any interference received, including interference that may cause undesired operation. 4 4. PRODUCT FEATURES Sporty behind-the-neck design for comfort and convenience Suitable for use during sports activities or use as a hands-free device while driving Announces the selected Mode when Mode/Call Answer ( pressed, and also announces the “Battery is Running Out” Stereo Bluetooth Function: Answer phone, listen to the music from phone ) button is or other Bluetooth devices FM Radio: Listen to the radio; Auto Channel Scan (ACS) function Music Play: Built-in large capacity flash memory to store and play music or other audio files in MP3 and WMA formats Directory/Folder change support: In addition to skipping audio files the player supports skipping directories/folders 7 built-in preset Equalizer modes: Nature, Rock, Pop, Classical, Soft, Jazz & Heavy-Bass U Disk Function: Use as a USB drive to save all kinds of data files IMPORTANT NOTE: Please use computer’s USB port or an AC charger with DC Output of 5V and between 300mA to 500mA 5 5. BUTTONS & INTERFACE 6 6. OPERATING INSTRUCTIONS: A. ON.OFF BUTTON Press and hold ON.OFF button for three seconds to turn Headset power ON - the headset will power on and enter Bluetooth standby mode. When the Headset is switched on, both the red light (MP3/FM indicator LED) will be solid RED and, green light (Bluetooth indicator LED) will flash 3-times per second indicating the headset is in Bluetooth searchable mode (visible to other Bluetooth devices for pairing) – if the headset has already been paired to a Bluetooth device and that device is powered on with Bluetooth enabled then the headset will automatically reconnect to that device – once successfully connected the Green Bluetooth LED on the headset will flash once every 5 seconds. When powered on Press and hold the ON.OFF button for three seconds to turn Headset power OFF. B. ACS.EQ Button (Controls: Automatic Channel Search and Preset Equalizer): Preset Equalizer: To change preset equalizer effects, press & release EQ 7 button while the player is playing songs from built-in memory. Automatic FM Channel Search and Store (FM Mode): In Radio Mode Press and Release ACS.EQ Button for the headset to scan all FM radio frequencies and store up to 40 channels with good signal in that area. Once the channels are stored pressing Previous and Next buttons will switch and play stored channels C. Mode (M), Call Answer Button Use this button to select Bluetooth, Music Play or Radio mode. The Headset defaults to Bluetooth Mode when power is turned on - to change mode Press and Release button until you hear the desired mode announcement from the Headset NOTE: The mode announcement is heard a couple of seconds after the Mode button is pressed and released – wait until you hear the announcement before pressing the button again. When phone is paired to the headset (Green LED flashes once every 5 seconds), Press and Release button to answer a call when the 8 phone rings. Long press button to reject the call. Press and Release the button to end the call when done talking. D. Reset Button Press this button only when the Headset is in hung state and other buttons do not work E. +VOL- Buttons (Controls: Volume Adjustment and Channel, Song & Folder Selection): Volume Adjustment: Press and hold the +VOL or VOL- button to adjust the volume level up or down respectively Song/Channel Selection: During Play Mode Press and release (tap) or (Next) (Previous) button once to play next or previous song, and during FM Mode next or previous Channel Folder/Directory Selection: During Song Pause press and release (tap) (Next) or (Previous) button once to select next or previous folder on headset memory – Red LED will flash indicating folder change. Press ON.OFF button to play first song in the new folder. 9 7. Charging Headset’s Battery The Red LED stays on for a second and off for a second when the headset is in use and the battery charge level is good. When the headset battery charge level is low, the Red LED will fast-flash (two times per second) When the battery charge level is extremely low the Headset announces “Battery is Running Out” and the Headset is powered off automatically. When battery needs charging plug the Headset to a computer’s USB port or Optional AC Charger using the USB cable - while charging the Red LED will flash once every second IMPORTANT: When the battery charge level is extremely low the Red LED will stay solid for the first few minutes of charging and then start flashing When fully charged the Red LED will stop flashing and become solid Red. NOTE: The headset can be used while getting charged just press and hold the ON.OFF button for 3 seconds. The battery can be fully charged in 3-4 hours if using optional AC charger (5V, 500mA) and in 5-6 hours if charging through computer’s USB port. NOTE: The player’s battery must be fully charged each time, in order to extend the battery life and optimize playing time. Battery usage may vary depending on volume level, mode of the headset, and other environmental conditions like temperature. 10 8. Bluetooth Mode: The Headset defaults to Bluetooth Mode when power is turned on. To switch from another mode to Bluetooth mode Press and Release hear “Bluetooth Mode” announcement from the Headset button until you NOTE: The mode announcement is heard a couple of seconds after the button is pressed and released A. Pairing Bluetooth devices with the Headset: Make sure the Headset is powered on and in Bluetooth searchable mode (Fast flashing Green LED – about 3 times per second); or turn Headset off & then on. See pairing instructions of the Bluetooth device you are trying to pair with the Headset and enable Bluetooth pairing mode on that device to search for Bluetooth devices – Look for “DE658” in available Bluetooth devices list. Select “DE658” from the list and if prompted for the password enter "0000" – the Bluetooth device will display “Pairing Successful” message once the Headset and the Bluetooth device are successfully paired and ready to use. The Green LED on headset will flash once every 5 seconds indicating successful pairing with the Bluetooth device. 11 B. Bluetooth LED: The Bluetooth indicator LED has three states Bluetooth Searchable mode: Green LED flashes about 3 times per second indicating Headset is in Bluetooth Pairing mode and is “Searchable” by other Bluetooth devices – See instructions in the previous section to pair Headset with a Bluetooth device Bluetooth Standby mode: Green LED flashes about 1 time per second when Headset is in Standby mode – This mode occurs when a Bluetooth device already connected to the headset gets disconnected from the headset due to other device powering off, or being out of range or the Bluetooth mode was disabled on that device. In standby mode the headset will automatically connect to that device once that device is powered on or is back in range, or Bluetooth mode is enabled on that device Bluetooth Connected mode: Green LED flashes about once every 5 seconds indicating Headset is already connected to a Bluetooth device and ready to use e.g. receive phone calls, listen to music from other Bluetooth devices. NOTE: Headset can store pairing information and connect to only one Bluetooth device at a time. 12 Special Tip: When the headset is in Standby mode (Green LED flashes about once per second), it is not searchable by other Bluetooth devices. To connect Headset to a different Bluetooth device when it’s in Standby mode (Green LED flashes about once per second) or Connected mode (Green LED flashes once every 5 seconds), it must be turned off and then on again to make the headset searchable by other Bluetooth devices (Green LED flash 3 times per second). In addition to the Headset being in searchable mode, the Bluetooth device already paired with the headset must be powered off or its Bluetooth mode disabled, otherwise the Headset will automatically connect to that device thus ending searchable mode. C. Bluetooth Phone Mode: Once a phone is paired to the headset (Green LED flashes about once every 5 seconds), Press and Release rings. Long press button to answer a call when the phone button to reject the call. Press and Release the button to end the call when done talking. If the device is successfully paired with a phone, then in any mode (Music Play, Radio or Bluetooth Music Play), the headset will automatically switch to phone mode when a call is 13 received – just press and release button to accept the call. Press & Hold +VOL button to increase volume and VOLbutton to decrease volume. Once the Call is ended the headset will automatically switch back to the mode it was in before the call was answered. NOTE: Low battery charge may cause bad Bluetooth connection or abnormal sound from the headset D. Bluetooth Music Play Mode When the Headset is connected to a phone or other Bluetooth device (Green LED flashes once every 5 seconds) and the Headset is in Bluetooth mode (press button until you hear “Bluetooth Mode” from the Headset), you can play music from the Bluetooth device and if supported by the Bluetooth device use the ON.OFF and +VOLthe Bluetooth device. Press & Hold buttons on the Headset to control these functions of +VOL button to increase volume and VOL- button to decrease volume The Red LED flashes once every second while the music is playing, and Solid Red when music is paused on the Bluetooth device. 14 NOTE: When the Headset is in Music Play or Radio mode, whenever music is played on the connected Bluetooth device, the Headset will automatically switch to Bluetooth mode and play music on the Headset. NOTE ABOUT PHONE’S BLUETOOTH FUNCTION: Phone Calls and Music Media are two independent functions on a Cellular Phone and require pairing by the headset to both functions. Most of the cellular phones when paired with the Headset will provide access to both the Phone and the Music Media playback functions by default. If only one function works on your phone, please check your phone’s user manual if it requires manual enabling of both functions for Bluetooth controls. 9. Music Play Mode (playing music from headset’s built-in memory): The Headset defaults to Bluetooth Mode when power is turned on. To switch Headset to Music Play Mode from another mode, Press and Release button until you hear “Music Play Mode” announcement from the Headset and the music will start playing (The Red LED flashes ones every second indicating the music is playing and Solid Red when music is paused). 15 NOTE: The mode announcement is heard a couple of seconds after the button is pressed and released A. When Music is playing during Music Play Mode: Short press ACS.EQ key to select from 7 built-in Preset Equalizer modes: Nature, Rock, Pop, Classical, Soft, Jazz & Heavy-Bass NOTE: Equalizer function works only when music is played from Built-in memory i.e. Music Play Mode only. Press & Release ON.OFF button to Pause Music (Solid Red LED). Press & Release LED) ON.OFF button again to Play Music (Flashing Red Press & Hold +VOL button to increase volume and VOL- button to decrease volume Press & Release +VOL button to play Next song and VOL- button to play previous song B. When Music is paused during Music Play Mode: Press & Release +VOL button to switch to next folder/directory (Red LED will flash once indicating next folder is selected) - Press ON.OFF button to play first song in the new folder. 16 Press & Release VOL- button to switch to previous folder/directory (Red LED will flash once indicating previous folder is selected) - Press ON.OFF button to play first song in the new folder. C. Copying Songs to the Headset Built-in Memory from your computer’s hard-drive 1. Plug the USB Cable included with the Headset into any available USB port on your computer and the other end of the USB cable into the USB port on the Player. NOTE: It may take a couple of minutes for the computer, running Windows ME, 2000, XP, Vista, 7 or 8 Operating System, to automatically enable USB driver when the Player is connected to the computer for the firs time – No Manual USB Driver installation is required 2. The computer will recognize Headset’s built-in memory as a removable disk (Windows users will see a “Removable Disk” under “My Computer”. 17 IMPORTANT: This player supports using Windows Media Player®, iTunes®, RealPlayer® or other song SYNC programs to transfer songs to the Headset, as long as the songs are in MP3 or WMA (without DRM) format. If you DO NOT want to use any of the file sync programs and instead want to use your computer’s file management program (Windows Explorer, Finder, etc.) and use drag and drop, or copy and paste to copy song files from one folder (your computer’s hard drive) to another (Headset’s built-in memory), then follow these steps you need to follow to copy songs (MP3, WMA) or other files: a. If you have a Windows PC use Windows Explorer (or click and open My Computer) (Mac users can use Finder) and open the folder where you have the MP3 or WMA files. b. When the Headset is connected to your computer it appears as a Removable disk under My Computer, click and open My Computer again and this time, locate and open Removable Disk that corresponds to the Headset’s memory. c. Now you have two Windows (folders) open on your computer’s screen, the first window is the SOURCE (Hard Drive) and the second is the DESTINATION (Headset Memory) – Now you can drag and drop MP3 songs from Source folder to the destination folder. IMPORTANT: DO NOT DISCONNECT THE USB CABLE WHILE DATA IS BEING COPIED TO THE PLAYER, DOING SO MAY CAUSE DATA CORRUPTION AND WILL REQUIRE REFORMATTING PLAYER’S MEMORY d. Disconnect the USB cable to use the Headset to listen to the songs 18 NOTE: Headset can be used as an MP3 Player to store & play MP3/WMA songs and also as a standard USB-Drive to store other computer files. When in play mode, the Headset will ignore other files and only play MP3 & WMA files. 10. Radio Mode The Headset defaults to Bluetooth Mode when power is turned on. To switch Headset to Radio Mode from another mode, Press and Release button until you hear “Radio Mode” announcement from the Headset and if Auto Channel Scan (ACS) function has already been run, one of the stored FM Channels starts playing (The Red LED flashes ones every second indicating the Radio is playing). NOTE: The mode announcement is heard a couple of seconds after the button is pressed and released A. AUTO CHANNEL SCAN (ACS) FUNCTION: Auto Channel Scan (ACS) function is enabled by Pressing & Releasing ACS.EQ button when the Headset is in Radio Mode. When ACS function is enabled, the Headset automatically scans all FM radio frequencies and stores up to 40 radio channels it detects during 19 scanning process (IMPORTANT: Run ACS function every time using the Radio in a new location with different radio channels) The scanning process can take up to 3 minutes to complete - during scanning process there could be long or short pauses (no sound) and also different radio stations playing briefly. Once the scanning process is completed the first stored station will play continuously indicating Auto Scan process has completed (Red LED will flash once every second) B. When Radio is Playing: Press & Release ON.OFF button to Mute Radio (Solid Red LED). Press & Release LED) ON.OFF button again to Play Radio (Flashing Red Press & Release +VOL button to switch to Next stored channel and VOL button to switch to Previous stored channel Press & Hold +VOL button to increase volume and VOL- button to decrease volume 20 7. TECHNICAL SPECIFICATIONS Weight 2.2 oz (62.5 g) Battery Lithium Rechargeable Bluetooth Standby Time = 19-20 hrs** Bluetooth Talk Time = 4-5 hrs** MP3 or FM Play Time = 10-12 hrs** Charging Time = 4 hrs (5V,500mA AC Charger) or 6 hrs (Computer’s USB Port) ** Listed times are for continuous use in a single mode – actual times may vary depending on the environment Supported Audio Format MP3, WMA (only WMA files without Digital Rights Management supported) Internal Memory 4GB Equalizer Settings 7 Preset Interface USB Power Requirements DC 5V, 300mA to 500 mA Included Accessories USB Cable, User Manual Optional Accessories AC Charger (5V, 500mA) 21 8. FREQUENTLY ASKED QUESTIONS Q: How do I charge the Headset? A: You can charge players’ built-in battery by connecting the player using USB cable to a computer’s USB port or an A/C charger. Q: Can I use the Headset while it’s getting charged? A: Yes, the Headset can be used while it is getting charged – Press & Hold the ON.OFF button to turn on the power. Q: What do I enter when I am prompted to enter pin while pairing the Headset with my phone or Bluetooth device? A: Enter 0000 as pin Q: Why does the player turn-off soon after I turn on the power? A: The player powering off within few seconds of turning on the power, is an indication that the battery needs recharging or the headset’s memory got corrupted - when required, reformat the Headset’s memory by connecting it to your computer using the USB cable (Headset appears as a removable drive) select FAT32 format option to reformat the Removable Drive. Q: What media formats does the Headset support for Music Play Mode? A: Make sure that songs are MP3 or WMA format and are not copy protected (only WMA files without Digital Rights Management-DRM are supported by the player) Q: What if I have any other questions about the Headset or need help to use it? A: You can visit our website www.hittusa.com, or email [email protected] for assistance 22 Limited 90-Day Warranty Coverage: Hi-Tech Trading (USA), Inc. (“HiTT”) warrants this Headset (“product”) against defects in materials and workmanship under normal consumer use for 90 days from the date of purchase. HiTT, at its option, will at no charge repair, replace or refund the purchase price of this product should it not conform to this warranty. This limited warranty is a consumer’s exclusive remedy, extends only to the first consumer purchaser, is not transferable and is valid only on products purchased by consumers in the United States or Canada. Exclusions: Normal Wear and Tear: Periodic maintenance, repair and replacement of parts due to normal wear and tear are excluded from coverage. Batteries: Only batteries whose fully charged capacity falls below 80% of their rated capacity during the warranty period and batteries that leak are covered by this limited warranty. Miscellaneous: This warranty does NOT cover defects or damage that result from: (a) improper operation, storage, misuse or abuse, accident or neglect, such as physical damage (cracks, scratches, etc.) to the surface of the Product resulting from misuse; (b) contact with liquid, water, rain, extreme humidity or heavy perspiration, sand, dirt or the like, extreme heat, or food; (c) use of the Product for commercial purposes or subjecting the Product to abnormal usage or conditions; (d) service, installation, alteration, or modification in any way by someone other than HiTT and, (e) other acts which are not the fault of HiTT. Obtaining Service: To obtain service or information, please send email to [email protected]. You will receive instructions on how to ship the Product, at your expense, to a HiTT Service Center. To obtain service, you must include a copy of your receipt. 23 COMPANY & CONTACT INFORMATION Hi-Tech Trading USA Inc P.O. Box 179 Woodbury, NY 11797 U.S.A. Web: www.hittusa.com Email: [email protected] ZOpid and the Stylized Logo are registered in the US Patent & Trademark Office. All other product or service names are the property of their respective owners. © 2013 Hi-Tech Trading USA Inc The information contained in this User Manual is believed to be correct at the time of printing. HiTT reserves the right to change or modify any information or specifications without notice. The contents of this User Manual are provided “as is.” Except as required by applicable law, no warranties of any kind, either express or implied, including, but not limited to, the implied warranties of merchantability and fitness for a particular purpose, are made in relation to the accuracy, reliability, or contents of this guide. Unauthorized copying or reproduction of this user manual is strictly prohibited. 24