1
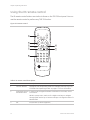
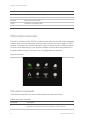
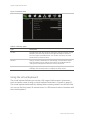
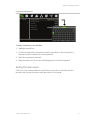
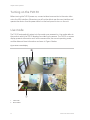
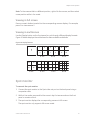
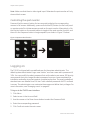
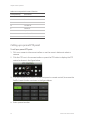
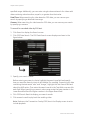
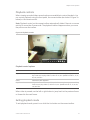
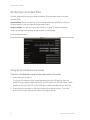
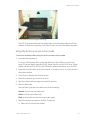
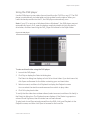
Chapter 3
Operating instructions
Summary
This chapter describes the how to control and navigate through the TVR 30’s menus
and options.
Content
Control interfaces 10
Controlling the TVR 30 10
Front panel overview 11
Status LEDs 12
Using the mouse 12
Mouse toolbar 13
Using the IR remote control 16
Controlling multiple DVRs with one remote control 17
Operating modes 17
Main menu overview 18
Main menu commands 18
Using the main menu 19
Navigating through dialog screens 19
Using the virtual keyboard 20
Exiting the main menu 21
TruVision DVR 30 User Manual
9
Chapter 3: Operating instructions
Control interfaces
The TVR 30 has three control interfaces:
•
Built-in interface
•
Display interface
•
Web browser interface
Built-in interface. The built-in interface is displayed on the monitor output. It consists
of a main menu and several dialog screens that let you configure and control the
device. You can invoke the built-in interface using the front panel, remote control, or
mouse.
Display interface. The display interface consists of various toolboxes that appear on
top of the monitor image. These let you control live or playback video while in PTZ or
playback mode. You can invoke the display interface from the built-in interface
screens or from the mouse toolbar. The controls in any toolbox can be operated
using the front panel, remote control, and mouse.
Web browser. The Web browser interface uses Internet Explorer to simulate the
display and control functions of the VGA monitor on a remote PC. The Web browser
interface can only be accessed by a PC with Internet access. See Chapter 5 “Using the
Web browser” on page 39 for more information on the Web browser interface.
Controlling the TVR 30
You can control the TVR 30 using:
•
Front panel control
•
IR remote control
•
Mouse control
Front panel control. Use the directional arrow buttons to select a command, option,
or button on a screen. Use the Enter button to confirm a selection. Use the Esc button
to cancel a selection.
IR remote control. Use the directional arrow buttons to select a command, option, or
button on a screen. Use the OK button to confirm a selection. Use the Esc button to
cancel a selection.
Mouse. Move the pointer to a command, option, or button on a screen. Click (with the
left mouse button) to confirm a selection. Right-click to save and exit a screen.
10
TruVision DVR 30 User Manual
Chapter 3: Operating instructions
You can use your preferred control method for any procedure, but in most cases we
describe procedures using mouse terminology. Optional control methods are given
only when they differ substantially from mouse control methods.
Front panel overview
The buttons on the front panel control all TVR 30 functions and set the programmable
functions. The LED indicators light up or flash to alert you of various conditions.
Figure 3: Front panel
1
e
TruVision DVR 30
2
3
TM
1
2
3
4
5
6
7
8
9
10
11
12
13
14
15
16
ESC
MENU
REC
USB
Archive
USB
4
5
6
PTZ
7
Seq
Display
8
Search
Live
9
Table 2: Front panel button descriptions
Item
Name
Description
1
Numeric buttons
Display the corresponding video in full screen while in both
live and playback mode. The number of the button
corresponds to the camera number. Press and hold a
numeric button for two seconds to display the
corresponding video on the spot monitor.
While in PTZ mode, press the 1 button to access the Set/Go
Preset menu.
2
Menu and Esc controls
Press Esc to exit a screen or cancel a selection. Press Menu
to display the main menu.
3
Directional Controls And
Enter button
Use arrow buttons as directional keys in zoom mode.
While in a setup menu, use the Left or Right Arrow keys to
navigate through fields. Use the Up or Down Arrow keys to
change the value of a selected field. Press Enter to confirm
the selection or display additional screens.
4
USB ports
Connect USB devices.
5
CD/DVD drive
Insert media for archiving.
TruVision DVR 30 User Manual
11
Chapter 3: Operating instructions
Item
Name
Description
6
Archive button
Begin archiving or displays the Archive screen.
Press once to begin copying a video segment for export
while in playback mode. Press again to stop copying. See
“Archiving recorded files” on page 34 for more information.
7
Status LEDs
Display device status and conditions. See “Status LEDs”
below for more information.
8
Function buttons
Change the TVR 30 operating mode. For example, press
PTZ to go into PTZ mode. See “Operating modes” on page
17 for more information.
9
Playback controls
Control video playback speed.
Status LEDs
The LEDs on the front panel of the DVR are described as follows.
Table 3: Status LED descriptions
LED
REC
Name
Description
Power
Steady indicates that the correct power is connected to the unit.
Network
Blinking indicates that the DVR is connected to a network.
Alarm
Steady indicates that an alarm is triggered.
Record
Blinking indicates that the TVR 30 is recording. Steady indicates hard
drive failure.
Using the mouse
Use the USB mouse provided with the TVR 30 to carry out the same operations as the
front panel and remote control. Connect the mouse to the TVR 30 by plugging the
mouse USB connector into one of the USB ports on the front panel. The mouse is
immediately operational and the pointer should appear.
Click the left mouse button to enter or confirm a selection. This is similar to pressing
Enter button on the front panel. Click the right mouse button to the exit setup menus
and save the settings. Use the scroll wheel to change values.
12
TruVision DVR 30 User Manual
Chapter 3: Operating instructions
Mouse toolbar
While in live, playback, or sequence mode, point to the date and time to display the
mouse toolbar, as shown in Figure 4 below.
Note: To move the mouse toolbar to a different position, click and drag the date and
time display.
Figure 4: Mouse toolbar
Mouse toolbar icons
Table 4 below describes the icons that appear on the mouse toolbar.
Table 4: Mouse toolbar icons
Icon
Description
User is logged in. Numerical value indicates the user’s access level. User icon with a G
character indicates that the device requires logon credentials to access the main menu.
The device is recording.
The device is recording an alarm event.
The device is in sequence mode.
The device’s front panel is locked.
The device is in archive mode.
Indicates the starting point of a video segment for archive while in playback mode.
TruVision DVR 30 User Manual
13
Chapter 3: Operating instructions
Icon
Description
Indicates the ending point of a video segment for archive while in playback mode.
The device is in PTZ mode.
The device is playing video forward.
The device is fast forwarding video playback.
The device is playing back video reverse.
The device is fast reversing video playback.
Video playback is on pause.
Video playback has reached the end of a video segment.
Indicates the amount of available hard disk space left.
Indicates the hard disk is full.
Camera commands
The camera commands appear when you point to Cameras on the mouse toolbar.
Click a camera number to display that camera in live mode.
Function commands
The function commands display when you point to Functions on the mouse toolbar.
Table 5: Mouse toolbar function commands
Icon
14
Name
Function
Main menu
Displays the main menu
Multiscreen
Toggles through the available multiscreen displays including full
screen, four-screen, nine-screen, and 16-screen.
Monitor
Toggles between main and spot monitor. M indicates the main
monitor is currently selected. S indicates the spot monitor is
currently selected.
TruVision DVR 30 User Manual
Chapter 3: Operating instructions
Icon
Name
Function
Sequence
Launches the sequence mode. Sequence mode refers to the display
of live video in programmed sequence of cameras.
Search
Displays the Search screen.
Archive
Lets you archive video. Archives the video being played back while
in playback mode.
PTZ
Launches PTZ mode.
Play
Plays back video instantly starting at one minute from the current
date and time.
Esc
Hides the function commands.
TruVision DVR 30 User Manual
15
Chapter 3: Operating instructions
Using the IR remote control
The IR remote control buttons are similar to those on the TVR 30 front panel. You can
use the remote control to perform any TVR 30 function.
Figure 5: IR remote control
Live
Search
1
PTZ
Archive
2
Seq
Display
Enter
3
6
ESC
MENU
4
7
DVR ID
Camera
1
2
3
4
5
6
7
8
9
10
11
12
13
14
15
16
5
GE Security
Table 6: IR remote control descriptions
Item
Name
Description
1
Function buttons
Change the TVR 30 operating mode. For example, press PTZ to go into
PTZ mode. See “Operating modes” on page 17 for more information.
2
Directional controls In menu mode, navigate and select commands. In PTZ mode, use for
and Enter button
PTZ controls.
While in a setup menu, use the Left or Right Arrow keys to navigate
through fields. Use the Up or Down Arrow keys to change the value of a
selected field.
3
Esc
Exit a screen or cancel a selection.
4
DVR ID
Switch control between different TVR 30 units.
16
TruVision DVR 30 User Manual
Chapter 3: Operating instructions
Item
Name
Description
5
Numeric buttons
In live mode, display the corresponding camera. In edit mode, enter
numeric characters.
6
Menu
Display the main menu.
7
Playback
Control video playback speed.
To place batteries into the IR remote control:
1. Remove the battery cover.
2. Insert the batteries (AAA). Make sure that the positive and negative poles are
correctly placed.
3. Replace the battery cover.
To connect the remote control to the TVR 30:
1. Turn on the TVR 30 and wait for live video to appear.
2. On the remote control, press the DVR ID button, and then press the 1 button.
Note: The numeric button depends on the remote ID assigned to the TVR 30. The
remote ID assigned is 1 by default. See “Controlling multiple DVRs with one
remote control” below for more information.
3. The remote control is now operational.
Controlling multiple DVRs with one remote control
You can control up to 16 DVRs with one remote control. Each DVR must have a
unique remote ID assigned. To connect the remote control to a DVR, press the DVR ID
button on the remote control, and then press the numeric button with the desired
remote ID. For more information on assigning a remote ID to a DVR, see “Audio and
remote” on page 71.
Operating modes
Table 7 below describes the various operating modes for the TVR 30.
Table 7: TVR 30 operating modes
Mode
Description
Live
Displays live video from a specific camera.
Sequence
Displays live video in a programmed sequence of cameras.
TruVision DVR 30 User Manual
17
Chapter 3: Operating instructions
Mode
Description
Menu
Displays menu options for configuration.
PTZ
Displays live video from multiple cameras in a programmed sequence.
Playback
Plays back recorded video.
Freeze
Freezes live or playback video.
Spot
On-screen display for spot monitor.
Main menu overview
The built-in interface of the TVR 30 includes a main menu screen with eight command
buttons. Each command displays a dialog screen that lets you edit a group of TVR 30
settings. The main menu screen is shown in Figure 6 below. Access to different option
screens varies depending on your access privileges. Most screens are available only
to system administrators. The menu icon is highlighted when selected.
Figure 6: Main menu
Main menu commands
Table 8 below describes the commands available for each menu items.
Table 8: Main menu commands
Command
Description
Cameras
Configures camera settings including motion detection, PTZ, video image
adjustments, camera title, and copy settings to other cameras.
18
TruVision DVR 30 User Manual
Chapter 3: Operating instructions
Command
Description
Schedule
Configures recording and schedule settings including recording quality, and
schedule definitions.
Alarms
Configures alarm settings including alarm input, relay output, video loss
detection, remote alert, prealarm, and post-alarm seconds.
Users
Configures users, passwords, access privileges, and defines privilege levels.
Network
Configures standard network settings including IP address, e-mail
notifications, DDNS setup, and advanced network settings.
Display
Configures display settings including sequence order, dwell time, on-screen
alerts, display formats, and transaction overlay.
System
Configures system settings including system date and time, audio output,
device name, RS-485 settings, RS-232 settings, firmware upgrade, hard
drive settings, boot log, and shutdown.
Info
Displays the unit’s system information including model ID, network address,
firmware version, and MAC addresses.
Using the main menu
Use the mouse or directional arrow keys to navigate through the menu commands
and display the configuration screens. To display the main menu, click the Menu
button on the mouse toolbar or press the Menu button on the front panel or remote
control.
Navigating through dialog screens
Each dialog screen includes various options and buttons as seen in Figure 7 on page
20. The frame surrounding an option or button indicates that this option (or button) is
currently selected.
Use the mouse to select any option or button on the screen. You can also use the
directional arrow buttons (Up, Down, Left, or Right) to navigate through the options.
Changes to screen settings can be entered in various ways as shown in Table 9 on
page 20.
Saving your changes
Closing a screen, either by clicking the X button at the top right corner or by rightclicking, automatically saves and applies your changes. You cannot cancel or undo
any changes you have entered in a dialog screen.
TruVision DVR 30 User Manual
19
Chapter 3: Operating instructions
Figure 7: Cameras menu
Table 9: Field entry types
Type
Description
List box
Provides more than two values for the option. Only one of them can be
selected. Click the scroll arrows at the right-hand side of the box to
scroll through the possible values. You can also use the Up or Down
Arrow buttons to select a value.
Edit box
Lets you to enter characters into the settings, such as camera name.
Enter characters into an edit box through the virtual keyboard. See
“Using the virtual keyboard” below for more information.
Button
Triggers a special function or allows you to display a new screen. For
example, click the Setup button to display the setup screen.
Using the virtual keyboard
The virtual keyboard allows you to enter a full range of alphanumeric characters,
such as camera name, through a virtual keyboard as shown in Figure 8 on page 21.
The virtual keyboard automatically displays when entering values in an edit box field.
You can use the front panel, IR remote control, or USB mouse to enter characters with
the virtual keyboard.
20
TruVision DVR 30 User Manual
Chapter 3: Operating instructions
Figure 8: Virtual keyboard
To enter characters in an edit box:
1. Highlight the edit box.
2. Click the mouse within the action frame (or press Enter in the front panel or
remote control) to display the virtual keyboard.
3. Select the characters required.
4. When finished, click OK on the virtual keyboard to close the keyboard.
Exiting the main menu
Click Esc on the mouse toolbar (or right-click) or press Esc on the front panel or
remote control to exit the main menu and return to live mode.
TruVision DVR 30 User Manual
21
Chapter 3: Operating instructions
22
TruVision DVR 30 User Manual
Chapter 4
Basic operation
Summary
This chapter describes the basic operation of the TVR 30 such as how to turn on the
unit, log on, control a PTZ camera, play back video, and archive recorded video files.
Content
Turning on the TVR 30 24
Live mode 24
Viewing in full screen 25
Viewing in multiscreen 25
Spot monitor 25
Controlling the spot monitor 26
Logging on 26
Controlling a PTZ camera 27
Accessing PTZ mode 27
PTZ control buttons 27
Calling up a preset PTZ point 28
Exiting the PTZ control mode 29
Playing back video 29
Instant video playback 29
Searching video for playback 29
Playback controls 33
Exiting playback mode 33
Archiving recorded files 34
Using Quick Archive in live mode 34
Using the Archive screen in live mode 35
Archiving a video segment in playback mode 36
Using the DVR player 37
Logging off 38
Turning off the TVR 30 38
TruVision DVR 30 User Manual
23
Chapter 4: Basic operation
Turning on the TVR 30
Before turning the TVR 30 power on, connect at least one monitor to the main video
out or the VGA interface. Otherwise, you will not be able to see the user interface and
operate the device. Use the power switch on the back panel to turn on the unit.
Live mode
The TVR 30 automatically enters into live mode once powered on. Live mode refers to
the mode in which the TVR 30 displays live video from cameras. The TVR 30 on-screen
display presents information such as the camera title, the current operating mode,
and the date and time information as shown in Figure 9 below.
Figure 9: On screen display
1
2
1.
Camera title
2.
Mouse toolbar
24
TruVision DVR 30 User Manual
Chapter 4: Basic operation
Note: To the camera title to a different position, right-click the mouse, and then select
a new position while in live mode.
Viewing in full screen
Press a numeric button to switch to the corresponding camera display. For example,
press 2 to view camera 2.
Viewing in multiscreen
Use the Display button on the front panel to cycle through different display formats.
Figure 10 below displays the multiscreen formats available as defaults.
Figure 10: Display formats
1
2
5
6
9
10
3
4
7
8
11
12
1
2x2
13
15
14
16
2x2
2x2
2x2
1
2
3
8
9
10
4
5
6
11
12
13
7
8
3x3
9
14
15
3x3
16
1
2
3
4
5
6
7
8
9
10
11
12
13
14
15
16
4x4
Spot monitor
To connect the spot monitor:
1. Connect the spot monitor to the Spot video out port on the back panel using a
composite cable.
2. While in live mode, press and hold a numeric key for two seconds on the front
panel or remote control.
3. The spot monitor displays the corresponding camera in full screen.
The spot monitor only supports full screen mode.
TruVision DVR 30 User Manual
25
Chapter 4: Basic operation
Note: Make sure that there is video signal input. Otherwise the spot monitor will only
show a blank screen.
Controlling the spot monitor
Press and hold a numeric button for two seconds to display the corresponding
camera in full screen. Additionally, press and hold the SEQ button (on the front panel
or remote control) to initiate sequence mode on the spot monitor. Alternatively, click
the Monitor button on the mouse toolbar to toggle to the spot monitor function, and
then click the Sequence button to begin sequence, as shown in Figure 11 below.
Figure 11: Spot monitor function
Logging on
The TVR 30 is shipped with a predefined user for the system administrator. The
default system administrator logon uses “admin” as a user name with a password of
1234. You can modify the admin password but not the admin user name. GE Security
recommends that you change the admin password once you have completed the
installation and setup to protect against unauthorized access. The seven predefined
standard users are labeled User1 to User7 with a default password of 4321 and level
4 access. The administrator can customize these users and define their privileges. For
more information, see “Managing users” on page 49”.
To log on to the TVR 30 user interface:
1. Click Menu.
2. Select a user in the Account field.
3. Use the mouse or the Down Arrow button to select the Password field.
4. Enter the corresponding password.
5. Click Confirm to enter the main menu.
26
TruVision DVR 30 User Manual
Chapter 4: Basic operation
Controlling a PTZ camera
PTZ mode lets you to control the PTZ operation of the cameras using a TVR 30 PTZ
interface. You can control PTZ cameras using the buttons on the front panel and IR
remote control or by using the PTZ control icons on the mouse toolbar. To enter PTZ
mode, you must have PTZ control access privileges.
Note: The TVR 30’s support for Digiplex (GE RS-422) is limited. As a result, you may not
be able to control Digiplex domes with a multiplexer unless the camera’s output
connects to the input of a keypad.
Accessing PTZ mode
To access PTZ mode, select a camera using the numeric buttons (on the front panel,
remote control, or the mouse toolbar). Click PTZ in the mouse toolbar or press the PTZ
button on the front panel or remote control. The PTZ control interface displays as
shown in Figure 12 below.
Note: You can only access the PTZ control interface while in live mode.
Figure 12: PTZ control interface
PTZ control buttons
When you enter PTZ mode, the PTZ control interface displays. In PTZ mode, the
numeric buttons control additional PTZ functions. Table 10 on page 28 lists the front
panel keys and their PTZ control functions.
TruVision DVR 30 User Manual
27
Chapter 4: Basic operation
Table 10: Front panel PTZ control function
Front panel key
PTZ control
8
Zooms out
16
Zooms in
7
Focuses near
15
Focuses far
6
Closes iris
14
Opens iris
Enter
Auto focus/iris
Esc
Exits PTZ mode
Calling up a preset PTZ point
To call up a preset PTZ point:
1. Click on a camera in the mouse toolbar or use the numeric buttons to select a
camera.
2. Click the PTZ icon in the mouse toolbar or press the PTZ button to display the PTZ
control as shown in the figure below.
3. Click the Preset icon (or press 1 on the front panel or remote control) to access the
Set/Go Preset function as shown in the figure below.
4. Enter a preset number.
28
TruVision DVR 30 User Manual
Chapter 4: Basic operation
5. Click Go Preset. The selected camera adjusts to the settings of that preset
number.
Exiting the PTZ control mode
Press Esc to exit the PTZ control mode and return to live mode.
Playing back video
The TVR 30 allows you to play back recorded video. This section describes the
features and methods in playing back video.
There are several ways to play back recorded video:
Instant playback. Play back instantly, starting from the last recorded minute in live
mode.
Searched video playback. Play back video starting from a specific date and time.
Instant video playback
To play back video instantly, press the Play button on the front panel, remote control,
or mouse toolbar. The TVR 30 plays back recorded video from the selected camera
starting from the last recorded minute in live mode.
Searching video for playback
The TVR 30 lets you search and play back recorded video based on the following
search criteria:
•
Date and time
•
Events
•
Text (if a POS machine is connected)
While in live or playback mode, click Search to display the Search menu as shown in
Figure 13 on page 30.
TruVision DVR 30 User Manual
29
Chapter 4: Basic operation
Figure 13: Search menu
To search for recorded video by date and time:
1. Click Search to display the Search screen.
2. Enter a start date and time in the Go To field.
3. Click Play Data. Recorded video will begin to play back starting from the specified
date and time.
To search for recorded video using the Calendar Mode:
1. Click Search to display the Search screen.
2. Click Calendar Mode. The Calendar Mode screen displays as shown in the figure
below.
3. Select a date from the Calendar.
30
TruVision DVR 30 User Manual
Chapter 4: Basic operation
Click on a date or use directional arrow keys to select a date. Dates that appear in
italics and underlined indicate recorded video available for that day. Days
highlighted in gray indicate that the days are within the start and end time of the
database. Days not highlighted indicate that the days are beyond the start and
end time of the database.
4. Select a start time using the timeline.
The timeline displays a 24-hour period for the specified date. Yellow areas
indicate normal recorded video. Red areas indicate events that occurred that day.
You can click anywhere in the timeline to specify a start time for the video you
want to play back. If you are using the front panel or remote control keys,
highlight the From/End option and press Enter to move the marker at the start or
end points of the video segment.
If using the front panel or the remote control to navigate through the Calendar
Mode, use the Select fields to specify a start date and time.
5. Click Play Data to begin playback.
To search for recorded video by events:
1. Click Search to display the Search screen.
2. In the Choose Camera box, select the cameras you want to use in your search.
You can select more than one camera or all cameras.
3. Click Event List to display the Event List screen.
4. Click an event from the Event List to play video.
Searching for recorded video by POS text
The TVR 30 lets you to search for video based on text data from a point-of-sale (POS)
device connected to the unit. You can search using any of these methods:
•
By text
•
By numeric value
•
By date and time
•
By camera
Text. When searching by text, you can search for video with data containing the
exception string defined using the setup menu. You can also enter two word strings
and search for video with data containing either one of the word strings or both of
the word strings. Alternatively, you can specify only one word string.
Value. When searching by value, you can enter two numeric values to specify a
range. You can search for videos with data containing values within or outside the
TruVision DVR 30 User Manual
31
Chapter 4: Basic operation
specified range. Additionally, you can enter a single value and search for videos with
data containing values less than, equal to, or greater than that value.
Date/Time. When searching for video based on POS data, you can narrow your
search by specifying a date and time range.
Camera. When searching for video based on POS data, you can narrow your search
by specifying a camera.
To search for recorded video by POS text:
1. Click Search to display the Search screen.
2. Click POS Data Search. The POS Data Search screen displays as shown in the
figure below.
3. Specify your search criteria.
Before entering any search criteria, highlight the search type field and specify
how you want the search criteria to be handled. For example, if searching for data
containing the text words “sale” and “charge,” highlight the Text Search field and
select the AND option. Then enter the search words in the Text fields, one word for
each field. When specifying a numeric value range, enter the lower number in the
Lower Bound field and the higher number in the Upper Bound field.
4. Click POS Search Result to display your search results.
5. Click a search result to play back the resulting video.
Note: Make sure the Transaction Overlay (POS) box in the Display screen is set to
include playback.
32
TruVision DVR 30 User Manual
Chapter 4: Basic operation
Playback controls
When viewing recorded video, several options are available to control playback. You
can control playback using the front panel, the mouse toolbar (as shown in Figure 14
below), or the remote control.
Note: Playback control on the mouse toolbar automatically hides if there is no mouse
activity for more than five seconds. The playback toolbar reappears when you move
the pointer over the toolbar.
Figure 14: Playback controls
Playback control options
Option
Description
Play reverse
Plays video backwards at a speed based on how many times you press the
key. Press once to play video 1x, twice for 2x, etc. Speeds include: 1x, 2x, 4x,
8x, 16x, and 32x.
Pause
Pauses the video playback.
Play forward
Plays video forward at a speed based on how many times you press the key.
Press once to play video 1x, twice for 2x, etc. Speeds include: 1x, 2x, 4x, 8x,
16x, and 32x.
When video is paused, use the left or right button to jump back to the previous frame
or forward to the next frame.
Exiting playback mode
To exit playback mode, press Live or click the Live button on the mouse toolbar.
TruVision DVR 30 User Manual
33
Chapter 4: Basic operation
Archiving recorded files
Archive recorded files using an external device. There are two ways to archive
recorded files:
Quick Archive. Quick archive lets you archive recorded files quickly by using the
Archive button on the front panel and remote control.
Archive screen. Use the Archive screen (shown in Figure 15 below) to specify
archiving settings such as date range, events, and data type.
Figure 15: Archive screen
Using Quick Archive in live mode
To archive recorded video using Quick Archive while in live mode:
1. Insert the backup device.
If using a USB memory drive, insert the device into the USB port on the front
panel. If using a digital video disc (DVD), insert the disc into the DVD drive. If both
media are found in the TVR 30, the USB device takes precedence over the DVD.
2. Press the Archive button on the front panel or the remote control. The Quick
Archive hint screen displays as shown in the figure below.
34
TruVision DVR 30 User Manual
Chapter 4: Basic operation
3. Click Quick Archive to begin archiving.
The TVR 30 archives the latest recorded video onto the backup device until the
medium is filled to its capacity or all video found in the unit have been exported.
Using the Archive screen in live mode
To archive recorded video using the Archive screen in live mode:
1. Insert the backup device.
If using a USB memory drive, insert the device into the USB port on the front
panel. If using a digital video disc (DVD), insert the disc into the DVD drive. If both
media are found in the TVR 30, the USB device takes precedence over the DVD.
2. Press the Archive button on the front panel, or remote control, or click Archive in
the mouse toolbar.
3. Press Enter to display the Archive screen.
4. Select the cameras you want for archive.
5. Specify a date and time range you want for archive.
6. Select a data type.
Use the Data Type option to select one of the following:
Normal. Archive normal video only.
Event. Archive event video only.
Both. Archive both normal and event video types.
7. Select the events you want to archive, if required.
a. Select the Choose Events option.
TruVision DVR 30 User Manual
35
Chapter 4: Basic operation
This option is only enabled if you select Event as the data type. A list of events
displays on the Event List screen.
b. Click an event in this screen to be archived.
You can click additional events you want to archive.
Note: When archiving a motion event, the DVR archives the motion event for the
selected camera as well as post-event video from all other cameras. The duration
of the post-event video is based on the value you specified on the Post-Alarm
Seconds option in the Alarms screen.
8. Select a file format.
Use the Format option to specify whether to export to an original, DRV or AVI file
type. Selecting the original format results in faster archiving of large amounts of
video compared to the DRV format.
Although selecting the original format results in faster archiving, you cannot
select which camera to archive. The system archives all the data in the DVR. In
addition, when specifying a time range to archive, selecting the original file format
results in the exporting of video clips that include the specified time range, but
may not be contained in a single file.
The DVR identifies a video clip when the clip reaches 20 MB in size. If you select
the original file format and specify a time range with both the start and end times
falling in the middle of two video files, both video files are archived.
9. Select Yes for the Begin Export option to start archiving.
Note: The Watermark box is always set to On.
Archiving a video segment in playback mode
While playing back recorded video, you can mark a video segment to archive.
To mark and archive a video segment:
1. Play back recorded video.
See “Playing back video” on page 29 for more information.
2. Press Archive to mark the start time of the video segment you want to archive.
3. Press Archive again to mark the end time of the video segment you want to
archive.
This segment is then archived to the media.
36
TruVision DVR 30 User Manual
Chapter 4: Basic operation
Using the DVR player
Use the DVR player to view video clips archived from the TVR 30 on any PC. The DVR
player is automatically included when archiving data from the device. When you
insert the backup media into the PC, the DVR player automatically runs.
Note: If your PC is running on Windows Vista or Windows 7, the DVR player may not
automatically launch. If so, open the backup media by double-clicking the device
drive letter, and then launching the DVR_Player file located in the Player folder.
Figure 16: DVR player
To view archived video using the DVR player:
1. Launch the DVR player.
2. Click Play to display the Data List dialog box.
The Data List dialog box displays a list of all archived video. If you don’t see a list,
click Open and browse for the folder containing your archived video.
3. Select an event, and then click Playback to display the Playback screen.
You can select the start time and cameras from which to play video.
4. Click OK to play back video.
To verify that the video has not been altered, select an event, and then click Verify in
the Data List dialog box. The Playback screen displays. If the Status Log reports a
value of Good Signature, then the video has not been altered.
To play back a local file previously saved from the DVR, click Local Playback in the
Playback screen, and then click Open to browse for the local file.
TruVision DVR 30 User Manual
37
Chapter 4: Basic operation
Logging off
There are two ways to log off. You can:
•
Log off manually by pressing Esc while in live mode
— or —
•
Automatically log off from live or menu mode when no buttons are pressed for
five minutes
Turning off the TVR 30
To avoiding potentially damaging the TVR 30, use the proper method to turn off the
unit.
To turn off or restart the unit:
1. Display the main menu.
2. Select System to display the System screen.
3. Select Shutdown. The Shutdown screen displays.
4. Select Restart to restart the unit or Shutdown to turn off the unit.
38
TruVision DVR 30 User Manual