1
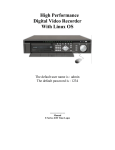
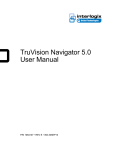
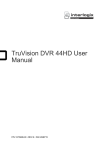
GE
Security
TruVision DVR 10 User Manual
P/N 1068258 • REV A • ISS 06JUL09
Copyright
© 2009 GE Security, Inc.
This document may not be copied in whole or in part or otherwise reproduced without prior
written consent from GE Security, Inc., except where specifically permitted under US and
international copyright law.
Disclaimer
The information in this document is subject to change without notice. GE Security, Inc.
(“GE Security”) assumes no responsibility for inaccuracies or omissions and specifically disclaims
any liabilities, losses, or risks, personal or otherwise, incurred as a consequence, directly or
indirectly, of the use or application of any of the contents of this document. For the latest
documentation, contact your local supplier or visit us online at www.gesecurity.com.
This publication may contain examples of screen captures and reports used in daily operations.
Examples may include fictitious names of individuals and companies. Any similarity to names
and addresses of actual businesses or persons is entirely coincidental.
Trademarks and patents
GE and the GE monogram are trademarks of General Electric Company. The TruVision DVR 10
name and logo are trademarks of GE Security.
Other trade names used in this document may be trademarks or registered trademarks of the
manufacturers or vendors of the respective products.
Intended use
Use this product only for the purpose it was designed for; refer to the data sheet and user
documentation for details. For the latest product information, contact your local supplier or visit
us online at www.gesecurity.com.
FCC compliance
This equipment has been tested and found to comply with the limits for a Class A digital device,
pursuant to part 15 of the FCC Rules. These limits are designed to provide reasonable protection
against harmful interference when the equipment is operated in a commercial environment.
This equipment generates, uses, and can radiate radio frequency energy and, if not installed
and used in accordance with the instruction manual, may cause harmful interference to radio
communications.
Changes or modifications not expressly approved by the party responsible for compliance could
void the user’s authority to operate the equipment.
Certification and compliance
European Union directives
2004/108/EC (EMC directive): Non-European manufacturers must designate an authorized
representative in the Community. Our authorized manufacturing representative is:
GE Security B.V., Kelvinstraat 7,
6003 DH Weert, The Netherlands.
2002/96/EC (WEEE directive): Products marked with this symbol cannot be disposed of as
unsorted municipal waste in the European Union. For proper recycling, return this product to
your local supplier upon the purchase of equivalent new equipment, or dispose of it at
designated collection points. For more information see: www.recyclethis.info.
2006/66/EC (battery directive): This product contains a battery that cannot be disposed of as
unsorted municipal waste in the European Union. See the product documentation for specific
battery information. The battery is marked with this symbol, which may include lettering to
indicate cadmium (Cd), lead (Pb), or mercury (Hg). For proper recycling, return the battery to your
supplier or to a designated collection point. For more information see: www.recyclethis.info.
CAUTION: There is risk of explosion if batteries are replaced by an incorrect type. Dispose of
used batteries according to the instructions.
Contact information
For contact information see our Web site: www.gesecurity.com.
Chapter 3
Operating instructions
Control interfaces
The TVR 10 has three control interfaces:
•
Built-in interface
•
Display interface
•
Web browser interface
Built-in interface. The built-in interface is displayed on the VBA monitor. It consists of
a main menu and several dialog screens that let you configure and control the
device. You can invoke the built-in interface using the front panel, remote control, or
mouse.
Display interface. The display interface consists of various toolboxes that appear on
top of the VBA monitor image. These let you control live or playback video while in
PTZ or playback mode. You can invoke the display interface from the built-in interface
screens or from the mouse menu. The controls in any toolbox can be operated using
the front panel, remote control, and mouse.
Web browser. The Web browser interface uses Internet Explorer to simulate the
display and control functions of the VGA monitor on a remote PC. The Web browser
interface can only be invoked by a PC with Internet access.
TruVision DVR 10 User Manual
9
Chapter 3: Operating instructions
Controlling the TVR 10
You can control the TVR 10 using:
•
Front panel control
•
IR remote control
•
Mouse control
Front panel control. Use the directional arrow buttons to select a command, option,
or button on a screen. Use the ENTER button to confirm a selection.
IR remote control. Use the directional arrow buttons to select a command, option, or
button on a screen. Use the OK button to confirm a selection.
Mouse. Move the pointer to a command, option, or button on a screen. Click (with the
left mouse button) to confirm a selection.
You can use your preferred control method for any procedure, but in most cases we
describe procedures using mouse terminology. Optional control methods are given
only when they differ substantially from mouse control methods.
Front panel overview
The buttons on the front panel control all DVR functions. The LED indicators light up or
flash to alert you of various conditions. See Table 2 below for more information.
Figure 3: Front panel introduction
1
3
Power
TVR10
e
HDD
Tx/Rx
1
Disp
2
Srch
3
PTZ
4
Live
MENU
Rec
Esc
2
Table 2: Front panel legend
Item
Type
Name
Description
1
Status
LEDs
Power
Green indicates the DVR is working. No light indicates the DVR
is powered off.
10
TruVision DVR 10 User Manual
Chapter 3: Operating instructions
Item
2
Type
Numeric
buttons
Function
buttons
Name
Description
HDD
Blinking red indicates that video is being recorded. Solid red
indicates that the hard drive has an error.
Tx/Rx
Solid green indicates that the DVR is being accessed by
Internet Explorer or Client Software. Blinking green indicates
that data is being transferred between the DVR and Internet
Explorer or Client Software.
1 to 4
Enter numbers from 1 to 4.
MENU
Switches out of display mode to display the main menu.
ESC
Cancels the current changes and returns to the previous
screen or main menu.
SRCH
Displays the Search screen to search for and play back
recorded video.
REC
Displays the Manual Record screen and options.
PTZ
Enters PTZ control mode.
DISP
Multiple screens display.
Switch from the main menu to live mode.
LIVE
3
Displays Camera 1 in live mode.
Directional
, , ,
In menu mode, use the Left or Right Arrow buttons to select
controls
(arrow buttons) and the Up or Down Arrow buttons to edit.
PTZ direction control.
Playback speed control.
ENTER
Confirms menu selections.
(central button)
Enters or × to enable or disable options.
Pauses playback.
Using the mouse
Use the USB mouse provided with the TVR 10 to carry out the same operations as the
front panel and remote control. The USB mouse lets you navigate and make changes
to settings in the user interface.
Connect the mouse to the TVR 10 by plugging the mouse USB connector into the USB
port on the back panel. The mouse is immediately operational. You can replace the
standard mouse with a wireless mouse. However, the unit may not support all types
of wireless mouse.
TruVision DVR 10 User Manual
11
Chapter 3: Operating instructions
To use the mouse in live view:
1. Scroll forward and backward between cameras.
When in full-screen view, use the scroll button on the mouse to scroll forward and
backward through the cameras.
2. Double-click to toggle between full-screen and multiview.
When in multiview, double-click a camera to display its image in full-screen view.
Double-click again to return to multiview.
Mouse shortcut menu
To display the mouse control menu, right-click while in live view. The commands on
this shortcut menu are shown in Figure 4 below. Table 3 below describes the
commands.
Figure 4: Mouse shortcut menu
Table 3: Mouse shortcut menu commands
Command
Description
Main Menu
Displays the main menu.
Camera
Selects an individual camera.
Multi-screen
Selects multiview. The multiview options vary based on the number of
cameras connected to the TVR 10. You can choose either a four-screen or
single screen display.
12
TruVision DVR 10 User Manual
Chapter 3: Operating instructions
Command
Description
PTZ Control
Controls a PTZ camera. Right-click to view the following options:
Channel: Selects the camera to control
Preset: Selects a preset number to use
Exit: Returns to display mode
Search
Displays the Play Back screen. Lets you search for recordings using specific
criteria such as by camera, type of event, time, and text.
Right-click to return to display mode.
Manual Record
Displays the Manual Record screen.
Open/Close Status
Toggles the on-screen status bar on and off.
Spot Channel
Controls the spot monitor.
TruVision DVR 10 User Manual
13
Chapter 3: Operating instructions
Using the IR remote control
Use the IR remote control to carry out functions similar to the front panel buttons.
Figure 5: Controls on the IR remote
POWER
TVR10
2
1
ABC
3
DEF
1
2
3
GHI
JKL
MNO
4
5
6
PQRS
TUV
WXYZ
7
8
9
DEL
#
5
0
4
INFO
PTZ
8
6
ESC
MENU
9
7
10
+
US
+
11
OK
SRCH
REC
C
FO
LIVE
DISP
12
14
13
15
e GE Security
Table 4: IR remote control legend
Item
Name
Description
1
POWER
Turns off the device.
2
TVR 10
Enables the IR remote control to control the TVR 10.
3
Numeric buttons
Enter numbers, lower case or upper case letters, and symbols
in edit mode.
4
DEL
Deletes an entry in edit mode.
5
#
Toggles between video inputs or video channels.
6
INFO
Reserved for future use.
7
ESC
Cancels and returns to the main menu.
8
PTZ
Enters PTZ control mode.
14
TruVision DVR 10 User Manual
Chapter 3: Operating instructions
Item
Name
Description
9
MENU
Switches from live mode to menu mode and displays the main
menu.
10
,
,
,
(arrow buttons) In menu mode, the Left or Right Arrow buttons select
commands or options; the Up or Down Arrow buttons edit or
OK (central button)
select values. OK enters the selection or value.
PTZ direction control.
Playback speed control.
11
Lens control
FOCUS and ZOOM control for camera lens.
12
SRCH
Displays the Search screen to search for and play back
recorded video.
13
REC
Displays the Manual Record screen.
14
DISP
Displays multiscreen. Switches to live mode.
15
LIVE
Displays Camera 1 in live mode.
To place batteries into the IR remote control:
1. Remove the battery cover.
2. Insert the batteries. Make sure that the positive (+) and negative ( ) poles are
correctly placed.
3. Replace the battery cover.
To connect the remote control to the TVR 10:
1. Turn on the TVR 10 and wait for the live video to appear.
2. On the remote control, press and release the Power button. The remote control is
now operational.
To turn off the IR remote control:
1. Press the TVR 10 button while the IR remote control is still controlling the TVR 10.
To turn the TVR 10 off with the remote control:
1. Press and hold the POWER button for several seconds. A power off prompt
displays.
2. Enter a password, if required.
3. Select Confirm then switch off the manual power located on the back panel.
Troubleshooting the remote control
If the IR remote control is not functioning properly, perform the following tests:
TruVision DVR 10 User Manual
15
Chapter 3: Operating instructions
•
Check the battery polarity.
•
Check the remaining charge in the batteries.
•
Check that the IR remote control sensor is not masked.
If the problem still exists, please contact your administrator.
Using the Web browser
The TVR 10 Web browser lets you view, record, and play back videos as well as
manage all aspects of the TVR 10 from any PC connected to your network. The
browser’s easy-to-use controls give you quick access to all TVR 10 functions.
Figure 6: TVR 10 Web browser
1
4
2
3
5
6
Table 5: Web browser interface layout
Item
Name
Description
1
Viewer
View live or playback video.
2
Navigation bar
Logs you out of the interface. Accesses live or playback video.
Displays the TVR 10 logs. Configures the unit remotely.
3
PTZ control
Controls the PTZ functions of camera in live mode.
16
TruVision DVR 10 User Manual
Chapter 3: Operating instructions
Item
Name
Description
4
Navigator
View video of the selected camera. Right-click the camera to set
the viewing stream type (main stream or sub-stream).
5
Taskbar
Displays single or four-screen views. Selects multiscreen. Captures
screen. Archives video. Lets you talk through a microphone to a
speaker connected to the TVR 10 (bidirectional audio).
6
Video adjust
Adjusts video image such as brightness, saturation, hue, and audio
volume. Restores default settings.
To access the TVR 10, open a Web browser and enter the IP address assigned to the
TVR 10 as a Web address. In the login screen, enter the default user ID and password.
User ID: admin
Password: 1234
The Web browser uses the following ports:
Video Port: 8000
HTTP Port: 80
Searching recorded video for playback
To search for recorded video for playback, click the Playback button on the
navigation bar. The Search screen displays. Select a play type and a file type in the
appropriate boxes and specify a time range. Click the Search button (displayed as a
magnifying glass) to start your search.
Search results display below your specified search criteria and are arranged by start
time. Double-click a result item to play back video.
Playing back recorded video
Use the playback control bar, shown in Figure 7 below, to control playback video. The
playback control bar lets you do the following:
•
Control playback speed (fast forward, slow forward, and stop)
•
Capture a screen image of the playback video
•
Save a video segment onto your desktop
•
Download recorded video to your hard drive
Figure 7: Playback control bar
TruVision DVR 10 User Manual
17
Chapter 3: Operating instructions
To quickly archive a segment of a video you are playing back, click the Save button to
begin archiving and click again to stop archiving. The resulting video file is saved on
your desktop.
Click the Download button to download that video file into your hard drive.
Viewing logs
To view logs using the Web browser interface, click the Log button on the navigation
bar. The Log screen displays. Use the filter boxes, located on the right of the screen,
to narrow the list of logs by defining the event type and date range. Click the Search
button (displayed as a magnifying glass) to begin your search.
Use the Save button, located at the bottom right of the screen, to save the log files on
your hard drive.
Using the Web browser to configure the device
The Web browser lets you to configure the TVR 10 remotely using your PC. Click the
Configure button to display the Remote Configuration screen. This screen lets you
configure the server, network, cameras, alarms, and upgrade the firmware.
Setting the stream type
Video stream refers to the flow of network data between the device and the Web
browser interface. The higher the stream type specified in the Web browser, the
higher the video quality being viewed and recorded. When viewing video in a fourscreen layout, data is being transferred into four different streams, which can
overload a system with low bandwidth. We strongly recommend that you set your
stream type to Sub-stream to avoid overloading your network.
To configure the stream type to sub-stream:
1. Click Configure on the navigation bar to display the Remote Configuration screen.
2. Click the Channel Configuration tab.
3. Select Sub-stream in the Type box.
4. Change the appropriate video quality settings.
Note: We recommend that you do not change the frame type and iframe.
5. Click Save to save your changes.
18
TruVision DVR 10 User Manual
Chapter 3: Operating instructions
Viewing video in sub-stream
To view video in sub-stream, right-click a camera in the Navigator and select Substream. The camera displays video in sub-stream.
Main menu overview
The built-in interface includes a main menu with eight command buttons. Each
command displays a screen that lets you edit a group of TVR 10 settings. The main
menu is shown in Figure 8 below. Access to different option screens varies depending
on your access privileges. Most screens are available only to system administrators.
The white frame surrounding a command button or option shows that the item is
currently selected.
Figure 8: Main menu
Main menu commands options
Table 6 on page 20 provides a list of controls and options available on each screen
that you can access from the main menu.
TruVision DVR 10 User Manual
19
Chapter 3: Operating instructions
Table 6: Menu commands and screen options
Main menu
command
Dialog screen options
Main menu
command
Dialog screen options
Display
Device ID
Require password
Menu timeout
Video standard
Enable scaler
Menu transparency
Date and Time
Multi-Screen
Camera
Camera
Camera title position
Adjust video
Time and date display
Motion detection
Advanced settings
Copy to camera
Recording
Record mode
Camera
Stream type
Resolution
Frame rate
Bit rate
Record schedule
Pre-event time
Post-event time
Copy to camera
Network
IP address
Subnet mask
Gateway
Port
HTTP port
Advanced settings
PPPoE
DDNS
Alarms
Alarm input
Input type
Alarm handling, policy, and PTZ
linkage
Alarm rules / PTZ
Copy to alarm in
Alarm out
Duration
Alarm out time
Copy to alarm out
Notifications
PTZ
Camera
Baud rate
Data bits
Stop bits
Parity
Flow control
Protocol
PTZ address
Preset
Preset tour
Shadow tour
Copy to camera
User
Add/Delete
Password/Verify
Default privileges
Set Privileges
Utilities
System information
View log
Alarm output
Hard disk
Firmware upgrade
Factory defaults
Reboot
Power off
Using the main menu
Click a command on the main menu to display the related screen. Alternatively, you
can use the Up or Down Arrow buttons to select a menu command or screen option,
and then press the ENTER or OK button to confirm the selection.
20
TruVision DVR 10 User Manual
Chapter 3: Operating instructions
Table 7 below shows the front panel buttons you can use to display the main menu
or various dialog screens.
Table 7: Main menu display
Button
Action
MENU
Display the TVR 10 main menu
SRCH
Display the Play Back screen
REC
Display the Manual Record screen
PTZ
Display the PTZ interface
Note: You must enter a user name and password to display the main menu. The
default user name is “admin” with a password of “1234”.
Navigating through dialog screens
Each dialog screen includes various options and buttons as seen in Figure 9 below.
The frame surrounding an option or button indicates that this option is currently
selected.
Use the mouse to select any option or button on the screen. You can also use the
directional arrow buttons (Up, Down, Left, or Right) to navigate through the options.
Changes to screen settings can be entered in various ways as shown in Table 8 on
page 22.
Figure 9: Camera input adjustment
TruVision DVR 10 User Manual
21
Chapter 3: Operating instructions
Table 8: Types of control on the screen
Control
Description
Check box
Provides two values: indicates enabled and × indicates disabled. You can click the
check box or use the ENTER or OK button to switch between values.
List box
Provides more than two values for the option. Only one of them can be selected.
Click the scroll arrows at the right-hand side of the box to scroll through the possible
values. You can also use the Up or Down Arrow buttons to select a value. For
example, the Camera option is a list box that lets you select the camera you want to
work with.
Edit box
Lets you enter characters. For more information, see “Using an edit box” below.
Command
button
Triggers a special function or lets you display another screen. For example, click the
Rules button to display the Rules screen. Click the Confirm button to save your
settings and return to the main menu. Click the Cancel button to abandon any
changes made on the screen and return to main menu. Command buttons that are
unavailable are displayed in gray. They must be enabled before you can click them.
Using an edit box
An edit box lets you type characters to set the value of an option, such as a camera
name. You must be in edit mode before you can enter a value.
Note: A full range of alphanumeric characters is only available when using the mouse
or remote control.
To enter text in an edit box using the mouse:
1. Click anywhere within the edit box to enter the edit mode and display a virtual
keyboard.
2. Click to enter the desired characters into the edit box.
3. When you’re finished, click the edit box to accept the value you’ve entered.
To enter text in an edit box using the remote control:
1. Press OK to enter the edit mode.
2. Press # to select the format and type of character you want to enter.
While in edit mode, the status bar on the bottom left of the screen displays which
type of character will be entered. For example, the figure below indicates that
characters will be entered in uppercase.
Options include number, uppercase, lowercase, or symbols. There are 24 different
symbols to select. Press 0 to scroll between four pages of symbols.
3. Enter your characters.
22
TruVision DVR 10 User Manual
Chapter 3: Operating instructions
Use the numeric buttons on the remote control to enter characters. Press the
numeric buttons repeatedly to cycle through different characters available for
that button. The character format and type depends on the value you selected in
step 2. Use the Left or Right Arrow buttons to move the cursor within the edit box.
Use the DEL button in the remote control to delete the character left of the cursor.
4. Press OK to accept the value you’ve entered, or ESC to exit from the edit box
without saving any changes you’ve made.
Exiting the main menu
Right-click and then click Camera or Multiview to exit the main menu and return to
live mode. Press ESC on the front panel or remote control to exit the main menu and
return to live mode.
TruVision DVR 10 User Manual
23
Chapter 3: Operating instructions
24
TruVision DVR 10 User Manual
Chapter 4
Basic operation
Turning on the TVR 10
Before turning the TVR 10 power on, make sure that the power supply matches that
of the TVR 10 and the AC adapter is connected correctly. Connect at least one
monitor to the video out or the VGA interface. Otherwise, you will not be able to see
the user interface and operate the device.
To turn the TVR 10 power on:
1. Connect power supply correctly.
2. Switch on the manual power button on the back panel. Once the TVR 10 is
powered, the POWER LED should light up in green.
Live mode
The TVR 10 automatically enters into live mode once powered on. On the display
screen, you can see date, time, and camera name. To change the camera name, refer
to “Camera name” on page 47. To set system the date and time refer to “System date
and time” on page 60.
While in live mode, the TVR 10 also displays the status icon of each camera as shown
in Figure 10 on page 26.
TruVision DVR 10 User Manual
25
Chapter 4: Basic operation
Figure 10: Recording status
Camera status
Each icon represents a camera. The icon color shows the camera status. Table 9
below gives the status color code..
Table 9: Camera status
Icon
Color
Status description
White
No video signal
Yellow
Standby recording (when recording upon alarm and/or motion)
Green
Recording
Blue
Motion detection
Red
Alarm
Activating/deactivating the on-screen status bar
Mouse
Right-click to open the mouse menu, and then click Status Bar.
Front panel/remote control
Press # to activate or deactivate the status bar.
Cycling through camera views
Right-click and then click Camera or press the numeric buttons to switch to an
individual camera display. For example, you can press 2 to view the second camera.
26
TruVision DVR 10 User Manual
Chapter 4: Basic operation
Press DISP to manually toggle through single camera and four-screen views . The
single camera display reverts back to camera 1 when switching to single view. You
can set the auto live mode on the Display menu.
Viewing in multiscreen
Mouse
Right-click to open the mouse menu, and then click Multi Screen.
Select the desired display layout. You can select either a fourscreen or single screen view.
Front panel/remote control
Press DISP to switch to multiscreen display viewing.
Connecting the spot monitor
To connect the spot monitor:
1. Connect Video out 2 with the spot monitor by a cable.
2. While in live mode, right-click and click Spot Channel.
3. You now have access to the secondary monitor.
Note: Make sure that there is video signal input; otherwise the spot monitor will
only show a blue screen.
Logging on
The TVR 10 is shipped with one predefined user for the system administrator. The
default system administrator log on uses “admin” as a user name with a password of
1234. You can modify the admin password but not the admin user name. We
recommend that you change the admin password once you have completed the
installation and setup to protect against unauthorized access. The administrator can
create up to 15 users and define their privileges. For more information, see “User
settings” on page 41.
TruVision DVR 10 User Manual
27
Chapter 4: Basic operation
Figure 11: Login screen
To log on to the TVR 10 user interface:
1. In the User box, select a user.
2. Enter the corresponding password in the Password edit box.
3. Click Confirm to enter the main menu.
If there is no response, it means the user name and password are not matched.
The TVR 10 will enter the live mode if you enter unmatched logon credentials
three times.
Controlling a PTZ camera
The PTZ control interface lets you control the PTZ operation of the cameras within the
TVR 10 user interface. You can control PTZ cameras using the buttons on the front
panel and IR remote control as well as utilizing the PTZ control icons accessed with
the mouse. To display the PTZ control interface, the user must have PTZ control
access privileges.
Displaying the PTZ control interface
While in menu mode, right-click and then click PTZ control to display the PTZ control
interface directly. Select a user name and type the correct password in the Login
screen. The PTZ control interface displays as shown in Figure 12 on page 29. You can
adjust the position of the current camera display on the screen.
28
TruVision DVR 10 User Manual
Chapter 4: Basic operation
Figure 12: PTZ control interface
Selecting a camera
When in PTZ control mode, press the numeric buttons to select a camera. For
example, press the number 2 button to select the second camera PTZ.
After selecting the camera PTZ, you can use the control buttons to control the PTZ.
PTZ control buttons description
Table 10 below provides descriptions of the PTZ control buttons.
Table 10: PTZ control buttons description
Button
Description
Up, Down, Left, Right Arrow
buttons
Pans left and right. Tilts up and down.
ZOOM+, ZOOM-
Zooms in and out.
FOCUS+, FOCUS-
Focuses in and out.
IRIS+, IRIS-
Opens and closes the iris controls.
REC/SHOT
Calls up a preset position. This feature is camera and protocolspecific.
PLAY/AUTO
Calls up auto panning.
Calling up a preset PTZ position
There are several ways to call up a preset position.
TruVision DVR 10 User Manual
29
Chapter 4: Basic operation
Front panel
Press PTZ to enter PTZ mode. Press REC and enter a preprogrammed threedigit preset number. Preset starts immediately.
If you enter a one or two-digit number, depending on your TVR 10 model,
you will change the selected camera.
This function is only available if the mouse is not connected to the TVR 10.
Remote control
Press PTZ to enter PTZ mode. Press SHOT and enter a preprogrammed
three-digit preset number. Preset starts immediately.
If you enter a one or two-digit number, depending on your TVR 10 model,
you will change the selected camera.
This function is only available if the mouse is not connected to the TVR 10.
Mouse
Right-click and select PTZ control to enter PTZ mode. Right-click again and
select Preset. Select one of the preset numbers listed.
PTZ preset numbers are preprogrammed.
When you exit PTZ control mode, the camera stays at the current position.
Note: The PTZ preset position must already be configured. Refer to “PTZ settings” on
page 76 for more information. You can define up to 128 preset positions.
Exiting PTZ control mode
Press ESC or ENTER to exit and return to the live mode.
Manual recording
When a camera is recording, its corresponding LED on the front panel lights up in
green. This green LED is also lit when recording manually. Start or stop a camera
recording by pressing the REC button and entering the Manual Record menu.
Note: You must have access privileges to enter the Manual Record dialog screen.
Manual Record screen
To enter the Manual Record screen while in live mode, press REC and enter your user
name and password if requested.
30
TruVision DVR 10 User Manual
Chapter 4: Basic operation
Figure 13: Manual Record screen
The controls and options available on the Manual Record screen are described in
Table 10 below.
Table 11: Manual Record controls and options
Option
Description
Camera
Lists the number of cameras the TVR 10 has.
Status
Camera work status has four values:
•
Gray indicates the camera is idle.
•
Green indicates the channel is recording (including real time recording,
alarm recording, motion detection recording).
•
Red indicates network transmission.
•
Orange indicates both recording and network transmission.
Start/Stop
The checkmark indicates you can start recording on the corresponding channel .
The X mark means you can stop recording.
Start All
Starts recording on all channels.
Stop All
Stops recording on all channels.
Manually starting or stopping a recording
This section describes how to manually start or stop a recording.
To manually start or stop a recording:
1. Right-click and then click Manual Record to display the Manual Record screen.
Alternatively, press the REC button on the front panel or remote control.
2. Enter your user name and password if requested.
TruVision DVR 10 User Manual
31
Chapter 4: Basic operation
The Manual Record screen displays listing all cameras. The camera status line
shows which cameras are currently recording.
3. Click the camera’s Start/Stop line to begin the recording. A checkmark appears on
that camera’s Start/Stop box.
4. Select the next camera you want to start or stop recording. Repeat step 3.
5. To select all cameras for recording, click Start All.
All camera status LEDs on the front panel and the on-screen camera status icons
on the status bar turns green.
6. Click Stop All to stop recording for all cameras.
7. Right-click or press ESC to save changes and return to the live mode.
Playing back video
The TVR 10 lets you play back recorded video. This section describes the features and
methods in playing back video.
Play Back screen
The Play back screen lets you search and view recorded video. You must be in live
mode to view video. Search for recorded video using different criteria including:
•
Motion detection, alarm, or manually recorded files
•
Start and end time of recording
Note: You must have access privileges to enter the Play Back screen.
See Table 12 on page 33 for a description of the Play Back screen controls and
options.
32
TruVision DVR 10 User Manual
Chapter 4: Basic operation
Figure 14: Play Back screen
Table 12: Play Back controls and options
Option
Description
Cam
Selects a specific camera.
Search for
Specifies a recorded file type. The file type options include: All, All Time, Motion
Detect, Alarm, and Manual.
Time
Specifies a start and end date/time to conduct a search based on a recording
period.
Search
Begins your search. If there are no files that match your search criteria, a
corresponding screen displays.
Play
Plays back the recorded stream directly based on the time section.
Page No.
Selects a page. In the file list box, each page can only display eight files. If more
than eight files match, you can select a page to list other files. 500 pages (4,000
files) can be searched at one time. You can use numeric buttons or the Up or
Down Arrow buttons to select page.
File list box
Lists the matched files. File started time and size are displayed in the list box.
You can use the Up or Down Arrow buttons to move the scroll bar to select a file.
Media
Selects a device (media) to backup your recorded files. You can select USB flash,
USB HDD, or USB CD/DVD drive to backup the files or clips.
Archive
Starts backup.
Archive Today
Backs up all recorded files from today.
Searching for a recorded video
Prior to playing back a recorded video, you must first search for the video files you
want to play.
TruVision DVR 10 User Manual
33
Chapter 4: Basic operation
To search for recorded video:
1. Right-click and click Search in live mode or press PLAY on the front panel or the
remote control.
2. If requested, enter your user name and password. The Play Back screen displays.
3. Select the camera you want to search video from in the Camera list box.
4. Select the file type of recorded video you want in the Search For list box.
5. For recording periods, enter the start and end dates as well as times in the Time
edit boxes.
6. Click Search to begin the search.
A list of files displays once the search is completed. The list may extend to several
pages. The files are listed by date, with the most recent file listed first.
7. Right-click or press ESC to quit playback and return to live mode.
Searching for motion detection video
When searching for motion detection video, if you select Always on the Rec Type box
in the Recording Schedule screen, you will not receive any motion detection results.
To search for motion detection video, select Motion, Motion or Alarm, or Motion and
Alarm on the Rec Type box in the Recording Schedule screen. For more information,
see “Defining a recording schedule” on page 65.
Playing back a recorded file
Once you have found the video files using the Play Back screen, you can view video in
several different ways:
•
Click the Play button. The system starts playing each listed file.
— or —
•
Click a video file in the File List box or select the file and press the ENTER button.
Only the selected file is played.
While playing back a video, an information bar displays the following information as
shown in Figure 15 on page 36:
•
Volume
•
Play progress
•
Play speed
•
Played time
•
File total time
34
TruVision DVR 10 User Manual
Chapter 4: Basic operation
Table 13: Playback interface options
Option
Description
MENU
Displays or hides the information bar.
PLAY
Turns the sound on or off.
Right or Left Arrow button
Adjusts the play progress by percentage (%).
Up or Down Arrow button
Adjusts the play speed: Normal speed is “1x.” Use the Up Arrow button
to increase play speed (2X, 4X). Use the Down Arrow button to decrease
play speed (1/2X, 1/4X, 1/8X and single)
ENTER
Pauses or continues playback. If playing video in frame by frame, use
this option to play one frame.
PTZ
Press once to copy the segment and again to stop. You will need an
external backup device to store the segment in.
ESC
Exits the interface.
SRCH
Mutes audio.
REC
Zooms video.
Note: Performance of playback speed may decrease depending on how much
information the TVR 10 is processing.
Exiting playback
There are several ways to exit the playback interface depending on the screen or
operating mode you want to access afterwards.
ESC
Takes you to live mode
MENU
Takes you to the main menu
REC
Takes you to the Manual Record screen
PTZ
Takes you to PTZ control mode
Playing back video with a mouse
Playing back video with a mouse provides you with an additional playback control
bar as shown in Figure 15 on page 36.
TruVision DVR 10 User Manual
35
Chapter 4: Basic operation
Figure 15: Playback control interface
Table 14: Playback control bar description
Control
36
Name
Description
Skip reverse/forward
Skips backward or forward 3% each time.
Fast forward/ Slow
forward
Adjusts the play speed: Normal speed is “1x.” Use
the Up Arrow button to increase play speed (2X,
4X). Use the Down Arrow button to decrease play
speed (1/2X, 1/4X, 1/8X and single)
Pause
Pauses the video.
Audio
Toggles between mute and sound. Click once to
mute the video. Click again to recover the sound.
Copy
Copies a video segment. Click once to start the
copy. Click again to stop.
Hide Status
Hides the control bar. Right-click your mouse and
click display to display the control bar again.
Search
Triggers a rectangle area on the screen to zoom
into. Use the left mouse button to drag a rectangle
around the area, and then double-click to zoom
into that area. Click again to return to the
playback interface.
Toggle camera
Switches to the next or previous playback
cameras. These options are irrelevant if you only
recorded using one camera at that time.
TruVision DVR 10 User Manual
Chapter 4: Basic operation
Archiving recorded files
Archive recorded files using an external device. You can also archive specific
incidents in a file. You must be in live mode to play back a recorded file.
You can insert a mini-USB hub to the USB port to attach a mouse for navigation and
a USB drive for archiving. However, the unit may not support all types of USB hubs.
Note: You must have playback privileges to play back recorded files. Avoid moving
the external recording device when backing up information onto it.
Archiving the day’s recorded files
Use the Archive Today option on the Play Back screen to archive all the day’s
recordings. A dialog box displays the backup status.
If the external device is not connected correctly or the TVR 10 does not detect the
external device, an alert dialog displays. Please alert the administrator if this occurs.
Archiving recorded files from a file list
You can also archive recorded files displayed in the File List box.
To archive files from the File List box:
1. Search for recorded files.
For more information on searching for recorded files, see “Searching for a
recorded video” on page 33.
2. Select the files that you want to back up.
In the file list box, click the file you want to archive. The checkmark symbol
indicates a selected file. Select additional files you want to archive. You can use
the Up and Down Arrow buttons to move through the files as shown in the figure
below. Press ENTER to select the file you want to archive.
TruVision DVR 10 User Manual
37
Chapter 4: Basic operation
3. Use the Media box to select the backup device you want to use.
4. Click Archive to start the archiving process.
When the archiving starts, a corresponding message box displays, indicating the
status. If the selected files exceed the capacity of your storage device, an error
message displays.
Archiving a video segment
While playing back a recorded file, the TVR 10 lets you archive a specific segment of
the video you are watching.
To back up image segments during playback:
1. Enter the playback interface by selecting a recorded file. For more information,
see “Playing back a recorded file” on page 34.
2. While the video is playing, press PTZ to begin recording the video, and press PTZ
again to stop recording. A video segment is created.
3. You can repeat step 2 to create additional segments. You can generate up to 30
additional segments.
4. After all segments have been created, press ESC. A confirmation message window
displays. Press Confirm to begin archiving the selected segments. Press Cancel to
abort the archive process.
Playing back the archived files
Use the standard file player software to play back the video segment on your PC.
38
TruVision DVR 10 User Manual
Chapter 4: Basic operation
Turning off the TVR 10
To turn off the TVR 10:
1. On the main menu, click Utilities, and then click Power Off.
— or —
Press and hold the Power button on the remote control for at least five seconds.
Enter a user name and password if required.
2. Wait 10 seconds then turn off the power switch located on the back of the unit.
TruVision DVR 10 User Manual
39
Chapter 4: Basic operation
40
TruVision DVR 10 User Manual
Chapter 5
Advanced setup
This chapter covers the advanced setup of your TVR 10. Only users with appropriate
access privileges can define and modify advanced configurations. When the
following settings are modified and saved, you will be prompted to reboot the TVR 10
in order for the new settings to take effect. You do not need to reboot the device for
any other configurations.
•
Any network configurations
•
Resolution and record schedule
•
External alarm sensor type
•
View tampering alarm schedule
•
Video loss alarm schedule
•
Motion detection alarm schedule
•
External alarm schedule
•
Alarm output schedule
User settings
The TVR 10 is shipped with one predefined user for the system administrator. The
default system administrator log on uses admin as a user name with a default
password of 1234. You can modify the admin password but not the admin user
name.
The administrator can create up 15 users and define their privileges. When new users
are added to the list, the administrator can define individual passwords or each user
can use a default password.
TruVision DVR 10 User Manual
41