1
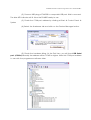
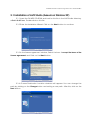
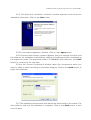
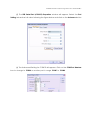
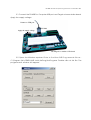
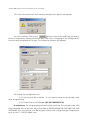
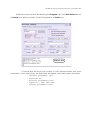
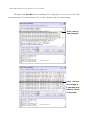
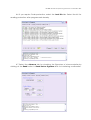
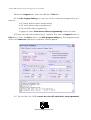
PX-4000 mini-AVR In-System Programmer documentation l 1
PX-4000 mini-AVR In-System programmer
1. Features
l Connects with the computerís USB port.
l Program the AVR microcontroller via ISP connector.
Plug ditect to the target board. The ISP cable is not required .
Supports Read, Write, Erase and Protection functions.
l Requires +5V power supply from target/master board.
l Operates with the AVR Program software. This software is included in the AVR Studio
and can be found in the tools menu and works with the Avr-OspII software as well.
Model Numbers of microcontroller supported in AVR Prog software
AT90S1200, AT90S2313, AT90S2323, AT90S2343, AT90S4433 , AT90S8515 , AT90S8535 ,
ATmega128 , ATmega16 , ATmega161 , ATmega162 , ATmega163 , ATmega164P ,
ATmega165 , ATmega168 , ATmega32 , ATmega64 , ATmega8 , ATmega8515 , ATmega8535 ,
ATtiny12 , ATtiny13 , ATtiny15L , ATtiny2313, ATtiny26
Model Numbers of microcontroller supported in Avr-OSP II software
AT90CAN128, AT90CAN32, AT90CAN64,
AT90PWM2, AT90PWM3,
AT90S1200, AT90S2313, AT90S2323, AT90S2343, AT90S4414, AT90S4433, AT90S4434,
AT90S8515, AT90S8515comp, AT90S8535, AT90S8535comp,
ATmega103, ATmega103comp, ATmega128, ATmega1280, ATmega1281,
ATmega16, ATmega161, ATmega161comp, ATmega162, ATmega163, ATmega165,
ATmega168, ATmega169,
ATmega2560, ATmega2561,
ATmega32, ATmega323, ATmega325, ATmega3250, ATmega329, ATmega3290,
ATmega406, ATmega48,
ATmega64, ATmega640, ATmega644, ATmega645, ATmega6450, ATmega649,
ATmega6490,
ATmega8, ATmega8515, ATmega8535, ATmega88,
ATtiny11, ATtiny12, ATtiny13, ATtiny15,
ATtiny22, ATtiny2313,ATtiny24, ATtiny25, ATtiny26, ATtiny261, ATtiny28,
ATtiny44, ATtiny45, ATtiny461,
ATtiny84, ATtiny85, ATtiny861
Includes :
Programmer box with cable and CD-ROM.
2 l PX-4000 mini-AVR In-System Programmer documentation
1. Install USB driver of PX-4000
(1)Double-click at the USBDriverInstallerV2.0.0.exe file from PX-4000 CD-ROM.
The driver installation begins and the Installation complete dialog will appear after finish.
Troubleshooting USB Driver Problems
To use INEXís USB-based products, the proper FTDI USB drivers need to be installed on your
computer system first. INEX supports the FTDI USB VCP Drivers for Windows 2000/XP. For other operating
systems you may obtain drivers from the FTDI website at http://www.ftdichip.com.
IF, after installing the correct USB drivers for your operating systems, you have problems
communicating with your USB device, refer to the troubleshooting advice given below.
Communication Issues
Most laptop computers and some desktops have issues with USB Latency when it comes to
communication. When this happens the port will show up in the list but you may not be able to
identify or communicate with your USB Device. This may require the Latency Timer Setting in the
Device Manager to be set lower. To lower the Latency Timer settings please follow the steps below.
The USB Device should be plugged in to adjust these settings.
Reducing The Latency Timer Setting
l Click on your Start Button and select Control Panel
l Open the ëSystemí icon (you may have to be in classic view to see this icon)
l Select the Hardware Tab and click Device Manager
l In the hardware categories you should see a Ports Category, click the plus sign next to it
l You should see an entry for USB Serial Port (COMx) where x is the COM Port assigned to the
USB Adapter
l Click this entry and then click Properties (or double-click the entry)
l Select the Port Settings Tab and click AdvancedÖ
l Under BM Options reduce the setting from 16 down to 1 and click OK
l Click OK on the properties sheet and close the Device Manager window
l If, when you connect your hardware, Windows pops up with a New Hardware Wizard
this could be for one of two reasons.
- The driver did not register during installation. If this is the case then simply follow the
new hardware wizard by following the default selections and selecting automatic installation.
- There is a problem with either the Interface and/or the computer. If you continue
to have problems please contact our Tech Support Department.
PX-4000 mini-AVR In-System Programmer documentation l 3
(2) Connect USB plug pf PX-4000 to computerís USB port. Wait a moment.
The blue LED indicator will lit. Now the PX-4000 ready to use.
(3) Check the COM port address by clicking at Start à Control Panel à
System
(4) Select the Hardware tab and click on the Device Manager button.
(5) Check the hardware listing. At the Port item, you will found USB Serial
port (COM x).Normally the address will be COM3 or higher. Note this COM port address
to use with the programmer software later.
4 l PX-4000 mini-AVR In-System Programmer documentation
2. Software Installation
Programming in the AVR microcontroller development is in both C and Assembly
languages. The software that are installed for programming are the following :
(1) AVR Studio : This software tool is developed by Atmel Corporation. AVR Studio
is a Development Tool for the AVR microcontrollers. AVR Studio enables the user to fully
control execution of programs on the AVR In-Circuit Emulator or on the built-in AVR
Instruction Set Simulator. AVR Studio supports source level execution of Assembly
programs assembled with the Atmel Corporationís AVR Assembler and C programs
compiled with IAR Systemsí ICCA90 C Compiler for the AVR microcontrollers and WinAVR
open-source C Compiler. AVR Studio runs under Microsoft Windows95 and Microsoft
Windows NT. Now Windows XP SP2 is recommended. Free download this software at
www.atmel.com.
(2) WinAVR : WinAVR is a set of tools for the C compiler, these tools include avrgcc
(the command line compiler), avr-libc (the compiler library that is essential for avrgcc),
avr-as (the assembler), avrdude (the programming interface), avarice (JTAG ICE
interface), avr-gdb (the de-bugger), programmers notepad (editor) and a few others.
These tools are all compiled for Microsoft Windows and put together with a nice
installer program. Free download of the updated version is located at : http://
sourceforge.net/projects/winavr/.
User will need to install AVR Studio first and WinAVR after which. AVR Studioís
mechanism integrates automatically with WINAVR. With this feature, it assist the user in
the development of C language and programming on AVR Studio which is much easier
and more powerful compared to WinAVR. The compiled file is a HEX file in which case,
the user has to download it into the program memory of the AVR microcontroller Board.
(3) Programmer software : This software is used to download the compiled .HEX
file to the AVR Microcontroller. Included in PX-4000 programmer is the AVRProg and
AVR-OSP II. All software can work with PX-4000 via Computer USB port.
(3.1) AVR Prog is Atmelís software and an add-in feature in AVR Studio.
(3.2) AVR-OSP II is created by Mike Henning. Download the latest version
at http://esnips.com/web/AtmelAVR
PX-4000 mini-AVR In-System Programmer documentation l 5
2.1 Installation of AVR Studio (based-on Window XP)
2.1.1 Insert the PX-4000 CD-ROM and look for this file in the AVR Studio directory;
aStudio4b460.exe. Double-click on this file.
2.1.2 Enter the Installation Wizard. Click on the Next button to continue.
2.1.3 In the license agreement window, Select the box : I accept the terms of the
license agreement and Click on the Next button.
2.1.4 Choose Destination Location windows will appear. You can change the
path by clicking on the Change button and setting a new path. After this, click on the
Next button.
6 l PX-4000 mini-AVR In-System Programmer documentation
2.1.5 The Driver USB Upgrade window will now appear. Click on the Next button
to pass this step.
2.1.6 In the begin installation window, click on the Install button to start installation.
2.1.7 After the installation is complete, click on the Finish button to end the
installation of AVR Studio.
2.1.8 To Launch the AVR Studio program, click on Start à Programs à Atmel AVR
Tools à AVR Studio 4. The main window of the AVR Studio program will appear.
2.2 Installation of WinAVR
Please note that installation of WinAVR is done after the installation of AVR Studio.
Please ensure this is being done before proceeding.
2.2.1 Insert the PX-4000 CD-ROM, and find the installation file of WinAVR; WinAVR20050214-install.exe (or the newer version if appear). Double-click this file.
2.2.2 Installation language dialog box will appear for selection the language of
this installation. Select your preferred language from the sliding bar. After that click on
the OK button.
PX-4000 mini-AVR In-System Programmer documentation l 7
2.2.3 The Welcome installation software window appears and shows the
installation information. Click on the Next button.
2.2.4 In the License agreement window, Click on the I agree button.
2.2.5 Choose Install Location window appears. User can change the path and
the folder for the installation of WinAVR by clicking at the Browse button and selecting
the respective folder. The proposed folder is C:\WinAVR. After selection, click Next
button to continue to the next step.
2.2.6 In the Choose Components window, select the components which you
want to install or follow according to the below diagram. Click on the Install button to
begin the installation.
2.2.7 The installation process starts and reports the status back on the screen. The
User needs to wait until the installation is complete. Click on the Finish button to end
once its done.
8 l PX-4000 mini-AVR In-System Programmer documentation
2.3 Installation of Programmer software
2.3.1 AVR Prog
It will install ready after instaaaltion AVR Studio.
2.3.2 Avr-Osp II 4.00 (or the latest version)
Copy the file AvrOspII_400.zip into the harddisk. Decompress the .zip file to
AvrOspII_400 folder. It contains 3 main files ; AvrOspII.exe, AvrOspII.ini and Devicelist.dat
3. Using AVR Prog software
The AVR Prog software can interface with COM port not higher COM4. Thus, use
must mae sure the USB serial port address of PX-4000 not higher than COM4. If higher,
please do following procedure.
(1) Connect the PX-4000 to Computer USB port and wait Blue LED indicator on.
(2) Check the COM port address by clicking at Start à Control Panel àSystem
(3) Select the Hardware tab and click on the Device Manager button.
(4) Check the hardware listing. At the Port item, you will found USB Serial port
(COM x).If COM port is higher than COM4 (this example is COM10), please click on the
right-button mouse and select to Properties
\
PX-4000 mini-AVR In-System Programmer documentation l 9
(5) The USB Serial Port (COM10) Properties window will appear. Select the Port
Setting tab and set all value following the figure below and click on the Advance button
(6) The Advanced Setting for COM10 will appear. Click on the COM Port Number
box to change to COM4 or another port in range COM1 to COM4.
10 l PX-4000 mini-AVR In-System Programmer documentation
(7) Set the value following the figure below. Especially at the Latency Timer (msec)
suggess to set to 1 and check the box at Serial Enumerator. Click OK button.
(8) Back to the USB Serial Port Properties. Now the COM port number at the title
bar will change to COM4. Click on the OK button.
(9) Remove the PX-4000 and plug again. Check the USB Serial port address. The
new address must be COM4. Now the PX-4000 ready for using with AVR Prog. software.
PX-4000 mini-AVR In-System Programmer documentation l 11
3.1 Connect the PX-4000 to Computer USB port and Target microcontroller board.
Apply the supply voltage.
Connect to USB port
Apply the supply voltage
PX-4000
NX-Mega16 or another AVR board
3.2 Open the Window explorer. Enter to find the AVR Prog execute file as :
C:\Program file\ATMEL\AVR tools\AvrProg\AvrProg.exe. Double clikc at this file. The
programmerís window will appear.
12 l PX-4000 mini-AVR In-System Programmer documentation
3.3 If the connection fail, the warning dialogue box below will appear.
3.4 If all is correct, Click at the
button at the main AVR Prog window to
set the configuration. Setting this will be done only once. Changing of the configurations
can be done subsequently as well. The Advance window will appear.
3.5 Setting the configuration bit :
3.5.1 Set the Lock Bit to Mode 1 if you need to read the protected code
after programming.
3.5.2 Check the box SPI Enable (DO NOT UNCHECK !!!!)
If unchecked, the programming process will still continue. The programmed AVR
microcontroller will run but you will not be able to RE-PROGRAM THE CHIP WITH THE AVR
SOFTWARE. The only solution is to Re-program this bit with a High-Voltage Programmer
such as ALL-11, AVR ISP Mark II etc.
PX-4000 mini-AVR In-System Programmer documentation l 13
3.5.3 Set to Oscillator mode. Normally this will set to Ext XTAL.High frequency
in connection to the external crystal to clock source. (Important; do not remove or
change unless are using another clock source).
3.5.4 Click
button to store Configuration information.
3.5.5 Click
button for erasing the Program memory
3.5.6 Click
button for finishing the Configuration setting.
3.6 Open the HEX file by click at
button.
3.7 Click
for programming the HEX file to the microcontrollerís program
memory. The Busy red LED on PX-4000 programmer lights until finish it will off. At the Progess
bar on AVR Prog software will show the status until finish too. Target microcontroller will
run immediatly.
The PX-4000 programmer has indicators as :
1. The LED is green for Ready status: Inform that it is ready and supply voltage
status.
2. The LED is red for Busy status: Lets the user know the programmer is still
working.
14 l PX-4000 mini-AVR In-System Programmer documentation
4. Using Avr-Osp II software
4.1 Connect the PX-4000 to Computer serial port and Target microcontroller board
with ISP cable. Apply the supply voltage.
4.2 Open Avr-Osp II software by double-click on AvrOspII.exe file. The main
window will appear.
4.3 Select the Configuration tab to select the communication port (this software
can support COM port up to COM16) and baudrate. You need to set it to 115,200
baudrate only. The port is selected to Auto.
PX-4000 mini-AVR In-System Programmer documentation l 15
4.4 Back to main window by selecting the Program tab. Click Auto Detect button
in Device box. Wait a moment to see the operation at Status box.
Status box
A Device box will show the number of AVR microcontroller with some
information. At the same time, the Status box will display much status and information
-
Checking programmer type...
Found AVR ISP
Entering programming mode
Signature = xxxx xxxx xxxx
- Leaving programming mode
16 l PX-4000 mini-AVR In-System Programmer documentation
4.5 Select the Fuse Bits tab for reading the Configuration or Fuse bit of the AVR
microcontroller. Two parameters must not be change. See the figure below.
Donít remove
and change !!!
Donít remove
and change !!!
If operated with
external Crystal
or Resonator.
PX-4000 mini-AVR In-System Programmer documentation l 17
4.6 If you require Code protection, select the Lock Bits tab. Select the bit for
reading protection after programmed already.
4.7 Select the Advance tab for checking the Signature of microcontroller by
clicking at the Read button in Read Device Signature box for interfacing confirmation.
18 l PX-4000 mini-AVR In-System Programmer documentation
4.8 Back to Program tab, select the HEX file in Flash box.
4.9 At Auto Program Setting box, user can set the automatic programming to 3
steps as :
4.9.1 Erase devive before programming
4.9.2 Verify device after programming
4.9.3 Send Exit after programming
Suggess to select Erase devive before programming choice at least.
4.10 User can start the programming 2 methods. First, click at Program button in
Flash box or click the Auto button in the Auto program setting box. The progress bar will
active and Status box reports the operation status together.
4.11 The Avr-Osp II (in V4.00) cannot show the HEX data that it has programmed.
www.inexglobal.com