1
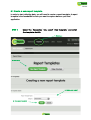
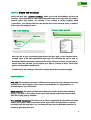
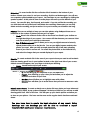
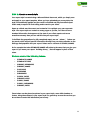
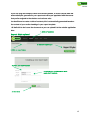
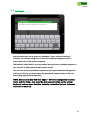
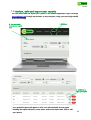
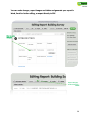
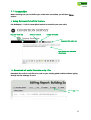
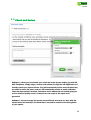
User Manual
1
Welcome to your GoReport® Tutorial
We are delighted that you are about to start using GoReport®
and trust that this guide will get you started quickly in order to
gain the benefits of using this innovative technology.
Your account Manager is:
________________________
You can contact our Technical Support Team:
(9am - 5pm)
+44 (0) 2890 494006
[email protected]
2
Contents
1.0 About GoReport................................................................................... 4 2.0 How it works ....................................................................................... 5 GoReport Web Application ....................................................................... 5 GoReport iPad App ................................................................................. 5 3.0 GoReport website application ................................................................ 6 3.1 Create a new report template ............................................................. 7 4.0 Using the GoReport iPad App ............................................................ 14 4.1 Creating New Reports ...................................................................... 15 4.2 The sketching tool .......................................................................... 17 4.3 Photos and video ............................................................................ 18 4.4 Import Tool - Import photos ............................................................. 19 4.5 Text input ...................................................................................... 20 4.6 Dictation Options ............................................................................ 21 5.0 GoReport features ............................................................................. 22 6.0 Submit your report ............................................................................ 24 8.0 Transcribe ........................................................................................ 27 1. Using GoReport “s built in feature ....................................................... 27 2. Download all audio files into a zip. File ................................................ 27 3. Professional Transcription .................................................................. 28 Appendix ............................................................................................... 32 3
1.0 About GoReport
GoReport® is an innovative complete end-to-end report generation solution for onsite professionals. We provide cutting-edge technology right to the palm of your
hand.
Traditional ways of collecting data and writing reports is time consuming, and can
involve transporting multiple bulky devices such as cameras, note pads and
Dictaphones. Like an ideal personal assistant GoReport® takes pictures, transcribes
notes, makes sketches, formats data, carries all your equipment and produces a
professionally written report. GoReportÆ gives you the ability to instantly generate
high quality customizable reports while on location. Using an iPad and our
technology you can then upload and export reports to Word, Excel or PDF for
distribution.
Whether you are a user, a buyer or a head of department, GoReport can save you
time; money; boost productivity; improve efficiency and increase margins. Start
making your time count.
4
2.0 How it works
GoReport® consists of two elements, a website application that you log into from
any Internet enabled device and the iPad app itself. Your secure logins credentials
are used to access both the website application and iPad app.
GoReport Web Application
The website application will let you build report templates that can be synchronised
with your iPad for capturing data on site. Your submitted survey data will be
securely stored here and you will use this part of the system to carry out any edits to
your reports or to export them to Microsoft Word, Excel or PDF formats.
GoReport iPad App
The second element of GoReport ® is the iPad app, which is
FREE
to
download from iTunes and the Apple App Store. Simply download the
app and login from your iPad. Here you will select a report template
from those that you have previously created in the website application. This report
template will allow you to collect all your data on site, including text, photos, videos,
sketch, dictation and tabular information.
When you have collected your data you can submit it from site by the simple click of
a button. Your data is then ready for final edit and accessible through the Web App.
5
3.0 GoReport website application
The GoReport® website application allows you to manage your reports in one
secure place. Here you can create and manage your report templates, your
uploaded reports, your users and your GoReport® account. It has a simple user
interface that gives you complete control over every aspect of your reporting.
To get started, simply click : sign in : at www.goreport.net and login to the
GoReport® website application (screen above) and create a report template.
6
3.1 Create a new report template
In order to start collecting data, you will need to create a report template. A report
template is the foundation for how you want to capture data on your iPad
application.
STEP 1
Und er th e ‘ Tem plate s ’ tab, s elect ‘ New tem plate ’ and en ter
the tem plate de tails
1. Cl ick h er e
2. C lic k he re
3. Name you r r epor t
4. Save y our template
7
STEP 2: A dd a S ection Head ing
Once you have created a new report template you will need to add depth to your
report. To do this you can begin to add the content by creating section headings.
Section headings are the main section breaks of your report. They provide the basic
outline for what information your report contains. Examples include Introduction,
Summary, and Conclusion.
Begin by adding a n ew h eading
To add a section heading click on
the ADD NEW HEADING icon.
Next add the head ing t itle
You will then be prompted to
provide a name for the heading.
Headings cannot be left blank.
STE P 3 : Se lecting the inp ut t ype
You will now be prompted to
pick the input type. Choose
Section Heading. Please note
that Sections Headings do not
allow you to capture data, they
just provide the structure of
your report.
8
STEP 4: Create Sub Headings
Select the input type ‘se ction headin g’ allows you to add sub headings and sub-sub
headings. The information for each sub heading will relate to the data that you need to
capture within that section, for example if you created a section heading called
‘Introduction’, the content within this may be the name of the surveyor, date, or address.
Add a new sub heading for each.
Cho ose inpu t m eth od
A dd a su b h eading
C lick her e
Enter the title of your sub heading and choose the input type. In the example above,
‘multiple input’ is the most appropriate input type. This will allow the user to type or
dictate the specific information required in the section. There is an array of input types to
choose from that will allow you to capture your data in a variety of ways. These input
options are described in detail below.
To add another sub heading to this section, simply repeat the same process again.
Input Options
Pick List: This method of data input will allow you to choose the most relevant answer to a
question from a list of options. If your answer is not listed click on “please specify” to
manually input in your information.
Date Selector: This method of data input allows you to select a date value instead of
typing it. Just click on the section of your report that requires a date and select the date
from the scrolling pop-up calendar.
Pre-defined Responses: This allows you to select a large block of information commonly
used in your reports. Click in the section of the report where this information is required,
and select from the drop down. You can add more then one pre-defended response in a
section by appending your text.
9
Dictation: To record audio click the red button this is located on the bottom of your
toolbox. Dictate your notes. To end your recording, click the red button again. You will now
see a speaker symbol added to your report. You can listen to your recordings by clicking the
speaker symbol. At this point in time an audio player will come up at the bottom of your
screen. You can click play, fast forward, and rewind. If you do not like the recording you
can click the trash can symbol and it will delete the recording. Please note you can only
delete a whole recording, not just a section. So try not to make your dictations too long.
Photos: There are a multiple of ways you can take photos using GoReport there are no
limitations to the number of photos you can put in a report.
•
iPad: Once in the relevant section click on the Photo icon listed in your toolbox on
the right hand sign of your screen. Your screen will then become your camera. Point
and click at what you would like to document.
•
Eye-Fi Enhancem ent: Eye-Fi allows you to use your digital camera to instantly
upload photos while out on the job site. Turn on your digital camera and take the
photos you need. After you take a couple photos the Eye-Fi will start uploading
them to your iPad”s camera roll. To access the photos click on the Polaroid icon,
and select the images that you wanted displayed in your report.
Sketch: To create a sketch click in the area of your report where you need to add a sketch.
Click the drawing pencil icon in your toolbox located on the right hand side of your screen.
A blank canvas will appear. Use your finger to sketch your drawing.
•
Icons- located on the top of your screen
o
o
o
o
T: icon will bring up your keyboard so you can add notes.
Pencil: icon will bring up your colour pad and allow you to adjust the
thickness and colour of your lines.
M arker: icon will allow you to highlight areas with yellow.
Eraser: icon will allow you to eraser areas that you want to remove or redo.
Sketch over Photo: To create a sketch over a photo click on a photo you have taken and
saved into your report. A pop up box will appear. At the top of that box you will see an add
drawing pencil icon. Click on this icon. This will open up your sketch options and allow you
to draw on your picture. The icons are the same as the regular sketch function mentioned
above.
Yo u now k now how to create the bas ic s tructure of any report. Usin g
he adings and s ub he adings yo u w ill be ab le to co nstru ct a repo rt
tem plate th at m e ets yo ur com pany s require men ts.
10
STEP 5: Create a word style
Your report style is created using a Microsoft Word document, which you simply save
and apply to your report template. When you have uploaded your survey data, the
style is automatically applied and the result is a finished and fully formatted report
thatís ready to export for final editing and to send to your client!
Open up a blank word document and customise it to replicate your own corporate
style. Your report style can contain as many pages as you like, so if there is some
standard information that appears at the start of your client reports such as an
executive summary then you can add this into your report style.
To facilitate the generation of a fully completed report, we use ‘ tokens ’. Tokens are
key words, which will pull specific information directly from your data collection on the
iPad app and populates into your report. Tokens are in a format of $TOKEN_NAME$.
So for example the token $TEMPLATE NAME$ will relate to the name that you give your
report. If you name your report ‘ Building Survey ’, that will appear in place of that
token.
We h ave created the follo win g to ke ns:
•
$TEMPLATE_NAME$
•
$TEMPLATE-TYPE$
•
$REPORT_REFERENCE$
•
$REPORT_NAME$
•
$AUTHOR$
•
$CHECKER$
•
$REVIEWER$
•
$CHECK_DATE$
•
$REVIEW_DATA$
•
$VIDEO_LINKS$
•
$VIDEO_PASSWORD$
•
$REPORT_DATE$.
These tokens can be placed anywhere in your report style, even within headers or
footers. Using these tokens in your report style is a great way to save time as that you
do not have to enter this information post survey!
11
If you are using the GoReport check and review workflow, a version control table will
automatically be generated in your report and will be pre-populated with the names
that youíve assigned to the checker and reviewer roles.
You donít have to create a table of contents; this is automatically generated based on
the content of your section headings in your report template
All thatís left to do is save the document so you can upload it to the website application
later.
1. Cl ick o n template s
Report Style upload
3. C lick new r epor t style
2. C lic k on repo rt style s
4. Name yo ur sty le templ ate
5. U pload y our wor d docum ent. B ack
page also i f r equi red.
6. Cli ck Save
12
Applying the word style to a report template
In order for your report to download fully formatted, you must link the report template
with a style template. This enables the user to have multiple styles available for different
templates.
1. Cl ick o n templates
2. C lic k on repo rt template s
3. C lick to edit the repo rt that yo u
want to add the sty le to
4. C lick to edit
settings
5. U sin g th e dro p do wn me nu
yo u can c hoo se whic h style you
want to apply to this tem pl ate
6. Be spo ke you r styl e usin g th ese o pti ons
7. Cl ick save
13
4.0 Using the GoReport iPad App
When do you need an Internet connection?
You only need an Internet connection for a few common situations
An Internet connection is required to:
Log on
Log on to the GoReport® iPad app with your username and
password that you received when activating your account. Turn
‘ sta y logge d in ’ to on. To log on you must be connected to
the internet, however once logged in with ‘ sta y logge d in ’
set to on you do not need a connection and can complete as
many reports as you like, with no need for an Internet
connection
An Internet connection is required to:
Submit a reports
You will need to be connected to the Internet in order to
submit reports from the iPad to the web application. This can
be done directly from site by using a 3G-enabled iPad.
An Internet connection is required to:
Perform a full sync
You will need to be connected to the Internet in order to
perform a ‘ full sync ’. The ‘ full sync ’ function enables any
changes made your templates on the web application to sync
with the iPad application.
An Internet connection is required to:
Use Siri
Apples voice recognition function ‘ Siri ’ requires an Internet
connection if used.
An Internet connection is required to:
Use GPS
Apples GPS function, which captures your location, requires an
Internet connection for initialising location.
14
4.1 Creating New Reports
Click ‘ Create n ew repo rt ’. You will be presented with a list of report templates that
have been built previously in the website application. Simply choose the report template
you want to use. Then name the report, add any internal reference number (if applicable)
and provide the report date. Once your report is created you will now be able populate
your data.
There is also a library of templates here for you to use ñ you can ‘ Clon e ’ these in the
website application and edit to suit your own requirements. Cloning a template is only
done once a report has been submitted from a template and adjustments need to be
made to the template layout.
15
Pro gress i ndicator s
Our user interface is extremely clean and clear allowing you to navigate through your
survey and complete it with ease. Youíll see your section headings listed to the left of the
screen and the main content of each section is displayed on the right.
There are progress indicators attached to each section to let you know if it is complete or
still requires attention. You can tell this by how the colour changes in the circles and the
icons:
Full G reen Circle: section completed;
Se m i-G reen Circle: only part of that section was completed.
Em pty Circle : section needs data.
Data
capture
toolsyou can jump between sections!
For your
convenience
Sk etc h to ol - tap to bring up sk etch too ls
pad the sketch pad
Cam era tool - tap to tak e p hoto s
Video to ol - tap to record video s
Im port too l - tap to inse rt an im age from
your iPad
Text input too l - tap to ente r tex t
into
fields
Dicta te t ool - tap to start recordin g au dio
16
4.2 The sketching tool
Adding tex t
High lighter
Penc il
Er aser
C licki ng the
done button
gene rate an image
in th e re levan t
sectio n
Pen, C hoose colo ur
and stro ke si ze
Create detailed sketches on your iPad. Choose from a range of colours and stroke sizes,
and there's a highlighter and eraser. You can annotate your drawings too and there is a
zoom function, which is perfect for detail sketching.
You can also sketch over photos
17
4.3 Photos and video
Title you r ph oto he re
Take photos using your iPad. The images will be automatically integrated into your report
in the relevant section. You can also import photos using your digital camera.
Eye-Fi is a wireless SD card that allows you to use your digital camera to instantly upload
photos while out on the job site. Turn on your digital camera and take the photos you
need. After you take a couple photos the Eye-Fi will start uploading them to your iPad
camera roll. To access the photos click on the import icon, and select the images that
you wanted displayed in your report.
You have the option to choose whether you wish the photo to appear in the body of the
report or in the appendix of the final report.
For traceability and quality control purposes GoReportÆ gives each photo and sketch a
unique ID and title which auto indexes them to the correct report heading which saves a
lot of time and admin hassle. You can also give the images a title as shown in the image
above, but if you forget, donít worry, GoReport® will tag the photo to the correct place
in your report!
You can also record video using your iPad. This will be automatically integrated into your
report output as a link with a password, which can be clicked by the client to view.
18
4.4 Import Tool - Import photos
C lick her e to impo rt pho to s
Select the import tool icon to import photos from your iPad library. This feature is
great if you need to use a separate DSLR camera and need to include the images
within your report. (see our separate “how to guide” for photos )
19
4.5 Text input
Select the text input icon to enter text. GoReport® has a variety of text input
methods. You can add a single line of text, add multiple paragraphs of text or
choose from a list of pre-defined responses.
This feature is really useful if you have clauses that you use as a standard response in
your reports ñ it really speeds up data capture on site.
You can enter as many predefined responses as you require and these will appear in
a list on your iPad so you simply select the appropriate response when on site. No
more typing long standard responses!
NO TE: So m e u sers m ay fin d th at A pple ’s Siri voice reco gnition fun ction
w orks w ell for them . J ust push th e m icrop hone bu tton on the virtu al
keyboard to have your dictation in stantly transcribe d to te xt. (Inte rnet
con nectio n re quired)
20
4.6 Dictation Options
Select the dictate icon to start recording audio. Simply talk into your iPad and it will
record and place the audio file within the relevant section of your report.
This eliminates the need to go through audio files trying to match the recordings to the
relevant parts of the survey. GoReport® automatically saves your data into the
relevant sections ñ saving you more time! Click on the audio file icon to bring up the
controls, which allow you to review your dictation. As you can only delete a recording in
its entirety, best practice is to dictate in multiple short recordings. All audio files are put
into the correct section of the report automatically.
Transcription for your Admin support team
Once you have captured your audio on site you will have three transcription options
1. Use GoReport®’s built in transcription feature to transcribe your own audio.
2. Download the audio in a zip file to be used on your existing pedal enabled software,
typing directly into the web app or word.
3 . Submit your report to be professionally transcribed within 24hrs
21
5.0 GoReport features
GoReport has lots of intelligent features that have been designed to allow you to
collect data faster.
Da te sele ctor
Streamlining the data capture process is at the
heart of what GoReport does. We have
enabled smart iPad features like this to make
gathering your data easier and more efficient.
Easily input the date of your survey using a
scrolling pop-up calendar. This allows you to
select a date value instead of typing it. This
feature is great for saving time and it reduces
the likelihood of mistakes.
H int s-an d-Tip s G oR ep or t o ffe rs se ction -by se ction gu idan ce n o te s
GoReport ‘Hints’ feature allows you to customise
guidance notes for e ach an d e very p art of your
report template! On site, they act as a prompt to
guide the user on what is required to complete the
survey successfully. This is great for giving junior staff
instructions and guidance or for introducing new
template formats.
For those experienced with the template, the hints
can be hidden.
Pick lists
Use pick lists to speed up data capture on site
and standardise your responses. This method
of data input will allow you to choose the most
relevant answer to a question from a list of
options.
You create your pick lists in the website
application to contain whatever options are
required. A clever ‘please specify ’ option will
allow you to add in something that isnít
contained within the list.
You can also set up your pick list to allow
multiple selections.
22
Dynamic Pick lists
Now you can save even more time
due to our ‘Dynamic Pick List’
functionality. When using our
dynamic pick list you can instantly
choose recently entered data
through the "Please Specify" option
of a Pick List. This is beneficial if you
have a distinctive feature recurring
within your survey. Now you only
have to manually input it once and it
becomes a unique option for all the
pick lists in the specific section you
are working on. No more having to
manually input the data multiple
times or add it to your standard
options.
Pre-defined responses
GoReport has a variety of text input
methods. You can add a single line of text,
add multiple paragraphs of text or choose
from a list of pre-defined responses.
This feature is really useful if you have
clauses that you use as a standard
response in your reports ñ it really speeds
up data capture on site.
You can enter as many predefined
responses as you require and these will
appear in a list on your iPad so you simply
select the appropriate response when on
site. No more typing long standard
responses! Once selected you can also
make edits to the input text or fill in
[bracketed] sections to customise.
23
6.0 Submit your report
Whe n yo u have finish ed
col lectin g you r data
simply clic k ‘Don e’.
C lick ‘Submit r epor t’ to upl oad you r data to the
website appli cation. You must be c onne cted to the
Inter net to do this.
24
7.0 Review, edit and export your reports
You can review edit and export your reports in the website application. Sign in through
www.GoReport.net through any browser on any computer, using your same login details
as for the iPad app
2. You can se ar ch
thr ough y ou r r epor ts
he re
1. Cl ick h er e
3. C lick her e to
open yo ur r epor t
Your uploaded reports will appear in a list. You will see details of each report
including the report reference, name, status, author and report date. Click to edit
your reports.
25
You can make changes, export images and tables and generate your report in
Word, Excel for further editing, or export directly to PDF.
C lick to make
chan ges
Export images,
audio and tables
26
8.0 Transcribe
When choosing how you would like your audio to be transcribed, you will have three
options.
1. Using GoReport ís built in feature
Use GoReport®’s built in transcription feature to transcribe your own audio.
Play y our audio clip
Rewin d 5 sec onds
Rewin d 15 seco nds
Down load this au di o clip
Ty pe dire ctly i nto the audio
cli p w indow.
2. Download all audio files into a zip. File
Download the audio in a zip file to be used on your existing pedal enabled software typing
directly into the web app or word.
Export into a zip
file.
27
3. Professional Transcription
Submit your report to be professionally transcribed either by your own in-house pool of
transcribers or by our own transcriber company who will your audio transcribed within 24hrs
By clicking on Trans cribe Now your audio will be
automatically transcribed by our tried and tested 3rd
party professional transcription company.
The cost will depend on the length of the audio being
submitted.
If you choose to use this option for your own pool of
transcribers, the cost will not apply.
We have separate T&C’s for setting up our
customer’s own transcribers. If you are interested,
please ask your account manager for more details.
28
9.0 Check and Review
GoReport® allows you to automate your check and review process helping you with ISO
9001 compliance. Simply assign a checker and reviewer through the web application and
instantly submit your reports to them. They will automatically receive an email when they
are asked to review the report, and you will automatically receive an email notification
when they have posted comments. Comments can be added and are tracked giving you
a clear record for quality control. Comments are not output in the report when
generated.
GoReport® lets you manage this process more efficiently and saves you time. With the
checks carried out instantly in the cloud there's no need to waste time circulating drafts
of your reports!
29
1 0.0 Final report
Generate your
report in Word or
PDF
C over page with l ogo, tex t and images.
C onten ts page ge ner ated automatical ly
30
Te xt and images fo rmatted.
F ont style & size form atte d
Spac ing and paragr aphing for matted
He ade rs and foo ters i nclu de d
Ver sion c ontr ol table gen er ate d au tomatically
31
Appendix
Tutorial Videos- Click the link to watch the video
Subject Web App screen Building templates Building templates Building templates Building templates Building templates Building templates Building templates Building templates Building templates Building templates Output Styles Output Styles Output Styles Managing users Managing reports Managing reports Managing reports Managing reports Tutorial Name Dashboard
How to build a new report template
How to create a switch
How to add a pick list
How to apply a single line of text
How to create a section heading
How to create a numeric only field
How to add a pop up calendar
How to capture multiple input data
How to apply a fixed row table
How to build a table with continuous rows
Creating a report style
Uploading a report style
Assigning a report Style…
User Manager
Checking and Reviewing
How to edit reports
Reports Manager
Sample Out Put Report
If you require any further assistance please contact our support team
E: [email protected]
T: 028 9049 4006
32