1
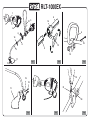
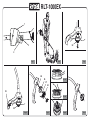
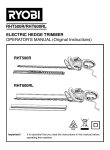
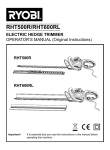
RLT-1000EX
ELECTRIC LINE TRIMMER
OPERATOR’S MANUAL (Original Instructions)
Important! It is essential that you read the instructions in this manual before
operating this machine.
RLT-1000EX
1
2
8
10 5
3
14
7
4
6
6
14
8
9
9
16
13
15
11
12
Fig.1
19
17
Fig.2
Fig.3
10
18
21
11
20
Fig.4
Fig.5
Fig.6
RLT-1000EX
7
22
3
2
Fig.7
Fig.8
26
25
27
Fig.9
Fig.11a
24
23
Fig.11b
22
Fig.10
Fig.11
Fig.11c
Fig.12
ENGLISH
n Do not handle the product with wet hands.
n Do not use the product if the switch does not turn the
product on or off. A product that cannot be controlled with
the switch is dangerous and must be repaired.
n Avoid accidental starting; never carry the product with
your finger on the trigger.
n Stay alert and pay attention to what you are doing. Use
common sense when using this product.
n Do not force the product. It will do a better job with less
likelihood of a risk of injury when you operate it at the
rate for which it was designed.
n Pull the plug out immediately if the mains or extension
lead is damaged or severed.
n Disconnect the product from the power supply when
it is not in use, before servicing and when changing
accessories.
Your line trimmer has been engineered and manufactured to
Ryobi’s high standard for dependability, ease of operation,
and operator safety. When properly cared for, it will give
you years of rugged, trouble-free performance.
Thank you for buying a Ryobi product.
INTRODUCTION
This appliance is not intended for use by persons (including
children) with reduced understanding, or lack of experience
and knowledge, unless they have been given supervision
or instruction concerning use of the appliance by a person
responsible for their safety. Children should be supervised
to ensure that they do not play with the appliance.
This product has many features for making its use
more pleasant and enjoyable. Safety, performance, and
dependability have been given top priority in the design of
this product making it easy to maintain and operate.
SPECIFIC SAFETY RULES
SPECIFIC TRIMMER SAFETY RULES
GENERAL SAFETY RULES
WARNING:
When using electric gardening appliances, basic
safety precautions should always be followed to
reduce the risk of fire, electric shock and personal
injury, including the following:
READ ALL INSTRUCTIONS GENERAL SAFETY
RULES
n Be familiar with the controls and proper use of the product.
n Clear the work area before each use. Remove all objects,
such as rocks, broken glass, nails, wire or string that
can be thrown or become entangled in the cutting line.
n Wear heavy, long trousers, boots and gloves. Do not
wear loose fitting clothing, shorts or go bare foot. Do
not wear jewelry of any kind.
n Secure hair above shoulder level to prevent entanglement
in moving parts.
n Do not allow children or untrained individuals to use
this product.
n Keep all by standers, especially children and pets, at
least 15m from the operating area.
n Do not operate this product when you are tired, ill or under
the influence of alcohol, drugs or medication.
n Do not operate in poor lighting. Use the unit only in
daylight or good artificial light.
n Keep firm footing and balance. Do not over reach. Over
reaching can result in loss of balance or exposure to
hazards.
n Keep all parts of your body away from moving parts.
Inspect the product before use. Replace any damaged
parts before use.
n Do not operate the product in damp or wet locations.
n Do not use the product in the rain.
n Wear safety glasses or goggles when operating this
product.
n Use the right product. Use the product for the intended
purpose only.
2
nReplace the trimmer head if cracked, chipped or damaged
in any way. Be sure the trimmer head is properly installed
and securely fastened.
nMake sure all guards straps, and handles are properly
and securely attached.
nUse only the manufacturer’s replacement line in the
trimmer head.
nNever operate the product without the safety guard in
place and in good condition.
nUse the product for cutting grass and light weeds only.
Do not use for any other purpose.
nBefore starting the product, position it so that the line
does not come in contact with anything you do not intend
to cut.
nMaintain a firm grip on both handles while trimming. Keep
the trimmer head below waist level. Never cut with the
trimmer head over 76 cm or more above the ground.
nKeep the working area free from wires, stones and debris.
nDo not cut against hard objects. This could cause injury
or damage the trimmer.
nDo not use the trimmer to cut grass which is not in contact
with the ground; for example, do not cut grass which is
on walls or rocks etc.
nAlways use your trimmer in an upright position.
nKeep hands away from the cutting line. Do not attempt
to remove cut material or to hold material to be cut when
the line is moving. Be sure to unplug the product before
clearing jammed material from the line. Do not grasp the
line when picking up or holding the product.
nBe cautious after turning off the product. The line coasts
after turning off the product.
nDo not switch the trimmer on in enclosed or poorly
ventilated spaces or in the presence of flammable
and/or explosive substances such as liquids, gas and
powders.
nDo not cross roads or gravel paths with the trimmer still
running.
nNever fit metal cutting elements to the trimmer.
ENGLISH
SERVICE RULES
SPECIFIC SAFETY RULES
n
Service on this product must be performed by qualified
repair personnel only. Service or maintenance performed
by unqualified personnel could result in injury to the user
and/or damage to the product. Such service may also
void your warranty.
nUse only identical replacement parts when servicing the
product. Follow the instructions in the Maintenance
section of this manual. Use of unauthorized parts or
failure to follow maintenance instructions may create a
risk of shock, serious injury to the user and/or damage
to the product. Such use may also void your warranty.
ELECTRICAL SAFETY RULES
nMake sure the cord is located so that it will not be stepped
on, tripped over or otherwise subjected to damage or
stress.
nDo not abuse the power cord. Never carry the product
by the cord. Never pull the plug out of the power point
by the cord. Keep the cord away from heat, oil and sharp
edges.
nFor outdoors work use only suitably approved extension
cables with a min. conductor cross section of 1.5mm2
The plug connectors must have earthing contacts and
be rain-water-proof.
nInspect extension cords for deterioration, cuts or cracks in
the insulation. Repair or replace the cords if any defects
appear.
nA nameplate on the product indicates the unit’s voltage.
Never connect the product to an AC voltage that differs
from this voltage.
nIf the power cord or extension cable becomes damaged
during use, disconnect the cord from the supply
immediately. DO NOT TOUCH THE CORD BEFORE
DISCONNECTING THE SUPPLY.
nElectrical power should be supplied via a Residual Current
Device (RCD) with a tripping current of not more than
30mA.
STORAGE AND TRANSPORTATION RULES
nStop the motor when you are not trimming or when you
are walking from one trimming location to another.
nStore the product inside in a dry place.
nStore the product up high or lock it up to prevent
unauthorized use or damage. Keep the product out of
the reach of children.
nSecure the product when transporting it.
nSave these instructions. Refer to them frequently and
use them to instruct others who may use this product. If
you loan someone this product, loan these instructions
also.
n Never allow children or people unfamiliar with the
instructions to use the machine.
TRAINING
MAINTENANCE RULES
nRead the instructions carefully. Be familiar with the controls
and the proper use of the machine.
nNever allow people unfamiliar with these instructions
or children to use the machine. Local regulations may
restrict the age of the operator.
nKeep in mind that the operator or user is responsible for
accidents or hazards occurring to other people or their
property.
nMaintain the product with care. Follow instructions for
changing accessories. Keep the product dry, clean and
free from oil and grease.
nUnplug the product before making adjustments or repairs.
nDo not use the product if parts have been damaged.
Check the product regularly to make sure that it will
operate properly and perform the intended function.
Check for alignment of moving parts, binding of moving
parts, breakage of parts and any other condition that
may affect the unit operation. Inspect the unit’s power
connection. Any part that is damaged should be properly
repaired or replaced by a Ryobi authorized service centre.
nKeep the product clean of grass clippings and other
materials that may become lodged in the cutting lines
and air vents.
nNever douse or squirt the product with water or any other
liquid. Do not use detergents or solvents. Keep handles
dry, clean and free from debris.
nAfter each use, clean with a soft, dry cloth.
PREPARATION
nBefore use, check the supply and extension cord for signs
of damage or aging. If the cord becomes damaged during
use, disconnect the cord from the supply immediately. DO
NOT TOUCH THE CORD BEFORE DISCONNECTING
THE SUPPLY. Do not use the appliance if the cord is
damaged or worn.
n Never operate the machine while people, especially
children, or pets are nearby.
n Wear eye protection and stout shoes at all times while
operating the machine.
WARNING:
OPERATION
nKeep supply and extension cords away from cutting
means.
n Use the machine only in daylight or good artificial light.
n Never operate the machine with damaged guards or
shields or without guards or shields in place.
Before carrying out any maintenance operations, cut
off the electric power supply by disconnecting the
plug from the mains.
nIf the line cut-off blade is well worn or breaks, have this
replaced by contacting an authorized service centre.
3
ENGLISH
MAINTENANCE AND STORAGE
nSwitch on the motor only when the hands and feet are
away from the cutting means.
nAlways disconnect the machine from the power supply
(i.e. remove the plug from the mains or remove the
disabling device)
– whenever leaving the machine unattended;
– before clearing a blockage;
– before checking, cleaning or working on the machine;
– after striking a foreign object;
– whenever the machine starts vibrating abnormally.
n Take care against injury to feet and hands from the
cutting means.
nAlways ensure that the ventilation openings are kept
clear of debris.
nDisconnect the machine from the power supply (i.e.
remove the plug from the mains or remove the disabling
device) before carrying out maintenance or cleaning
work.
n Use only the manufacturer’s recommended replacement
parts and accessories.
nInspect and maintain the machine regularly. Have the
machine repaired only by an authorized repairer.
nWhen not in use, store the machine out of the reach of
children.
SYMBOLS
Some of the following symbols may be used on your tool. Please study them and learn their meaning. Proper interpretation
of these symbols will allow you to operate the tool more safely and effectively.
SYMBOL
EXPLANATION
Warning! Indicates a potentially hazardous situation, which, if not avoided, could result in death or
serious injury.
Read this safety and operating instructions in this booklet and keep it in a safe place for future
reference.
Wear eye protection.
Do not expose to moisture
Keep all bystanders away.
Disconnect the mains plug if the cord is damaged or entangled.
Beware of thrown or flying objects to bystanders. Keep bystanders a safe distance away from the
machine.
4
ENGLISH
SYMBOLS
The following signal words and meanings are intended to explain the levels of risk associated with this product.
SYMBOL
SIGNAL
DANGER: WARNING: CAUTION: CAUTION: MEANING
Indicates an imminently hazardous situation, which, if not avoided, will result in death or
serious injury.
Indicates a potentially hazardous situation, which, if not avoided, could result in serious
injury.
Indicates a potentially hazardous situation, which, if not avoided, may result in minor or
moderate injury.
(Without Safety Alert Symbol) Indicates a situation that may result in property damage.
SERVICE
Servicing requires extreme care and knowledge and should
be performed only by a qualified service technician. For
service we suggest you return the product to your nearest
AUTHORISED SERVICE CENTRE for repair. When
servicing, use only identical replacement parts.
WARNING:
Observe all normal safety precautions related to
avoiding electrical shock.
WARNING:
The operation of any power tool can result in foreign
objects being thrown into your eyes, which can result
in severe eye damage. Before beginning power tool
operation, always wear safety goggles or safety
glasses with side shields and a full face shield when
needed. We recommend Wide Vision Safety Mask
for use over eyeglasses or standard safety glasses
with side shields. Always use eye protection.
SAVE THESE INSTRUCTIONS
WARNING:
To avoid serious personal injury, do not attempt
to use this product until you read thoroughly and
understand completely the operator’s manual. Save
this operator’s manual and review frequently for
continuing safe operation and instructing others
who may use this product.
5
ENGLISH
SPECIFICATIONS
ASSEMBLY
Voltage................................................... 230-240V~50Hz
Nameplate Power.................................................. 1000W
No Load Speed.................................................7,000/min
Cutting Line............................................................1.5mm
Max.Cutting Path..................................................380 mm
Measured Sound Power Level.................. LWA: 90.9dB(A)
Sound Pressure Level......... LPA:79.2dB(A); KPA: 3.0dB(A)
Vibration............................................ 4.8m/s2, K=1,5m/s2
Weight.....................................................................4.8 kg
CONNECTING LOWER SHAFT TO THE UPPER
SHAFT (FIG.2)
WARNING:
The split shaft is for transport and storage purposes
only. The electric power head is not recommended for
use with any other attachment.
The coupler (item 14) connects the lower shaft to the upper
shaft. Follow these steps to connect the lower shaft to the
upper shaft.
nLoosen the wing nut (item13) by turning it
counterclockwise.
n Remove any end cap from the lower shaft.
n Align the button with the guide recess on the upper shaft.
n Slide the lower shaft (item9) into the upper shaft (item8)
until the two shafts click into place.
NOTE: If the button does not release completely in the
positioning hole, the shafts are not locked. Slightly rotate
the lower shaft until the button is locked into place.
n Tighten the wing nut (item13) securely by turning it
clockwise.
NOTE: During operation, periodically check the wing nut
(item13) and tighten as necessary.
DESCRIPTION
1. Trigger handle
2. Trigger
3. Lock button
4. Cord retainer
5. Motor housing
6. Front handle
7. LiveTool Indicator
8. Upper shaft
9. Lower shaft
10.Shoulder strap
11.Safety guard
12.Cutting line
13.Wing nut
14.Coupler
15.Knob nut
16.Bolt
17.Washer
18.Screws
19.Bracket
20.Clip
21.Loop
22.Bump knob
23.Cut off blade
24.Spool
25.Trimmer head
26.Drive shaft
27.Spring
REMOVING THE LOWER SHAFT FROM THE
UPPER SHAFT (FIG.2)
Disconnect the upper shaft and lower shaft for storage or
when transporting.
Follow these steps to remove the lower shaft from the
upper shaft.
n Release the trigger (item 2) and allow the trimmer to
coast to a stop.
n Unplug the trimmer.
nLoosen the wing nut (item 13) by turning it
counterclockwise.
n Push the button, while pulling the two shafts apart.
ATTACHING THE FRONT HANDLE (FIG.3)
Follow these steps to attach the front handle.
n Press the front handle (item 6) onto the upper shaft (item
8) so that the handle is angled back toward the trigger
handle (item 1).
n Place the front handle along the upper shaft to a position
that allows for comfortable operation.
n Slide the bolt (item 16) through the holes in the front
handle.
n Slide the washer (item 17) onto the bolt.
6
ENGLISH
ASSEMBLY
OPERATING THE TRIMMER (FIG.8)
Follow these steps to operate the trimmer.
n Plug the trimmer cord into an extension cord approved
for outdoor use. Refer to “Electrical Safety Rules” earlier
in this manual.
n Once the unit is connected to electric power, the LiveTool
Indicator (item 7) will show a blue light.
n Put the shoulder strap (item 10) over your shoulder
opposite side to the unit. Adjust shoulder strap to the
most comfortable length.
n Hold the trimmer with your right hand on the trigger handle
and your left hand on the front handle.
NOTE: Keep a firm grip with both hands during operation.
n Place the trimmer on the side of your body with the motor
behind and away from your body.
n Press the lock button and then the trigger to start the
trimmer.
n The trimmer will build up speed steadily.
n Trim grass and weeds in a right-to-left motion with the
line parallel to the ground.
n Place the knob nut (item 15) onto the bolt and tighten
the knob nut securely.
ATTACHING THE SAFETY GUARD (FIG.4)
Follow these steps to attach the safety guard.
nPlace the safety guard (item 11) around the lower shaft
and align with the bracket (item 19).
n Install the screws (item 18) through the holes and tighten
the safety guard.
EXTENSION CORD RETAINER (FIG.5)
An extension cord retainer (item 4) is located on the bottom
of the trimmer. This provides strain relief for the cord,
preventing unwanted disconnects.
n Use the extension cord retainer when you connect the
extension cord to the power cord to prevent disconnection.
Use only an outdoor approved extension cord.
n Loop the extension cord through the extension cord
retainer slot located on the bottom end of the trimmer.
n Pull loop of extension cord around tongue and pull tight.
n Attach extension cord to plug on trimmer.
NOTE:
If the machine is overloaded, thermal protection inside the
unit will cut off the trimmer. Leave the trimmer for about
10 minutes before turning it ON again. The line trimmer
should then start.
SHOULDER STRAP (FIG.6)
A shoulder strap(item 10) is supplied for your greater comfort.
n Simply attach the clip(item 20) of the shoulder strap onto
the loop (item 21) at the front of the motor housing (item 5).
n To switch off the line trimmer, simply release the trigger.
OPERATION
WARNING:
After switching off, the nylon line will continue to rotate
for a few more seconds. Maintain vigilance until the
line completely stops.
INTENDED USE
This grass trimmer is designed for cutting grass and similar
soft vegetation in private and hobby garden areas which
are not accessible with a lawn mower.
The device is not allowed to be used in public gardens,
parks, sports centers or at roadsides as well as in agriculture
and forestry.
This line trimmer is not allowed to be used for cutting or
chopping hedges, shrubs, bushes or flowers.
CUTTING TIPS
n Inspect and clear the area to be trimmed for any rocks,
broken glass or wire that could be thrown or become
entangled in the cutting line. Trim only when grass or
weeds are dry . Keep the cutting line parallel to the ground.
n Cut grass or weeds over 20cm tall from the top to the
bottom in small amounts. This will prevent grass becoming
wrapped around the trimmer head assembly, which may
result in damage due to overheating. If grass becomes
wrapped around the trimmer head assembly, stop the
trimmer, unplug it and remove the grass.
n Move the trimmer slowly in and out of the area you are
cutting, keeping the trimmer at the desired cutting height.
n Use the tip of the line to do the cutting. Do not force the
trimmer head assembly into uncut grass.
n Feed out some line as required during use to prevent the
line from retracting into the cutting head.
WARNING:
The product may throw objects during operation,
causing injury to the operator or to bystanders. Always
wear suitable eye protection, boots, gloves and long,
heavy trousers while operating the product.
STARTING AND STOPPING THE TRIMMER (FIG.7)
n To start the trimmer: press the lock button (item 3) and
then press the trigger (item 2). Release the lock button
once the motor has started.
n To stop the trimmer: Release the trigger.
7
ENGLISH
OPERATION
MAINTENANCE
n Hold the spool so that its tabbed side is positioned
upward. On the new spool, the ends of the lines are
secured in slots on tabs. Release the line from the tabs,
unwind approximately 15cm of line and resecure the
lines in the tabs.
* Ensure that the bump head spring is correctly positioned
between the trimmer head and the spool.
n Insert the lines on the new spool into the eyelets on the
trimmer head.
n Place the spool on the drive shaft (item 26).
To install the spool, you may need to rotate it slightly.
If the line should tangle or break at the eyelets,remove the
spool, refeed the line through the eyelets and reassemble
the spool on the trimmer.
n Release the lines from the tabs by sharply pulling each
line while pushing down on the spool.
n Push down on the spool to reveal the drive shaft.
n Place the bump knob on the drive shaft.
n The tip of the cutting line will wear during use; this reduces
the cutting swath. If the line is not advanced occasionally,
it will wear down to the eyelet. When the trimmer stops,
the line tends to relax and may retract into the trimmer
head assembly. Should this occur, unplug the trimmer,
remove the spool, refeed the line through the eyelets
and reassemble the spool.
n Avoid hitting objects with the line, such as chain-link
fences or concrete, as this causes rapid wear.
n Never drag the trimmer head assembly on the ground
while trimming.
ADVANCING THE CUTTING LINE (FIG.9)
The trimmer includes the EZ LineTM Tap Advance System.
Follow these steps to advance the cutting line automatically.
n Tap the bump knob (item 22) lightly on the ground while
the motor is running. Do not hold the bump knob on
the ground.
NOTE: The line cutting off blade (item 23) on the safety
guard will cut the line to the proper length.
NOTE: To help prevent line tangle, tap only once to
lengthen the line. If additional line is required, wait a few
seconds before retapping the bump knob. Keep the line
length at or near full cutting diameter.
WARNING:
Switch off and disconnect from the mains supply
before replacing the cutting line, adjusting or cleaning
your trimmer.
SAFETY GUARD LINE TRIMMING CUT-OFF BLADE
REPLACING THE CUTTING LINE
(FIG.10)
This trimmer is equipped with a line trimming cut-off blade
(item 23) on the safety guard. For best cutting, advance line
until it is trimmed to length by the cut-off blade. Advance line
whenever you hear the engine running faster than normal.
This will maintain best performance and keep line long
enough to advance properly.
Use only identical Ryobi replacement parts when servicing
this product. Use of any other parts may create a hazard or
cause product damage.
nRemove the empty spool (Item 24) from the cutting head
nThe spool requires 10m lengths of 1.5mm twist cutting
line.
nFind the middle of the cut length of line and insert into
the slot on the centre of the spool, then wind neatly in
the direction of the arrows. (see fig.11a and fig.11b)
nSecure the lines to the holding slots on the top of the
spool. (see fig.11c)
nFeed the lines through the eyelets of the cutting head
whilst inserting the spool.
nRelease the lines from the holding slots by sharply pulling
each line while pushing down on the spool.
nReplace the bump knob on the drive shaft.
REPLACING THE SPOOL
(FIG.11 & FIG.12 )
When your cutting line wears out, replacement spools are
available through our local retailer.
n Release the trigger.
n Unplug the trimmer.
Make sure the trimmer head stops rotating. Contact with a
rotating trimmer head could cause personal injury.
n Remove the bump knob by turning it counterclockwise.
n Remove the empty spool (item 24).
n Clean the trimmer head (item 25) thoroughly. Inspect the
trimmer head for any damaged or worn parts.
8
ENGLISH
TROUBLESHOOTING
PROBLEM
POSSIBLE CAUSE
SOLUTION
Line will not advance when
tapping bump button
1. Line is welded to itself.
2. Not enough line on spool.
3. Line is worn too short.
4. Line is tangled on spool.
1. Lubricate with a silicone spray.
2. Install more line (Refer to “Replacing
replacement spool” earlier in this
manual).
3. Pull lines while alternately pressing down
on and releasing bump button.
Bump head is hard to turn
Grass wrapped or built up
around head.
Clean affected parts of the machine.
Grass wraps around the
attachment shaft and the
trimmer head assembly
Cutting tall grass at ground level.
Cut tall grass from the top down.
Liner trimmer stops and will
not start again
1) Overload protection activated
2) Fuse from main supply blown
3) Unit failed
1) Wait 10 minutes before restarting
2) Check fuse
3) Contact dealer to check damage
DIPOSAL
DISPOSAL
Waste electrical products should not be disposed of together with household waste. Please
recycle where facilities exist. Check with your local authority or retailer for recycling advice.
9
LIMITED WARRANTY
TTI warrants this outdoor product to be free of defects in material and workmanship for 24 months from the date of purchase by the
original purchaser, subject to the limitations below. Please keep your invoice as proof of date of purchase.
This warranty is only applicable where the product is used for personal and non-commercial purposes. This warranty does not
cover damage or liability caused by / due to misuse, abuse, accidental or intentional acts by user, improper handling, unreasonable
use, negligence, failure by end user to follow operating procedures outlined in the user’s manual, attempted repair by non-qualified
professional, unauthorized repair, modification, or use of accessories and/or attachments not specifically recommended by authorized
party. Please see your local dealer for list of authorized service centers in your area.
This warranty does not cover belts, brushes, bags, bulbs or any part which ordinary wear and tear results in required replacement
during warranty period. This warranty does not cover transportation cost or consumable items such as fuses and batteries.
This limited warranty is void if the product’s original identification (trade mark, serial number, etc.) markings have been defaced,
altered or removed or if product is not purchased from an authorized reseller or if product is sold AS IS and / or WITH ALL FAULTS.
Where permitted, the provisions of this limited warranty are in lieu of any other written warranty, whether express or implied, written or
oral, including any warranty of MERCHANTABILITY OR FITNESS FOR A PARTICULAR PURPOSE. IN NO EVENT SHALL WE BE
LIABLE FOR SPECIAL, INCIDENTAL, CONSEQUENTIAL OR INCIDENTAL DAMAGES. OUR MAXIMUM LIABILITY SHALL NOT
EXCEED THE ACTUAL PURCHASE PRICE PAID BY YOU FOR THE PRODUCT.
This warranty is valid only in the European Union, Australia and New Zealand. Outside these areas, please contact your authorized
Ryobi dealer to determine if another warranty applies.
TECHTRONIC INDUSTRIES EMEA
Medina House, Field House Lane,
Marlow, Bucks
SL7 1TB - United Kingdom
RYOBI TECHNOLOGIES (UK) LIMITED.
Medina House, Field House Lane,
Marlow, Bucks
SL7 1TB - United Kingdom
Tel: + 44 (0) 1628 894400
Fax: + 44 (0) 1628 894401
Technical Helpline : + 44 (0) 800 389 0305
TECHTRONIC INDUSTRIES FRANCE SAS
Immeuble Le Grand Roissy
Z.A. du Gué - 35 rue de Guivry
77990 LE MESNIL AMELOT FRANCE
Phone: + 33(0)1 60 94 69 70
Fax: + 33(0)1 60 94 69 79
RYOBI BELGIUM
Avenue des Pâquerettes, 55
Zoning artisanal - bâtiment 5
B - 1410 Waterloo, BELGIQUE
Tel : + 32(0) 2357 8140
Fax : + 32(0) 2357 8149
TTI ITALIA SRL
Via Fratelli Gracchi, 39
20092 Cinisello Balsamo (MI)
Italia
Tel : + 39(0) 5923 8408
Fax : + 39(0) 5924 6960
TECHTONIC INDUSTRIES IBERIA S.L
Av. De la Industria,52
Coslada – Madrid – España
Tel: 91 485 12 10
TECHTRONIC INDUSTRIES SOUTH AFRICA
CO. (PTY) LTD
P.O Box 83888, South Hills,
Johannesburg, 2136
South Africa
TECHTRONIC INDUSTRIES (ASIA) CO., LTD.
24/F, CDW Building,
388 Castle Peak Road,
Tsuen Wan, Hong Kong.
Tel : + 852 2402 6888
RYOBI TECHNOLOGIES GMBH
Itterpark 4, D-40724 Hilden
DEUTSCHLAND
Tel: + 49 (0) 2103 2958-0
Fax: + 49 (0) 2103 2958-29
Machine: ELECTRIC LINE TRIMMER
Name of company: Homelite Far East Co., Ltd.
Address:
24/F, CDW Building,
388 Castle Peak Road,
Tsuen Wan Hong Kong.
RYOBI TECHNOLOGIES GMBH
Vertriebsbüro Österreich
Schinitzgasse 13
A-8605 Kapfenberg
Tel.: + 43 (0) 3862 23590-0
Fax: + 43 (0) 3862 23590-25
TECHTRONIC INDUSTRIES AUSTRALIA PTY LIMITED.
Building B, Rosehill Industrial Estate,
3 Shirley Street,
Rosehill NSW 2142
AUSTRALIA
Tel: (02) 8892 1800 or 1300 361 505
Fax: 1800 807 993
TECHTRONIC INDUSTRIES (NZ) LIMITED.
27 Clemow Drive, Mt Wellington
PO Box 12-806, Penrose, Auckland
NEW ZEALAND
Tel: + 64 (0) 9 573 0230
Free Call: +64 0800 279 624
Fax: + 64 (0) 9 573 0231
A&M MIDDLE EAST FZCO
P.O.Box 61254
Jedel Ali, Dubai,
UNITED ARAB EMIRATES
Tel.: + 9714 8861399
Fax: + 9714 8861400
TECHTRONIC INDUSTRIES DENMARK APS
Stamholmen 147, 4.
DK-2650 Hvidovre
Denmark
Tlf 43 56 55 55, Fax 43 56 55 56
E-mail: [email protected]
TECHTRONIC INDUSTRIES NORWAY AS
Tlf.: 800 12 493, Faks: 800 12 492
E-mail: [email protected]
TECHTRONIC INDUSTRIES SWEDEN AB
Tel (+46) 08 24 60 30. fax (+46) 08 24 60 31.
E-mail: [email protected]
TECHTRONIC INDUSTRIES FINLAND OY
Tel. 0800 1 09000, Fax 0800 1 09001
Email: [email protected]
Type: RLT-1000EX
Name / title: Andrew John Eyre BEng CEng MIET
Vice President of Engineering
Signature:
4 / 2010