1
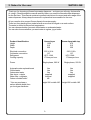
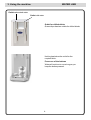
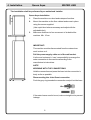
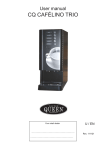
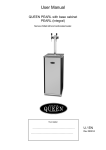
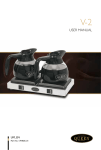
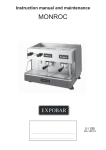
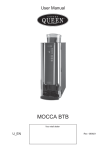
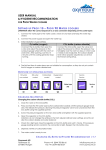
User manual
COFFEE QUEEN
QUEEN AQUA Table Top
QUEEN AQUA
Floor model
Serves chilled water and chilled carbonated water
Your retailer
U_EN
...............................................................................
...............................................................................
Rev. 090914
1. Contents.
WATER LINE
1.
Contents
2
2.
Notes for the user
3
3.
Using the machine
4
4.
Queen Aqua Installation
5-6
4.
Installation Queen Aqua table top
7-8
5.
Care, replacing a water filter
9
6.
Cleaning the machine
10
7.
Important
11
2.
2. Notes for the user.
WATER LINE
Thank you for choosing a Queen Aqua water dispenser – we hope you will enjoy the benefits
of using it. Read through the manual carefully before you use the automatic water dispenser
for the first time. This manual contains important instructions for correct and safe usage of the
water dispenser. Always keep the manual in a place that is accessible for the user.
All you need to do is connect Queen Aqua to the water supply.
There is a free-standing floor model as well as one that is integral on a work surface.
The water is chilled to the perfect temperature.
You can choose whether you want chilled water or carbonated water.
You can also choose whether you want water in a glass, jug or bottle.
Product identification:
Height
Width
Depth
Queen Aqua
1355
310
330
Electrical connection
Cold water connection
Refrigerant
Cooling capacity
230 V/10 A
1/2"
HFC-134A
17 litres per hour
230 V/10 A
1/2"
HFC-134A
17 litres per hour
Single phase, 293 W
Single phase, 293 W
Power
Automatic water replenishment
Chilled water
Carbonated water
Gas dome + nipple
Water filter + regulator
Carbon dioxide bottle*
* You can purchase a
carbon dioxide bottle from
you local gas distributor.
Yes
Yes
Yes
supplied
Integral
No
height 580 x width 185
3.
Queen Aqua table top
470
210
330
Yes
Yes
Yes
supplied
supplied
height 580 x width 185
3. Using the machine.
WATER LINE
Outlet carbonated water
Outlet cold water
Outlet for chilled drinks
Queen Aqua has two outlets for chilled drinks
Hold a glass below the outlet for the
required drink.
Press one of the buttons
Water will continue to run as long as you
keep the button pressed.
4.
4. Installation.
Queen Aqua
WATER LINE
The installation shall be performed by an authorised installer.
Queen Aqua Installation
1.
Place the machine on a level and waterproof surface.
2.
Mount the machine on the floor cabinet and screw in place
using the screws supplied.
(Use a spirit level where necessary and adjust with the
adjustable feet).
3.
Make sure that there is free movement of air behind the
machine. Min. 10 cm.
IMPORTANT!
The machine must be disconnected from the mains when
work is done on it.
Pull the power supply cable out of the wall socket.
It is the end customer’s / user’s responsibility to arrange the
water connection to the machine according to the
manufacturer’s instructions.
NOTE
WORKING WITH THE CONNECTIONS
Hold the connection and press the hose into the connection’s
body as far as possible.
Disconnecting the John Guest connection
Push the grey ring towards the connection and pull out the hose.
If the water hoses need to be cut, make a straight cut to prevent
leakage.
5.
4. Installation.
Queen Aqua
WATER LINE
The installation shall be performed by an authorised installer.
Queen Aqua installation
Install the machine using the water hoses and gas dome
supplied.
4. Undo the service hatch (A).
5. Mount the gas dome (B) on the carbon dioxide bottle and
then fit the nipple supplied on the gas dome.
Connect the carbon dioxide bottle (C) to the chiller unit.
See 1. (Carbonated water).
6. Connect the hose from the water filter (D) to the chiller
unit. See 2. (Cold water).
7. Connect the ½” hose supplied to the machine (E) and
then to the mains water supply.
E
The most appropriate connection is to a tap that can be
turned off.
A
Check to ensure that no kinks or sharp bends are formed on
the hoses during connection.
water filter with
regulator.
Connected to
the carbon
dioxide bottle
D
Water IN
B
8.
Insert the plug in an earthed 230 V 10 A wall
socket.
C
9.
Flush out approximately 2.5 litres chilled water and
then approximately 2.5 litres carbonated water before
the machine is taken into use.
6.
4. Installation.
Queen Aqua Table Top
WATER LINE
The installation shall be performed by an authorised installer.
Queen Aqua Table Top Installation
1.
Place the machine on a level and waterproof surface.
2.
Install the machine using the water filter + regulator, elbow
connections, water hoses and gas dome supplied.
(Use a spirit level where necessary and adjust with the
adjustable feet).
3.
Make sure that there is free movement of air behind the
machine. Min. 10 cm.
IMPORTANT!
The machine must be disconnected from the mains when
work is done on it.
Pull the power supply cable out of the wall socket.
It is the end customer’s / user’s responsibility to arrange the
water connection to the machine according to the
manufacturer’s instructions.
NOTE
WORKING WITH THE CONNECTIONS
Hold the connection and press the hose into the
connection’s body as far as possible.
Disconnecting the John Guest connection
Push the grey ring towards the connection and pull out the
hose.
If the water hoses need to be cut, make a straight cut to
prevent leakage.
7.
4. Installation.
Queen Aqua Table Top
WATER LINE
The installation shall be performed by an authorised installer.
Queen Aqua Table Top Installation
4.
Mount the gas dome (A) on the carbon dioxide
bottle (B) and then fit the nipple supplied for the
water hose on the gas dome.
5.
Mount using the elbow connections supplied under
the chiller unit 1 and 2.
6.
Connect the hose from the carbon dioxide tube to
the cooling unit’s elbow connection. See 1.
(Carbonated water).
7.
Mount the water filter with regulator (C) and connect
the hose from the water filter to the chiller unit’s
elbow connection. See 2. (cold water).
8.
Connect the ½” hose to the water filter and then to
the mains water supply (D).
The most appropriate connection is to a tap that
can be turned off.
(Check to ensure that no kinks or sharp bends are
formed on the hoses during connection.)
D
Water IN
A
C
9.
B
Water filter
with regulator
Insert the power plug in an earthed wall socket.
10. Flush out approximately 2.5 litres chilled water and
then approximately 2.5 litres carbonated water
before the machine is taken into use.
(When installing hoses that go straight down, two holes need to be drilled
for the incoming hoses. See fig.(A).
Fig. A
8.
5. Replacing water cleaning filter.
WATER LINE
To make sure a high quality on drinks replace water cleaning filter every 6 months.
Replacing water cleaning filter. Can changes under water pressure.
1.
2.
Loosen filter by turn it 1/4 lap. See fig.1. OPEN
Assemble the new filter by turn it 1/4 lap. See fig. 1. CLOSE
Fig.1
water filter
Filter from below
Only use Coffee Queen original water cleaning filter: Article no: 1505344
3.
IMPORTANT!
Now push the button for cold water.
Push until water is coming out in a regularly flow.
9.
6. Cleaning.
Daily cleaning.
Daily cleaning or when needed.
Outside cleaning;
use asoft rag and liquid
cleaning agent to prevent
scratches.
Empty and clean drip tray and
drip tray insert daily.
10.
WATER LINE
7. Important.
WATER LINE
Important
Do not do anything to the water dispenser. Inappropriate action can lead to personal injury and
faults.
The water dispenser should stand on a level surface to work satisfactorily.
The water dispenser must be placed on a waterproof surface so that any water leakage is visible.
Make sure that kinks are not formed in the connection hose during installation or when the water
dispenser is pushed into place. The machine’s supply and drain connection shall be checked
regularly. Check that no leakage has occurred in connection with installation.
The water connection always presents a risk of leakage irrespective of safety equipment.
The water dispenser must be completely drained of water if it is going to be stored for a long time.
Turn off the water tap if the machine is not going to be used for a long time.
Disconnect the machine from the electricity supply before doing any work on it.
This can be done by pulling out the plug from the wall socket.
CHILLER SYSTEM
INSTALLATION AND LOCATION:
The system is designed for use in standard environments according to CCN standard 33 2000-3
and is included in climate class N.
It must not be located close to a heat source or be subjected to direct sunlight.
The system is designed for use in an ambient temperature of no lower than 6°C and no higher
than 28°C.
The system must not be used or placed in an ambient temperature that is lower than 0oC.
ELECTRICAL CONNECTION
Connect the system to 220–240 V, 50 Hz and 10 A. The contact for electrical installation shall
comply with the current CSN regulations, EN and ISO standards. If the cable is damaged, it
must be replaced by a qualified person. This is to prevent an accident.
CONNECTION AND SERVICE:
The condenser shall be cleaned every 6 months in connection with water filter replacement.
Use compressed air when cleaning.
Carry out cleaning only once the power supply is disconnected from the chiller!
All installation work must be done by a qualified person.
11.
WATER LINE
FOR SERVICE
please contact
Your retailer
...............................................................................
...............................................................................
...............................................................................
CREM International AB
Box 960, 671 29 ARVIKA, Sweden
Tel: +46 (0)570-477 00, Fax: +46 (0)570-47719
E-mail: [email protected] www.creminternational.com
Art. nr/Art. no. 1730009