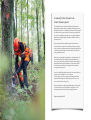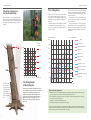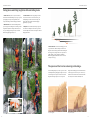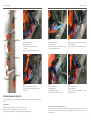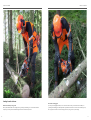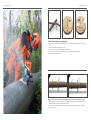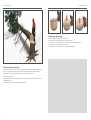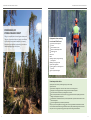
1
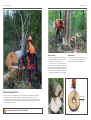
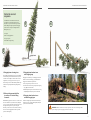
Working with chainsaws Husqvarna UK Limited, Preston Road, Aycliffe Business Park, Newton Aycliffe, County Durham, DL5 6UP. Telephone 0844 844 4567 Email info @ husqvarna.co.uk www.husqvarna.com /uk Copyright © 2012 Husqvarna AB (publ). All rights reserved. Husqvarna and other product and feature marks are trademarks of the Husqvarna Group as displayed at www.international.husqvarna.com Stendahls. 115 42 47-25 UK. Advanced manual for safe and efficient chainsaw use – part 2 Husqvarna Performance Series A manual for those who want to be a better chainsaw operator. This manual describes how to safely and effectively work with advanced tree felling, limbing and cutting, and how you should proceed when working on trees brought down in storms or in a fire-ravaged forest. The manual is aimed at people who already have a basic grasp on chainsaw use in both theory and practice, and who now want to develop their knowledge to carry out complex and hazardous operations. Basic working techniques and methods are described in “Working with chainsaws, Part 1”. Many experts have forewarned of global warming that could lead to a more extreme climate. The consequence of this could be more frequent and stronger storms in some places, and drier weather with more frequent and larger forest fires in others. More people will be affected, and are also likely to be involved in the clearing up operation afterwards. Work on processing storm-felled or fire-ravaged trees is extremely hazardous. If a lot of inexperienced staff need to be quickly recruited and deployed for the clearing up work, work accidents with chainsaws are likely to increase sharply. It is therefore essential that the requisite knowledge for safe and effective work with chainsaws is disseminated in the best way among those who are tasked with carrying out the clearing up work. As one of the world’s leading chainsaw manufacturers, it is quite natural for us at Husqvarna to share knowledge on how to use a chainsaw. In this manual, we give our view on proper and safe working methods for the complex and advanced operations involved in felling work. But of course we cannot cover all the situations that may arise. What is considered to be the right working methods might also vary in different parts of the world according to law and tradition. Consequently, it is of the utmost importance that users observe local laws regarding chainsaw use. Happy reading and good luck! Contents. Safety first ___________________________________________________________________ 8 Chainsaw safety requirements _____________________________________________________ 7 What is TrioBrake? ______________________________________________________________ 8 Avoid working alone! ____________________________________________________________ 9 Your personal protective equipment _______________________________________________ 10 Useful accessories and tools ______________________________________________________ 12 Advanced tree felling _______________________________________________________ How to estimate how far the tree can reach ________________________________________ This is how you measure the lean of a tree __________________________________________ Selecting a felling tool ___________________________________________________________ The lifting height of the felling cut _________________________________________________ Tree felling force _______________________________________________________________ Felling force and lifting height for different felling tools ________________________________ Safe winch technique ____________________________________________________________ Trees that lean towards the direction of felling _______________________________________ Trees that lean across the direction of felling ________________________________________ Trees that are leaning along the direction of felling ___________________________________ Check the saw alignment ________________________________________________________ This gives you a completely even hinge _____________________________________________ Felling around the other trees, less than 20 cm in diameter ____________________________ Split and crack prone tree species _________________________________________________ Felling weakened trees __________________________________________________________ Decayed trees _________________________________________________________________ Hollow trees __________________________________________________________________ Dead trees, dry trees ___________________________________________________________ Fire-damaged trees _____________________________________________________________ Bringing down a hung tree _______________________________________________________ 14 15 15 16 16 17 18 20 22 25 26 28 28 29 30 34 35 35 36 37 38 Advanced limbing_______________________________________________________ 42 Lever method _________________________________________________________________ 43 Limbing sequence steps 1– 6 ______________________________________________________ 44 Limbing from the bottom ________________________________________________________ 46 Advanced cutting ___________________________________________________________ 48 Thicker trunks with ground contact at both ends ____________________________________ 49 Thicker trunks with free-hanging ends ______________________________________________ 50 Trunks located on a sharp slope ___________________________________________________ 52 Cutting using a felling wedge _____________________________________________________ 52 Processing of storm-felled forest ___________________________________________ 54 Equipment when working in a storm-felled forest ____________________________________ 55 Fell in the correct sequence ______________________________________________________ 56 Stand on the safe side when cutting roots ___________________________________________ 58 Storm cut _____________________________________________________________________ 59 Recommended cutting methods for trees under tension _______________________________ 60 For excessive tension: Opening on the pressure side __________________________________ 61 For moderate tension: Open counter cut ___________________________________________ 62 Safety inspection and service _______________________________________________ 64 Maintenance of cutting equipment _________________________________________________ 66 Chain type, table _______________________________________________________________ 67 Filing the chain _________________________________________________________________ 68 Sharpening the saw chain in the forest _____________________________________________ 72 Filing the lifting hook and tongs ___________________________________________________ 74 4 5 SAFETY SAFETY Chainsaw safety requirements. 1. A modern chainsaw must be fitted with the following safety features: 1. KICKBACK GUARD AND CHAIN BRAKE The chain brake Working with chainsaw 1 A 2. B C is designed to be activated in two ways. Or three, if the saw is fitted with TrioBrake™ : A. If your left wrist forces the kickback guard forwards, the chain brake will activate. B. Following kickback the chain brake will trigger from the inertial forces generated. C. With TrioBrake™: If your right wrist lifts the guard on the rear handle, the chain brake will activate. 2. THROTTLE LOCK The throttle lock is designed to prevent a ccidental throttle advance. The throttle will only work if the lock is pressed in, i.e. if you hold the saw’s rear handle with a firm grip while accelerating. 3. CHAIN CATCHER The chain catcher is designed to catch the chain, if the chain should break or derail. 4. RIGHT-HAND GUARD The right-hand guard is designed to protect the user’s hand, if the chain should break or derail. 3. 5. EASY ACCESSIBLE STOP CONTROL The stop control must be placed where it is easy to access on the saw so that the engine can be stopped quickly in a critical situation. 4. SAFETY FIRST Working with a chainsaw involves many different work situations with both simple and more complicated steps. The chainsaw is a very effective tool, but it can also be dangerous if used improperly. In order to avoid accidents and unnecessary strain, you should use the correct working techniques, the best possible safety equipment and a modern chainsaw with functioning safety features. 6 Regular inspection. 5. Remember to regularly inspect the safety features on the saw and always make sure you have a sharp and properly filed chain! Read more in the safety inspection and service page 64 and maintenance of cutting equipment page 66. If the safety features do not function properly, contact your nearest dealer! 7 SAFETY SAFETY Working with chainsaw 1 What is TrioBrake™? TrioBrake™ is a safety system for Husqvarna chainsaws, where the chain brake can be activated in a third way – with your right hand – besides the two customary ways, i.e. with the left wrist and through the inertia function. TrioBrake™ can provide extra protection in situations where a regular chain brake fails to provide adequate protection. For example, in the event of climbing kickback when pruning a standing tree, or if you stumble and risk injury from the saw. TrioBrake™ also provides additional protection when felling if you plan to bore and hold the saw horizontally. TrioBrake™ also helps you work in a more ergonomic, safe and comfortable way. The guard on the rear handle will let you know if you bend and strain your back instead of bending your knees when crosscutting. TrioBrake™ is also activated if you use the saw above shoulder height incorrectly, for example when limbing. TrioBrake™ also makes it easier to intentionally activate the chain brake when starting and moving. Avoid working alone! 8 A cleaner working and local environment. Alkylate petrol and vegetable chain oil. Technological developments are resulting in ever cleaner, more effective and more fuel-efficient internal combustion engines. The chainsaw’s two-stroke engine is no exception. Having a clean and healthy working and local environment is important to everyone, including those who use chainsaws in their daily work. X-Torq, which is Husqvarna’s new technology for two-stroke engines, reduces exhaust emissions by up to 75 % and lowers fuel consumption by up to 20 % compared to earlier engine generations. By using alkylate petrol, such as Aspen, you can lower the amount of harmful emissions from your chainsaw. There are also vegetable chain oils that are biodegradable and therefore significantly more environmentally friendly than conventional oils. If you are currently using a petrol/oil can with top-up protection, this prevents unnecessary waste being released into the open. Avoid working alone! If there are two or more of you, you can help each other if something were to happen. The minimum requirements on the occasions where you are working alone: • • • • • • • Tell someone where you will be during the day Mark on the map where you are, also mark the route, and give the map to your contact person Always carry a mobile phone or communications radio Keep in regular contact with your contact person (a designated person), at least every three hours Always have a transport vehicle in the forest Always park the vehicle so that you can quickly leave the area Observe all other safety procedures carefully 9 SAFETY – PERSONAL EQUIPMENT Your personal protective equipment. SAFETY – PERSONAL EQUIPMENT 6. Protective clothing should be signal coloured ensuring you are clearly visible in the open. Protective equipment must be tested in accordance with applicable international rules and standards within the EU and the US (CE /ISO/UL marking). These requirements may vary by country. You can obtain further information from your local servicing dealer. For your own sake, never leave out any part of the personal protective equipment! 1. HELMET WITH EARMUFFS, VISOR AND PROTECTIVE GLASSES The helmet is designed to protect you from falling branches and impacts. The visor should cover all of your face to protect against scratches and sawdust spray. Protective glasses provide additional protection for your eyes. Ear muffs also protect against harmful loud noises. The inserts for your ear muffs will eventually become worn. It is important that you replace them regularly. The plastic in the helmet ages and becomes brittle due mainly to UV radiation. For this reason, you should replace the helmet within 5 years after the date of manufacture, or a maximum of 3 years after removing from its original packaging. The Husqvarna helmets have a calendar where you mark the first day of usage. 1. A 2. 2. FORESTRY JACKET / SHIRT The forestry jacket should provide full upper body coverage, have signal colouring, and be ventilated. 3. PROTECTIVE TROUSERS / CHAPS Protective trousers must be fitted with saw protection that meets international standards. The saw protection consists of a lining with several layers of very long fibres that become entangled in the chain and stop it in a fraction of a second (Illustration A). It is important that you follow the manufacturer’s washing guidelines. If you cut into the protective layers, the trousers must be discarded. 5. Working with chainsaw 1 4. PROTECTIVE BOOTS The boots should be fitted with protective toe caps, saw protection and deep treaded soles (anti-slip protection) in accordance with international standards. 5. WORK GLOVES You should always wear work gloves to protect against cuts and scratches, oils and fuels. Gloves with saw protection in the left hand also protect you from the saw chain. 3. 6. FIRST AID You should always have a first aid kit easily accessible and close at hand. A first aid box should always be available in the felling zone. 7. COMMUNICATIONS EQUIPMENT IN THE EVENT OF ACCIDENTS In case of accident, you must quickly summon help. Always carry a whistle and a mobile phone or radio at the felling site. 10 4. 11 SAFETY – PERSONAL EQUIPMENT SAFETY – PERSONAL EQUIPMENT 1. Useful accessories and tools. 1. Logger belt A complete tool belt for a professional logger. Includes holster for the lifting hooks and lifting tongs and back section with room for measuring tape, round and flat file, combination gauge for filing, combination spanner, first aid, chalk and adjustment screwdriver for the carburettor. 2. Felling tools You should always include breaking bars and wedges of different sizes when felling trees. As well as a turning strap if you accidentally fell a tree against another tree. A hand winch is also useful to have to bring down a hung tree. For particularly difficult or sensitive felling, you should also include a winch, rope and pulley as well as a means for attaching a rope high up in a tree if needed. See Page 20. 3. Lifting hook and lifting tongs A lifting hook is used to lift and turn the logs. Lifting tongs are used to lift and move the smaller logs and pieces of firewood and pulpwood. It is very important that your tongs and hook are pointed and sharp to ensure good grip on the logs. For sharpening the hook and tongs: see Page 74. 12 2. 3. 4. 5. 6. 7. 4. Use an axe to remove bark, soil and sand from the log before cutting, as this will reduce wear on the guide bar and chain. You also use the axe to knock in the felling wedges. 5. Extra cutting equipment Take an extra guide bar and chain with you so that you do not have to stop work if the chain breaks or if you saw into a rock. 6. Callipers Practical tool for measuring the diameter and calculating the volume of logs. 7. Combi can for fuel and chain oil A combined petrol/oil can with filling protection that prevents unnecessary spills being released into the environment. By using alkylate petrol, such as Aspen, you can lower the amount of harmful emissions from your chainsaw. If you use regular petrol, you should mix it with a high quality 2-stroke oil (XP-oil is recommended). For chain lubrication, we recommend vegetable chain oils that are biodegradable. 13 ADVANCED FELLING ADVANCED FELLING Plan the felling thoroughly. Advanced tree felling When planning the felling of a complex tree, you need to consider the tree’s height, diameter, lean, the wind direction and speed and of course the distance to surrounding trees, buildings, overhead wires, roads and other obstacles. Selecting the right direction of felling, felling tool and felling method is crucial for a successful outcome, and the margins are less than when felling normally. You should therefore only carry out advanced felling work, if you have sound knowledge and extensive experience in felling trees. When you read further in this book, we will assume that you have practical and theoretical knowledge equivalent to the contents in the section "Working with chainsaws, Part 1". Felling work may be complicated for a variety of reasons. The tree may be leaning backwards, sideways or substantially forwards relative to your preferred direction of felling . You then have to select the appropriate method. Likewise, if the wind is blowing strongly. Felling dead or hollow trees, or trees damaged by rot or fire, is also more complicated than felling a healthy tree. Felling next to buildings, power lines and similar puts extra high demands on precision. Basic working techniques and methods for felling are described in "Working with chainsaws, Part 1". How to estimate how far the tree can reach. It is often easy to misjudge the length of trees. Always estimate the tree’s length before felling it, especially in hazardous and confined locations (close to other trees, buildings, overhead power lines, etc.). A simple way of estimating how tall a tree is to do as follows: 1. Hold a stick with your arm stretched out straight in front of you so that the stick length is equal to the distance between your eye and hand. Hold the stick vertically to create an equilateral triangle between your eye, hand and the top of the stick. 2. Point at the tree and stand at a distance so that the tree appears to be as tall as the length of your stick. If the tree is leaning, you get a more accurate estimate if you measure from the side, so that the tree is neither leaning towards you or away from you. 3. The distance between you and the tree is now equal to the height of the tree. Step out the distance, or measure with a tape measure. Always add a hefty margin of error. 14 This is how you measure the lean of a tree. To measure the lean of a tree, you need a plumb line, such as a nut tied to the end of a string. 1. Aim towards the top of the tree trunk. Note where the plumb line hits the ground. 2. Measure the distance from the plumb line’s point of impact to the centre of the trunk. 15 ADVANCED FELLING ADVANCED FELLING Tree felling force. Selecting a felling tool for advanced felling. A felling tool must be able to provide the power needed to make the tree fall. The power, multiplied by the distance to the pivot of the hinge forms the effect known as felling force. The felling force that is required for the tree you plan to fell determines the felling tool you should select. The diagram will help you estimate the felling force and select the correct felling tool for complex felling work. The values apply to Nordic tree species and trunks forms and should be considered as a guide, not as exact figures. When you fell a larger tree, or tree leaning backwards against the direction of felling, you should carefully think through the type of felling tools you will need to make the tree fall. This is determined by two critical factors: The lift height in the felling cut and the tree’s felling force. Moment, daNm (kgm) The numbers indicate the maximum values for professional foresters, healthy trees and calm weather. The graphs assume that the hinge is of a suitable thickness and the depth of directional notch is about 20 % of the trunk diameter. You should also take into account a potential asymmetrical crown, curved trunk, the wind and the weight of any snow on the branches when selecting felling tools. At the back of this manual there are a number of pages with the same table, which you can tear out, put in a plastic folder and take with you out to the felling site. The diagram has been produced by the Swedish forest researcher Tomas Gullberg at the University of Dalarna, Sweden. 3m 2.5 m backward lean 4500 Tree lean at the top 10 3m 9 2 large wedges Large wedge, max 4000 2m 3500 Large wedge 1,5 m 8 2m 7 6 3000 1m 2500 5 1m 4 3 straight 2 2000 1,5 m To make the tree fall, the centre of gravity must pass over the pivot of the hinge. For this to happen, the felling tool must produce sufficient lift and enough felling force. 30 40 50 60 70 DBH, cm The lifting height of the felling cut. The lifting height is the distance that the felling tool must push apart the felling cut before the tree falls on its own accord. The diagram shows the required lifting height for different tree diameters, including the saw cut. The values apply to Nordic tree species and trunks forms and should be considered as a guide, not as exact figures. Using the diagram you can, for example, see if you need several wedges in height to bring down the tree. “Ox breaker” 4 m pole Breaking bar medium size Foot breaking bar, stand + press 0 20 Breaking bar large Winch 0.5 to fix point 2.5 m 1500 1000 10 Stalpen tree jack Small wedge straight 1 Winch 0.5 to fix point 5 m 0.5 0,5 m forwards 500 Pole length 5 m 0 20 25 30 35 40 45 50 55 60 DBH, cm How to use the diagrams: 1. Measure the tree’s diameter at 1.3 m height (DBH, diameter at breast height). Use callipers or measure the circumference using a logger’s measuring tape. The exact diameter is obtained by dividing the circumference by 3.14. 2. For trees with DBH < 25 cm, use diagram 1, for larger trees, use diagram 2. Base the DBH on the diagram’s x-axis. Go straight up until you hit the curve for the lean in question. 3. Go straight out to the left. Read the felling force in the y-axis. 4. Select a felling tool that provides a greater felling force than the reading. Example: A tree with a 45 cm DBH that leans 1 m backwards, requires a felling force of 14,000 Nm. A large breaking bar provides a little over 12,000 Nm, which is insufficient. A large wedge produces about 15,000 Nm which is just about enough. Two wedges along the width or a heavy impact tool (Large wedge max) produce a better margin. 16 17 ADVANCED FELLING ADVANCED FELLING Felling force and lifting height for different felling tools. 1. Hand force. Only useful on very small trees without any backward lean. Provides limited felling force. By using a 4 m pole and pressing higher up from the ground you significantly increase leverage and the felling force. Maximum lifting height: Unlimited. 3. Felling wedge. Provides very large felling force for thick trees, much less for narrow trees due to the shorter leverage. For demanding felling, you will need to knock in more wedges, first along the width and then in height. Maximum lifting height: Approximately 3 cm per wedge. 2. Breaking bar. Comes in different handle lengths which provides varying amounts of felling force. Avoid breaking bars with a long handle for really thick trees and large backward leans, as this may require a lifting height that is greater than you can handle. Maximum lifting height: Approximately 2 cm. 1. 4. Tree jack. A kind of mechanical jack that presses against the trunk. Provides a lot of felling force and is therefore a good choice for extensive felling work for medium-sized complex trees. Maximum lifting height: Unlimited. 2. 5. Winch and rope. The safest method of bringing a tree down in a particular direction. Works on both large and small trees. The felling force is affected both by the pull of the winch and the height of the fastening point. By attaching a winch 5 metres up the trunk and pulling at 5,000 N, you produce a felling force of 25,000 Nm. Maximum lifting height: Unlimited. Read more about safe winch techniques on the next page. The species of the tree has a bearing on the hinge. 3. 4. For advanced felling the hinge may be subject to greater stress than at normal felling. When using felling wedges, the hinge is also subject to stress both along and across the grain. To maintain control over the felling direction the hinge is designed to ensure it is kept intact throughout the whole felling operation. You should therefore also consider the properties of various tree species. In the winter you should bear in mind that frozen timber is less flexible and breaks earlier. Decayed wood is also weaker than healthy wood. Tree species with long fibres. Tree species with short fibres. 4. 3. 1. 18 2. 19 ADVANCED FELLING ADVANCED FELLING Safe winch technique. A winch is used primarily where extremely safe felling is demanded, which takes into account adjacent buildings, overhead power lines and roads, as well as other confined spaces. A winch is also used to great advantage if the tree is difficult to assess in terms of lean, branch overhang, damage (e.g. decay), etc. There are many different hand winches and winching techniques on the market. Equipment to execute safe and effective winching: Hand winch, attaching rope/wire, pulley, straps, ladder, felling tongs with telescopic handle to attach the rope near the top of the tree 1. 1.Attach the rope at the top of the trunk using, for example, felling tongs with telescopic handle. If the rope is attached near the tree’s centre of gravity (about 40 % of the tree height), the hinge is relieved and the tree cannot fall backwards. 2.Attach the pulley to a tree trunk located in the felling direction but far enough away to ensure you avoid the risk of hang-up. 3.Attach the winch to a tree a few metres behind the tree to be felled and to the side of the direction of felling. Pull the rope through the pulley and up to the winch. Tighten the rope a little with the winch before you begin sawing. 4.Make directional cuts and felling cuts as usual using felling wedges and a safe corner. Saw off the safe corner and stretch the rope with the winch until the tree falls. 3. 2. 4. 20 21 ADVANCED FELLING ADVANCED FELLING Options: Safe corner method. 1.Make a directional notch as normal. Now make a bore through the trunk and extend the felling hinge laterally. 2.Continue to saw backwards until 2/3rds of the trunk is sawn. Pull back the guide bar to create a 5–10 cm wide corner. Now continue sawing until you cut through the tree. All that then remains is a corner of unsawn timber. The corner is roughly the same total area as the hinge. 3.Insert the wedge or breaking bar straight to the back. 4.Finally saw off the corner and the tree will fall. Place the cut immediately under the previous cut in order to avoid sawing in the felling wedge. Trees that lean towards the direction of felling. Felling method for small trees 1.Make a directional notch as normal. Now saw a felling cut 2/3rds of the diameter from the rear side of the tree. 2.Insert the wedge or breaking bar straight back in the felling cut. 3.Now complete the felling cut with an oblique cut from the other direction, ensuring the nose of the guide bar slightly overlaps the first cut. You are then at no risk of cutting into the wedge or breaking bar. 22 Felling method for large trees. This method can be used if the lean is moderate and the tree is medium-thick to thick. 1.Make a directional notch as normal. Now make a bore to about 60 % of the tree diameter. 2.Cut straight backwards through the whole tree. 3.Change your position to the other side of the tree. Make a bore at 60% of the tree diameter and cut straight backwards until you have shaped a suitable corner. 4.Knock the first wedge in straight back. Start with a wide wedge. 5.Saw off the safe corner. Place the cut immediately under the previous cut in order to avoid sawing in the felling wedge. 6.If necessary, knock in more wedges to make the tree fall. Start with a thicker wedge alongside the first. You can now knock in a third wedge on top of the first. See the examples on Page 18, Figure 3. 23 ADVANCED FELLING ADVANCED FELLING For severely backward leaning trees: The felling cut lower than the directional notch. The use of wedges in severely backward leaning trees can create massive strain on the hinge and the wood fibres holding the tree. In this special case, a felling cut below the directional notch can be an alternative that provides less strain on the hinge. Trees that lean across the direction of felling. For side leaning trees, the tree wants to fall to the side of your line of sight. You should compensate for the side lean by aiming by the same amount in the opposite direction as the tree is leaning. Example: If the tree leans 1 metre to the right, aim at least 1 metre to the left. Insert the felling wedge at an oblique angle from the side of the lean allowing the felling force to shore up the tree When the tree is felled across the direction of the lean, there is a risk that the hinge will be torn open like a zipper and you lose control over the direction of felling . To counter this, you can make the hinge a little longer than normal by making the directional notch slightly deeper. Avoid sawing off the root protrusions. Try supporting with a wedge on the side of the lean, and insert to the side of the felling cut close to the hinge. If you are unsure you can secure the tree with a rope and winch rigged at right angles to the direction of felling. Remember that the support rope must be able run free at all times. Line of sight Direction of felling If the tree moves backwards (small to medium sized trees). If you make an error of judgement causing the tree to move backwards and pinch the felling cut, you can make a new directional notch and felling cut further up the trunk, at least 1 meter (3.3 feet) higher. Now align the felling in the direction that you believe the tree will fall, provided it can be felled without any risks. 24 Lean 25 ADVANCED FELLING Trees that are leaning along the direction of felling. If the tree leans in the direction of felling, it is very likely that the tree will start to fall before the felling cut is complete. You then run the risk of the wood splitting violently causing half the tree trunk to jump out backwards resulting in a serious accident. Furthermore you will destroy much of the timber. Avoid this by using the following methods. For moderately forward leaning trees. Use the safe corner method but place the corner straight back. 1.Make a bore to about 60 % of the tree diameter. Cut up to the hinge. 2.Now saw straight back until about 5 cm is left 3.Change your position to the other side of the tree. Make a bore, saw up to the hinge. Saw straight back until about 5 cm is left 4.Finally saw off the safe corner straight from behind. ADVANCED FELLING For severely forward leaning or already split wood. Use the V-cut, deep V-cut or an opening on the pressure side to reduce the risk of splitting and allow the tree to fall slowly initially. V-cut: 1.Make two directional notches so that the nose is pointing in the direction of felling (i.e. the direction of the lean). Be sure that the cuts meet inside the bark edge. 2.Now make the felling cut from the back in stages. The tree will then fall relatively slowly. One version of the V-cut is the deep V-cut where you only saw from the pressure side. The starting point is the same as a V-cut, but you then saw an increasingly more obtuse cut in the V in stages until bending starts. Opening on the pressure side: Make an open directional notch. Continue cutting in stages deeper through the trunk until the tree starts to fall very slowly. Stand to the side of the tree to the direction of felling as you work. The method requires more cutting than the V-cut, but gives you greater control over the direction of felling. 1 2 1 26 27 ADVANCED FELLING ADVANCED FELLING Check the saw alignment. In order to ensure the best accuracy when felling, make sure that the line of sight of the saw is adjusted to suit the length of the tree you plan to fell. 1.Place the saw on a stump or similar surface and measure the distance from the stump in line with the tree’s height, e.g.15 metres. 2.Tie a cord at a point 15 metres away from the saw and pull the cord up to the middle of the guide bar. Adjust the position of the saw ensuring that the angle between the cord and guide bar is exactly 90 degrees. Use a set square or similar guide. 3.Now move the stretched cord so that it lies across the saw’s line of sight. If the two lines coincide, this means that the saw’s line of sight is exactly at 15 metres. 4.If the lines do not match, you can make a new line of sight by drawing with a felt pen along the cord on the saw’s engine housing. This means you can adjust the saw’s line of sight to the tree length you usually fell. Felling around the other trees, less than 20 cm in diameter. This felling technique is used to get around the crown of any trees in front. The diameter of the tree must not exceed 20 cm. 1.Cut the directional notch. 2.Start by sawing the felling cut from the side of the trunk that you want the tree to lean towards. Cut from the hinge, leaving only a small portion of the hinge on the opposite side. The remaining hinge should be thicker than normal. 3.Press the tree over to the side where the hinge has been sawn off. Continue to push the tree in the direction of felling past the trees in front. 1. 2. This gives you a completely even hinge. To get a perfectly smooth hinge, you can use this alignment method when you make the felling cut as well. When you saw up to the hinge from behind, you aim towards the same point as when you cut the directional notch. Both sides of the hinge are now exactly parallel. 28 29 ADVANCED FELLING ADVANCED FELLING Normal felling cutting Higher felling cut. One way to avoid splitting the wood is to make the felling cut at a level higher than the directional notch. The hinge should be thicker than normal to avoid the risk of sawing off curved fibres in the trunk. When you use this method you do not have optimal control of the tree, as the lip that is created when sawing the felling cut releases fairly early in the felling operation. Inverse directional notch, “Humboldt”. Split and crack prone tree species. Another way to avoid splitting the wood is to make an inverse directional notch. This method requires that the felling cut is not higher up than normal, which is better from a safety aspect. Just make sure that the two cuts needed for sawing the directional notch meet exactly. Wood that splits during felling can be a major safety hazard. Split wood can also result in major timber losses and consequently a large financial loss. Here are some tips on methods you can use to avoid splitting. 30 31 ADVANCED FELLING ADVANCED FELLING Root protrusions and “ears”. Bore in directional notch. Root protrusions always represent a risk for splitting and should be cut off if they are to the sides. Some tree species can split without having any root protrusions. You can then make a few saw cuts, known as ears: Add a saw cut on each side of the hinge ensuring no fibre is pulled out splitting the edges. However, root protrusions should not be sawn off if the tree is leaning across the direction of felling, as the felling hinge’s lateral strength will be weakened. Some tree species such as beech may have high tension in the core (trunk centre). This may cause the wood fibres to be pulled out of the wood when felling. One way to prevent this is to make a bore in the directional notch and saw off the core before starting the felling cut. As part of the hinge is sawn off, the remaining part can be made slightly thicker. Beware of kickback when making the bore! The method is also used on very thick trees with diameters up till 2.2 times the length of the guide bar. Ears Ears 32 33 ADVANCED FELLING ADVANCED FELLING Decayed trees. Hollow trees. Rot mainly attacks older and damaged trees. The disease weakens the wood fibres making felling hazardous. Fell the tree in the natural direction of felling or secure the tree with a winch. If you suspect rot, make an inspection bore with the guide bar upright directed in the direction of fall, positioned in the middle of the hinge and below the level of the felling cut. Check if the wood is discoloured and soft. Make sure the hinge is cut in healthy wood and is as long as possible, either by adapting the directional notch’s depth or cutting higher on the trunk where the wood is usually healthier. Fell using the same method as for decayed trees. Make sure the hinge is cut in healthy wood and is as long as possible by adjusting the directional notch’s depth. Fell in the natural direction of felling. Felling weakened trees. Weakened trees refer to trees that are dead, hollow, decayed or fire damaged. Felling a tree is particularly hazardous and should only be performed by a person with sufficient knowledge and experience. Plan the felling thoroughly and consider all the risks involved. In order to fell a weakened tree in a controlled manner, apply the same technique as for the directional felling of healthy trees with the directional notch, felling cut and hinge. But as the timber is greatly weakened, or partially missing at the hinge, you should either fell a tree in its natural felling direction or secure with ropes. Direction of felling Warning: Watch out for falling branches! 34 35 ADVANCED FELLING ADVANCED FELLING Dead trees, dry trees. Fire-damaged trees. Dry trees should only be felled in larger numbers caused, for example, by infestation or forest fire. A few dead trees are valuable to ecological diversity and should be left untouched. Dry trees are solid, hard and brittle and have poor strength at the hinge. They also weigh less and therefore may be harder to fell. Fire-damaged trees may be burned inside and may only standing on the root protrusions. A tree like this should be felled in its natural direction of felling, as follows: 1.Make the directional notch in the usual way, on both sides of the damage if you are felling from the front of the hollow 2.Make a bore from one side and cut backwards a little. The width of the hinge should be at least 1/10th of the trunk’s diameter, or more if the wood is poor. 1.As the timber is greatly weakened, you should fell the tree in the natural direction of felling. Make the directional notch deeper than normal (up to 50 % of the diameter of the tree is a decent depth). If the tree is very thick, you can reduce the amount of timber at the hinge with a bore in the directional notch. 2.Saw the felling cut as usual. Use a breaking bar where possible. If you use felling wedges, be careful to ensure the load on the hinge is not too great when you knock them in. Scarf on both sides of the burnt-out section Tree’s natural direction of fall Felling cut Directional notch Hinge Bore Hinge Felling cut Directional notches on both sides of the fire damage NOTE: Beware of dry, fallen branches and be aware that the top of the tree could break and fall back when the tree falls. 36 Tree’s natural direction of fall Warning: if the roots are burned the tree may be very unstable. 37 ADVANCED FELLING ADVANCED FELLING Alternative solutions. • Turn the tree down to the side • Prize the butt end backwards using the step down method • Bringing down with winch, tractor or other machine Turning the tree down to the side is a quick and easy method that works well when the hang-up is not too complex. A straight trunk indicates that the tree can be rotated while a curved trunk indicates the contrary. If the tree is heavily hung up with another tree, it is futile to try to turn it down. If prizing the butt end backwards does not help, all you can do is call for the aid of a tractor or harvester. Note: Never leave a trapped tree unmarked. Mark the area with highly visible marking tape if you must leave the area to get other tools or assistance. Turning down method. Use a turning strap or breaking bar with turning hook if you think that the tree is not too trapped. To remove a hung tree. If you accidentally fell a tree into another – always start by taking a break and thinking through the situation calmly. Removing a trapped tree is always a hazardous undertaking and there is no need to rush. Choose the safest solution to the problem even if it takes longer. There are several options. Do not be afraid to call for help – your safety is more important than anything else. 38 Follow these steps: 1.Assess which way the tree can be rolled down. Saw off the middle of the hinge so that two corners are saved. Next cut off one corner with repeated saw cuts diagonally from above. Leave the corner on the side that you intend to roll down the tree. 2.Take the turning hook (turning strap) and roll the tree away from you. Lift straight with a straight back and knees bent. If the tree is large or has hung really tightly, you can increase the rolling force by using the turning hook or turning strap with a longer piece from a thin tree. Warning: never turn the tree towards you! 39 ADVANCED FELLING ADVANCED FELLING WARNING: Never fell another tree over an already trapped tree. 2. 1. WARNING: WARNING: Never try to cut down the tree that has been felled on. Never work within the danger zone of the hanging trapped trees. Step down method. The name comes from the way the cuts and splitting form a step shape. The method is based on removing the tree from the stump or the place where the tree is stuck with the butt end in the ground. The trunk should have a good sliding surface and fall off cleanly. Follow these steps: 1.Lay branches and poles on the ground in front of the trunk to form a surface. 2.Cut into about half the diameter of the rear of the trunk. Continue cutting from the other side if the guide bar is shorter than the tree diameter. Taper the front of the trunk. (Arrow 1) 3.Insert a wedge to prevent the cut from being squeezed together. 4.Saw the next cut from the front, parallel to the previous cut, but 3 – 5 cm below. Cut into about half the diameter of the trunk. (Arrow 2) 5.Knock in the wedge until the wood fibres split between the two cuts. The trunk usually slides off the stump at the same time. 6.Prize the tree with a 2–3 m long rod/pole in the direction of movement until the tree falls. 7.If the tree does not come loose, redo the process from step 1. Note: It is important that the two saw cuts are not made too high up on the trunk as it could “fold down” at the breaking point. Also be aware that the trunk could sever too early. Therefore, never stand in the direction of movement and of course not under the trunk. If the tree is too tightly hung, you should use a tractor, winch or other machine. Bringing down by winch or tractor The method is similar to the step down method, but instead of prizing with a pole, you pull the tree down with a rope and a winch or a tractor. Follow these steps: 1.Tie the wire to the tree near the butt end. The wire must be long enough to ensure the tree can fall down without hitting the tractor or winch. 2.Pull the tree down in the trunk’s longitudinal direction with the winch or tractor. Make sure the tree does not get stuck in the ground and kick over in your direction. This can be avoided with a high pulling point that allows the butt end to be lifted up. Pull the wire so that it falls through a pulley that you attach higher up in another tree, before attaching the wire to the hung-up tree. 3.One option is to pull the tree loose sideways up at the crown. You then need to attach the wire as high up the trunk as possible. Remember that you must never walk under the tree or climb on it. Instead, you can throw the wire over and pull it in with a boat hook or similar. 40 41 Effective limbing Effective limbing Comfortable working height. Try to work at a height at which you do not have to stoop down. You can achieve the right working height by trying to fell a tree so that it falls over the other felled trees, logs, stones or elevations in the terrain. The most comfortable working height you can achieve when limbing can be at waist height down to knee level. Bend your knees, not your back! Effective limbing Limbing is the operation that usually takes the most time and effort when working with chainsaws. Therefore, you have much to gain by learning an effort saving and quick limbing method. If you get tired in your back from limbing a tree, this may well be an indication that your technique needs fine tuning. Safe working position. Stand securely with your feet apart at a 45 degree angle to the trunk. Work with the saw near your body. It is important that your stance is stable in two directions. It is always dangerous to move your feet while limbing. That is why it is important to have ample reach without needing to move your feet. Balance the chainsaw on the trunk or your leg. Carry the saw as little as possible while limbing and changing positions. The chainsaw must not be lifted away from the trunk more than necessary. Use the chainsaw as a lever, with the saw body resting on the trunk or your leg. Limbing will be easier and more effective with a short guide bar (13–15"). Safe movement. Always hold the guide bar on the other side of the trunk when you move your feet. The chain must be stationary when you move. Hold the saw by both handles when moving short distances, never by the rear handle only. For longer movements, you should activate the chain brake and carry the saw by the front handle. Beware of kickback. Avoid cutting with the guide bar tip. Your thumbs and fingers must always be wrapped around the handles during limbing work. Use a guide bar length that is adapted to the dimension of the tree. Consider the weight of the branch. Determine how the branches are tensioned. Cut on the opposite side of the branch where the guide bar is not likely to “pinch” because of the weight of the branch. If you are not sure you cut the branch in stages, from the outside in towards the trunk. Remove any branches that are in the way. Let the saw rest on the trunk while lifting off severed limbs or branches with your left hand. First release the throttle control and throttle lock and activate the chain brake. If the saw has Trio Brake, it will be even easier to activate the chain brake before you lift the branches off. Lever method. This method is based on using the saw as a lever with the saw body resting as much as possible against the trunk or your leg. The working pattern is to cut each branch in a certain order (see steps 1-6), which is based on the principle that you should lift the saw as little as possible from the tree trunk. Limbing will be easier and more effective using a short guide bar (13–15"). This method is suitable for trees with thin to medium thick branches and regular rounds of branches. For example, if a thick hanging branch is likely to jam the chain and the sword, you may need to deviate from the recommended direction of cut on the branches. 42 43 Effective limbing Effective limbing 6 5 4 Step 1. • Let the saw rest against the trunk. • Saw with a pushing chain. • The centre of gravity of the saw body should lie on your right leg. • Support your right leg against the trunk for extra balance. Step 2. • Rest the guide bar on the trunk. • Saw with a pushing chain. • The centre of gravity of the saw body should lie on your left leg. • Place your right leg against the saw body. Step 3. • Relieve the weight of the saw against the trunk and your right leg. • Saw with a pulling chain. • The centre of gravity of the saw body should lie on your left leg. Step 4. • Rest the saw against the trunk and your right leg. • Saw with a pushing chain. For thick branches you can also use a pulling chain. Step 5. • Rest the saw against the trunk. • Saw with a pushing chain. • Adjust the throttle with your thumb. • Divide the body’s centre of gravity over both legs. Step 6. • Rest the saw against the trunk. • Saw with a pulling chain. • The centre of gravity of the saw body should lie on your right leg. • Restart from branch No. 1. 3 2 1 Limbing sequence steps 1-6. The lever method is described step by step in the following sections. The following is the sequence that provides a brief description of the lever method. Starting position • Always stand on the left side of the tree trunk and limb from the roots to the top end. • Stable foot position. Your feet should be wide apart with the saw resting on the trunk. • Note that you must stand still with your feet in the same position during the whole limbing operation. 44 Moving to a new location from step 6 back to step 1. Hold the saw fully against the trunk during the movement and the guide bar on the opposite side of the trunk. If the distance between the round of branches is too far for the whole sequence, you can stop after step 3. Now move the saw to the starting position (step 1) and then move to the next round of branches. 45 Effective limbing Effective limbing Limbing from the bottom. With the trunk directly on the ground When you have limbed the whole trunk on the right, left and top, turn the log/trunk allowing you to access the branches underneath. Bend your legs as much as possible and work with a straight back in order to relieve the load on your back. 46 At a suitable working height. If you have a good working height that allows you access to the branches under the trunk, you can limb from the bottom while you are performing the normal limbing process. Normally, it will be enough to limb from the bottom after about two rounds of branches (steps 1—6). Move your right foot a little and turn to face the trunk. Support the saw by resting your arms on your knees/thighs. 47 Advanced cutting advanced cutting 1. 2. 3. Thicker trunks with ground contact at both ends. Advanced cutting Cutting up a lying tree trunk into appropriate lengths can be complicated for various reasons, such as the trunk being very thick, that it is lying on a slope or directly on the ground. Here are some techniques that may prove useful. Basic working techniques and methods for felling small and medium trees are described in “Working with chainsaws, Part 1”. If the trunk has contact with the ground at both ends, the upper surface is exposed to compressive strain. The guide bar will get pinched if you try to saw through the whole trunk from the top. The following method requires that you use a larger saw with a long guide bar. 1.Start by cutting about 1/4th of the diameter of the trunk on the side you are standing. Lean slightly forwards and stand a bit to the side of the cut. 2.Now cut about 1/3rd of the trunk diameter from the top. 3.Lean over the trunk and cut about 1/4th of the diameter from the opposite side. 4.Make a bore in the lower part of the trunk. Now saw down through the trunk. Avoid sawing into the ground. 5.Finally saw the undercut from the bottom up until the trunk breaks or you reach the corresponding cut from the top. NOTE: Observe how the trunk reacts at all times. Hazards when cutting. Before you begin, you should carefully consider the condition of the trunk, the stresses that are affecting it and how the log end will move when you cut through it. Most consider cutting as pretty safe work compared to felling. But when cutting there are risks you should consider before you begin: • Risk of kickback. • Risk of the blade pinching together and the guide bar jamming • That you saw into the ground or a rock when you have sawn through the log. • That the cut log end falls down on your feet. • That the cut log end rolls towards you. • That the cut log end kicks out towards you. 48 1 2 1 2 5 3 4 49 advanced cutting advanced cutting 4 2 3 1 2 1 Thicker trunks with free-hanging ends. 1.Start by cutting about 1/4th of the diameter of the trunk on the side you are standing. Lean slightly forwards and stand a bit to the side of the cut. 2.Now cut about 1/3rd of the trunk diameter from the bottom. 3.Lean over the trunk and cut about 1/4th of the diameter from the opposite side. 4.Finally saw the overcut from the top down until the trunk breaks or you reach the corresponding cut from the bottom. NOTE: Observe how the trunk reacts at all times. 1. 2. 1 1 Where you run the risk of the saw jamming by a falling log end, you can use one of the following two methods: 1.Both saw cuts (or only the undercut) are made slightly at an angle. Start with the top cut down to about 1/3rd of the diameter and then continue with the bottom cut. The log may fall down and the saw is set free. 2.The saw cuts are slightly separated. Start with the top cut down to about 1/3rd and then continue with the bottom cut. The log may fall down and the saw is set free. 50 51 advanced cutting advanced cutting Cutting using a felling wedge. An alternative method for cutting a thick trunk, for example, on the ground. 1.Cut the trunk from above until the guide bar and the tip of a felling wedge fit in the cut. 2.Let the saw remain in the cut. Knock the felling wedge in the cut as far as possible without the tip reaching the guide bar. 3.Cut down until about 1/3rd-1/4th of the diameter of the trunk remains. 4.Knock the wedge in as far as possible. Now saw the rest of the log. Avoid sawing into the ground. Trunks located on a sharp slope. Trees standing on a slope should be felled up the slope to ensure work proceeds as safely as possible. When you are working a trunk that is lying on a sharp slope, you should always stand at the top side of the trunk. Never stand whereby you risk the logs or the whole trunk rolling or sliding towards you. To support the trunk, keep the hinge, if any, intact and retain locking branches when working. 1.Mark the cutting point on the logs. 2.Start cutting the trunk where there are no supporting branches (usually at the butt end). Notice how the log moves when it starts to break off. 3.Carefully cut the other logs 4.Finally cut the supporting branches. Once again, watch carefully how the log moves. 52 53 Processing of storm-felled forest Processing of storm-felled forest Processing of storm-felled forest Felling in a storm-felled forest is the most dangerous chainsaw work. Taking care of uprooted trees, broken trees, leaning trees, trunks that are tensioned and trunks jammed in multiple layers is extremely hazardous work and should only be performed by a person who has excellent knowledge and long work experience. Equipment when working in a storm-felled forest • • • • • • • • • • • • Full personal protective equipment. First aid kit. Jacket with fluorescent colour. Chainsaw with effective safety features. Complete logger belt. Combi can. Axe. Wedges to prevent jamming and releasing a jammed guide bar. Breaking bar with longer handle. Extra chains and guide bars. Extra long guide bar to reach through from a safe position. More on equipment, see Page 13. Some important advice • • • • • • Always start with an inventory of the damage and plan your work carefully. Never work alone. Be careful when cutting. Tensions in the tree can cause the trunk to kick out with great force. Always keep a tractor with grapple loader or harvesting machine on hand whenever possible. Use the machine when several trees are jammed together on one another. Make sure that uprooted trees that are cut and at risk of springing back are secured. This is especially important near buildings or where people are often present. • Uprooted trees that can fall back are death traps. In winter, uprooted trees may be frozen and come loose from their position when they thaw • If you have the slightest doubt, you should hire professional help. Always carry extra chains and guide bars at the logging area. A lot of soil, gravel and dust will have settled on the fallen trees. This should be removed before cutting, otherwise the chains are quickly blurred and the guide bar’s nose-wheel is heavily worn. An axe is a great help for chopping out the earthy bark before cutting the wind-felled tree. 54 55 Processing of storm-felled forest Processing of storm-felled forest Fell in the correct sequence. Storm-felled forest is to be felled in the direction of the storm wind. Do not take any risks and ensure that you always have an escape route. Start with the top trees to reduce the risk of falling into a dangerous position and entrapping yourself. The trees in the picture are brought down in the following order: 1, 2, 3, 4. 4 1 1.Leaning tree 2.Broken tree, hanging/felled tree 3.Lying tree uprooted 4.Vertical broken tree, high stumps 2 3 D a n g e r zo n e 2. 1. 3. 1. Bringing down a leaning tree. Start by taking down the leaning tree. The tree’s roots are probably under strain and its position is unstable. For this reason you must never walk in the tree’s felling area. Fell the tree with a safe corner straight back or, on a steep sleep, with a V-cut or deep V-cut as described on Page 27. The tree will then fall slowly, and will be kept attached to the stump during the fall without splitting or hitting anything. 3. When cutting uprooted fallen trees there is a risk of falling forwards. Windfalls with large uprooted trees must never be cut at the butt end first as these could kick over in your direction. Start by limbing the tree so you can easily see if the trunk is under tension. Now measure the length of the first log from the top and cut the log there. Alternatively, cut as far as the ”butt off” so the roots cannot kick up. Now use a tractor with a grapple loader or winch to tip back the uprooted tree with high stump. 56 2. B ringing down broken trees with hanging tops Bringing down trees where the tops are still hanging in the trunk is hazardous. If the tree is broken high up, you should handle it as a hang-up. Never walk under the suspended section. 1.Start by cutting off the top so that it is easier to turn. 2.Turn the broken section down using a turning hook, turning strap or by pulling it loose with a machine. 3.Now fell the high stump in the usual manner. But beware – the log usually falls quickly and may kick up at the butt end and roll 4. B ringing down broken trees without hanging tops. Broken trees and high stumps are felled in the usual manner, like a normal tree. But beware – the logs usually fall quickly and may kick up at the butt end and roll erratically. WARNING: When the trunk has been cut off, the uprooted tree must never be left standing so that it represents a danger to passers by. Upright uprooted trees are death traps! 57 Processing of storm-felled forest Processing of storm-felled forest Storm cut. A special technique for cutting the roots of storm-felled trees. The method reduces the risk of you jamming the guide bar or saw in the ground. The little split that may occur at the lower lip will hardly affect the value of the timber. Remember to work from the safe side of the trunk (see below). 1.Make a bore in the bottom half of the trunk. 2.Cut down until you have a 3 cm wide lip remaining. 3.Now cut upwards until you have a 3 cm wide lip remaining here too. 4.Cut the upper lip by sawing from above, about 3 cm closer to the root. Be prepared when the tension in the trunk is released. 4 3 1 2 Stand on the safe side when cutting roots. When the trunk is cut at the root, it may move sideways at great force. Therefore, keep your retreat route behind you free! Stand with the uprooted tree on your left side and cut the trunk to your right, about 0.5 m up the trunk. You now have protection for your legs if the trunk kicks out sideways when it is cut through. If the entire tree must be processed with a chainsaw, it is best to start from the top. This releases any tension before you get to the root. Cutting the roots with a machine must only be done when there is no risk of the uprooted tree turning over and you are free from any kickback. WARNING: When the trunk has been cut off, the uprooted tree must never be left standing so that it represents a danger to passers by. Upright uprooted trees are death traps! 58 59 Processing of storm-felled forest Processing of storm-felled forest For excessive tension: Opening on the pressure side. A variation where you only saw from the inside of the arc (pressure side). Make a cut like an open directional notch with a larger opening angle. Saw a little at a time on both sides until the tension starts to release. The tension is released slowly under good control and direction. Be careful with the nose of the guide bar to avoid kickback! 1. Recommended cutting methods for trees under tension. Storm-felled trees that are often exposed to high tension in the trunk because of the lean or that the tree is jammed with a bent trunk. You release the tension in a controlled manner by cutting through the trunk in phases using the following techniques. Remember to always stand on the inside of the arc of the curved trunk if the tree is lying down and under strain. 60 61 Processing of storm-felled forest Processing of storm-felled forest For moderate tension: Open counter cut. 1.Cut an open directional notch on the inside of the arc of the curved trunk, to about 1/3rd of the trunk’s thickness. 2.Remain on the inside of the arc and cut in small stages from the outside of the arc, in the centre of the notch, until the trunk breaks. 62 63 SAFETY INSPECTION AND SERVICE SAFETY INSPECTION AND SERVICE 2. 7. 8. 10. 12. 13. 14. 15. Safety inspection and service. You should service your chainsaw regularly to maintain the saw’s functions and efficiency. You do basic service yourself according to the service points below. The safety features should be checked at each use (points 1– 5). 1. CHAIN BRAKE Clean and check the function. Read more in 10. GUIDE BAR Clean the holes for lubrication and chain groove. chain brake and inertia function, inspection on pages 18 –19. The guide bar should be turned at regular intervals to ensure more even wear. Also file off any burrs using a flat file. 2. CLUTCH COVER Clean the brake band for the chain brake. Replace the brake band if it is damaged or severely worn. 3. THROTTLE Check that the throttle lock works and that it is not damaged. 4. CHAIN CATCHER Make sure it is intact and is not loose. Replace the chain catcher if it is damaged. 5. STOP SWITCH Check that the stop switch is working properly. 6. CRACKS Make sure that no cracks have appeared in the safety 11. GUIDE BAR AND CHAIN LUBRICATION Check the function. Read more in Chain lubrication on page 18. 12. AIR FILTER Clean the air filter in a lukewarm soap solution. If the chainsaw is fitted with centrifugal cleaning (Air Injection), you do not need to clean as often. 13. CYLINDER Clean the cooling fins regularly to preserve the engine’s cooling function. 14. FLYWHEEL Clean the fins for sustained fan/cooling effect. features and other components on the chainsaw. Replace them if they could jeopardise your safety. If in doubt, consult your nearest dealer. 15. CLUTCH Lubricate the clutch bearing through the hole in the crankshaft (on some models) or directly on the bearing (other models). 7. BOLTS AND NUTS Check regularly that all nuts and bolts 16. OPERATORS MANUAL Read more about service and are tightened, especially on the muffler. aintenance in the chainsaw user’s manual. For other service and m repair work, contact your local servicing dealer. 8. STARTER Clean the air intake, check the functionality and wear. 9. CHAIN Sharpen and check the chain tension and condition. See pages 60–65. 64 65 SAFETY INSPECTION AND SERVICE SAFETY INSPECTION AND SERVICE Filing equipment. You should have access to these tools in order to make the chain sharp: • Round file • Flat file • File holder • Combination gauge with filing gauge and depth gauges Remember that the round file and gauges vary in size and design depending on the type of chain you use. The chain type is printed on the combination gauge. See the table herein or ask your nearest dealer. Here you can see how it looks when a cutting tooth is blunt. It is high time to sharpen the cutting teeth. Notice the cutting tooth’s “white” edge. Backward leaning angle. The cutting tooth is filed too high up, making it cut poorly. Use the depth gauge and re-file the cutting teeth according to the recommendation. The cutting tooth that has sawn through stone shows an irregular edge where the top layer of the cutting tooth is damaged. It is important that all the damage is filed away to ensure the best possible sharpness. This is what a sharp cutting tooth looks like. Maintenance of cutting equipment. Wear work gloves when you inspect the chainsaw’s cutting equipment. Chain tension. Make sure the chain is correctly tensioned. A slack chain may jump off the guide bar, injure you and damage the chainsaw. An overly tight chain tension can cause premature wear of the guide bar. A properly tensioned chain should not hang under the guide bar. The chain tension is correct when the chain is in contact with the underside of the guide bar, and you still can pull it around easily by hand. See picture above. A sharp chain. The chain must always be sharp to ensure cutting that is safe, effective and has good precision. An easy way to keep the chain sharp is to use the Husqvarna filing gauge and follow the filing instructions on the following pages. 66 How often should the chain be sharpened? A saw chain sharpness is impaired after time even if you have been avoiding cutting into objects that reduce its sharpness (rock, soil, etc.). The chain becomes blunt. If the chain has sawn through stone it is useless and must be sharpened immediately. If you use a chainsaw for much of the day, it is appropriate to sharpened the chain with a file each time you refuel. It is easier to sharpen a little but often than waiting a long time to file. You also get better precision and work more efficiently. Chain type. Always use the type of guide bar and chain recommended by the manufacturer. The table shows the various chain types and round file sizes for Husqvarna Chains and corresponding Oregon Chains. CHAIN TYPE PITCH (INCHES) FILE (MM /INCHES) 95VP .325" 4.8 / 3 / 16 Semi-Chisel H25 21BP .325" 4.8 / 3 / 16 Semi-Chisel H42 73LP 3 / 8" 5.5 / 7 / 32 Chisel H36 91VG 3 / 8" 4.0 / 5 / 32 Chamfer Chisel H37 91PX 3 / 8" 4.0 / 5 / 32 Chamfer Chisel H64 27 .404" 5.5 / 7 / 32 Micro Chisel HUSQVARNA OREGON H30 “Pixel” CUTTING TOOTH SHAPE 67 SAFETY INSPECTION AND SERVICE SAFETY INSPECTION AND SERVICE 2. 3. 6. Filing the chain. The chainsaw and guide bar should be fixed in a position to ensure good stability, and in order for you to have both hands free for filing. It is easiest if you use a vice on a workbench to secure the guide bar. Secure the chain by activating the chain brake. Side plate angle Top plate cutting angle 1.Start with the cutting teeth. Use the round file and filing gauge Filing angle Cutting tooth angles. The cutting teeth on the chain must be filed according to three different angles: sharpening angle, impact angle and edge angle. The angles vary depending on the type of chain you have. If you use a filing gauge you do not need to think about the different angles to ensure a good result. Just follow the instructions and you will get the right angles on the cutting tooth. 68 designed for the type of chain that you have (see table on page 61). 2.Place the filing gauge on the chain. The arrows on the filing gauge should point in the chain’s direction of rotation (towards the nose wheel). Make sure the gauge has contact with the chain. 3.File with both hands. Place the file at an 90-degree angle in relation to the rollers on the filing gauge. The file should rest on both rollers. The filing angle is then 25–35° depending on the type of chain. File the cutting tooth away from you with smooth strokes. 4.Now proceed to file every other tooth. Each cutting tooth is to be filed so that it is sharp. It is important that all the cutting teeth are of equal length. 5.Once you have finished filing all the cutting teeth on one side, loosen the vice and then attach the guide bar from the other direction. 6.Then sharpen the cutting teeth in the same way from the opposite direction. 69 SAFETY INSPECTION AND SERVICE SAFETY INSPECTION AND SERVICE Freehand filing. If you are used to filing you can also file without the filing gauge. Be sure to maintain the original angles for the cutting tooth. To maintain the correct angle and depth of the cutting teeth, we still recommend that you use the filing gauge when you have filed with a free hand a few times. Avoid filing in a way that produces hook. The chain will be too “aggressive” as a result. This means that the saw is exposed to unnecessary strain and the user to increased vibration. Correctly sharpened cutting tooth, see illustration on page 61. Hook. The side plate angle is too small. Replace the chain. 4 mm It is time to replace the chain when the longest portion of the c utting tooth is less than 4 mm or if you find cracks. Filing the depth gauge. Over-sharpened cutting tooth. If the cutting tooth is shorter than 4 mm, the chain must be discarded. We recommend that you file the depth gauges after you have filed the cutting teeth 3 – 5 times during normal wear. After filing following sawing through stone, for example, where you have filed each cutting tooth a lot, you should also file the depth gauges. The depth gauge has the words “Soft” and “Hard” stamped on it. “Soft” stands for soft wood (conifers) and “Hard” stands for frozen and hard wood (leaf trees). If the depth gauges are filed using the “Hard” setting, each tooth takes slightly less wood than when filing with “Soft”. When the timber is hard, you cannot saw off as much wood at one time as you can with soft wood. The measure of the depth gauge varies with the type of chain, see the saw’s user manual. 1.Add the gauge and hold it firmly with one hand. Select “Soft” or 3.Now continue to file all the depth gauges on the chain. Depth gauge. The height difference between the position of the depth gauge and the tip of the tooth (depth gauge clearance) determines how much the cutting tooth will cut. It works much like a plane. When the plane is set up with minimal cutting blades, the plane takes a very little amount of wood. The same thing happens with the saw chain if the distance between the depth gauge clearance lip and the tip of the tooth is too small. It is also not good if the depth gauge clearance lip has been filed down too much. The cutting tooth will then cut too deeply into the wood. The cut is more aggressive with high vibrations as a result. The risk of kickback increases and the chainsaw is exposed to unnecessary stress. Depth gauge. “Hard”, depending on the wood you are sawing. The depth gauge varies with the type of chain. 2.Take a flat file in your other hand and file the depth gauge until the file engages the gauge. 70 The gauge mounting varies with right and left-handed filed cutting tooth. 71 SAFETY INSPECTION AND SERVICE SAFETY INSPECTION AND SERVICE 1. 2 / 3. 4. 5. Sharpening the saw chain in the forest. Make sure you have a stable foundation and you can secure the saw when you use the file. Here are some examples of how to proceed. Use the method that works best for you. The main thing is that you always have a sharp chain to facilitate your work. 72 1.The simplest method is to use a filing vice. Attach it to a stump 4.This method allows you to file with both right and left hands. or log and secure the guide bar like a normal vice. File according to the filing instructions. 2.Use a smaller tree. Make a vertical bore at a suitable working height for filing. Make sure that you do not risk kickback when you make the bore (see previous chapter). Stop the engine and insert the guide bar in the bore. Secure the guide bar by inserting the combination spanner between the guide bar and the saw cut. File according to the filing instructions. 3.Use a smaller tree. Cut the tree at a suitable working height for filing. Make a mark on the stump, about one guide bar width deep. Saw a diagonal slot below the stump cut on the side where the saw body should be. Insert a lifting hook in the slot and use the hook grip to support the chainsaw. File according to the filing instructions. Sit astride a tree trunk. Hold the saw body between your thighs. Lean over the chainsaw body and support your forearms on your thighs. Start by filing all cutting teeth in one direction with the same file grip. Now change the file grip to your other hand and file the other side. File according to the filing instructions. 5.Filing as specified in point 4 with your right hand. Once you have filed all the cutting teeth in one direction and using this method, and it is time to change file grip to your left hand, lean the saw against a tree stump or log instead. Press your right leg against the engine body so that it is in a secure position. File the rest of the cutting teeth on the other side, according to the filing instructions. 73 SAFETY INSPECTION AND SERVICE SAFETY INSPECTION AND SERVICE Grinding the lifting hook and tongs. It is very important that your tongs and hook are pointed and sharp to ensure good grip on the logs. Blunt hooks and tongs are inefficient and can also be dangerous as you can hurt yourself if you slip. This is how you file the lifting tongs. The tip should where possible be sharpened in a chisel shape to easily release the tongs from the timber. Tip edge should be avoided as it may jam in the timber when the tongs are released. This is how you file the lifting hook. Using this tip you retain the tip naturally. You file the hook from the sides and the outside of the hook. File towards the tip. This is how you test the lifting hook. Check the effectiveness of the tip by pulling it horizontally with light pressure on the handle to a wooden board or bark-free log along the grain. A properly sharpened tip attaches evenly to the tree and ploughs a slight groove. 74 75