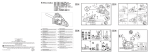
1
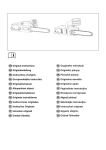
GB Original Instructions
PL Oryginalne Instrukcje
DE Originalanleitung
CZ Originální pokyny
FR Instructions d’origine
SK Pôvodné pokyny
NL Oorspronkelijke instructies
SI Originalna navodila
NO Originalinstrukser
HR Originalne upute
FI Alkuperäiset ohjeet
LT Pagrindin>s instrukcijos
SE Originalinstruktioner
RU Исходные инструкции
DK Originale instruktioner
EE Algsed juhised
ES Instrucciones originales
LV S◊kotn]j◊s instrukcijas
PT Instruções Originais
RO Instrucţiuni originale
IT Istruzioni originali
GR Αρχικές οδηγίες
HU Eredeti Utasítás
TR Orijinal Talimatlar
GB
IMPORTANT INFORMATION
Read before use and retain for future
reference
DE
WICHTIGE INFORMATIONEN
Bitte vor dem Gebrauch sorgfältig durchlesen
und für einen späteren Bezug an einem
sicheren Ort aufbewahren
FR
INFORMATIONS IMPORTANTES
A lire attentivement et bien assimiler avant
tout emploi
NL
BELANGRIJKE INFORMATIE
Deze informatie lezen alvorens het
product in gebruik te nemen en zorgvuldig
bewaren
NO
VIKTIG INFORMASJON
Les gjennom før bruk og oppbevar til
fremtidig bruk
FI
TÄRKEÄÄ
Lue ennen käyttöä ja säilytä tulevan varalle
CZ
DŮLEŽITÁ INFORMACE
Než začnete stroj používat, přečtěte si
pozorně tento návod a uschovejte jej pro
další použití v budoucnu
SK
DÔLEŽITÉ INFORMÁCIE
Pred použitím si prečítajte nasledovné
informácie a odložte si ich pre budúcu
potrebu
SI
POMEMBNA INFORMACIJA
Preberite pred uporabo in shranite za
prihodnjo uporabo
HR
VAŽNE INFORMACIJE
Pročitati prije upotrebe i sačuvati za
buduće osvrte
LT
Operatoriaus instrukcijÅ rinkinys
Perskaitykite |¡ instrukcijÅ rinkin¡ labai atidãiai,
kad pilnai suprastum>te turin¡, prie| prad>dami
naudoti vejos/ ãol>s pjov>jƒ.
RU
ВАЖНАЯ ИНФОРМАЦИЯ
Прочитайте перед тем, как включить триммер,
и сохраните для дальнейшего использования.
SE
VIKTIG INFORMATION
Läs detta innan du använder maskinen
och spara för framtida användning
EE
OLULINE TEAVE
Enne seadme kasutuselevõtmist lugege
kasutusjuhend läbi ning säilitage see tuleviku tarbeks.
DK
VIGTIG INFORMATION
Læs før brug og gem til at kunne
konsultere i fremtiden
LV
SVARŒGA INFORM÷CIJA
Pirms lieto|anas izlasiet un saglab◊jiet
turpm◊k◊m uzziª◊m
RO
Manual de instrucţiuni
Inainte să folosiţi mașina de tuns pentru prima
oară, citiţi cu atenţie manualul de instrucţiuni
pentru a-i înţelege conţinutul.
TR
ÖNEMLİ BİLGİLER
Kullanmadan önce okuyunuz ve ileride
başvurmak üzere saklayınız.
GR
ΣΗΜΑΝΤΙΚΕΣ ΠΛΗΡΟΦΟΡΙΕΣ
∆ιαβάστε αυτό το φυλλάδιο πριν από τη χρήση
της συσκευής και φυλάξτε το για µελλοντική
αναφορά
ES
PT
IT
INFORMACIÓN IMPORTANTE
Léala antes de usar el aparato y guárdela
como referencia futura
INFORMAÇÃO IMPORTANTE
Leia antes de utilizar e guarde para
consulta futura
IMPORTANTE INFORMAZIONE
Leggere prima dellʼuso e conservare per
futuro riferimento
HU
FONTOS INFORMÁCIÓ
Használat előtt olvassa el, és tartsa meg
későbbi felhasználásra
PL
UWAGA
Zapoznać się z treścią niniejszej instrukcji
przed użyciem i zachować ją do dalszego
użytkowania urządzenia
GB
Due to a constant product improvement
programme, the factory reserves the right
to modify technical details mentioned in
this manual without prior notice.
CZ
Vzhledem k pokračujicim inovacím si
výrobce vyhrazuje právo mínít technické
hodnoty uvedené v této příručce bez
predčhozího upožornení.
DE
Im Sinne des Fortschritts behält sich der
Hersteller das Recht vor, technische
Änderungen ohne vorherigen Hinweis
durchzuführen.
SK
Proizvajalec si pridržuje pravico, da
spremeni značilnosti in podatke
pričujočega priročnika v katerem koli
trenutku in brez predhodnega onvestila.
FR
La Maison se réserve la possibilité de
changer des caractéristiques et des
données de ce manuel à nʼimporte quel
moment et sans préavis.
SI
Zaradi programa za nenehne izboljšave
izdelkov si proizvajalec pridržuje pravico do
sprememb tehničnih lastnosti, navedenih v
tem priročniku, brez predhodnega opozorila.
NL
NO
FI
Door konstante produkt ontwikkeling
behoud de fabrikant zich het recht voor
om rechnische specificaties zoals vermeld
in deze handleiding te veranderen zonder
biervan vooraf bericht te geven.
Produsenten forbeholder seg all rett og
mulighet til a forandre tekniske detaljer i
denne manualen uten forhåndsvarsel.
Jatkuvan tuotteen parannusohjelman
tähden valmistaja pidättää oikeuden
vaihtaa ilman ennakkovaroitusta tässä
ohjekirjasessa mainittuja teknisiä
yksityiskohtia.
HR
LT
RU
S obzirom na program konstantnog
poboljšavanja proizvoda, tvornica
pridržava pravo izmjene tehničkih
podataka navedenih u ovom priručniku,
bez prethodne obavijesti.
Dėl pastovios gaminio tobulinimo programos,
gamykla pasilieka teisę pakeisti šiose
instrukcijose pateiktus techninius duomenis be
išankstinio pranešimo.
Kомпания произвдитель сохраняет за
собой право изменять характеристики
и данные в настоящем руководстве, в
любой момент и без предварительного
извещения.
SE
Tilverkaren reserverar sig rätten att ändra
fakta och uppgifter ur handboken utan
förvarning.
EE
Tootja jätab endale õiguse muuta käesolevas
kasutusjuhendis kirjeldatud omadusi ja
andmeid suvalisel hetkel ja sellest eelnevalt ette
teatamata.
DK
Producenten forbeholder sig ret til
ændringer, hvad angår karakteristika og
data i nærværende instruktion, når som
heist og uden varsel.
LV
Izgatavot◊js saglab◊ tiesœbas jebkur◊ brœdœ un
bez brœdin◊juma mainœt |ar◊ rokasgr◊mat◊
eso|os datus un raksturlœknes.
ES
La firma productora se reserva la
posibilidad de cambiar las caracteristicas
y datos del presente manual en cualquier
momento y sin previo aviso.
RO
Datorită unui program constant de îmbunätăţire
a produsului, fabrica își rezervă dreptul de a
modifica detaliile tehnice prezentate în acest
manual fără notificare prealabilă.
PT
A casa productora se reserva a
possibilidade de variar caracteristicas e
dados do presente manual em qualquer
momento e sen aviso prévio.
TR
Üretici firma bu kullanma kılavuzunda yer alan
özellik ve verilerin istediği zamanda ve haber
vermeksizin değitirebilme hakkini kendinde
sahip tutar.
IT
La casa produttrice si riserva la possibilità
di variare caratteristiche e dati del
presente manuale in qualunque momento
e senza preavviso.
GR
HU
PL
A gyártó cég fenntartja a jogot arra, hogy
a használati utasitásban megadott
adatokon és technikai tulajdonságokon
bármikor és elözetes bejelentés nélkül
változtasson.
W związku z programem ciągłego
ulepszania swoich wyrobów producent
zastrzega sobie prawo do wprowadzania
zmian w szczegółach technicznych
wymienionych w tej instrukcji bez
uprzedniego zawiadomienia. Instrukcja
jest częścią wyposażenia
Λόγω προγράµµατος συνεχο ‘θς βελτίωσης προι
όντων, το εργοστάσιο επιφυλάσσεται του
δικαιώµατος να τροποποιεί τις τεχνικές λεπτοµέ
ρειες που αναφέρονται
στο εγχειρίδιο αυτό χωρίς προηγούµενη ειδοποί
ηση.
A
4
27
20
32
3
31
13
8
35
1
30
29
23
21
2
9
11
26
10
12
14
10
28
24
22
18
19
6
16
17
4
3
8
13
7
33
15
29
1
5
25
23
31
2
21
9
10
11
34
32
20
27
B
C
1
1
2
2
12
3
3
14
4
5
6
D
1
2b
2a
3
4a
4b
5a
5b
6a
6b
7
8a
8b
E
G
2
1
3mm
1
2
=
3
4
F
5
7
6
8
G
10
11
9
12
13
600
300 - 350
0.5mm
14
15
H
1
2
3
4
H
5
6
7
9
8
A
2
C
3
B
C
C
B
B
10
A
C
B
A. GENERAL DESCRIPTION
1)
2)
3)
4)
5)
6)
7)
8)
9)
10)
11)
12)
13)
14)
15)
16)
17)
18)
Rear handle
Rear hand guard
Front handle
Front hand guard/chain brake
lever
Chain tensioner outer knob
Chain tensioner screw
Chain tensioner pin
Oil tank cap
Oil tank inspection gauge
Air vents
Cable
Manual
Switch
Switch block
Chain
Drive tooth
Cutting link
Cutting depth gauge
19)
20)
21)
22)
23)
24)
25)
26)
27)
28)
29)
30)
31)
32)
33)
34)
35)
Cutting tooth
Guide Bar
Drive Sprocket Cover
Drive Sprocket
Chain catcher
Bar retaining screw
Bar retaining inner knob
Bar retaining nut
Nose sprocket
Guard bar cover
Spiked bumper
Chain tensioner pin housing
Lubrication hole
Guide bar groove
Thermal Cut-Out
Metal scroll wheel
Spanner/screwdriver
12
9
6
13
Example of identification label
4
14
5
8
2
7
2008
1
11
1)
2)
3)
4)
5)
6)
7)
8)
9)
10)
11)
12)
13)
14)
3
10
Guaranteed sound power
according to directive 2000/14/EC
Class II tool
CE marking of conformity
Rated frequency
Rated power
Alternating current
Rated voltage
Type
Product code
Year of manufacture
Maximum length of guide bar
Manufacturerʼs name and address
Serial number
Model
ENGLISH - 1
B. SAFETY PRECAUTIONS
MEANING OF SYMBOLS
Correct direction of the
cutting teeth.
Warning!
Always grip the
machine with two
hands
Read the instruction
manual carefully
Protective boots
Kickback danger
Protective goggles or visor,
protective helmet and
hearing protection
Do not expose to
rain or moisture.
Protective cut-proof gloves
Chain oil
Protective long, cut-proof
trousers
Refrain from
Chain brake: deactivated,
activated
Turn the machine off
Remove plug from the
mains immediately if
the cable is damaged
or cut
10 m
Disconnect the plug before
adjusting or cleaning.
Keep bystanders away
Risk of electric shock
General Power Tool Safety Warnings
WARNING Read all safety warnings and all
instructions. Failure to follow the warnings and
instructions may result in electric shock, fire and/or
serious injury.
Save all warnings and instructions for future
reference.
The term ʻ“power tool” in the warnings refers to your
mains-operated (corded) power tool or battery-operated
(cordless) power tool.
1) Work area safety
a) Keep work area clean and well lit. Cluttered or
dark areas invite accidents.
b) Do not operate power tools in explosive
atmospheres, such as in the presence of
flammable liquids, gases or dust. Power tools
create sparks which may ignite the dust or fumes.
c) Keep children and bystanders away while
operating a power tool. Distractions can cause
you to lose control.
2) Electrical safety
a) Power tool plugs must match the outlet.
Never modify the plug in any way. Do not
b)
c)
d)
e)
f)
use any adaptor plugs with earthed (grounded)
power tools. Unmodified plugs and matching
outlets will reduce risk of electric shock.
Avoid body contact with earthed or grounded
surfaces, such as pipes, radiators, ranges and
refrigerators. There is an increased risk of
electric shock if your body is earthed or grounded.
Do not expose power tools to rain or wet
conditions. Water entering a power tool will
increase the risk electric shock.
Do not abuse the cord. Never use the cord
for carrying, pulling or unplugging the power
tool. Keep cord away from heat, oil, sharp
edges or moving parts. Damaged or entangled
cords increase the risk of electric shock.
When operating a power tool outdoors, use an
extension cord suitable for outdoor use. Use
of a cord suitable for outdoor use reduces the risk
of electric shock.
If operating a power tool in a damp location is
unavoidable, use a residual current device
(RCD) protected supply. Use of an RCD
reduces the risk of electric shock.
ENGLISH - 2
3) Personal safety
a) Stay alert, watch what you are doing and use
common sense when operating a power tool.
Do not use a power tool while you are tired or
under the influence of drugs, alcohol or
medication. A moment of inattention while
operating power tools may result in serious
personal injury.
b) Use personal protective equipment. Always
wear eye protection. Protective equipment such
as dust mask, non-skid safety shoes, hard had, or
hearing protection used for appropriate conditions
will reduce personal injuries.
c) Prevent unintentional starting. Ensure the
switch is in the off-position before connecting
to power source and/or battery pack, picking
up or carrying the tool. Carrying power tools
with your finger on the switch or energising power
tools that have the switch on invites accidents.
d) Remove any adjusting key or wrench before
turning the power tool on. A wrench or a key
left attached to a rotating part of the power tools
may result in personal injury.
e) Do not overreach. Keep proper footing and
balance at all times. This enables better control
of the power tool in unexpected situations.
f) Dress properly. Do not wear loose clothing or
jewellery. Keep your hair, clothing and gloves
away from moving parts. Loose clothes,
jewellery or long hair can be caught in moving
parts.
g) If devices are provided for the connection of
dust extraction and collection facilities, ensure
these are connected and properly used. Use
of dust collection can reduce dust-related
hazards.
4) Power tool use and care
a) Do not force the power tool. Use the correct
power tool for your application. The correct
power tool will do the job better and safer at the
rate for which it was designed.
b) Do not use the power tool if the switch does
not turn it on and off. Any power tool that
cannot be controlled with the switch is dangerous
and must be repaired.
c) Disconnect the plug from the power source
and/or the battery pack from the power tool
before making any adjustments, changing
accessories, or storing power tools. Such
preventive safety measures reduce the risk of
starting the power tool accidentally.
d) Store idle power tools out of the reach of
children and do not allow persons unfamiliar
with the power tool or these instructions to
operate the power tool. Power tools are
dangerous in the hands of untrained users.
e) Maintain power tools. Check for
misalignment or binding of moving parts,
breakage of parts and any other condition
that may affect the power tool’s operation. If
damaged, have the power tool repaired before
use. Many accidents are caused by poorly
maintained power tools.
f) Keep cutting tools sharp and clean. Properly
maintained cutting tools with sharp cutting edges
are less likely to bind and are easier to control.
g) Use the power tool, accessories and tool bits
etc. in accordance with these instructions,
taking into account the working conditions
and the work to be performed. Use of the
power tool for operations different from those
intended could result in a hazardous situation.
5. Service
a) Have your power tool serviced by a qualified
repair person using only identical replacement
parts. This will ensure that the safety of the
power tool is maintained.
Chain saw safety warnings:
•
Keep all parts of the body away from the saw
chain when the chain saw is operating. Before
you start the chain saw, make sure the saw chain
is not contacting anything. A moment of
inattention while operating chain saws may cause
entanglement of your clothing or body with the saw
chain.
• Always hold the chain saw with your right hand
on the rear handle and your left hand on the front
handle. Holding the chain saw with a reversed hand
configuration increases the risk of personal injury
and should never be done.
• Wear safety glasses and hearing protection.
Further protective equipment for head, hands,
legs and feet is recommended. Adequate
protective clothing will reduce personal injury by
flying debris or accidental contact with the saw chain.
• Do not operate a chain saw in a tree. Operation
of chain saw while up a tree may result in personal
injury.
• Always keep proper footing and operate the
chain saw only when standing on fixed, secure
and level surface. Slippery or unstable surfaces
such as ladders may cause a loss of balance or
control of the chain saw.
• When cutting a limb that is under tension be alert
for spring back. When the tension in the wood
fibres is released the spring loaded limb may strike
the operator and/or throw the chain saw out of
control.
• Use extreme caution when cutting brush and
saplings. The slender material may catch the saw
chain and be whipped forward toward you or pull you
off balance.
• Carry the chain saw by the front handle with the
chain saw switched off and away from your body.
When transporting or storing the chain saw
always fit the guide bar cover. Proper handling of
the chain saw will reduce the likelihood of accidental
contact with the moving saw chain.
• Follow instructions for lubricating, chain
tensioning and changing accessories. Improperly
tensioned or lubricated chain may either break or
increase the chance for kickback.
• Keep handles dry, clean and free from oil and
grease. Greasy, oily handles are slippery causing
loss of control.
• Cut wood only. Do not use chain saw for
purposes not intended. For example: do not use
chain saw for cutting plastic, masonry or nonwood building materials. Use of the chain saw for
operations different than intended could result in a
hazardous situation.
Causes and operator prevention of kickback:
Kickback may occur when the nose or tip of the
guide bar touches an object, or when the wood
closes in and pinches the saw chain in the cut.
Tip contact in some cases may cause a sudden
reverse reaction, kicking the guide bar up and back
towards the operator.
Pinching the saw chain along the top of the guide
bar may push the guide bar rapidly back towards the
operator.
Either of these reactions may cause you to lose
control of the saw which could result in serious
personal injury. Do not rely exclusively upon the
safety devises built into your saw. As a chain saw
user, you should take several steps to keep your
cutting jobs free from accident or injury.
Kickback is a result of tool misuse and/or incorrect
operating procedures or conditions and can be
avoided by taking proper precautions as given
below:
•
Maintain a firm grip, with thumbs and fingers
encircling the chain saw handles, with both
ENGLISH - 3
hands on the saw and position your body and
arm to allow you to resist kickback forces.
Kickback forces can be controlled by the operator,
if proper precautions are taken. Do not let go of
the chain saw.
•
Do not overreach and do not cut above
shoulder height. This helps prevent unintended
tip contact and enables better control of the chain
saw in unexpected situations.
•
Only use replacement bars and chains
specified by the manufacturer. Incorrect
replacement bars and chains may cause chain
breakage and/or kickback.
•
Follow the manufacturer’s sharpening and
maintenance instructions for the saw chain.
Decreasing the depth gauge height can lead to
increased kickback.
Additional Safety Recommendations
1. Manual use. All persons using this machine must
read the user manual completely with extreme care.
The user manual must be included with the machine
in the case of sale or loan to another person.
2. Precautions prior to machine use. Never permit
this machine to be used by any persons who are not
perfectly familiar with the manual instructions.
Inexperienced persons must follow a training period
operating on a saw horse only.
3. Control checks. Check the machine with care
before use each time, especially if it has been subject
to strong impact, or if it shows any signs of
malfunction. Perform all operations described in the
chapter “Maintenance & Storage – Before each use”.
4. Repairs and Maintenance. All the machine parts
that can be replaced personally, are clearly explained
in the “Assembly / disassembly” instructions chapter.
Where necessary, all other machine parts must be
replaced exclusively by an Authorised Service
Centre.
5. Clothing. (fig 4) When using this machine the user
must wear the following approved individual
protective clothing : close-fitting protective clothing,
safety boots with non-slip soles, crush-proof toe
protectors and cut-proof protection, cut-proof
vibration-proof gloves, protective goggles or safety
visor, ear protection muffs and helmet (if there is any
danger of falling objects).
6. Health precautions – Vibrations and Noise levels.
Avoid using the machine for long periods of time: the
noise and vibrations can be dangerous causing
irritation, stress, fatigue and hypacusia (hearing
problems). Prolonged machine use exposes the user
to vibrations that can generate “white finger
phenomenon” (Raynaudʼs Phenomenon), carpal
tunnel syndrome and similar disturbances.
7. Health precautions – Chemical agents. Avoid all
chain oil contact with skin and eyes.
8. Health precautions - Heat. During use, sprocket and
chain reach very high temperatures, take care not to touch
these parts while hot.
Transport and storage precautions. (fig 12) Each time
the work area is changed to another location,
disconnect the machine from the mains supply and
activate the chain brake lever. Mount the guide bar
cover guard each time before transporting or storage.
Always carry the machine by hand with the bar facing
backwards, or when transporting the machine in a
vehicle, always attach it securely to prevent damage.
Kickback reaction. (fig 14) The kickback reaction
consists of a violent upwards-reverse action of the bar
towards the user. This generally occurs if the upper part
of the bar nose (called the “kickback danger zone”)
comes into contact with some object, or if the chain is
blocked in the wood. Kickback can make the user loose
control of the machine provoking dangerous and even
fatal accidents. The chain brake lever and other safety
devices are not sufficient to protect the user against
injury: the user must be well aware of the conditions
that can provoke the reaction, and prevent them by
paying very close attention according to experience,
together with prudent and correct machine handling (for
example: never cut several branches at a time because
this can cause accidental impact on the “kickback
danger zone”
Work area safety
1. Never allow children or people unfamiliar with these
instructions to use the product. Local regulations
may restrict the age of the operator.
2. Only use the product in the manner and for the
functions described in these instructions.
3. Check the whole work area carefully to check for any
danger source (e.g.: roads, paths, electric cables,
dangerous trees, etc)
4. Keep all bystanders and animals well clear of the work
area (where necessary, fence off the area and use
warning signs) at a minimum distance of 2.5 x the trunk
height; in any case no less than ten metres.
5. The operator or user is responsible for accidents or
hazards occurring to other people or their property.
Electrical safety
1. It is recommended that you use a Residual Current
Device (R.C.D.) with a tripping current of not more
than 30mA. Even with a R.C.D. installed 100%
safety cannot be guaranteed and safe working
practice must be followed at all times. Check your
R.C.D. every time you use it.
2. Before use, examine cable for damage, replace it if
there are signs of damage or ageing.
3. Do not use the product if the electric cables are
damaged or worn.
4. Immediately disconnect from the mains electricity
supply if the cable is cut, or the insulation is
damaged. Do not touch the electric cable until the
electrical supply has been disconnected. Do not
repair a cut or damaged cable. Replace it with a
new one.
5. Your electric cable must be untangled, tangled
cables can overheat and reduce the efficiency of
your product.
6. Always make sure that the cable/ extension cord is kept
behind the user, ensuring that it does not create a
source of danger for the user or for other persons, and
check that it cannot be damaged (by heat, sharp
objects, sharp edges, oil, etc);
7. Position the cable so that it will not be caught on
branches and the like, during cutting.
8. Always switch off at the mains before disconnecting
any plug, cable connector or extension cable.
9. Switch off, remove plug from mains and examine
electric supply cable for damage or ageing before
winding cable for storage. Do not repair a damaged
cable, replace it with a new one. Use only
Husqvarna Outdoor Products replacement cable.
10.Remove the plug from the mains before leaving the
product unattended for any period.
11. Always wind cable carefully, avoiding kinking.
12.Use only on AC mains supply voltage shown on the
product rating label.
13.The chainsaw is double insulated to EN60745.
Under no circumstances should an earth be
connected to any part of the product.
Cables
1. Mains cables and extensions are available from your
local Approved service centre
2. Only use approved extension cables
3. Extension cables and leads should only be used if
they are designed for outdoor use and comply with
H07 RN-F or IEC 60245 designation 66.
Models ES516,518,520,616,618,620:
Use only 1.0mm2 size cable up to 40m in length
maximum
Rating:1.00mm2 size cable 10 Amps 250 Volts ac
Models ES522 & 622:
Use only 1.5mm2 size cable up to 50m in length
maximum
Rating:1.50mm2 size cable 16 Amps 250 Volts ac
ENGLISH - 4
C. SAFETY EQUIPMENT DESCRIPTION
SWITCH BLOCK
Your machine is equipped with a device (fig.1) that
when deactivated, stops the switch from being pressed
thus preventing accidental start-up.
N.B.: When the chain brake is activated, a safety switch
cuts off all current to the motor.
Releasing the chain brake whilst the switch
is held will start the product.
CHAIN BRAKE ACTION ON SWITCH RELEASE
Your machine is equipped with a device that blocks the
chain immediately as soon as the switch is released; If
this device should not work at any time, the machine
must NOT be used and must be taken to an Authorised
Service Centre.
CHAIN CATCHER
This machine is equipped with a chain catcher (fig.4)
located under the sprocket. This mechanism is designed to
stop the backward chain movement in the case of chain
breaking or derailing. These situations can be avoided by
ensuring correct chain tension (Refer to chapter “D.
Assembly/disassembly”).
REAR HAND GUARD
This acts to protect (fig.5) the hand in the case of chain
breaking or derailing.
FRONT HAND GUARD / CHAIN BRAKE LEVER
The front hand guard (fig.2) is designed to prevent your left
hand from coming into contact with the chain (on condition
that the machine is held correctly according to instructions).
The front hand guard also acts as a chain brake, including
a device that blocks the chain in less than 0.15 of a second
in the case of kickback. The chain brake is released when
the front hand guard is pulled backwards and clicked in
position (the chain is able to move). The chain brake is
activated when the front hand guard is pushed forward (the
chain is blocked). The chain brake can be activated using
the left wrist by pushing forwards, or when the wrist comes
into contact with the front hand guard as a result of
kickback.
When the machine is used with the bar in horizontal
position, for example during tree felling, the chain brake
offers less protection.(fig.3).
THERMAL CUT-OUT
The Motor is protected by a Thermal Cut-Out Switch (fig
6) which is activated when the chain becomes jammed
or if the motor is overloaded. When this occurs, stop
and remove the plug from the power supply, clear any
obstruction and wait for a few minutes for the product to
cool down. Reset by pushing back in the Thermal CutOut Switch.
Resetting the Thermal Cut-out Switch with the
chain brake released and the switch held will start
the product.
D. ASSEMBLY / DISASSEMBLY
BAR AND CHAIN ASSEMBLY
Assembly methods change according to the type of your machine- so please take care to refer to the illustrations
and machine type marked on the label. Take great care when assembling to ensure this is performed correctly.
1. Check that the chain brake is not activated. If so, deactivate it.
2a. Unscrew the bar retaining nut and remove the
2b. Unscrew the bar retaining knob and remove
drive sprocket cover.
the drive sprocket cover.
3 Position the chain over the bar, starting at the nose sprocket, fitting into the bar guide groove.
Attention! Ensure that the sharp side of the cutting teeth face in a frontward direction on the upper part of
the bar. Wear Gloves.
4a. Ensure the chain tensioner pin is as far back
4b. Rotate the metal scroll wheel anti-clockwise
towards the drive sprocket as possible. Mount the bar
as far as possible. Mount the bar on the bar
on the bar retaining screw and the chain tensioner
retaining screw and position the chain over the
pin and position the chain over the drive sprocket
drive sprocket.
Replace the drive sprocket cover, ensuring the drive teeth of the chain are engaged in the drive sprocket
and in the guide groove.
5a. Screw the bar retaining nut by hand unti loosely
5b. Screw the bar retaining knob until loosely
tightened.
tightened.
6a. To tension the chain, screw the chain tensioner
6b. To tension the chain, screw the chain
screw in a clockwise direction using the spanner/
tensioner outer knob in a clockwise direction.
screwdriver provided. To reduce tension screw in an
To reduce tension screw in an anti-clockwise
anti-clockwise direction when performing this operation,
direction. (when performing this operation,
( keep the bar nose raised upwards)
keep the bar nose raised upwards)
7. Tension the chain until the tension is correct. Pull the chain away from the bar and ensure gap measures
approx 2-3mm
8a. Tighten the bar retaining nut using the spanner/
8b. Tighten the bar until securely tightened.
screwdriver provided
Tensioning the chain too tightly will overload the motor and cause damage, insufficient tension can provoke chain
derailing, whereas a chain tightened correctly provides the best cutting characteristics and prolonged work life.
Check the tension regularly because the chain length tends to stretch with use (especially when the chain is new;
after the first assembly, the chain tension must be checked after 5 minutes machine operation); in any case do not
tighten the chain immediately after use, but wait until it cools down.
In cases where the loosened chain needs to be adjusted, always unscrew the bar retaining nut / knob before
adjusting the chain tensioning screw/knob; adjust the tension and tighten the bar retaining nut /knob accordingly.
ENGLISH - 5
E. START-UP AND STOPPING
Start-up: grip both handles firmly, release the chain
brake lever whilst ensuring hand is still on front
handle, press and maintain the switch block (fig E1)
pressed in, then press the switch (fig E2) (at this
point the switch block can be released).
Stopping: The machine will stop whenever the
switch is released. In the case where the machine
does not stop, activate the chain brake, disconnect
the cable from the main line socket and take the
machine to the Authorised Service Centre.
F. BAR AND CHAIN LUBRICATION
ATTENTION! Insufficient lubrication will provoke
chain breaking and can cause serious and even
fatal injury.
Bar and chain lubrication is performed by an
automatic pump.
Refer to “Maintenance & Storage” for indications on
ensuring that the chain oil is sufficiently distributed.
Choice of chain oil
Always use new oil only (special type for chains)
with adequate viscosity: the oil must adhere well
and guarantee good running properties in both
winter and summer. If chain oil is not available, EP
90 transmission oil can be used.
Never use waste oil because this is this harmful to
health, the machine and the environment. Make
sure that the oil is suitable for the temperature of the
environment where the tool will be used: For
temperatures under 0°C certain oils become thicker,
overloading the pump and causing damage.
Contact your Authorised Service Centre for advice
on oil choice.
Filling oil tank
Unscrew the oil tank cap, and fill the tank taking
care not to spill any oil (if this occurs clean the
machine carefully) and then screw the cap back on
tightly.
G. MAINTENANCE AND STORAGE
Before performing any maintenance or cleaning,
remove the plug from the mains.
ATTENTION! In cases where work environments are
particularly dirty or dusty, the operations described
must be performed more frequently than mentioned
in the instructions.
Before each use
Check that the chain oil pump functions correctly:
direct the bar towards a clear surface at a distance
of about 20 centimetres; after the machine has run
for about a minute, the surface should show clear
traces of oil (fig.1).
Check that excessive strength is not needed for
activating and deactivating the chain brake. Also
check that it is not activated too easily and that it is
not blocked. Then check chain brake function as
follows: release the chain brake, grip the machine
correctly and start up the machine, activate the
chain brake by pushing the front hand guard forward
with the left wrist or arm but without removing the
hand from the handle (fig.2). If the chain brake is
working correctly, the chain should be stopped
immediately.
Check that the chain is sharpened correctly, in good
working condition and that the tension is correct. If
the chain is irregularly worn, or if the cutting teeth
are only 3 mm long, the chain must be replaced
(fig.3).
Clean the air vents regularly to prevent motor
overheating (fig 4).
Check that the switch and switch block function
correctly (to be performed with the chain brake
released): press the switch and the switch block and
ensure that they return to idle position as soon as
they are released; check that it is impossible to
press the switch without activating the switch block.
Check that the chain catcher and the right hand
guard are in correct condition without any visible
faults such as damaged material.
bearing grease through the hole shown in the
illustration (fig.8).
Chain sharpening (When necessary)
If the chain does not cut correctly, or requires hard bar
pressure against the wood, and if the sawdust is very
fine, this is a sign that it is not sharpened correctly. If
the cutting action produces no sawdust, this means the
cutting edge has been worn completely and the chain
is pulverising the wood during cutting. A wellsharpened chain crosses through the wood without
effort or pressure and produces large long wood
shavings.
The cutting side of the chain is composed of the cutting
link (fig.9) with a cutting tooth (fig.10) and a cutting limit
gauge (fig.11). The difference between these
determines the cutting depth; a file guide and a 4mm
diameter round file are needed to obtain good
sharpening results; Follow the instructions below:
Once the chain has been mounted and the tension is
correctly adjusted, and the chain brake is activated,
position the file guide perpendicular to the bar as
shown in the illustration (fig.12), filing the cutting teeth
at the angle shown (fig.13), always working from the
interior towards the exterior, lessening the pressure
during the return stage (it is very important to follow the
instructions perfectly: excessive or insufficient
sharpening angles or an incorrect file diameter will
increase the risk of kickback.) To obtain higher
precision on side angles, it is advisable to position the
file so that it exceeds the upper cutter by about 0.5
mm. File all the teeth on one side first, then turn the
machine over and repeat the operation. Make sure
that after sharpening operations, all teeth are the same
length and that the height of the depth gauge is 0.6 mm
lower than the upper cutter: check the height using a
proper template and file (with a flat file) all protruding
parts, rounding off the front part of the depth gauge
(fig.14), paying attention to not file the kickback
protection tooth (fig.15)
Every 2-3 hours of use
Check the bar condition, if necessary clean the
lubrication holes (fig.5) and the guide grooves (fig.6)
carefully; If the groove is worn or shows signs of deep
notching, it must be replaced. Clean the drive sprocket
regularly and check that it has not been subject to
excess wear (fig.7). Lubricate the nose sprocket with
Every 30 hours use.
Take the machine to the Authorised Service Centre for
general revision and control check on brake components.
Storage
Store the product in a cool dry place and out of reach
of children. Do not store outdoors.
ENGLISH - 6
H. CUTTING TECHNIQUES
(fig.1) When using the machine, prevent:
- cutting in conditions where the trunk could split during
cutting (wood under pressure, dry dead trees, etc):
sudden splitting can be very dangerous.
- the bar or the chain from becoming blocked in the
cutting notch: if this should occur, disconnect the
machine from the main electricity supply and try to raise
the trunk using an appropriate tool as a lever; do not
attempt to free the machine by shaking or pulling as this
could cause damage or injury.
- situations that can lead to kickback reactions.
- using the product above shoulder height
- cutting wood with foreign objects e.g. nails
(fig.1) During machine use:
- When cutting on sloping ground, always work uphill of the
trunk to avoid being hit if the trunk should roll downhill.
- When felling trees, always finish the job: a partially cut tree
could break and fall.
- At the end of each cutting operation the user will notice a
considerable change in the strength necessary for controlling
the machine. Great care must be taken not to loose control.
Below is a description of two different types of cutting
operation:
Cutting action by pulling the chain (from top to bottom)
(fig.2) can lead to dangerous sudden movement of the
machine towards the trunk with consequential loss of
control. Where possible, use the spiked bumper during
cutting operations.
Cutting action pushing the chain (from bottom to top)
(fig.3) will lead to the danger of a sudden movement of
the machine in the direction of the user, with the risk of
hitting the user, or an impact of the “kickback danger
zone” on the trunk resulting in strong kickback; extreme
care must be taken when cutting in this manner.
The safest method for using the machine, is to block the
log on a sawhorse, cutting from top to bottom, on the
portion outside the sawhorse. (fig.4)
Spiked bumper use.
Where possible, use the spiked bumper to ensure safer
cutting action: plant it in the bark or surface of the trunk in
order to maintain more control over the machine.
Below are descriptions of typical cutting procedure to be
adopted for specific situations. However, these should be
assessed each time to calculate whether the method is
most suitable or not, In order to use a method with the
least possible risk.
Trunk on the ground. (Risk of touching the ground with
the chain once the bar has passed trough the trunk).
(fig.5)
Cut from top to bottom through the whole trunk. Towards
the end of the cut, proceed very carefully to prevent the
chain from hitting the ground. If it is possible, cut 2/3 of
the trunk, roll it over, and cut the remaining third from top
to bottom to limit the risk of the chain touching the
ground.
Trunk supported at one end only (Risk of trunk
breaking during cutting action). (fig.6)
Begin the cut from underneath for about 1/3 of the
diameter, and then finish the cutting action from the top to
meet the undercut.
Trunk supported at both ends. (Risk of pinching the
chain). (fig.7)
Begin the cut from above for about 1/3 of the diameter,
and then continue from underneath to meet the overcut.
Trunk laying on a slope. Always stand on the uphill side
of the log. When ʻcutting throughʼ, to maintain complete
control, release the cutting pressure near the end of the
cut without relaxing your grip on the chainsaw handles.
Dont let the chain contact the ground.
Tree felling.
ATTENTION!: Never attempt to fell a tree if you do not
have the necessary experience, and in any case never
fell trees that have trunks with a diameter larger than the
length of the bar! This operation is reserved for expert
machine users with adequate equipment.
When felling a tree, the aim is to have the tree fall in the
most convenient position for the following limbing and
bucking operations. (Avoid trees falling on top of other
trees: Felling trees that are entangled with other trees is
a very dangerous operation).
First of all decide which is the best direction for the tree to
fall by evaluating the following: objects or other plants
around the tree, the inclination, the curve, wind direction,
and greatest branch concentration. Take into account
dead or broken branches that may break off during felling
creating a further danger risk.
ATTENTION! During tree felling operations in critical
conditions, always remove ear protection immediately
after cutting operations to be able to listen for unusual
noises and any warning signals.
Preliminary cutting operations and identifying the
retreat path.
Eliminate any branches that interfere with the job (fig.8),
starting from top to bottom, and then, always keeping the
trunk between the user and the machine eliminate the
more difficult branches afterwards, piece by piece.
Eliminate all plants that interfere with work operations and
control the area for possible obstacles (rocks, roots,
ditches,etc.) when planning the retreat path (to follow
during tree fall); Refer to the illustration (fig.9) for the
directions to be maintained (A. predicted tree fall
direction. B. Retreat path. C. Danger zone).
FELLING CUTS (fig.10)
In order to ensure that the user has complete control over
the tree fall, the cutting instructions are as follows:
The cut that controls the fall direction of the tree is to be
executed first: First of all cut the UPPER PART of the
directional notch on the side the tree must fall. Remain
on the right hand side of the tree and cut using the chain
pull method; then cut the LOWER PART that must meet
the end of the upper part. The depth of the directional
notch must be 1/4 of the trunk diameter, with an angle of at
least 45° between upper and lower cut. The meeting
point between the two sides of the notch is called
“directional cut line” This line must be perfectly horizontal
at right angles (90°) to the felling direction.
The felling cut that provokes the tree fall, is performed at
3 to 5cm above the lower part of the directional felling cut
line, finishing at a distance of 1/10 of the trunk from the
notch. Remain on the left hand side of the tree and cut
using the chain pulling method and the spiked bumper.
Check that the tree does not move in a direction other
than that predicted for the fall. As soon as possible insert
a felling lever or wedge into the cut. The uncut part of the
trunk is called the “hinge”, as it is intended to guide the
tree as it falls; in cases where the cuts are not sufficient,
not straight, or have been cut through completely, the tree
fall cannot be controlled (extremely dangerous!). For this
reason the various cuts must be performed with great
precision.
When cutting operations are completed the tree will begin
to fall. Where necessary help tree fall using wedges or
felling levers.
Limbing
Once the tree has been felled, the trunk must be limbed:
in other words, the branches are removed from the trunk.
Do not underestimate this operation because the large
majority of kickback accidents occur during this stage.
For this reason pay close attention to the position of the
bar nose during cutting operations and always work on
the left hand side of the trunk.
ENGLISH - 7
I. ENVIRONMENTAL INFORMATION
This section contains information useful for maintaining the characteristic of ecocompatibility included in the origin
design of the machine, and as regards proper use and disposal of chain oil
USE OF THE MACHINE
The operations of filling the oil tank should be carried out in such a way as to avoid spilling oil and contaminating the
soil and the environment.
DISPOSAL
Do not dispose of the machine inappropriately when it is no longer usable. Deliver it to an authorized organization
for proper disposal in compliance with the regulation in force.
The symbol
on the product or on its packaging indicates that this product may not be treated as household
waste. Instead it shall be handed over to the applicable collection point for the recycling of electrical and electronic
equipment. By ensuring this product is disposed of correctly, you will help prevent potential negative consequences
for the environment and human health, which could otherwise be caused by inappropriate waste handling of this
product. For more detailed information about recycling of this product, please contact your local council office, your
household waste disposal service or the shop where you purchased the product.
J. TROUBLESHOOTING TABLE
Motor does
not start
Make sure the main
line is powered
Make sure the machine
is properly plugged in
Make sure your
cable/ext. cord is not
damaged
Make sure that chain
brake is not activated
Check that chain is
properly assembled
and tensioned
Check chain
lubrification as in
chapters F and G
Make sure that the
chain is sharp
Check cut-out switch
is activated
Contact your
authorised centre
•
•
•
•
•
•
Motor turns
with difficulty
or loses
power
The machine
starts but
does not cut
properly
•
•
ENGLISH - 8
Motor turns
improperly or
at reduced
speeds
Braking
devices do
not stop the
chain properly
•
•
•
•
•
K. EC DECLARATION OF CONFORMITY
Husqvarna UK Ltd., Aycliffe Industrial Park
Newton Aycliffe, Co. Durham, DL5 6UP, England
Declare under our sole responsibility that the product(s);
Category..................................... Electric Chainsaw
Type(s) ......................................ES516, ES518, ES520, ES522, ES616, ES618, ES620, ES622
Identification of Series............... See Product Rating Label
Year of Construction.................. See Product Rating Label
Conforms to the essential requirements & provisions of the following EC Directives:
98/37/EC (until 31.12.09), 2006/42/EC (from 01.01.10), 2004/108/EC, 2000/14/EC
based on the following EU harmonized standards applied:
EN60745-1, EN60745-2-13, EN50366, EN55014-1, EN61000-3-2, EN61000-3-11
Notified Body that carried out the EC type-examination
in accordance with article 8 section 2c....................... TÜV Rheinland Product Safety
GmbH, 0197
Am Grauen Stein
D-51105 Köln, Germany
Certificate no. ............................................................. 15023260 001
The maximum A weighted sound pressure level LpA at the workstation, measured according to EN ISO
11203, recorded on a sample of the above product(s) corresponds to the Level given in the table.
The maximum hand / arm vibration weighted value measured according to EN ISO 5349 on a sample of the
above product(s) corresponds to the Value ah given in the table.
2000/14/EC: The Measured Sound Power LWA & Guaranteed Sound Power LWA values are according to the
tabulated figures.
Conformity Assessment Procedure............. Annex V
Notified Body............................................... Intertek, Cleeve Road
Leatherhead, Surrey
KT22 7SB, England
Newton Aycliffe 18/03/2009
M.Bowden
Research & Development Director
Husqvarna UK Ltd.
Type
ES516
ES616
4.1
1.6
155
3/8
1.3
107
ES518
ES618
4.1
1.8
155
3/8
1.3
107
ES520
ES620
4.2
2.0
155
3/8
1.3
107
ES522
ES622
4.2
2.2
155
3/8
1.3
108
Guaranteed Sound Power LWA (dB(A))
108
110
108
109
Sound pressure Level (dB(A))
Value ah (m/s2)
Uncertainty K of ah (m/s2)
Mains-Impedance Zmax (Ohm)
91
4.43
1.5
0.345
91
4.43
1.5
0.345
93
3.59
1.5
0.296
92
5.20
1.5
0.332
Dry Weight (Kg)
Power (kW)
Oil tank volume (cm3)
Chain pitch (inches)
Chain gauge (mm)
Measured Sound Power LWA (dB(A))
EN 61000-3-11 Compliance statement
Depending on the characteristics of the local electricity supply network, use of this product may result in
short voltage drops at the instant of switching on. This may influence other electrical equipment e.g a
momentary dimming of a lamp. If the Mains impedance Zmax of your electricity supply is less than the value
shown in the table (applicable to your model) then these effects will not occur. The value of the network
impedance may be determined by contacting your electricity supply authority
ENGLISH - 9
Our policy of continuous improvement means that the specification of products may be altered from
time to time without prior notice.
5258668-01
Husqvarna UK Ltd.
Preston Road
Aycliffe Industrial Park
NEWTON AYCLIFFE
Co.Durham DL5 6UP
UNITED KINGDOM
Telephone - (00) 44 1325 302302 Fax - (00) 44 1325 310339