1
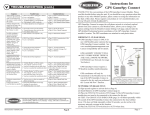
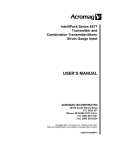
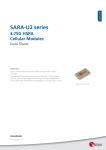
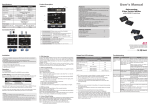
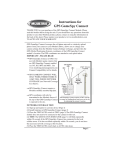
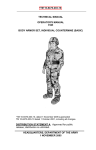
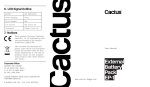
STEAM PRESS LOC K UNL OCK MAX 400ml 300ml 200ml MIN MODEL:SP-80 OPERATING INSTRUCTIONS Please read this manual carefully before using and keep in a safe place for further use CONTENTS Page 1. Features of the machine 3 2. Power Supply Index 3 3. Important Safeguards 4 4. Designation and application of various parts for electronic steam press 6 8 5. Operating The Steam Press 13 6. Pressing Suggestions 13 7. Pressing Application 14 8. Cleaning and maintenance 15 9. Trouble Shooting 16 2 1. Features of the machine 1. Saving time and effort: A pressing surface is seven times larger than most hand-held irons and reduces ironing . time. Approximatley 100LBS of steam per square inch which makes it easy to use for one hand operation; 2. Wide Application: Variable fabric temperature control from nylon to linen (20-200 degrees which prevents leaving a shine effect dry or steam press possible on all types of fabric; 3. Easy to handle: Possible to iron while either sitting down or standing up. 4. Safe and reliable: microcomputer temperature control mode may prevent the clothes from being damaged by the overheating of the ironing board and the continuously heated sole pate ; 5. Distinctive function: It may directly dry iron the clothes which are difficult to dry. 2. Power Supply Index Model: SP-80 Voltage: 230V~ Power: 1300W 50Hz *Your power supply must agree with the label on the base of the press.. 3 3. Important Safeguards When using your steam press, the following safety precautions should be followed: 1. Use this press only for its intended use. 2. Before plugging in , be sure the electrical information on the label on the bottom of the press agrees with your power supply. 3. To protect against risk of electrical shock, do not immerse the press in water or other liquids. 4. The press should always be turned OFF before plugging into or unplugging from electrical outlet. 5. Do not allow cord to touch hot surface. Loop cord loosely and store in base of the press, let the press cool completely(at least 30 minutes) before putting away. 6. Always disconnect press from an electrical outlet when not in use. 7. Do not operate the press with a damaged cord or if the press has been dropped or damaged. To avoid the risk of electric shock do not disassemble the press. Incorrect reassembly can cause risk of electric shock,take it to an authorized Service Center or our factory for examination and repair. 8. Do not operate another high wattage appliance on the same circuit. 9. Be careful, burns can occur from touching hot metal parts, hot water or steam. 10. Use distilled water in the appliance. Do not use perfumed products containing alcohol in the appliance. 11. For domestic household use only. 12. It is recommended to place protection on the table surface under the press 13. This appliance is not intended for use by persons (including children) with reduced physical, sensory or mental capabilities, or lack of experience and knowledge, unless they have been given supervision or instruction concerning use of the appliance by a person responsible for their safety. Children should be supervised to ensure that they do not play with the appliance. 14.If the supply cord is damaged, it must be replaced by the manufacturer, its service agent or similarly qualified persons in order to avoid a hazard. Indoor use only! 4 4 1 LOCK 2 SILK WOO L OFF N LINE 6 7 MAX YE S 8 9 10 400m l 300m l 200m l MIN 11 12 14 13 5 5 N N YL O TT O N UNL OC K O C 3 LOC K UNLOCK STEAM NO 4.Designation and application of various parts for electronic steam press 1. Power Insert the plug into the power socket. Turn on the power at the wall socket and turn on the on/off switch on the side of the press. The off light on the control panel will turn on. 2. Power key: Make sure the ON/OFF switch to the ON position,it shows already connect the power,the(off) light on the operation display light up. 3. The steam control: Is set by default. For dry pressing simply press the No control. To return to steam pressing, press the Yes control and the steam indicator will flash. 4. Locking slide: To close the press, lower the sole/pressing plate, push the locking slide to the locked position 5. Temperature control panel: Turn the temperature control dial to the required Temperature. 6. Ergonomic Pressing Handle: Raise and lower the pressing plate using the ergonomic handle. For automatic maximum pressure lower the pressing plate until it reaches its lowest position. Use the handle to carry the press when the pressing plate and ironing board are locked together. 7. Pressing plate: It has a temperature control for steaming and pressing fabric. 6 8. The ironing board: Has a padded surface which holds the fabric during pressing. The board cover can be removed for cleaning or replacement. 9. Water tank: Holds the water for the steaming process. Pull the water tank half way out for water filling. 10.Base: It is used for storage of water for steaming. In case of no water, the water tank can be drawn out for water filling. 11. ON/OFF switch: Located under the ironing board, next to the power cord. 12. Pressing pad: Used for pressing contoured areas e.g. sleeves, darts, yolks and gather. 13.Sprayer: The plastic spray bottle is used to dampen fabrics before pressing. 14. Water jug: It is used for filling water into the water tank. NOTICE: During ironing process, the locking key must be in ( OPEN )position. When pressing board is pressed down and then faces upward, the hand shall not leave the handle and slight force shall be given to make it face upward automatically in slow way. *Automatic shutdown safety switch: *The ironing machine adopts electronic temperature control pattern, which will adjust the temperature of ironing plate automatically and control the temperature within the required range; *When the temperature of ironing plate is lower than set temperature, it will be in heating state; when the temperature of ironing plate is higher than set temperature, it will be stop heating; *Under ironing state : When the ironing plate is pressed down for 15 seconds, the electric ironing machine will shut down automatically; *When pressing plate is standby for more than 15 minutes, the electric ironing machine will shut down to stop heating automatically; 7 5.Operation of electric ironing machine 1. Before inserting power cord A. It is required to check if the voltage indicated for the base of the machine shall be identical to the voltage of power supply you are using B. Place the electric ironing machine in a stable place 2. Water filling During water filling, it is required to cut off power supply, draw out the water tank under the base half way, fill water into the water jug and then fill the water into water tank, or pull out the water tank completely for direct water filling. Normally it is required to fill in 450ml water, and then push the water into the base (the water tank shall be pushed into the base completely). Note: There is filtration sponge on inlet of LOCK UNLOC K water tank and water shall be filled in slowly. HOW TO EMPTY THE WATER TANK WHEN NOT IN USE IF THERE IS ONLY A SMALL AMOUNT OF WATER LEFT IN THE TANK THEN A MOCK STEAM IS BEST. YOU DO THIS BY CONTINUING TO STEAM ON AN OLD TOWEL OR PIECE OF FABRIC UNTIL ALL THE WATER IS GONE MAX 400ml 300ml 200ml MIN IF THERE IS A LOT OF WATER LEFT IN THE TANK THEN R E M O V E T H E L I D F R O M T H E S P R AY B O T T L E GENTLY PULL OUT THE WATER CONTAINER HALF WAY AND INSERT THE TUBE INTO THE TANK AND THEN SYPHON OFF THE WATER INTO A SUITABLE CONTAINER. MAX 400ml 300ml 200ml MIN 8 MAX: 450ml M I N : 100ml 3. Starting of electric ironing machine A. Hold down the handle of pressing board, pull up locking key, shake the handle lightly to make the locking pin retreat and pressing board separate with ironing plate. The hand shall not leave the handle and slight force shall be given to make it face upward automatically in slow way. B. Insert the plug into power socket, When the (OFF) lamp of operaton display lights up, it means the power has been connected TOGGLE PULL UP LOCK UNLOCK 1 2 9 7 4. Temperature selection and control SILK WOO L OFF N LINE you wish to press. If you cannot determine the type of N N FABRIC INDICATION O TT YL O O N C Turn the temperature control dial to the kind of fabric fabric then begin at the lowest temperature setting SELECTION DIAL and increase until you achieve your desired result when the desired temperature has been reached the YE indicator light will stop flashing. During pressing should the light start flashing wait a few seconds for S STEAM NO STEAM INDICATIOR LIGHT Fabric settings the press to regain its temperature then start pressing again, When changing the setting from a higher Nylon Silk Wool Cotton Linen Acetate Nylon Silk Wool Polyester Rayon Cotton Triacetate Linen selection to a lower pressing plate to cool sufficiently. It is always recommended to start pressing at the lowest temperature and work up to the highest. 10 5. Steam Control A. The Sp80 will always start in default mode, the steam spraying function will be activated the steam light will turn on automatically on the display panel for dry pressing press the “No” steam control. As the pressing plate is lowered there will be a tick sound followed by the steam spray. Pause for 1-2 seconds each time the pressing plate is raised during steam pressing to maintain good pressing results. Please note always make sure that the water tank has the recommended amount of water in the tank for steam pressing please contact our help line on 08705 133 105 should you have any queries. B. When steam spraying function is not required, press (No) key, in which operation display (STEAM) indicates ( ) indicator light will be off, the steam spraying function will be switched off. NOTICE: Before use of steam ironing, it is necessary to check if there is any water in the water tank. In case of no water, it is required to fill water. SILK WHILE PRESSING DOWN 2/3, IT WILL HAVE A TICK SOUND AND CAN SPRAY STEAM. WOO L N N YL O TT O O N C N OFF LINE YE S STEAM NO indicating lamp Connection 11 6. Pressing Carefully spread the fabric area to be pressed on the pressing board. CAUTION: Please be careful not to touch the pressing plate. For dry pressing grasp the pressing plate handle and lower the pressing plate to press the fabric on the pressing board. For steam pressing in order to increase the steam spray to remove stubborn creases please adjust the fabric temperature.. Control to wool level or higher, Once the indicator light has stopped flashing press down the handle and you will here a tick sound and the steam will be sprayed on to the fabric, then press down the pressing plate for forced steam pressing. IMPORTANT- After pressing allow the press to cool down then turn off the power at the electrical socket. Empty the water tank, lower the pressing plate and push the locking slide into the lock position, The press is now ready to be stored please contact our helpline if you need any further guidance on 08705 133106 2 SLIDE 1 CAUTION: The operation shall be done after the steam press is completely cooled down. PRESS DOWN LOCK 12 UNLOCK 6. Pressing Suggestions *You may find it desirable to place cloth between your fabric and pressing plate. *Buttons, zippers, etc. Most of today`s buttons, zippers and other notions require no special attention, however, some may be sensitive to heat. Care should be taken with items that may melt, place these items face down on the ironing board or cover with a press cloth before pressing. *Additional Steam Pressing Methods: 1.Using the spray bottle, lightly spray entire garment before placing on ironing board or spray the area to be pressed after it is positioned for pressing. 2.Place a damp cloth over the area to be pressed. In either case, press for a few seconds and then raise the pressing plate to allow steam to escape, repeat until the fabric is dry. *Using The Pressing Cushion: Curved seams and shoulder caps are not intended to be pressed flat. A pressing cushion has been supplied with your press for use on these areas. Use the Cushion whenever pressing areas where no creases are desired or to shape tailored garments. 1.Place the area to be pressed on the ironing board. 2.Place the pressing cushion under the dart, curved seam etc. 3.Lower the pressing plate, since the cushion area is raised, it is the only area which the plate will contact. 4.Raise the pressing plate after a few seconds. Note: The pressing plate and ironing board can’t be locked for the maximum pressure when using the pressing cushion, attempting to lock into maximum pressure position can damage the press. 13 7. Pressing Application Shirts and Blouses: A.Place the shoulder yoke on the ironing board first, face down and press. B.Place the sleeves on board with folds parallel to the long edge and press. C.Place the cuffs on the end of ironing board and press. D.Place the shirt into storage area and press the side front including the plackets and the opening/plactket. E.Pull the shirt section by section towards you and press. E.Place the yoke flat on the ironing board and press to remove the crease. F.Place collar right side up on the ironing board and press. Trousers and pants: A.Place the pressing pad under the waistband and press. Then reposition and continue until the entire waistband is pressed. B. To press inside leg seam (inseam) place the pad under the area to be pressed, press the entire inseam, repeat for the other leg. C. Front and back pleats are pressed in the same way. D.Fold the trouser leg on the crease line, position on the ironing board. Steam press the crease in place Pleated skirts: A.Place the pressing pad under the waistband and press. Then reposition the waistband and pressing pad and continue around the skirt until the entire waistband is pressed. B. Place the pleated areas on the ironing board, fold the pleats carefully and press, continue with each pleated area until all the pleats are pressed. . Curtains: A.Medium sized curtains may also be pressed using the SP 80 steam press. B.Fold the curtain in a fold of 4 or 6 and push the curtain into the opening of the steam press. C.Make sure the curtain lies lengthwise on the ironing board and press the top half of the curtain, section by section. D.Repeat the pressing procedure for the bottom half of the curtain. E.Make sure you do not press in any fold creases. Should you require further assistance, please call the help line 08705 133 106. 14 8.Cleaning and maintenance 1. To clean the pressing plate. Place the pressing pad in the centre of the ironing board, and place a clean towel over the pressing pad and board. Set the temperature to cotton and on to the steaming mode. Gently lower the pressing plate on to the pressing pad 3 to 4 times 2. Clean the pressing plate regularly with a damp cloth, do not use any abrasive cleaners. 3. The ironing board cover is easily removed for washing. Note: If you cannot solve the problem, in the first instance please call the help line on 08705 133 106. Do not take the product back to the store. 15 9. TROUBLE SHOOTING PROBLEM SOLUTION CAUSE 1. The machine cannot be opened by handle of pressing plate The locking switch is in lock position. 2. The steam press is hot but it does not remove creases Incorrect fabric temperature The temperature has not been set ● The plug of electric ironing machine has not been inserted into the socket ● 3. The steam press is not heating Increase the fabric temperature Rotate temperature control knob to set proper temperature ●I n s e t t h e p l u g i n t o t h e s o c k e t ● Automatic shutdown: The pressing plate and ironing plate are not pressed together ● Automatic shutdown: When the electric ironing machine reaches the set temperature, it will shut down automatically ● ● ● The water level in the water tank is too low ● Steam spraying function has not been activated ● 4. No steam The temperature control is not properly set, the temperature has not reached steam spraying temperature ● 5 . Wa t e r d r i p p i n g f o r p r e s s i n g p l a t e T h e s t e a m i s u s e d c o n t i n u o u s l y a n d f r e q u e n t l y 6. The handle of pressing plate cannot reach the maximum pressure position Push the locking slide to the open position The article on ironing plate is too thick Press power key after pulling up pressing plate Reset the temperature or set the temperature of pressing plate lower than the set temperature Fill the water into the water tank ● Press(STEAM) key to indicate ( indicating lamp Connection ● ) Increase the temperature to wool to activate the steam spraying function ● Pause for 2-3 seconds between each press Light pressure shall be used for thick article NOTICE: Please contact the helpline on 08705 133106 if you require guidance, please do not take the product back to the store. 16 Correct Disposal of this product This marking indicates that this product should not be disposed with other household wastes throughout the EU. To prevent possible harm to the environment or human health from uncontrolled waste disposal, recycle it responsibly to promote the sustainable reuse of material resources. To return your used device, please use the return and collection systems or contact the retailer where the product was purchased. They can take this product for environmental safe recycling. Warranty Information The manufacturer provides warranty in accordance with the legislation of the customer's own country of residence, with a minimum of 1 year (Germany: 2 years), starting from the date on which the appliance is sold to the end user. The warranty only covers defects in material or workmanship. The repairs under warranty may only be carried out by an authorized service centre. When making a claim under the warranty, the original bill of purchase (with purchase date) must be submitted. The warranty will not apply in cases of: - Normal wear and tear - Incorrect use, e.g. overloading of the appliance, use of non-approved accessories - Use of force, damage caused by external influences - Damage caused by non-observance of the user manual, e.g. connection to an unsuitable mains supply or non-compliance with the installation instructions - Partially or completely dismantled appliances 17 DO NOT THROW AWAY! RECYCLING We are committed to the protection of the environment. We strive tominimize the environment impact of our products by continuously improving product design and our manufac-turing methods. At end of life please dispose of this product in an environmentally responsible way. The crossed-out wheelie bin symbol featured above and on the product's data-plate means that this product falls under the scope of the E.U. “Waste Electrical and Electronics Equipment” (WEEE) directive and “Restriction of the Use of Certain Hazardous Substances in Electrical and Electronic Equipment”(ROHS) directive and should not be disposed of with your household waste. At end of life, you must ensure that this product is disposed of in accordance with national and local legislation and that it is sorted as Category “Small Domestic Appliances” WEEE. You may be liable under local and national laws for improper disposal of this product. Please consult the web, or a competent national or local body, for the return and collections systems available to you old product back,irrespective of the brand, if it is a like for like sale. As an individual you can make a positive impact on reuse, recycling and other forms of recovery of the WEEE. This will reduce use of landfill and minimize the environmental Impact of the products you use. Hazardous substances in electronic and electrical products can have a harmful impact on human health and on the environment. 18