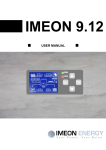
Transcript
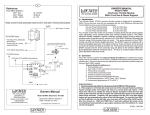
Specifications
Video Input
Video Output
VSPM-212
DisplayPort x 1
DVI-D x 1
DisplayPort x 1
HDMI x 1
DVI-D x 2
HDMI x 2
VSPD-212
A
Vi
Vi
DC in
DisplayPort Dual Mode
HDMI 1.3b
Compliance
LED
Indicators
User's Manual
Product Description
VSPD-212
Input
x 1 (Triple color)
x 1 (Triple color)
Output
x 2 (Dual color)
x 2 (Dual color)
Video Resolution (max.)
Li
Full HD 1080p (1920 x 1080)
Frequency Range
25~225 MHz
Lo
Input Selection x1
EDID Copy x 1
Button
Power Supply
DC 5V
Dimensions H x W x D
Weight
20 x 83 x 59 mm
20 x 130 x 59 mm
150(g)
195(g)
B
Connection Pattern
Vo
Vo
Select video source DP or DVI/HDMI
(Manual Mode only)
1. Press this button 3~6 seconds to copy the
connected monitor's EDID data
EDID Copy Button
2. Press this button 9~15 seconds for EDID
Auto Mixing
VIDEO Connector
Connect to the video source
VIDEO Connector
Connect to the monitor
Port Selection LED
Input LED Indicator
EDID Copy LED
Output LED Indicator Video output status (see LED Indicator)
A Port Select Button
B
Vi
Vo
Li
Lo
Features
● Duplicate one DVI/HDMI or DisplayPort input to two DVI/HDMI outputs
● Two input sources selectable
● Auto-sensing function enables the system to automatically select the
latest video source
● Push button for easy computer selection
● Simple LED indicatior makes operation user-friendly
● EDID Copy functions effect simultaneously of all video sources
● Alternatively perform the default or the copied EDID for the connected
display device
● HDCP content protection support
● HDMI 1.3b transmitter, up to 2.5Gbps supporting 1080p with 12-bit
deep color
● Fully compliant HDMI output, up to 225 MHz TMDS clock
● Automatically power-saving when input is lost
● Plug-n-Play system configuration
● Compatible with most of the popular screen resolution to XGA, SXGA,
UXGA, WSXGA ….Full HD, WUXGA system.
Package Contents
Auto-sensing
Video Switch Splitter
with EDID Function
VSPM-212
x1
x1
● Video Switch Splitter
● Power Adapter Set
Power Adapter with necessary AC Cord
or
Plug-in Power Adapter
● User's Manual
VSPD-212
x1
◘ The final specification is the actual product based.
◘ Features and functions may be added or changed
after the manual was written. Please visit our
website to download the latest version of manual
for reference.
RoHS
PP5-VIT342Z-000
Installation
3. EDID Algorithm
● Prior to the installation, please power off all devices that will be connected to
this system.
● Ensure that all devices you will connect are properly grounded.
● Place cables away from fluorescent lights, air conditioners, and machines that
are likely to generate electrical noise.
1. Plug a monitor to the video output port.
2. Plug one or two VIDEO sources to video input ports.
3. Apply the power to the unit.
Operation
1. Port Selection
Press Select button to select DP or HDMI/DVI source to display
2. Mode Setting: Normal mode setting & Priority mode setting
Press and hold Select button for 2 sec. to enter Mode Setting, the Input LED
flashes indicating which mode is currently in (factory default: Normal Mode)
Normal Mode
Normal mode
Priority Mode
DP-Priority
HDMI/DVI-Priority
Input LED
slow-flashing blue & green alternatively
Input LED
quick-flashing blue
quick-flashing green
press EDID COPY button once to the next mode (DP-Priority→HDMI/DVI-Priority
→Normal mode), and finally release Select button to exit Mode Setting.
*If users press and hold Select button but don’t press EDID COPY button
afterwards, it will escape from Mode Setting and returns to normal status
Priority:
1.Set up DP or HDMI/DVI as the priority display source.
2.When there’s no video input in Priority port, it automatically displays the other one
(if there’s a video source in that port).
3.Users can press Select button to switch to the other port. After re-powering, the
system displays the priority one no matter which port is selected before. However, in
normal mode, the system automatically memory the last setting status.
In some cases display problems may occur due to incorrect EDID communication
between the display monitor and the unit or inappropriate EDID data
programmed by display manufactures. This function allows the system either to
read the necessary EDID information from the unit or to copy EDID from EDID
compliant displays.
NOTICE: After applying EDID Algorithm functions as described below, in some
situations, users may need to re-plug the video cable, or even reboot the
connected source system to have new setting become effective.
3-1 EDID Copy (EDID Ghost)
If the unit is insufficient for EDID of the attached displays, it is suggested copying
EDID from the displays.
Copy (new) monitor EDID
Step 1. Apply the power to the unit.
Step 2. Connect the (EDID compliant) monitor to the Video Port 1 on the Unit
and power on the monitor.
Step 3. Press the EDID Copy button for 3~6 sec. and release the button RIGHT
AFTER the Input LED flashes green.
Step 4. The LED flashes red and green alternately and then lights green
indicating the copy successfully.
Otherwise, if the Input LED flashes RED, it means that
a. The monitor is not properly connected.
b. The monitor is not powered on.
c. EDID data of the monitor is not applicable. Try to repeat Step 3 to 4 again.
3-2 EDID Auto-mixing
Automatically detect the specifications of the connected monitors.
Step 1. Apply the power to the unit.
Step 2. Press the button EDID COPY (9~15 sec.) and release the button RIGHT
AFTER the Input LED flashes [green] & [red].
Step 3. The Input LED flashes [green + red] & [red] alternately (2 sec.) and then
returns to normal status; it indicates that the setting is completed.
4. Factory Default Setting
In case your settings are misbehaving, resetting it to the factory default (including
EDID Setting and Priority Setting) might be just the way you are looking for.
Step 1. Press and hold the button “EDID COPY” and apply power to the Unit.
Step 2. Release the button RIGHT AFTER the Input LED flashes red
Step 3. The LED flashes red and green alternately and then lights green
indicating the setting successfully.
Output Port LED Indicator
Troubleshooting
Symptom
Output Port LED Indicator (Red+Blue)
LED
STATUS
Output device ready?
Video Source detected
Emits RED and goes off
twice
NO
NO
Flashes BLUE twice
NO
Yes
Emits RED with BLUE
flashing twice
Monitor detected
NO
Steady blue
Monitor detected
Yes
Steady purple
Monitor detected
(HDCP compliant)
Yes
(HDCP compliant)
NOTE: If users encounter no screen display in computer connection, you may...
1. Make sure the device cables are correctly and firmly attached.
2. Set your display device’s (TV, monitor, etc.) input source as DVI/HDMI.
3. Check the PC BIOS configuration about the video output setting.
4. Connect your video source to the display DIRECTLY to check if the video
signal gets through.
NOTICE:
1. At least one monitor connection to the splitter unit is required when powering
on the source device.
2. The splitter unit is required to connect to the computer before the computer
powered on.
3. It is recommended using identical brand and type of displays.
If not, setting up equivalent resolution for each display is suggested.
4. The quality of the output signal will depend largely upon the quality of video
source, cable and display device used. Low quality cables degrade output
signal causing elevated noise levels. Please use the proper cable and make
sure the display device is capable of handling the resolution and refresh rate
selected. Interference from nearby electrical devices can have an adverse
effect on signal quality as well.
Possible Cause
Video does not DVI specification of
display on some t h e s o u r c e d e v i c e s
ports
doesn’t match the DVI
specification of DVI
cable and/or the DVI
display device
Erratic behavior Splitter may not receive
enough power
Not receiving Wrong installation
picture or sound process
The signal source may
require the display
device that is HDCP
compliant.
The display monitor is
added to the unit by
hot-plug, but the video
source may not support
hot-plug.
The attached devices
are not well connected.
Solution
There are three DVI standards: DVI-I,
DVI-D, and DVI-A. Make sure that DVI
specifications of the source devices,
cables, and monitors all match.
NOTE: Some monitors are able to
support multiple DVI signals.
Check if the splitter unit has been
connected to the source computer
before the computer powered on
Please check the power adapter
attached to the splitter if it matches
the system specifications, and if it is
functioning properly.
The video splitter requires at least one
monitor connection before powering on
the source device.
Check if the display monitor is HDCP
compliant. HDCP prevents the transfer
of digital content to unauthorized HDMI
devices.
Check if the video source supports hotplug.
If it doesn’t, shut down the source
device and reboot it again.
Check if you have connected your
components correctly