1
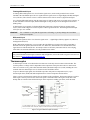
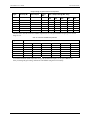
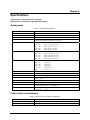
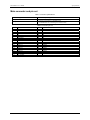
CIO-EXP32 User's Guide Installing the CIO-EXP32 Configuring the CIO-EXP32 Before using the CIO-EXP32, there are switches and jumpers to set, and one or more cables to install. Please turn the PC power OFF before proceeding. The CIO-EXP32 is shipped with the factory-default settings listed in the following table. Factory-configured default settings Jumper/switch Description Default setting Power source select switch S3 A/D BOARD TYPE jumper EXP OUTPUT TO DAS jumper +5V power switch that sets the power source to internal or external INT (internal +5V PC power) Selects DAS08 or DAS16 compatibility Selects the A/D board channel to connect the multiplexed analog output to. CJC OUTPUT TO DAS jumper Selects the A/D board channel to connect the CJC output to. GAIN switches S1 and S2 Four DIP switches per each bank of 16 inputs that set the gain of the differential amplifier. Three 'connect pads' per channel on the etch side (under side) of the CIO-EXP32 board. Bridge each pad to configures its associated input channel as follows: Bridge the V pads to enable open thermocouple detection for the associated input channel. Bridge the C pads to connect a 1 µF capacitor across the signal high and low inputs, forming a low-pass filter having a 7 Hz cutoff. Bridge the G pads to enable a reference to ground for the associated input channel. DAS08 CH 0 to 15: 0 CH 16 to 31: 1 (EXP multiplexed output connects to channel 0 and 1 on the A/D board) 7 (CJC circuit connects to channel 7 on the A/D board) Gain = 1 (all gain switches OFF) V, C and G solder bridge switches (one for each input channel) Open pads (all are not bridged) Figure 3 shows the location of the board jumpers, switches, and connectors. The solder bridges are on the under side of the board, and are not shown in the figure. EXP and CJC Output to A/D Board Type DAS channel jumpers jumper P2 connector (DAS) P1 connector (Next EXP) Gain switch S2 Gain switches S1 Power source switch S3 External power connector P29 Figure 3. Switch, jumper, and connector locations Before using the CIO-EXP32, verify that the board is configured with the settings that you want. Review the following information to change the default configuration of a jumper, switch, or solder gap. 12