1
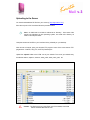
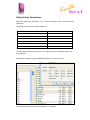
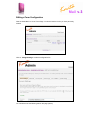
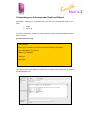
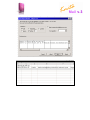
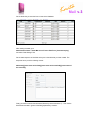
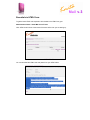
Version 3.0 Installation and User Manual 44, Ambazari Layout, Nagpur, MH, India – 440033 Phone: +91 712 223 7066, 395 8918 Fax: +91 712 223 5838 Email: [email protected] Website: http://www.kkeim.com Contents Using This Help............................................................................................... 3 Text Conventions...............................................................................................................4 Special Messages ..............................................................................................................5 Locating Help .....................................................................................................................6 About Kmita Mail v.3....................................................................................... 7 What's New in Kmita Mail v.3?..........................................................................................8 Kmita Mail v.3 Requirements ...........................................................................................9 Getting Started .............................................................................................. 10 Uploading to the Server ..................................................................................................11 Setting Folder Permissions ............................................................................................12 Entering License Information .........................................................................................13 Creating and Editing Form Configurations................................................ 15 Creating a Form Configuration .......................................................................................16 Editing a Form Configuration .........................................................................................18 Basic Kmita Mail v.3 Features ..................................................................... 20 Customizing your Form Data Email and Subject ..........................................................21 Customizing your Autoresponder Email and Subject...................................................23 Data storage in Text File .................................................................................................25 Import Datafile in MS Excel, MS Access ........................................................................26 Store Data in MySQL Database.......................................................................................28 Building an HTML Form ............................................................................... 31 Essentials in HTML Form. ...............................................................................................32 Changing an Existing Form ............................................................................................34 Field Names Formatting (Without Form Validation)......................................................36 Field Names Formatting (With Form Validation) ...........................................................37 Changing SMTP Settings ............................................................................. 39 Advanced Kmita Mail Features.................................................................... 42 Multi-page forms using Kmita Mail v.3 .........................................................................43 Conditional Form Submission ........................................................................................46 Preview the form before submission / after submission ..............................................49 Changing the Kmita Admin Language ...........................................................................54 Glossary......................................................................................................... 55 Chapter 1 Using This Help Thank you for buying Kmita Mail V2 for your website forms. Please take a moment to familiarize yourself with the special text and messages used throughout this guide. Text Conventions The examples below explain the specially formatted text used in this guide. HTML code appears in Green coloured Text : <form method=”post” action=””> The names of the input form tags appear in Bold Type : formname, Email PHP code appears in Brown coloured Text : <? $to = [email protected]; ?> File names appear in Italics Text : setup.php , setup.asp URL appear in Bold Blue text : http://www.kmita-mail.com Email address appears in Blue text : [email protected] Special Messages The following words and symbols have special meaning in this guide. Note : Important information concerning the operation of Kmita Mail V2 Caution : Failure to follow directions may result in malfunctioning and data loss. // Error : Failure to follow directions could lead to the errors listed in this box. Locating Help Kmita Mail provides you with several ways to find help. 1. Setup Manual 2. Knowledgebase : http:// support.kkeim.com/faq 3. Website Support : http:// support.kkeim.com/ 4. Email Support : [email protected] Note : Always mention Location of Kmita Mail on your server and the form you are trying to integrate with Kmita Mail when communicating with Support. Chapter 2 About Kmita Mail v.3 What's New in Kmita Mail v.3? Kmita Mail v.3 is the latest version for Kmita mail. The new version now has • New 4 step spam check • CAPTCHA image security • Tabbed form configurations for easy understanding and use. • Individual Upload settings for each form • Individual Validation Settings for each form • Option of changing the language of the Admin Panel. • Integrates into Kmita Admin • Intutive menus • SMTP settings page • Blocked IP page Kmita Mail v.3 Requirements Since Kmita Mail is installed on your server. You server should fulfill the following requirements. Kmita Mail can be installed on mostly any Linux, Unix or Windows Server as we have kept the PHP requirements to very low. • PHP 4.1.0 or higher installed on the server running in Normal Mode. • SendMail installed or any SMTP server with or without authentication. • GD2 Library ( for CAPTCHA Image Security ) • MySQL Writing privileges( if you wish to add data to database) Chapter 3 Getting Started Uploading to the Server You have downloaded the ZIP file from your account [ http://login.kkeim.com ] Since the script is in PHP therefore follow the procedure below. Note : On UNIX and Linux folder is referred to as “directory” . Since most of the people use Windows as their operating system, we would refer directory as folder in this help document. Unzip the contents of the ZIP on your local hard drive, preferably on your desktop. Now connect to Internet, open your favourite FTP program. Some of the most common FTP programs are CuteFTP, WS_FTP, AceFTP (Freeware),etc. Upload the “upload” folder to the HTML root of your website. The root of your website may be called as htdocs, httpdocs, wwwroot, www_public, www, public_html, etc. Caution : The files have to be in the HTML root of the website, else Kmita Admin and Kmita Mail will not work. Setting Folder Permissions Kmita Mail creates files and folders on your server and requires read , write and execute permissions. The following files and folders require CHMOD 777 File / Folder Permission [CHMOD] /kmitaadmin/smtp.php 777 /kmitaadmin/login.php 777 /kmitaadmin/kmitam.php 777 /kmitaadmin/login.php 777 /kmitaadmin/kmitam/data/ 777 /kmitam/temp/ 777 The image below shows the view of ACE_FTP . Right Click on the “kmitaadmin” folder and click properties. Select all the checkboxes or type CHMOD value directly to 777 and click “OK”. You can reduce the permissions once Kmita Mail v.3 is installed. Entering License Information Now that you have uploaded and set permissions, you now need to Open your browser window. Enter : http://www.yourwebsite.com/kmitaadmin/ to get page like this. Enter your username and password which are set as “admin” and “admin” respectively. You can change the password once you login into Kmita Admin. Goto http://login.kkeim.com . Using your username and password sent to you, login into your account and create your Kmita Mail v.3 Key. Enter the key in the field shown in the figure above and press “Save License”. If you get several PHP warnings after saving the password, there is a problem with the Permissions provided to “kmitaadmin/kmitam.php” . Please see “Setting Folder Permissions” Chapter 4 Creating and Editing Form Configurations Creating a Form Configuration Click on “List of Forms” to view the list of form configurations. Since this is the first time you are opening this page, you’ll not see any form configuration file. Click on “To create a new form Click Here”. You’ll need to fill some name for the form like : contact, feedback, registration, etc. You also need to fill a primary email address for the form , preferably , the email address which will receive all the form data emails. The email address is used for default settings and can be changed later. Press “Create” button to build the configuration files. You can now either go back to the “List of Forms” to use directly with default settings [Goto Chapter # ]or “Edit the form settings” to customize your form processing further. Editing a Form Configuration Goto the Kmita Mail v.3 List of Forms Page. You should see the form/s you have previously created. Click on “Change Settings” to edit the configuration file. You’ll be able to see the following tabs on this page (above) 1. General Settings 2. Data Email 3. Autoresponder 4. Data Storage 5. Form Validation 6. Upload Settings You can change any settings on the page and press “Save Settings” button on the bottom of the page. Caution : You’ll lose all the changes you made if you do not press “Save Settings” Chapter 5 Basic Kmita Mail v.3 Features Customizing your Form Data Email and Subject Kmita Mail v.3 allows you to customize how you receive the form details from your website visitor. 1. HTML 2. Plain Text You have an option to receive the data in following formats 1. Kmita Mail Default 2. My own HTML/ Text [Full Customisation ] If you select option # 2 i.e. My own HTML/ Text [Full Customisation ], you’ll need to provide complete email body. To start with , you can make a table with two columns. One column will hold the label for the particular field and the other will show the value filled by the visitor. The name of the field if enclosed by vertical bars and square braces substitutes the value filled in the form. [| exact name of the field|] Data Email from [|rn_Name|] Email address [|re_Email|] Address [|Address|] Query [|Query|] Date : [|DATE|] Time: [|TIME|] IP: [|IP|] Once this email has been designed in HTML/Text you simply need to paste it in the Textbox for Data Layout. The name of the field mentioned in the Data Email should be exactly the same. Even the change in the case or capitalization takes place, Kmita Mail v.3 will not work. That is, the value in the form field will not be substituted. You can use the following code to add IP address, date and Time in your form results. Value Code IP [|IP|] Date [|DATE|] Time [|TIME|] Unique ID [|UNIQUEID|] Customizing your Autoresponder Email and Subject Kmita Mail v.3 allows you to customize how you send your autoresponder email to your visitor. 1. HTML 2. Plain Text The name of the field if enclosed by vertical bars and square braces substitutes the value filled in the form. [| exact name of the field|] Dear [|Name|], Thank you for contacting us. We have received the following information Your email address: [|re_Email|] Address: [|rn_Address|] Thank you Sales Dept. Once this email has been designed in HTML/Text you simply need to paste it in the Textbox for Autoresponder Text. The name of the field mentioned in the Autoresponder Email should be exactly the same. Even the change in the case or capitalization takes place, Kmita Mail v.3 will not work. That is, the value in the form field will not be substituted. You can use the following code to add IP address, date and Time in your form results. Value Code IP [|IP|] Date [|DATE|] Time [|TIME|] Unique ID [|UNIQUEID|] Data storage in Text File Kmita Mail v.3 allows you to store the form details in a text file. Kmita Mail v.3 separates each field by “|” and includes all field values in inverted commas. You can specify the field sequence in the “Datafile Sequence” textbox. If you leave it empty, Kmita Mail v.3 will save the details in the sequence they are sent are sent by the form. 2004-2-13|02:05:44|82.66.188.129|""|""|""|""|""|"India"|"contactus1.php"|"Submit"| 2004-2-12|19:06:59|220.224.41.47|"Krutika"|"[email protected]"|"44, Ambazari Layout"|"Nagpur"|"Yes"|"India"| If you need to specify the field sequence, separate name of each field by “,”. DATE,TIME,IP,rn_Name,re_Email,km_Address,UNIQUEID You can use the following code to add IP address, date and Time in your datafile results. Value Code IP IP Date DATE Time TIME Unique ID UNIQUEID Import Datafile in MS Excel, MS Access 1. Download the datafile from your server. The file is stored in /kmitaadmin/kmitam/data/ . If your form configuration file name is contact0.php then the name of your datafile will be contact0.dat . 2. Download the file to your desktop and import the file using import options of the softwares. Importing of data into MS Excel is shown below. Store Data in MySQL Database Kmita Mail v.3 can store form data directly into your MySQL database. This may be helpful in storing email addresses across multiple tables in database saving you your valuable time. Setting Up your MySQL database: Login to your MySQL database In case have not created database before or in case you need to build a new one, create a database in MySQL. A tool like PHPMyAdmin would be helpful and is generally provided by all the webhosts these days. Create a table in the database. Specify the number of fields that are to be inserted in the MySQL. Put the fields that you want the form to insert in the Database After creating the table, go to Administration Home > Kmita Mail List of Forms > Edit Form [ formname 0.php ] And select “Data Storage” Tab. Put the exact sequence of the fields as they are in the table that you have created. The sequence has to put in the following manner. tablename|||[|exact name of the field|],[|exact name of the next field|],[|exact name of the next field|] Firstly you need to mention the tablename followed by three vertical bars "|" . Then Put the field names enclosed in [|name of the field|] separated by commas . If you need to insert the data in more that one table, you need to put the name of the tables separated by line ("Enter") .When the tablenames are written you need to put ||| . Then Put the field names enclosed in [|name of the field|] separated by commas . customers |||[|exact name of the field|],[|exact name of the next field|],[|exact name of the next field|] Chapter 6 Building an HTML Form Essentials in HTML Form. To get the basic HTML code required to be included in the HTML form, goto Administration Home > Kmita Mail List of Forms Click “HTML Code” infront of the name of the name of the form you are setting up. You can download the HTML code and paste it into your HTML editor. <form action="/kmitam/submit.php" method="post" > Email : <input type="text" name="re_Email"><br /> <input type="hidden" name="formname" value="contact0.php"> <!--// Security Image Code --> <p><img src="/kmitam/image.php" width="150" height="80" /></p> <p>Enter the characters shown in the above image [0-9, A-F]: <input name="secnum" type="text" id="secnum" /></p> </form> Changing an Existing Form If you already have a form, you need to modify your form by adding and modifying the following fields. Form Tag Form tag specifies method of send data from your HTML form to Kmita Mail. The action in the form tag specifies the location of Kmita Mail. E.g. <form action="/kmitam/submit.php" method="post" > Hidden input tag formname The formname input tag tells Kmita Mail, which form to execute. Kmita Mail then opens the form configuration and then sends data to the email addresses in To, CC and BCC, sends Auto responder to visitor and sends the visitor to Success Page etc. E.g. <input type="hidden" name="formname" value="contact1.php" > Input tag Email This is mandatory tag if the auto responder is to be sent. You can place this tag wherever you wish to have your visitor’s email address. Eg. <input type="text" name="re_Email"> How to put the code in the existing form? 1. You get the form action as the first part of the code. This code is to be placed in the starting of the form before the form fields begin. <form method="post" action="/kmitam/submit.php" enctype="multipart/form-data"> <input name="kk_Name" type="text" id="r_Name">name Email : <input type="text" name="re_Email"> The extra code enctype="multipart/form-data" is added in the form tag if the form is a Upload form. 2. The second field is a hidden formname tag which carries the name of the configuration file. This can be placed anywhere inside the form. Preferably just below the form tag. <form method="post" action="http://website.com/kmita/submit.php?go=1" enctype="multipart/form-data"> <input type="hidden" name="formname" value="3.php"> <input name="kk_Name" type="text" id="r_Name">name <input type="text" name="re_Email"> 3. Third is the re_Email field .You can place this tag wherever you wish to have your visitor’s email address. 4. Insert this code where ever you wish to have the security CAPTCHA Image. <img src="/kmitam/image.php" width="150" height="80" /> <p>Enter the characters shown in the above image [0-9, A-F]: <input name="secnum" type="text" id="secnum" /></p> 5. Always ensure that the </form> tag which ends the form is present where the form fields end. Eg. <form method="post" action="/kmitam/submit.php"> <input type="hidden" name="formname" value="3.php"> <input name="kk_Name" type="text" id="r_Name">name <input type="text" name="re_Email">email <select name="km_list" size="4" multiple > <option value="1">hello</option> <option value="2">go</option> <option value="3">my baby</option> <option value="4">good boy</option> </select> <p><img src="/kmitam/image.php" width="150" height="80" /></p> <p>Enter the characters shown in the above image [0-9, A-F]: <input name="secnum" type="text" id="secnum" /></p> <input type="submit" name="Submit" value="Submit"> </form> Field Names Formatting (Without Form Validation) You can choose any name for form tags except formname. You can include “_” (underscore) which will be removed in the Data Email which you’ll receive. Note : You cannot use special characters like – “/” , “\” , “:”, “(”, “)” , “{”, “}” , “[”, “]”, etc. for proper functioning of Kmita Mail. Field Names Formatting (With Form Validation) The form fields need to be formatted as per the requirement of the field. The phone field will hold a number while Name will hold simple text. You can make the fields mandatory by proper formatting to enable good validation. Syntax Example Explanation re_Fieldname re_Email Checks the syntax of Email Address and is required ne_Fieldname ne_Name Cannot be blank and should be valid text rn_Fieldname rn_Company Cannot be blank br_Start_End_FieldName br_1_10_Qty The number filled should be between specified range nn_Fieldname nn_Phone The field should contain a number km_fieldname km_comments Field with no validation required 0 Eg. email <input type="text" name="re_Email"> <select name="km_list" size="4" multiple > <option value="1">hello</option> <option value="2">go</option> <option value="3">my baby</option> <option value="4">good boy</option> </select> <input type="text" name="br_10_15_Number_of_Items"> Eg. br_10_15_Number_of_Items: In this field you need to put “br_” initially followed by the first limit “10_” of the range you want to the value to be between. Then put the end limit “15_” followed by the name of the field. You can change the validation text for each form in “Form Validation” Tab on the Edit form page. Chapter 7 Changing SMTP Settings By default, Kmita Mail v.3 uses PHP’s mail() function. If your webhosthas disabled the mail function, you can use your SMTP server to send the emails. To view the settings , go to Home > SMTP Settings In the admin panel. To enable sending emails through SMTP server, Click on Yes . Fill the required details in the form and press “Save Settings” Chapter 8 Advanced Kmita Mail Features Multi-page forms using Kmita Mail v.3 Multi page forms are an easy way of splitting up large form into number of number of forms spread over number of pages. Visitors on internet do not like to fill forms, especially the forms which run for several screens; Multi page forms can help you by tempting your customer to fill very few fields on first page and then asking more information on the following pages. What you need to have a multi page form? 1. A form configuration setup normally. 2. A Long form. Step 1. Split your form based on the content. For example , contact information of one page, details about occupation on other page. You can split the form into any number of pages but consider that people on internet do not have much patience. They may leave your form half if they cannot get to the end of the form. If you have a long form, mention like “Page 4 of 10” , “4 pages more to go”, etc. This lets the visitor know how many pages he still has to fill. Multi page forms are an easy way of splitting up large form into number of number of forms spread over number of pages. Visitors on internet do not like to fill forms, especially the forms which run for several screens; Multi page forms can help you by tempting your customer to fill very few fields on first page and then asking more information on the following pages. Step 2. 1. Open the Kmita Admin > Kmita Mail List of Forms > and create a new form. 2. Once this setup is done, you will obtain a code similar to one below. Insert these tags and fields in the first page of your form. <form method="post" action="/kmitam/submit.php"> <input type="hidden" name="formname" value="feedback.php"> <input type="text" name="re_Email"> </form> 3. Secondly, add a hidden field named _multipage in the form. The value of the form should contain the server location of the next page. <input name="_multipage" type="hidden" id="_multipage" value="/home/kmita/public_html/feedback_2.html" > The first page of the form is completed. 4. Now on to the second page and the pages in between the first and the last page. Set the action of form on all the pages as <form method="post" action="/kmitam/submit.php"> 5. All the pages except the first one should contain this block “[|CODE|]” any where inside the form tags. This will produce hidden fields and will not be visible even if placed any where inside the form. 6. Then set the hidden field _multipage having the value of the location of the next page. <input name="_multipage" type="hidden" id="_multipage" value="/home/kmita/public_html/feedback_3.html"> 7. In short,every page in the form should have its action to be set, then have a hidden tag named _multipage and [|CODE|] written anywhere inside the form. 8. The last page in the form WILL NOT contain any hidden field named "_multipage", but will contain [|CODE|] block. The form will now be directed to the thank you page collecting all the data. 9. The Email field can be any of the form pages but it should be present. CHECKLIST Page Kmita Mail Multipage form requirements First page Action, inserting formname tag , Email field,_multipage hidden field Between pages Putting [|CODE|], setting action, _multipage field Last page Putting [|CODE|], setting action Conditional Form Submission There are cases when you need to send email to different people through same form depending upon the selection made by the visitor. For example, in a contact form you can have a drop down menu which asks the visitor to specify the recipient or if you want to create a form which has conditional data handling likeproviding details for Product 1 Product 2 Product 3 Product 4 or Marketing Sales Finance Purchase ..... ..... or send email to any one Allen Jim Thomas Peter ...... ...... There can be n number of such applications and it for you to decide how you can use it. As you know, "formname" field tells Kmita Mail which form to execute. < input type="hidden" name="formname" value="contactus.php" > So, if you want Kmita Mail v.3 to submit data to different email addresses according to formname selected. You are not required to make different HTML forms for each. There are two options . Either have 1. Radio Buttons, or 2. Drop Down Menu Step 1. Run Form setup for as many options you want to create. This gives you the option of giving different Success Page Autoresponder Data file etc.. for each form! No generalised autoresponder! E.g. For support you can provide by what time you can provide support and also provide instructions and Marketing or Sales you can provide where to contact your marketing people and bit of thank you text with flowery language. Copy the "formname" value-> text for each form setup. Step 2 Make an HTML form. Step 3 Now this step differs for Radio Button and Drop Down Menu For Radio Button Use the code below to get Radio Buttons for whom to submit data. The visitor selects the radio button and the email is sent through the indicated formname by Kmita Mail. <input type="radio" name="formname" value="mktg.php" checked> Marketing <input type="radio" name="formname" value="sales.php"> Sales <input type="radio" name="formname" value="purchase.php">Purchase <input type="radio" name="formname" value="finance.php"> Finance <input type="radio" name="formname" value="resel.php"> Reseller Options Ensure that at least one form is checked other Kmita Mail will send the email data to website administrator email address. This is how the above code looks like For Drop Down Menu Use the code below to get Drop Down Menu for whom to submit data. The visitor selects the required person from menu and the email is sent through the indicated formname by Kmita Mail. <select name="formname"> <option value="mktg.php" selected>Marketing</option> <option value="sales.php">Sales</option> <option value="purchase.php">Purchase</option> <option value="finance.php">Finance</option> <option value="resel.php">Resseller</option> </select> Ensure that atleast one form is selected other Kmita Mail will send the email data to website administrator email address. Above code looks like this Note : Kmita Mail cannot handle multiple "formnames"' . If it receives multiple form names, it will only execute the last formname that is specified or in some cases it may give error. Preview the form before submission / after submission Preview the form before submission 1. Create a form configuration. [Refer Chapter 3 ] 2. Once this setup is done, you will obtain a code similar to one below. Insert these tags and fields in the first page of your form. <form method="post" action="/kmitam/submit.php"> <input type="hidden" name="formname" value="contact.php"> <input type="text" name="re_Email"> </form> Ensure that your form fields are validated and made required. 3. Secondly, add a hidden field named _multipage in the form.The value of the form should contain the server location of the next page. e.g. <input name="_multipage" type="hidden" id="_multipage" value="/home/kmita/public_html/preview.html"> The form is now complete. Preview Page 1. The preview page can contain any text as per your requirements.Then insert a form tag in the form. Inside the form tags insert [|CODE|] as shown below. <form method="post" action="/kmitam/submit.php"> [|CODE|] </form> 2. Inside these tags you can insert a table where you can can show the preview of the data filled by the visitor. One column can contain the label of the form field and the other should have [|Exact name of the field|] e.g Name : [|rn_Name|] Address : [|re_Address|] 3. Put submit button at the end of this table inside the form tags. Your preview page is now ready. On submission this will appear as Name : John Address : [email protected] You can personalize any part of your text by inserting [|Exact name of the field|] in your emails, email subjects, success pages etc. Preview the filled details after submission 1. Create a form configuration. [Refer Chapter 3 ] 2. Once this setup is done, you will obtain a code similar to one below. Insert these tags and fields in the first page of your form. <form method="post" action="/kmitam/submit.php"> <input type="hidden" name="formname" value="contact.php"> <input type="text" name="re_Email"> </form> Ensure that your form field are validated and made required. Kindly refer the details of Form field validation. Once the form is prepared place the submit button. The form is directed to the success page on form submission. The success page can be personalized as per the form submitted by the visitor, Any field can be added into the page using [|exact name of the field|] e.g If the code below is put on the success page Name : [|rn_Name|] Address : [|re_Address|] The success page will appear as Name : John Address : [email protected] Blocking IP addresses Click on “Banned IP Addresses” in the menu as shown below. . Add the IP addresses you wish to block. Separate each IP address using a comma “,” or a line break “Enter key” Once you have entered the list , press “Save”. Changing the Kmita Admin Language In Kmita Admin, the language of the complete Admin Panel can be changed. Just copy the lanuguage file from the "Language Files" directory in kmitaadmin directory and save it in kmitaadmin directory. Now, find and delete the earlier "admin_lang.php". Rename the file you copied from "Language Files" as "admin_lang.php". Currently the language files are available in English Spanish French Chapter 9 Glossary BCC BCC is an abbreviation for blind carbon copy. If you add a recipient's name to this box in a message, a copy of the message is sent to that recipient, and the recipient's name is not visible to other recipients of the message. CAPTCHA A CAPTCHA (an acronym for "Completely Automated Public Turing test to tell Computers and Humans Apart", trademarked by Carnegie Mellon University) is a type of challenge-response test used in computing to determine whether or not the user is human. A CAPTCHA involves one computer (a server) which asks a user to complete a test. While the computer is able to generate and grade the test, it is not able to solve the test on its own. Because computers are unable to solve the CAPTCHA, any user entering a correct solution is presumed to be human. The term CAPTCHA was coined in 2000 by Luis von Ahn, Manuel Blum, Nicholas J. Hopper (all of Carnegie Mellon University), and John Langford (of IBM). A common type of CAPTCHA requires that the user type the letters of a distorted image, sometimes with the addition of an obscured sequence of letters or digits that appears on the screen [Source : Wikipedia , http://en.wikipedia.org/wiki/Captcha ] CHMOD CHMOD stands for "Change Mode" . CHMOD is used for changing mode of usage of the file. The mode parameter consists of three octal number components specifying access restrictions for the owner, the user group in which the owner is in, and to everybody else in this order. One component can be computed by adding up the needed permissions for that target user base. Number 1 means that you grant execute rights, number 2 means that you make the file writeable, number 4 means that you make the file readable. Add up these numbers to specify needed rights. You can also read more about modes on UNIX systems with 'man 1 chmod' and 'man 2 chmod'. Set these settings using some FTP Client like WS_FTP, ACE FTP, Cute FTP, to name a few. The following steps are mostly common for all FTP clients 1. Right click the folder "kmita" 2. A menu pops up, Select CHMOD or Set File Permissions. 3. A new Dialogue box appears. Set CHMOD 777, (Owner : Read, Write, Execute | Group : Read, Write, Execute | Public : Read, Write, Execute ) 4. and That’s Done! You can also do the same at UNIX command prompt. FTP File Transfer Protocol.: This is the language used for file transfer from computer to computer across the WWW. An anonymous FTP is a file transfer between locations that does not require users to identify themselves with a password or log-in. An anonymous FTP is not secure, because it can be accessed by any other user of the WWW.