1
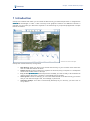
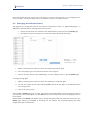
Sensorscope Sàrl, PSE-D, CH-1015 Lausanne
+41 216 917 001, [email protected], www.sensorscope.ch
Climaps
User Manual
Updated on April 19, 2012
Climaps − Manuel Utilisateur | Page 2
Table of Contents
1
Introduction ...................................................................................................................................... 3
2
Setting Up Your Sensorscope Station ............................................................................................... 4
2.1
Creating a Climaps Account ......................................................................................................... 4
2.2
Activating your Station .................................................................................................................. 4
3
Rights Management .......................................................................................................................... 5
4
Control Panel .................................................................................................................................... 6
5
4.1
Filters............................................................................................................................................. 6
4.2
Managing Access Authorizations .................................................................................................. 7
4.3
Profile ............................................................................................................................................ 8
4.4
Parameters .................................................................................................................................... 8
World Map ........................................................................................................................................ 9
5.1
General Overview ......................................................................................................................... 9
5.2
The Action Menu......................................................................................................................... 10
5.3
Labels .......................................................................................................................................... 11
6
Quick Overview .............................................................................................................................. 13
7
Plotting Data................................................................................................................................... 14
8
Downloading Data .......................................................................................................................... 16
9
Alarms ............................................................................................................................................. 18
9.1
The address book........................................................................................................................ 18
9.2
Creating an Alarm ....................................................................................................................... 19
9.3
Credits ......................................................................................................................................... 20
10 Radio Link Qualities ........................................................................................................................ 21
Climaps − Manuel Utilisateur | Page 3
1 Introduction
Climaps is the website with which you can access the data sent by your Sensorscope station. It integrates the
latest WEB technologies to offer a clean and easy-to-use graphical interface. No additional software is
required: You can access your data from anywhere in the world using any computer equipped with a simple
Internet connection.
General overview of Climaps.
Climaps has numerous features, among which:
•
•
•
•
•
Data Sharing. Share your data in a few mouse clicks with any of your co-worker in the office next
door or at the other side of the Earth.
Distant Access. Access your data from anywhere in the world, using a computer or a smartphone
thanks to the mobile version of Climaps.
Easy to Set Up. Once your Sensorscope station installed, your data is ready to be accessed. No
need to install a data server, your data is automatically sent to Climaps.
Alarm System. Thanks to Climaps, you can create alarms based on the data sent by your station
that you can receive through e-mail, text message, or phone call.
Automatic Backups. Your data is automatically backed up by our services, you don’t have to
worry about it.
Climaps − Manuel Utilisateur | Page 4
2 Setting Up Your Sensorscope Station
2.1
Creating a Climaps Account
To access the data gathered by your Sensorscope station, you first have to create a Climaps account. If you
already have one, you can skip this section.
To create an account, start your web browser and go to http://climaps.com. In the header on top of the
screen click on the “sign up” link.
The header allows you to log in or to sign up to
Climaps.
You will then get a form to fill in. The Login is the unique identifier of your account: We recommend using
something simple to remember, linked to your actual name. The user “John Doe” could for instance use
“j.doe”. Please note that once chosen, there is no way to modify your login.
Please be careful as well when filling in your e-mail address: It must be valid, and you must be able to access it
to fully validate your account. This validation must be done within an hour.
Once the form filled in, click on the “Submit” button. You should receive an e-mail in the following minutes
with a link to click on in order to validate your account. If you don’t receive this e-mail, please check that it
hasn’t been marked as spam by your e-mail client.
Once the validation link clicked, you will land on the log in page. You can then fill in your login and your
password to connect to Climaps. If later on your choose to disconnect, use the “log in” link in the header to
connect again.
Hint
Although Climaps is compatible with most of the web browser, we strongly
recommend using Google Chrome.
2.2
Activating your Station
Once installed and powered, your Sensorscope station automatically sends its data to Climaps. This data is
not visible to anyone at first, even to you. To access your data, you must activate your station in order to
associate it to your Climaps account.
When you received your station, you should have received as well a sheet of paper explaining the process to
activate your station. It contains an activation code, which looks like XXXX-XXXX-XXXX-XXXX, and the
unique identifier of the station.
To activate your station, go to http://climaps.com/?comp=activatestation to fill in the fields, and click on the
“Activate” button. Your station is then associated to your Climaps account, and only you can access its data.
Please note that a station can only be activated once. If you want other people to access its data, you have to
give them the rights to do that. This is explained in the section “3 - Rights Management”.
Climaps − Manuel Utilisateur | Page 5
3 Rights Management
There are three levels of rights that a user may have on a Sensorscope station:
•
•
•
None. The user cannot access the station.
See. The user can access the station and view its data, but cannot change its properties (like its
geographical location).
Modify. The user can do anything with the station, including giving to other users some rights on
that station. The Modify right implies the See right.
Once your Sensorscope station activated, you have the Modify right on it. Nobody else can access it. If you
want other users to access your stations, there are two possibilities:
1.
Make the station public. If you make your station public, any Climaps visitor has the See right on it.
When you log in to Climaps for the first time, the stations you can see on the map are those that
have been made public by their owner. The procedure to make a station public is explained in
section ”5 - World Map”.
2.
Give rights. If you do not want your station to be public, you can individually assign the See and
Modify rights to any user. Excepting you, only these users will be able to access your station. The
procedure to manage authorizations is explained in section “4.2 - Managing Access Authorizations”.
Climaps − Manuel Utilisateur | Page 6
4 Control Panel
The control panel lets you manage everything about your Climaps account. You can get there by clicking on
the corresponding icon in the navigation bar, on top of the screen. The various configuration options are
grouped by tabs.
Accessing your control panel.
4.1
Filters
If you have access to a large number of stations, it may be easier to display only a subset of them when you
plot or download data for instance. This can be done through the use of filters.
Let’s say you have access to stations 1, 2, 3, 4, and 5: You could decide to create a filter containing only
stations 2 and 5. Thus, when you select this filter, only stations 2 and 5 are visible.
To create a new filter, click on the “Create” button. A dialog box opens up to define the setup of your filter.
In the example below, we create a new filter named “EPFL Campus”, containing stations 41, 42, and 43.
Creating a filter.
As you can see, the dialog box is split into three parts:
•
•
•
The text field on top lets you define the name of the filter. This is the name you will see later on
in the various parts of the website.
The left part shows the list of all the stations you have the See right on. If you select one of these
stations, it is added to the filter if it was not already in, or removed if it was already in.
The right part shows the list of stations in the filter. If you click on one of these stations, it is
removed from the filter.
Climaps − Manuel Utilisateur | Page 7
Once satisfied with the filter, click on the “Save” button to actually create the filter. It is now displayed in the
list of your filters. You are then able to edit or even delete it if you do not need it anymore.
4.2
Managing Access Authorizations
This page lets you manage the access to your stations, as explained in section “3 - Rights Management”. In
additional to the filter selector, the page is split into two parts:
•
•
The left part shows the list of stations in the selected filter on which you have the Modify right.
The right part shows the users that can access the stations selected in the left part.
Managing
access
authorizations in the
“Authorizations” tab.
To give some rights to a user, you must know his Climaps login. Then:
1.
Select in the left part the stations on which you would like give some rights.
2.
Fill in the Climaps login in the field at the bottom of the right part.
3.
Click on the “See” button to give the See right, or on the “Modify” button to give the Modify right.
To modify existing rights:
1.
Select in the left part the stations on which you would like to modify the rights.
2.
For each user, select the new rights. Selecting None removes all the rights on the selected stations
from the given user.
3.
Click on the “Save” button.
Once the See or Modify right given to a user, the stations automatically appear in his list of stations. If later on
you choose to remove these rights, just select None for that user and save: The station will disappear from his
list of stations.
Please note that the Modify right allows a user to change the rights himself. He could thus remove your own
Modify right, making you incapable of accessing your own stations. We recommend being wary when
assigning this right to another user.
Climaps − Manuel Utilisateur | Page 8
4.3
Profile
This part lets you modify your personal information, such as your name, your address, or your phone numbers.
You can as well modify your password or you e-mail address: In these two cases, you will receive by e-mail a
link to click on to validate the process.
You can also see how many credits you have left: Credits are used to generate alarms (see section “9 Alarms”). The page also shows the minimum number of credits you are allowed to have. Below this value, your
alerts are no longer sent (excepting e-mails which are free). You should thus be careful about your credits
when your use the alarm system with text messages or phone calls.
Climaps lets you give some of your credits to another user. To do this, you need to know his Climaps login.
Then, just click on the “Transfer credits” button: You are then asked to enter the other user’s login and the
number of credits you would like to give him. Once the process over, the credits are removed from your
account and added to the account of the other user.
Hint
Giving credits cannot be undone, so please be careful when you do this.
4.4
Parameters
The parameters you can set are:
•
•
•
Language. The language used to display Climaps.
Time Zone. The time zone in which you are located.
Display of the dates. You can choose between UTC and your local time. In the latter case, your
time zone is used to convert dates.
Climaps − Manuel Utilisateur | Page 9
5 World Map
This part can be accessed using the Earth icon in the navigation bar.
Accessing the world map.
5.1
General Overview
The world map is surely the part you will be accessing the most. It lets you see the location of your stations,
and displays in real time their data.
The world map.
The general usage is as follows:
1.
In the upper part, select a filter (see section “4.1 - Filters”) to define which stations are displayed.
Filters “Public Stations” and “My Stations” (the stations on which you have the See right) are
predefined.
2.
The list on the left and the world map are updated with the corresponding stations. Select a station
by clicking on it, either in the list or directly on the map.
3.
The list of sensors installed on that station and its health status appear in the list on the bottom left.
Click on one of the sensors.
4.
The plot on the right is updated with the data received during the past 5 days.
Climaps − Manuel Utilisateur | Page 10
Hint
The plot is interactive : Move your mouse over it to get an information window, or
select an area to zoom on it.
The list of stations on the left shows for each station the date of the latest data received. If the text is greyed
out, the latest data has been received more than 12 hours ago. Moreover, two icons may be shown in front of
each station:
•
•
A battery icon indicates that the battery level is low.
An open lock icon indicates that the station is public, and can thus be accessed by anyone.
This station is public, and its battery level is low.
Icons on the world map represent the type of station. A master station has some small radio waves to
symbolize the GPRS transmission. Furthermore, the icon may be either green (last data received less than 12
hours ago) or grey (last data received more than 12 hours ago).
Station 3026 is a master station, and its last
data has been received less than 12 hours
ago. Station 3075 is a slave station and has
not sent any data in the past 12 hours.
5.2
The Action Menu
The menu located on top of the map, on the left, lets you do a number of actions on filters and stations.
5.2.1 Actions on Filters
•
•
Link to this filter. This action reloads the page in order to give you, in the address bar of your
browser, the link to the selected filter. This is useful if you wish for instance to send this link to a
co-worker to let him access a set of stations you have defined.
Import this filter. This action is only available when the selected filter does not belong to you.
This is the case for instance when a co-worker has sent you the link to one of his filters. Using this
action, you can copy that filter in your own filters.
Hint
When you share a filter with someone, he can only access the stations in this filter
on which he has the See right. You have to specifically give some rights to this
user if this is what you want to do.
5.2.2 Actions on Stations
These actions act on the selected station.
Climaps − Manuel Utilisateur | Page 11
•
•
•
•
•
Make the station public. If you make a station public, everyone gets the See right on that
station. This action is available only if you have the Modify right on the selected station.
Rename the station. This action lets give a more significative name to the station, in addition to
its unique identifier. This action is available only if you have the Modify right on the selected
station. Please note that the name is the same for all Climaps users: If you change it, it will be
changed for everyone.
Move the station. This action lets you place the station on the world map. You can either directly
fill in the coordinates, or place the station with your mouse. This action is available only if you
have the Modify right on the selected station.
Station reboots. This action displays all the reboots of the station, as well as the firmware
characteristics (such as the version or the radio transmission frequency).
Select a station. This lets you fill in the unique identifier of a station you would like to select
rather than looking for it in the list. This is useful if the list of station is really long.
Dialog box for setting the location of
a station. The text box lets you type
the name of a place to go there
more quickly.
5.3
Labels
On the map, a white label is associated to each station. You can choose what to display in these labels by
using the menu on the top right of the map. The various options are:
•
•
•
•
Identifier. The unique identifier of the station. This is the default display.
Name. Displays the name of the station. This is the name you can define using the “Rename the
station” action.
Temperature. Displays the last temperature measured by the station. If the station does not have
a temperature sensor or if the measurement is older than an hour, “N/A” is displayed.
Battery. Displays the last battery level sent by the station. If the measurement is older than an
hour, “N/A” is displayed.
Climaps − Manuel Utilisateur | Page 12
Labels showing the temperature.
Climaps − Manuel Utilisateur | Page 13
6 Quick Overview
You can access the overview using the magnifier icon in the navigation bar.
Accessing the quick overview.
This overview lets you see at a glance the characteristics of a set of stations.
Quick overview.
The various tabs are:
•
•
•
•
Sensors. Displays the latest value sent by each sensor.
Health. This list contains everything related to the general working operation of the stations,
such as the battery level or the GPRS values for master stations.
Advanced. Displays, for each station, the number of hops to go through for the data to arrive at
the master station.
Details. Firmware data, such as the version of the radio transmission frequency.
Climaps − Manuel Utilisateur | Page 14
7 Plotting Data
You can access this part using the plot icon in the navigation bar.
Accessing the plotting part.
It lets you plot the data sent by your stations in a more precise way than the small plot on the world map. This
plot is for instance not limited to the past 5 days of data. You can also plot at once the data sent by many
stations/sensors.
Plotting data.
The general usage is as follows:
1.
On the bottom left, select the interval between which you would like to plot data.
2.
Select the couple station/sensor you would like to plot. You can add new values by using the “+”
button located on the right, or remove some of them by using the corresponding “-“ button. Please
note that the available sensors depend on the dates you have selected (some sensors may have been
physically added or removed upon time).
3.
Once statisfied with the selection, click on the “plot” button. The plot is displayed and you can play
with it in the same way you do with the plot on the world map.
Hint
In the list of stations, you can select “all” in order to plot a sensor’s data for all the
stations in the filter, rather than selecting them one by one.
Climaps − Manuel Utilisateur | Page 15
To limit the amount of data to display, the resolution of the plot is decreased when the selected interval is too
big. The resolutions are as follows:
•
•
•
Less than 7 days. Maximum resolution, you get all the measurements done by the sensors.
Less than 30 days. The resolution is 15 minutes: The points displayed are means over 15
minutes.
More than 30 days. The resolution is one hour: The points displayed are means over one hour.
Please note that the actual resolution used is precisely given on the bottom left of the plot. Some limitations
of Internet Explorer constrain the plot to use a smaller resolution for smaller intervals.
Inside the plot, on the top right, two icons let you:
•
•
Download the plot as an image using the image format of your choice.
Print the plot.
Climaps − Manuel Utilisateur | Page 16
8 Downloading Data
This part can be accessed using the hard drive icon in the navigation bar.
Accessing the data downloading part.
This part lets you retrieve text files containing the data sent by one or multiple stations, in order to manipulate
them using software such as Matlab.
Downloading
data.
The general usage is very similar to that of the plotting data part:
1.
Select the interval between which you would like to download data.
2.
Select the options you want to use
3.
Select the stations you would like to get data from.
4.
Click on the “Download” button.
Your browser then starts downloading a zip file with the files your have requested. You get one text file per
selected station.
Hint
Similarly to data plotting, you can select “all” instead of a particular station to get
the data from all stations in the selected filter.
The various options are as follows:
•
•
Format. You can choose between CSV (tabular format with values separated by commas) and the
Matlab format.
Raw data. Sensors send data in a proprietary format that must be converted to a standard format
(such as “°C“ for temperature). This option lets you retrieve the proprietary raw data instead of
the converted data, in order to let you convert them by yourself.
Climaps − Manuel Utilisateur | Page 17
•
•
Include health status. This option includes in the text files the health status of the station (such as
its battery level) in addition to the sensors’ data.
UTC plain dates. With the default settings, dates are provided in epoch time (also known as Unix
time), which is the number of elapsed seconds since 01/01/1970. This format suits to most
scientific software, such as Gnuplot or Matlab. Selecting this option lets you get dates in a text
format that can be read by humans.
Climaps − Manuel Utilisateur | Page 18
9 Alarms
Climaps lets you create alarms based on the values sent by the Sensorscope stations. The general usage is as
follows:
1.
You create an alarm based on a condition.
2.
You associate alerts to this alarm (e-mails, text message or phone calls).
3.
When the condition is met, alerts are sent.
The alarm system can be accessed using the whistle icon in the navigation bar.
Accessing the alarm system.
9.1
The Address Book
The address book.
Alarms are associated to a number of alerts that will be sent to contacts in your address book. For instance, if
you want a text message to be sent when an alarm triggers, you have to select to which contact in your
address book the message will be sent. The first step is thus to add at least one contact to your address book.
When you create a contact, you must provide at least a name. Other information is optional, and is used to
send alerts at the right place. We recommend filling in all the contact fields to avoid situations where, for
instance, a text message should be sent to a contact without a phone number.
In the example below, a contact “John Doe” is created. The selected language is English, so the alerts sent to
this contact will be in English.
It is possible to provide different phone numbers for text messages and phone calls. You may want for
instance to send text messages to a cell phone rather than to a fixed-line. The two numbers may be the same
as well. Please note that phone numbers must be provided using the 00-prefix international format, regardless
of the country in which the contact lives.
Creating a contact “John Doe”.
Climaps − Manuel Utilisateur | Page 19
9.2
Creating an Alarm
In the “Alarms” tab, click on the “Create” button. When you create an alarm, you first have to give it a name.
In the example below, it is named “Frost Alarm”.
9.2.1 Trigger Condition
Creating an alarm to detect frost.
You now have to fill in the trigger condition for the alarm. In this example, the alarm triggers when the
Decagon temperature sensor measures a value below 0°C, and is re-armed automatically upon measuring a
value above 1°C.
To understand the notion of re-arming, one must understand the various states an alarm can be in:
•
•
•
When an alarm is armed, if the associated condition becomes true, it triggers.
When an alarm triggers, alerts are sent. While the alarm is triggered and once all alerts sent, no
new alert is sent for that alarm.
The alarm is automatically re-armed when the re-arm value is measured.
In our example, alerts are sent when the temperature goes below 0°C. Once all alerts sent and while the
temperature is below 1°C, no more alerts are sent. If the temperature goes above 1°C, the alarm is re-armed.
It will trigger again if the temperature goes again below 0°C, and new alerts will then be sent.
9.2.2 Alerts
Once the trigger condition entered, click on the “Next” button in order to define the alerts that will be sent if
the alarm triggers.
Defining the alerts associated to an alarm.
In the example above, when the alarm triggers, an e-mail, a text message, and a phone call are sent to the
contact “John Doe”. If the alarm is re-armed before 15mn have elapsed, no more alerts are sent. Otherwise, a
second text message is sent 15mn later. Then, no more alerts are sent while the alarm is triggered.
You can associate as many alerts as you want to an alarm. To add new alerts, click on the “+” button located
at the bottom of the dialog box. To delete an alert, click on the “X” button in front of the alert you want to
delete.
Alerts cost a given amount of credits: The dialog box automatically computes up to how many credits the
alarm will cost if it triggers. In the case of our frost alarm, the cost depends on the number of text messages
actually sent.
Once the alerts correctly defined, click on the “Save” button.
Climaps − Manuel Utilisateur | Page 20
9.2.3 Liste of Alarms
The new alarm now appears in the list as shown in the example below.
List of alarms.
This list lets you see the state of your alarms. You can edit them by selecting an alarm and clicking on the
“Edit” button. You can also delete an alarm you no longer want.
Thanks to the “Enable/Disable” button, you can as well temporarily disable an alarm instead of deleting it. A
disabled alarm never triggers
9.3
Credits
Each alert costs you some credits:
•
•
•
E-Mail: 0 credit.
Text message: 1 credit per message.
Phone call: 2 credits per call.
Thus, with our frost alarm, an e-mail (free), two text messages (2 credits) and a phone call (2 credits) will cost
you 4 credits if all alerts are sent. You can see how many credits you have left above the list of alarms.
If you want to buy credits, please contact us.
Climaps − Manuel Utilisateur | Page 21
10 Radio Link Qualities
If you have multiple stations communicating through radio, you can plot the quality of the radio links between
them.
Accessing the radio link qualities.
The general usage is as follows:
1.
Select a filter in the bottom left part of the interface.
2.
Select a station and its neighbor. You can also select all the stations in the filter.
3.
Select the time interval in the bottom right part of the interface.
4.
Click on the “Plot” button.
Radio link
qualities.
You then get a plot showing the quality of the radio link from the neighbor to the station (e.g., how well
“Station” hears “Neighbor”). If “All” is selected for the station, you get a tab per station in the filter. If “All” is
selected for the neighbor, you get the set of qualities (one for each neighbor) on the same plot.
The quality of the radio links varies between 0 and 16, 16 being the best quality. There is a grey area between
0 and 12, showing the area in which stations do not communicate with each other because the quality is too
low.