1
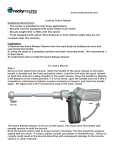
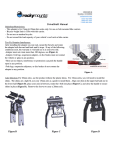
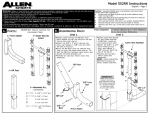
FlyTrap Adapter Instructions
Application and use
The FlyTrap Adapter is designed to carry your 20mm thru-axle (except Marzocchi QR20)
equipped bike on a fork mount. We have tested and approved this for use with the following:
RockyMounts- Clutch, Lariat, Noose, Thule®- VeloVise, V2, Echelon, & Peloton,
Yakima®- Copperhead, Steelhead, Viper & Sprocket Rocket
If your fork mount is not listed, it is the user’s responsibility to deem their fork mount sufficient.
At printing, we offer an axle for use with the Specialized Enduro Forks (sold separately) as well.
Use of this product in other capacities or with a non-specified fork will void the warranty.
-DO NOT use bike covers or bike bras these items create excessive wind force.
-If you do take the vehicle off road, drive cautiously. Bottoming out the vehicle suspension can
be bad for both your suspension fork and the rack.
-Approved for use with Single Bikes, not Tandems.
-Note on security; Even the best locks are only deterrents to well equipped thieves.
RockyMounts cannot be held liable for stolen bicycles. For additional security, a cable lock can
be run through the bike frame and roof rack or tie down.
Installation of FlyTrap Adapter
In most instances, the FlyTrap Adapter can be installed without removing the quick release from
the rack. Slide the large keyhole opening over the non-handle side of the quick release (Figure
#1). Rotate the U-shaped end onto the other side, while pulling up on the keyhole side, push
down on the open end. When it stops (Figure #2) on the quick release; close the skewer or
mechanism per your rack manufacturer’s instructions. Be sure the FlyTrap adapter is level to the
fork mount and properly engaged. If it is crooked or uneven, it will not hold properly.
Note: Many thru axle forks are equipped on heavier downhill bikes. These bikes put greater
forces on the quick release. It is imperative the quick release is closed properly. Check the
tension of the quick release EVERYTIME you mount your bicycle! Some quick releases or
mechanisms can lose tension over time, in this case, the FlyTrap Adapter can detach without the
proper tension. This is imperative for safe operation.
Use with a 20mm thru axle
1) Remove the axle from the front wheel and the front wheel from the fork. Reinstall the axle in
the fork as per your manufacturers’ specifications without the front wheel.
2) Turn the black plastic handle of the FlyTrap open by turning clockwise until it stops and flip
open the lid.
3) Place your axle in the opening (Figure #3). Flip the lid closed and turn the handle counter
clockwise until it touches the built in stop on the bottom half (Figure #4).
4) You can now turn the key 90 degrees and lock the handle in place.
5) Secure the rear wheel.
6) Grab the fork and rock it side to side, be sure the handle is closed all the way and the FlyTrap
Adapter does not move on the fork mount.
Torque Setting and Changing of Lock Core
The bolt that secures the handle to the FlyTrap is factory set at 4Nm (3Lb-Ft) and should be
periodically checked. If the handle is too loose your bike can fall out. To tighten the handle;
open the lid of the FlyTrap and insert a 10mm open end wrench onto the hex nut, turn the bolt
with a 5mm allen wrench while holding the nut. The handle can also be replaced, and is available
as a spare part at rockymounts.com
If you want to change the lock core (only RockyMounts’ Lock Cores will work, Thule® and
Yakima® locks will not) follow these steps. Unbolt the handle from the body using a 5mm allen
wrench and a 10mm open end wrench. On the back side of the lock, there is a small gold tab that
is spring loaded. Push this down with a small screwdriver, and push the lock out. A new Lock
Core can now be installed: With the key in the lock core, align the thin protruding tab with the
two arrows on the inside face of the handle. Push in until flush. Core is now installed.
Figure 1
Figure 2
Pull Up Key
Hole Side
Figure 3
OPEN
Push Down
Open End
Figure 4
CLOSED
One Year Limited Warranty
Rocky Mounts Inc. Warrants to the original purchaser that the product will be free from defects in
material and/or workmanship for one (1) year from the date of original retail purchase. Subject to
the limitations stated below, Rocky Mounts will at its own expense during the one year warranty
period repair or replace the defective component(s). The purchaser will be responsible for freight
charges to Rocky Mounts. This warranty is only applicable if the instructions are correctly
followed and the components are properly used. This warranty is not applicable if the defect is
caused by normal wear and tear or exposure, the component(s) is damaged from misuse, abuse,
fire, accident, alteration, mixing third party components with the system and/or unlawful
operation of the vehicle. Rocky Mounts Inc. cannot and does not assume responsibility for any
damages to any property arising out of the improper attachment to a vehicle or a bicycle to the
system or use of its products. This limited warranty applies to Rocky Mounts products and not to
the products used in conjunction with Rocky Mounts products.
This warranty is in lieu of all other warranties, expressed or implied, and does not
cover consequential damages of any kind arising from the use or misuse or Rocky Mounts
products.
ROCKY MOUNTS DOES NOT AUTHORIZE ANY PERSON TO ASSUME, ON
ITS BEHALF, ANY OTHER OBLIGATION OR LIABILITY.