1
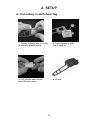
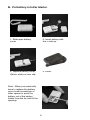
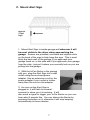
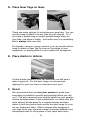
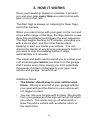
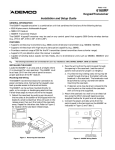
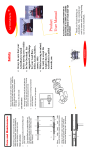
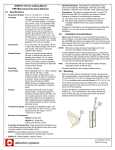
User & Setup Guide
2
TABLE OF CONTENTS
1. Box Contents
2. Setup
3. How It Works
4. Warranty & Legal
5. Product Registration & Feedback
3
1. BOX CONTENTS
•
User & Setup Guide
•
8.5" x 11" LED Alert Sign with Internal Wireless
Control Module
•
Two (2) Water-resistant Gear Tags, including
batteries
•
One (1) InCar Alerter, including battery
•
110V AC/12V DC Transformer
•
Mounting Screws/Mollies (for Sign)
•
HeadsUp Stickers
4
2. SETUP
A. Put battery in each Gear Tag.
1. Gently stretch silicon cover!
to remove plastic case.!
2. Insert battery with
the + side up.
3. Put plastic case back!
into silicone cover.
4. Done.
5
B. Put battery in InCar Alerter.
1. Slide open battery!
cover.!
2. Insert battery with
the + side up.
3. Replace battery cover.!
Option: slide on visor clip.
4. Done.
Note: When you eventually
have to replace the battery,
use a small screwdriver or
letter opener to push the
battery out of the battery
holder from the far side of the
opening:
6
C. Mount Alert Sign.
approx.
4 feet
high
1. Mount Alert Sign to inside garage wall wherever it will
be most visible to the driver when approaching the
garage. Screws are provided, and there are keyhole slots
on the back of the sign to help hang the sign. This is most
likely the back wall of the garage if you approach your
garage head on, or the side wall if you approach your garage
from the side - just put it where you normally look as you are
pulling into the garage.
2. With the InCar Alerter in the garage
with you, plug the Alert Sign into a wall
outlet using the enclosed power
adapter. Use an extension cord for the
power adapter if your outlet is further
away than the cord on the adapter.
3. As soon as the Alert Sign is
plugged in, it will flash for several
seconds to show you it is working. It will
also send a signal to trigger your InCar Alerter so you can
hear what it sounds like. You can silence the Alerter by
pressing the button on it; otherwise it will stop beeping
automatically in three minutes.
7
D. Place Gear Tags on Gear.
There are many options for mounting your gear tag. You can
use the strap to attach it to any tube on your bicycle. Or if
you have a saddle bag or cargo bag that always stays on
your bike, just place it inside. Just make sure it is something
that is always with your bike.
For kayaks, canoes or cargo carriers, you can use the silicon
strap to attach a Gear Tag to a bar on the inside of your
equipment, or simply place it in your watercraft storage bin.
E. Place Alerter in Vehicle.
Put the Alerter device in your car wherever you will hear it
when it goes off. For the best range, we recommend
clipping it to your sun visor or rearview mirror post.
F. Done!
We recommend that you test your system to make sure
everything is installed correctly and working before you rely
on it. The alert range will vary slightly based on your garage,
vehicle and placement of the components, so make sure you
drive several blocks away for a couple minutes and then
return to test the system and confirm the alert range for your
set-up. (Important Note: Wait 3 minutes after plugging in
your sign to do your test and at least 3 minutes between any
subsequent tests for the system to fully reset each time.)
8
3. HOW IT WORKS
Once your HeadsUp System is installed, it protects
you and your gear every time you return home with
gear on your roof rack.
The Alert Sign is always on, listening for Gear Tags
and InCar Alerters.
When you return home with your gear on the roof and
come within range of the Sign, the Sign detects a new
Gear Tag and Alerter and triggers the alert sequence.
The Sign begins flashing for 3 minutes, providing you
with a visual alert, and the InCar Alerter starts
beeping to alert you inside your vehicle. You can
silence the Alerter at any time by pressing its button if
you want to stop the beeping before it stops
automatically in 3 minutes.
The visual and audio alerts remind you to unload your
roof-mounted gear before you drive in to the garage.
And it works every time, saving you from potentially
thousands of dollars of damage to your gear, rack,
vehicle and garage. Smart move!
Additional Notes
•
The Alerter should stay in your vehicle at all
times. Driving in and out of your garage without
your gear with just the Alerter in your vehicle will
not trigger an alert.
•
You can ride your bicycle with its Gear Tag directly
from your garage and the sign will not go off when
you return. The alerts only go off when both a
Gear Tag and a vehicle with an Alerter return at
the same time.
9
•
If you store your bicycles, kayaks or other gear
with Gear Tags in your garage, the Sign detects
that they are present and ignores them for
deciding when an alert is needed. A Gear Tag and
Alerter need to both be away from your Alert Sign
for more than 30 seconds to trigger an alert when
you return home.
•
Your Gear Tags should always be with the gear
you want to protect. A Tags can easily be
mounted on your bike by wrapping the silicon
strap around any tube on your bike as shown in
the Installation instructions above. If you have a
saddle bag that always stays on your bike, you
can just tuck a Gear Tag in that instead. For
kayaks, canoes or cargo carriers, you can either
use the silicon strap to attach a Gear Tag to the
inside of your gear, or simply place it in your
watercraft storage bin. The silicon housing on the
Gear Tag is water-resistant, but if your tag is likely
to sit in water for extended periods, we suggest
placing it in a zip-seal bag first.
•
If, for some reason, you are carrying your gear
with a Gear Tag in your trunk instead of on the roof
rack, the alert will still go off (although the alert
range may be reduced). The Alert Sign senses
when you return home in your vehicle with your
gear, whether or not the gear is on the roof.
•
More than one vehicle with a roof rack? No
problem: extra InCar Alerters are available
individually at headsupsystems.com and at many
retailers that carry the HeadsUp System.
•
More than two bicycles or other gear you want
to protect? No problem: extra Gear Tags are
available individually at headsupsystems.com and
at many retailers that carry the HeadsUp System.
10
•
One HeadsUp System can support up to 100 Gear
Tags and Alerters. This means it works not only
for households with multiple roof racks and lots of
gear, but even for condos or apartment buildings
with multiple athletes. Just mount one sign in the
condo/apartment garage, and each resident can
purchase Alerters and Gear Tags separately.
•
The batteries in your Gear Tags and InCar Alerter
are expected to last a minimum of one year with
normal usage. The HeadsUp System includes a
low-battery warning feature that lights a lowbattery LED on the Alert Sign when a Gear Tag or
Alerter with a low battery is within range. This way
you’ll know to replace the battery before your
system stops working.
•
Please do not remove the battery from a Tag or
Alerter unless you are replacing it with a fresh,
new battery. The battery use meter is reset each
time a battery is replaced, so if you use an old
battery, the low-battery indicator will not work
properly.
•
If you are testing your system to verify the range
and function, the tag and alerter must be
completely removed from the range of the sign (at
least 500 feet away in open air) for more than 30
seconds to trigger then sign upon returning home.
Also, please wait at least three minutes between
tests for the system to reset.
•
See the FAQ section or Contact Us on
headsupsystems.com if you have any questions
about your new HeadsUp System and how it
works. We’re happy to help!
11
4. WARRANTY & LEGAL
If any part of your system stops working within 12
months from the time of purchase, we’ll repair or
replace it at no charge.
The HeadsUp System has undergone rigorous
product testing, and 100% of units are QA tested after
assembly, so you are unlikely to have a problem.
However, if you do, please first email us at
[email protected] or contact us at
headsupsystems.com (look for the Contact Us link)
with a brief description of the problem in case we can
solve it without you having to return anything to us. If
something does need to be returned, you can return it
to us at the address on on the last page of this guide,
along with a copy of your purchase receipt. Your
receipt is not required if you purchased it directly from
us or previously registered your product with us on
our website. We like happy customers, so we'll do
everything we can to make it right.
The legal details:
Limited Warranty. HeadsUp Systems represents and
warrants that the Products sold pursuant to this Agreement,
when used in accordance with the instructions in the
Documentation, will operate as described in the
Documentation in all material respects for a period of one (1)
year from shipment or purchase (“Warranty Period”). The
foregoing warranty does not apply to any Products which have
been subject to Buyer ’s own misuse, unauthorized
modifications, neglect, improper testing, attempts to repair, or
by accident, fire or other hazard while such materials were in
the possession or control of Buyer. HeadsUp Systems shall, at
its own expense and as its sole obligation and Buyer’s
exclusive remedy for any breach of this warranty, repair or
replace the defective Products reported to HeadsUp Systems
by Buyer in writing during the Warranty Period.
Disclaimer of Warranties. EXCEPT AS EXPRESSLY SET
FORTH IN THIS AGREEMENT, HEADSUP SYSTEMS MAKES
NO WARRANTY IN CONNECTION WITH THE SUBJECT
MATTER OF THIS AGREEMENT AND HEREBY DISCLAIMS
ANY AND ALL IMPLIED OR STATUTORY WARRANTIES,
12
INCLUDING ALL IMPLIED WARRANTIES OF TITLE, NONINFRINGEMENT, MERCHANTABILITY AND FITNESS FOR A
PARTICULAR USE OR PURPOSE REGARDING SUCH
SUBJECT MATTER. To the extent that a party may not, as a
matter of applicable law, disclaim any implied warranty, the
scope and duration of such warranty shall be the minimum
permitted under such law.
Disclaimer. Although the products and services HeadsUp
Systems sells are some of the best in the industry, HeadsUp
Systems does not guarantee or promise that a user will avoid
accidents or collisions while using its products. HeadsUp
Systems makes no claims as to the accuracy or functionality of
any of its products and is not responsible for damages or injury
resulting from the use of any of its products. The operator of a
motorized vehicle is responsible for his or her own actions and
the products of HeadsUp Systems are not intended in any way
to be a substitute for careful and cautious driving and should
only be used as a supplemental aide. The user assumes all
responsibility for the use of HeadsUp Systems’ products.
Regulatory Notices.
Model: EGAS Beacon
FCC ID: Z9B EGAS Beacon
IC: 10011A EGAS Beacon
Model: EGAS Alerter
FCC ID: Z9B In Vehicle Obstacle Alerter
IC: 1001A In Vehicle Alerter
Model: EGAS Sign
FCC ID: Z9B Visual Indicator
IC: 10011A Visual Indicator
These devices comply with part 15 of FCC rules.
Operation is subject to the following two conditions:
(1) These devices may not cause harmful interference and
(2) These devices must accept any interference received,
including interference that may cause undesired operation.
Notice to Users: This equipment has been tested and found to
comply with the limits for a Class A digital device, pursuant to
Part 15 of the FCC Rules. These limits are designed to provide
reasonable protection against harmful interference when the
equipment is operated in a commercial environment. This
13
equipment generates, uses, and can radiate radio frequency
energy and, if not installed and used in accordance with the
instruction manual, may cause harmful interference to radio
communications. Operation of this equipment in a residential
area is likely to cause harmful interference in which case the
user will be required to correct the interference at their own
expense.
FCC Statement: This device complies with part 15 of the FCC
Rules. Operation is subject to the following two conditions: (1)
This device may not cause harmful interference, and (2) this
device must accept any interference received, including
interference that may cause undesired operation. Changes or
modifications not expressly approved by the party responsible
for compliance could void the user's authority to operate the
equipment. The antenna(s) used for this transmitter must not
be co-located or operating in conjunction with any other
antenna or transmitter.
This equipment has been tested and found to comply with the
limits for a Class B digital device, pursuant to Part 15 of the
FCC Rules. These limits are designed to provide reasonable
protection against harmful interference in a residential
installation. This equipment generates, uses and can radiate
radio frequency energy and, if not installed and used in
accordance with the instructions, may cause harmful
interference to radio communications. However, there is no
guarantee that interference will not occur in a particular
installation. If this equipment does cause harmful interference
to radio or television reception, which can be determined by
turning the equipment off and on, the user is encouraged to try
to correct the interference by one or more of the following
measures:
- Reorient or relocate the receiving antenna.
- Increase the separation between the equipment and receiver.
- Connect the equipment into an outlet on a circuit different
from that to which the receiver is connected.
- Consult the dealer or an experienced radio/TV technician for
help.
Antenna Statement: Only the antenna supplied with this unit
may be used. Any attempt to modify this antenna or substitute
a different antenna by any means shall void the warranty and
will void the FCC approval to operate this equipment. In the
event an antenna is broken, a replacement antenna may be
obtained by contacting the Product Support Center listed in the
warranty section of this manual.
14
CE Statement: This equipment has been tested and found to
comply with the limits of the European Council Directive on the
approximation of the law of the member states relating to
electromagnetic compatibility (89/336/EEC) according to EN
55022 Class B.
Industry Canada Equipment Notice: This device complies with
Industry Canada license-exempt RSS standard(s). Operation is
subject to the following two conditions: (1) this device may not
cause interference, and (2) this device must accept any
interference, including interference that may cause undesired
operation of the device.
En Français:
Le présent appareil est conforme aux CNR d'Industrie Canada
applicables aux appareils radio exempts de licence.
L'exploitation est autorisée aux deux conditions suivantes : (1)
l'appareil ne doit pas produire de brouillage, et (2) l'utilisateur
de l'appareil doit accepter tout brouillage radioélectrique subi,
même si le brouillage est susceptible d'en compromettre le
fonctionnement.
The Industry Canada certification identifies certified equipment.
This certification means that the equipment meets certain
telecommunications network protective, operational and safety
requirements as prescribed in the appropriate Terminal
Equipment Technical Document(s). The Department does not
guarantee the equipment will operate to the user's satisfaction.
Before installing this equipment, users should ensure that it is
permissible to be connected to the facilities of the local
telecommunications company. The equipment must also be
installed using an acceptable method of connection. The
customer should be aware that compliance with the above
conditions may not prevent degradation of service in some
situations. Repairs to certified equipment should be
coordinated by a representative designated by the supplier.
Any repairs or alterations made by the user to this equipment,
or equipment malfunctions, may give the telecommunications
company cause to request the user to disconnect the
equipment.
Users should ensure, for their own protection, that the
electrical ground connectors of the power utility, telephone
lines and internal metallic water pipe system, if present, are
connected together. This presentation may be particularly
important in rural areas. Caution: Users should not attempt to
make such connections themselves, but should contact the
appropriate electric inspection authority or electrician, as
appropriate.
15
5. PRODUCT REGISTRATION & FEEDBACK
Product Registration
Please take a moment to visit headsupsystems.com
to register your product – just look for the Register
link on the home page. If you purchased your
HeadsUp System directly from our website, you are
already registered and don’t need to register again.
We want to hear your feedback!
Please let us know what you think about the
HeadsUp System and how it works for you.
Email your comments and suggestions to
[email protected] or visit the
Contact Us page at headsupsystems.com and
tell us your thoughts. We appreciate and value
your feedback.
HeadsUp Systems
283 Columbine Street, Unit 164
Denver, CO 80206
We Get It Because We’re Out There Too.
HeadsUp Systems was founded by two guys in
Colorado who are crazy passionate about outdoor
sports, solving problems and yes, even customer
service. We pledge to make it right: if you have a
problem or question about your order or your
HeadsUp System, contact us and we’ll make it right.
We are proud to say that HeadsUp Systems are
designed in Colorado.
www.headsupsystems.com
Copyright © 2012, HeadsUp Systems. All rights reserved.
16