1
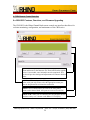
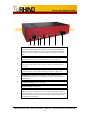
RHINO® Channel Bank
Users Manual
Models:
•CB24-FXS: T1, 24 FXS analog channels,
110, 220VAC, -48VDC
•CB24-FXO: T1, 24 FXO analog channels,
110, 220VAC, -48VDC
•CB24-MOD: T1, 4-24 FXS/FXO analog channels,
110, 220VAC, 48VDC
Rhino Equipment Corp. is proud to manufacture our products in the U.S.A..
Specifications are subject to change without notice.
© 2006 Rhino Equipment Corp. All rights reserved. Printed in U S America 1/2006 PN 031-00006
Rhino® is a registered trade mark of Rhino Equipment Corp.
Rhino Equipment Corp. • 8240 S. Kyrene Rd. • Suite 107 • Tempe, AZ 85284 • (480) 940-1826
1
1. PREINSTALLATION............................................................................................................................... 4
1.a Warranty ............................................................................................................................................... 4
1.b Standards .............................................................................................................................................. 4
1.c Surge Protection.................................................................................................................................... 5
2. INSTALLATION ...................................................................................................................................... 6
2.a Unpacking the Rhino Channel Bank..................................................................................................... 6
2.b Site Selection ........................................................................................................................................ 6
2.c Physical Installation.............................................................................................................................. 7
2.d Power Connection ................................................................................................................................ 8
3. T1 INSTALLATION.................................................................................................................................. 9
3.a Connecting the T1................................................................................................................................. 9
3.b Connecting the 24 Analog Channels .................................................................................................. 10
3.c Rhino LCD Screen and What It Means .............................................................................................. 11
4. RHINO CHANNEL BANK CONFIGURATION .................................................................................. 14
4.a AUTO T1 Configuration .................................................................................................................... 14
4.b Manually Configuring the T1 ............................................................................................................. 14
4.c Signaling Protocols............................................................................................................................. 18
4.d Configuring your Rhino and Asterisk................................................................................................. 19
4.e Configure the Analog Channels.......................................................................................................... 20
4.f System Configuration Settings and Status .......................................................................................... 23
4.g Alarms ................................................................................................................................................ 24
4.h Tests ................................................................................................................................................... 25
5. The LEDs and what they mean................................................................................................................. 26
5.a LED Status and Condition Codes ....................................................................................................... 26
5.b Power LED ......................................................................................................................................... 26
5.c LOS (Loss of Signal) Indicator – The first LED in the row of seven. ................................................ 26
5.d T1 Network Framing Indicator – The second LED in the row of seven............................................. 27
5.e Signaling Indicator – The third LED in the row of seven................................................................... 27
5.f Network Alarm Status Indicator – the fourth LED in the row of seven.............................................. 28
5.g Loop Back Indicator – the fifth LED in the row of seven. ................................................................. 28
5.h Console Indicator – the sixth LED in the row of seven...................................................................... 28
5.i Heartbeat Indicator – the seventh LED in the row of seven. ............................................................... 28
6. CB24 Remote Control Interface ............................................................................................................... 29
6.a CB24 RCI Features, Functions, and Firmware Upgrading ................................................................. 29
6.b CB24 Upgrading firmware ................................................................................................................. 30
Rhino Equipment Corp. • 8240 S. Kyrene Rd. • Suite 107 • Tempe, AZ 85284 • (480) 940-1826
2
Thank you for purchasing a RhinoTM Channel Bank. For unparalleled performance
and years of operation please follow the instructions provided in this user manual.
Rhino Equipment Corp. • 8240 S. Kyrene Rd. • Suite 107 • Tempe, AZ 85284 • (480) 940-1826
3
1. PREINSTALLATION
The Rhino is easy to setup and use, which we hope will make your telephony life easier!
Please spend a few minutes reviewing these instructions to ensure a successful
installation.
1.a Warranty
The Rhino Channel Bank is covered by a 5 year limited factory warranty. The warranty
statement is available on the Rhino CD-ROM, the Rhino Public FTP, or by request.
Contact [email protected] to request a copy.
Please note that improper installation or acts of nature are not covered by this
warranty.
1.b Standards
This equipment complies with Part 68 of the FCC Rules. The FCC Part 68 Label is
located on the bottom of the enclosure. This label contains the FCC Registration Number
for this equipment. If requested, this information must be presented to your telephone
company.
Connection to the telephone network should be made by using standard modular
telephone jacks, type RJ48C. The plug and/or jacks used must comply with FCC Part 68
Rules.
OPERATION
T1 CSU Interface
FIC
04DU9-1SN
04DU9-1ZN
SOC
6.0N
(USOC) JACK
RJ48C
If this telephone equipment causes harm to the telephone network, the telephone
company will notify you in advance that temporary discontinuance of service may be
required. But if advance notice isn’t practical, the telephone company will notify the
customer as soon as possible. Also, you will be advised of your right to file a complaint
with the FCC if you believe it is necessary.
The telephone company may make changes in its facilities, equipment, operations or
procedures that could affect the proper functioning of your equipment. If they do, you
will be notified in advance in order for you to make necessary modifications to maintain
uninterrupted service.
Rhino Equipment Corp. • 8240 S. Kyrene Rd. • Suite 107 • Tempe, AZ 85284 • (480) 940-1826
4
If trouble is experienced with this unit, please contact customer service at the address and
phone listed below. DO NOT DISASSEMBLE THIS EQUIPMENT. It does not contain
any user serviceable components.
Contact:
Attn:
Rhino Equipment Corp.
CUSTOMER SERVICE DEPT.
8240 S. Kyrene Rd. Suite 107
Tempe, AZ 85284
Ph 480-940-1826, Fax 480-961-1826
You must receive an RMA (Return Material Authorization) number from us so that your
return is handled promptly. Failure to do so may result in a lost or delayed replacement.
1.c Surge Protection
It is recommended that a surge protector or uninterruptible power supply (UPS) be
installed between the Rhino Channel Bank and the AC outlet to which it is connected.
This will help minimize damage as a result of lightning strikes and other AC line surges.
Failure to use a UPS could affect the 5 year limited warranty.
The analog connections on the Rhino are surge protected, but are not capable of lighting
strike protection (not much is!). Please note that if you are using above ground wiring on
the analog side, that this is very high risk of lighting strikes, and will damage the Rhino
internally. Please note that this phenomenon leaves very distinct and recognizable
damage characteristics and is NOT covered under the Rhino warranty!
Rhino Equipment Corp. • 8240 S. Kyrene Rd. • Suite 107 • Tempe, AZ 85284 • (480) 940-1826
5
2. INSTALLATION
2.a Unpacking the Rhino Channel Bank
The unit comes in a custom shipping box. The package contains the Rhino Channel Bank,
mounting brackets and screws, AC power cord, T1 cables, an RJ21 analog cable, and a
CD containing the most recent firmware, user interface, and version of this manual.
Please review the packing list and Quick Start guide for the exact contents of your Rhino
box.
Inspect the unit for any signs of physical damage. Report any damages to the shipper.
Keep all packaging material in the event that you need to move or ship the unit. Warranty
returns must be shipped back to Rhino Equipment Corp in the original shipping box with
included insert.
2.b Site Selection
The installation site should provide enough space for adequate ventilation and cable
placement. You need to allow 3-4 inches of space on the sides, above and below to
insure there is adequate air flow. Please note that you will require access to the front
panel red programming buttons, and LCD screen to validate the operation of your Rhino.
The selected installation site should provide a stable operating environment. The area
around the installation site should be clean and free from extremes of temperature,
humidity, shock, and vibration. The operating temperature should be kept below 100
degrees F (38° C).
The Rhino channel bank is designed to be used on T1 (DS1) service only. Connecting it
to any other type of telecommunications service or services will void the warranty and
could cause damage to the network of the provider of the non-approved service or
services.
All wiring done external to the Rhino channel bank should follow the guidelines as set
forth by the National Electrical Code. See section 1.b and 3.a.
Rhino Equipment Corp. • 8240 S. Kyrene Rd. • Suite 107 • Tempe, AZ 85284 • (480) 940-1826
6
2.c Physical Installation
The Rhino Channel Bank is intended to be installed on the wall as a wall mounted unit, in
a standard 19 inch rack mount environment or standard 23” rack mount environment.
Failure to install the unit in one of these configurations will affect the warranty on the
unit.
The “L” brackets that came with the unit can be easily moved to reconfigure the unit to
meet the installation environment you have chosen. The brackets mount in one of three
positions on the side of the unit: wall mount in the middle two holes, 19” mount using the
front holes and the short side of the L bracket, and 23” with the two front holes and the
long side of the L bracket. Be sure to use the four included #10 black pan head Philips
screws for mounting of the L bracket to the Rhino.
If the Rhino Channel Bank is mounted to the wall, be sure to use appropriate screws
and/or fasteners suitable for mounting heavy objects. The RhinoTM channel bank weighs
just less than 15 pounds. Masonry mollies, #8 or larger wood screws, or expansion bolts
should be used. Do not attempt to install the unit on a wall which may not support the
weight of the unit.
Rhino Equipment Corp. • 8240 S. Kyrene Rd. • Suite 107 • Tempe, AZ 85284 • (480) 940-1826
7
2.d Power Connection
Early Rhino models are dedicated to AC power input at time of assembly; the later
models have a switch on the rear of the chassis to select the input power.
110V AC Installation (models with 110V AC power supply)
It is recommended that the unit be plugged into a UPS, which is then plugged into a
standard 110V AC plug (in the wall). The unit is grounded on the third prong of modern
grounded AC building wiring. This is sometimes called "Green Wire" ground. This is
the safety grounding point used by the Rhino Channel Bank 110VAC Power Supply. As
long as the unit is plugged into a properly wired 3 prong outlet the unit will be properly
grounded. Failure to use a UPS could allow lightning to damage the unit and this is NOT
covered by the warranty.
220VAC Installation (models with 220VAC power supply)
It is recommended that the unit be plugged into a UPS, which is then plugged into a
standard 220V AC plug (in the wall). The unit is grounded on the third prong of modern
grounded AC building wiring. This is sometimes called "Green Wire" ground. This is
the safety grounding point used by the Rhino Channel Bank 220VAC Power Supply. As
long as the unit is plugged into a properly wired 3 prong outlet the unit will be properly
grounded. Failure to use a UPS could allow lightning to damage the unit and this is NOT
covered by the warranty.
NOTE: Early Rhino models did not have -48V DC battery input power.
-48V DC Installation (models with -48V (negative!) DC power supply)
Note that the Rhino uses a 48V DC positive ground; hence a negative 48V DC power
supply connection is required. The back of the Rhino depicts the negative and positive
supply feeds, please match these up to your main feed power supply.
Rhino models that have both AC power and DC battery inputs can normally be powered
from AC power; if there is a power outage the -48V DC power can provide the necessary
power to the unit, as a backup power system. The -48V can also be the normal everyday
power input.
Rhino Equipment Corp. • 8240 S. Kyrene Rd. • Suite 107 • Tempe, AZ 85284 • (480) 940-1826
8
3. T1 INSTALLATION
3.a Connecting the T1
The Rhino Channel Bank T1 (DS1) interface is an industry-standard RJ48C eight pin
connector with its connections described below. The T1 is usually connected to the
telecommunications carrier demarcation point. This is the point at which the carrier
terminates their T1 at the customer's premise. Use the included T1 cable to connect the
unit to the demarcation point. In some cases additional cable must be run from the
carrier’s demarcation point to the customer’s suite or nearby “phone room”.
T1 Line Interface on RJ48C - 8 pin Modular T1 jack
Pin Number
1
2
3
4
5
6
7
8
Signal
Receive Ring
Receive Tip
Not connected
Transmit Ring
Transmit Tip
Not connected
Not connected
Not connected
To/From What?
Coming From T1 (Network)
Coming From T1 (Network)
Going To T1 (Network)
Going To T1 (Network)
The maximum cable length for a T1 Network (DS1-1) connection is suggested as
follows. Reliable T1 cabling distances depend on which type of cable is used. It is
strongly recommended that only shielded cable be used as part of any T1 installation.
For best results use: shielded 22 AWG T1 cable (ABAM 600).
ABAM 600 T1 Cable
T1 Network (CSU)
can go as far as 6,000 feet
ABAM 600 Cable Specifications:
Nominal Impedance:
100 ohms +/- 5% at 772 kHz.
Insertion Loss:
Better than 7 dB per 1,000 feet at 1.544 MHz.
Better than 5 dB per 1,000 feet at 772 kHz.
Better than 85 dB per 1,000 feet at 1.544 Mhz.
Better than 90 dB per 1,000 feet at 772 kHz.
Better than 80 dB per 1,000 feet at 1.544 Mhz.
Better than 85 dB per 1,000 feet at 772 kHz.
Transmit and receive pairs are individually
shielded with aluminum/polyester tape.
Far-End Crosstalk:
Near-End Crosstalk:
Shields:
Rhino Equipment Corp. • 8240 S. Kyrene Rd. • Suite 107 • Tempe, AZ 85284 • (480) 940-1826
9
If you used unshielded cable you could experience problems. When this type of cable is
used, transmit and receive pairs are usually run in separate cables to avoid crosstalk
which often occurs in unshielded cables. Failure to use separate cable bundles for
transmit and receive can result in the CSU LINE port clocking onto itself (due to
crosstalk) with as little as 10 feet of un-terminated (unshielded) telephone cable attached.
The CSU can thus show a normal framed status when the far end of the telephone wiring
is actually disconnected. Again, this is due to crosstalk between pairs in the same cable
bundle. This is true of any CSU installation using any kind of unshielded twisted pair
cable.
Rhino Included T1 Cable
Rhino to Network - 7 feet
Connectors
RJ48C to RJ48C
3.b Connecting the 24 Analog Channels
The Rhino Channel Bank has a 25-Pair Female Telephony Connector. This connector is
on the back of the unit. To connect to it, use a 25 pair cable with a Standard "D" Style 50
Pin Telephone Wiring Connector with RJ-21X wiring jack (punch down block with 25
pair modular female connector in the side.) For your convenience a cable of this type
comes with the Rhino Channel Bank.
Pin Location
26
1
27
2
*
*
*
49
24
Function
Tip Channel 1
Ring Channel 1
Tip Channel 2
Ring Channel 2
*
*
*
Tip Channel 24
Ring Channel 24
Note: The Rhino channel bank utilizes only 24 pair of the available 25 pair in the analog
cable assembly.
Rhino Equipment Corp. • 8240 S. Kyrene Rd. • Suite 107 • Tempe, AZ 85284 • (480) 940-1826
10
3.c Rhino LCD Screen and What It Means
The Rhino Channel Bank is equipped with an LCD screen which is used to display the
signaling bits (the A and B bits), ringing and other status conditions. This status is
displayed in real-time (within a few milliseconds) as the status occurs.
The format of the display of these bits is as follows:
Rx: XXXXXXXXXXXXXXXXXXXXXXXX
Tx: XXXXXXXXXXXXXXXXXXXXXXXX
Where “X” can be 1, 0, A, B, b, R, L, n, -, r, p, d, P, F, i.
The top row of digits displays what the Rhino Channel Bank is receiving from the
network. The bottom row of digits displays what the RhinoTM Channel Bank is
transmitting out to the network. Channel one is to the far left.
FXS LCD Characters
The following key defines the FXS mode signaling bits as seen when running in
Immediate (IMMD), Wink (WINK), Direct Inward Dial (DID1, DID2, DID3), and
Ground (GRND) start modes.
1
0
A
B
R
r
P
d
A “1” means both the “A” and “B” bits are 1.
A “0” means both the “A” and “B” bits are 0.
An “A” means the “A” bit is 1 and the “B” bit is 0.
A “B” means the “B” bit is 1 and the “A” bit is 0.
An “R” means the Rhino is applying ring voltage to the analog channel.
An “r” means that the Rhino is generating ringback to the calling party
An “-“ means that the Rhino is in the ring mode, but not ringing or ringback
A “P” is present when in PowerDown mode
Channel (or DS0) is selected as a data channel
Rhino Equipment Corp. • 8240 S. Kyrene Rd. • Suite 107 • Tempe, AZ 85284 • (480) 940-1826
11
The following key defines the FXS signaling bits as seen when running in Loop (LOOP)
and Reverse Polarity (REVP) start mode.
B
L
n
r
R
i
d
A “B” means both the “A” and “B” bits are 0. (The channel is On-hook)
An “L” means both the “A” and “B” bits are 1. (The channel is Off-hook)
An “n” means there is no ring (Caller ID and FSK is passed at this time)
An “r” represents ring-back (inaudible ring).
An “R” means the channel bank is applying ring voltage to the analog channel.
An “i” means the channel is inactive and awaiting for coordination.
Channel (or DS0) is selected as a data channel
The following are miscellaneous signaling characters and in most cases are not present.
p A “p” represents a hardware error.
F An “F” represents a hardware error.
FXO LCD Characters
The following key defines the FXO mode signaling bits as seen when running in
Immediate (IMMD), Wink (WINK), and Ground (GRND) start modes.
1
0
A
B
R
r
i
d
A “1” means both the “A” and “B” bits are 1.
A “0” means both the “A” and “B” bits are 0.
An “A” means the “A” bit is 1 and the “B” bit is 0.
A “B” means the “B” bit is 1 and the “A” bit is 0.
An “R” means the Rhino senses a ring voltage to the analog channel.
An “r” means that the Rhino does not sense ring voltage, but believes the ring cycle
is still in timed limits
The Rhino is complete with the call and awaits a T1 “clear” signaling bit sequence
Channel (or DS0) is selected as a data channel
Rhino Equipment Corp. • 8240 S. Kyrene Rd. • Suite 107 • Tempe, AZ 85284 • (480) 940-1826
12
The following key defines the FXO signaling bits as seen when running in Loop (LOOP)
and Reverse Polarity (REVP) start mode.
B
1
n
R
i
L
b
d
A “B” means the “B” bit is 1 and the “A” bit is 0. (The channel is On-hook)
An “1” means both the “A” and “B” bits are 1. (The channel is Off-hook)
An “n” means there is no ring (Caller ID and FSK is passed at this time)
An “R” means the channel bank is applying ring voltage to the analog channel.
The Rhino is complete with the call and awaits a T1 “clear” signaling bit sequence
An “L” means there is no phone line attached to that channel.
A “b” means that reverse polarity has been sensed in REVP
Channel (or DS0) is selected as a data channel
The following are miscellaneous signaling characters and in most cases are not present.
p A “p” represents a hardware error.
F An “F” represents a hardware error.
Rhino Equipment Corp. • 8240 S. Kyrene Rd. • Suite 107 • Tempe, AZ 85284 • (480) 940-1826
13
4. RHINO CHANNEL BANK CONFIGURATION
The first time you power on the Rhino, it will auto configure itself to your T1
environment. Please note that an operational T1 is needed for this phase to complete.
However, if for some reason that does not successfully complete, you can initiate an
AutoT1 at any time.
4.a AUTO T1 Configuration
The AUTO T1 Configuration of the Rhino Channel Bank makes it the easiest channel
bank on the market to set up and configure. Simply plug in the unit and it will self
configure according to what the T1 has been set up for. If the T1 is not yet turned up by
the carrier simply go into Configure and then select Auto T1. The unit will reconfigure
itself.
To Auto Configure select the red button under the word “Configure”. You will then see
the following screen:
Press the red button under the word “AutoT1”, and then press the fourth red button to
confirm the operation.
Watch the display as the Rhino configures itself! It’s that easy!!
4.b Manually Configuring the T1
If the T1 is not connected (or T1 carrier is not found) the following screen will appear:
Rhino Equipment Corp. • 8240 S. Kyrene Rd. • Suite 107 • Tempe, AZ 85284 • (480) 940-1826
14
If, however, the T1 is connected and T1 carrier is recognized by the unit you will see the
Rhino go through the detection screen and then the following screen will be seen,
signifying that all went well with the automatic configuration. Please note that the screen
below will show your particular environment – below is an ESF and LOOP configuration
result:
Programming the Rhino Channel Bank is done with the four red buttons just below the
LCD screen. The buttons are “locked” in order to safeguard an accidental change in the
configuration. In order to “unlock” the programming buttons you will need to press them
in the following sequence: 1 3 2 4 (counting from the left). As you push each one you
will see an asterisk (*) appear above each button. If you make a mistake wait for a short
while as the password feature resets itself and you can then try again.
Once you press the four programming buttons in the correct order (1-3-2-4) as described
above you will see the following screen. All configurations are easily made using the
four red buttons which are located just below the LCD screen. The programming screen
is password protected so that unintentional changes are not accidentally made. Please
refer to section 3.d. for unlocking instructions.
(Note that the third display line shows the individual channel configuration)
Now you are ready to manually configure the Rhino Channel Bank.
Rhino Equipment Corp. • 8240 S. Kyrene Rd. • Suite 107 • Tempe, AZ 85284 • (480) 940-1826
15
Menu Items
Transmit and Receive Status Lines
When the keys are unlocked this line alternates between the
Channel Configuration (Modular Configuration Shown with FX(S)
and FX(O) Quad Cards) and the Signaling Configuration for each
channel.
This line shows the Firmware Version (2.00 in this case) and the
Hardware Configuration (Modular in this case, would otherwise
show FXS or FXO).
This line shows the Signaling and Framing Configuration (In this
example it is WINK signaling with ESF framing).
Configuring the T1 manually is very easy. Simply go to the “Configure” menu and press
the red button under the word “T1” and you will get the following screen:
From here the first red button (the one on the left) will move the cursor to the Next Field
(Nxt Fld). Pressing the second red button will Change the Value of that field (Chg Val).
By using the first and second red buttons you can navigate between each field and scroll
through each available setting.
Once your changes have been made you MUST save them by pressing the third red
button. If you do NOT save them – the changes will NOT go into effect. To exit this
area without saving OR after saving press the fourth red button to go back to the
previous screen.
The following is a description of each field.
Rhino Equipment Corp. • 8240 S. Kyrene Rd. • Suite 107 • Tempe, AZ 85284 • (480) 940-1826
16
Navigation and configuration menu items.
Clock: This is where you set where the T1 timing is derived.
SLAVE means the Rhino Channel Bank will gets it's timing from
the T1. MASTER means the Rhino Channel Bank will supply
master timing to the device at the other end of the T1.
Coding: This can be AMI or B8ZS. In most D4 (SF) installations
this will be set to AMI and in almost all ESF installations this will
be B8ZS.
Buildout: This is how far the Rhino Channel Bank is away from
the carrier's demarc point (in feet). If you are within 133 feet of the
demarc then you won't need to change this setting.
Proto: This references the start protocol you want to use.
Available options are Wink, Immediate, Loop, Ground, DID1,
DID2, and DID3. If you are setting up DID service you will need
to call your provider for tech support so that you can make sure all
the timing parameters are set up correctly. Different carriers
approach DID protocols differently. The Rhino Channel Bank is
flexible enough to handle virtually any DID protocol. For a list of
protocols refer to section 4.c.
Frame: This is the framing on the T1. It can be D4 (which is SF)
or it can be ESF.
Gain: This will adjust analog line volume, should not be adjusted
in most situations.
Slot: This references the "channels" on the T1. There are 24 of
them. You can configure ALL of them or you can step through
each one and configure each channel separately. (Keep in mind
you are configuring T1 channels - NOT analog channels in this
screen).
Rhino Equipment Corp. • 8240 S. Kyrene Rd. • Suite 107 • Tempe, AZ 85284 • (480) 940-1826
17
4.c Signaling Protocols
The following is a list of T1 signaling protocols and their descriptions.
Immediate Start (IMMD)
Immediate Start is the oldest of the start protocols. It is also the simplest to
understand. The “transmit” from the network is connected to the “receive” of the
channel bank. The “transmit” of the channel bank is connected to the “receive”
of the network. Immediate Start begins by having one end of the circuit (in our
example the network), on the same channel, seize the channel by going off hook.
This off-hook condition results in the network transmitting AB=11. The channel
bank recognizes the seizure and begins ringing the near end channel. When the
phone is answered the channel bank transmits back to the network AB=11.
Wink Start (WINK)
Wink Start is a very common start protocol because of its inherent “confirming”
characteristic. Like Immediate Start the network seizes the line by sending
AB=11. The channel bank then “winks” back at the network by sending a
momentary AB=11. This “confirms” to the network that the seizure was
recognized. The channel bank rings the phone corresponding to the seized
channel. When the phone is answered the channel bank sends the network
AB=11 indicating the call was answered. Likewise, when a near end phone goes
off-hook the channel bank seizes the channel on the T1 by sending AB=11. The
network responds by “winking” with a momentary AB=11. The network sends
AB=11 after the call has been answered at the far end.
Direct Inward Dialing (DID)
DID is a telco provided technique that allows an outside party to call an
extension in a PBX directly, by dialing an ordinary telco telephone number. The
signaling behavior is similar to Wink Start, with three different DID protocols
supported. It is best to try each one and see which fits your particular installation
the best.
Loop Start (LOOP)
Loop Start works similar to wink start except the A and B bits are used a bit
differently (no pun intended). One of the bits is used to signify ringing and the
other bit is used to signify on-hook or off-hook.
Ground Start (GRND)
Ground Start works similar to loop start with one exception. The network “A”
bit is used differently to indicate a call is starting or a call is ending.
Rhino Equipment Corp. • 8240 S. Kyrene Rd. • Suite 107 • Tempe, AZ 85284 • (480) 940-1826
18
Reverse Polarity (REVP)
Reverse Polarity works similar to Loop start. In some situations signaling call
answer and disconnect status is a problem on analog voice circuits (FXO). When
circuits supporting reverse polarity are available, the signaling problem can be
solved by sensing reverse polarity and toggling the status of the signaling bits
appropriately.
4.d Configuring your Rhino and Asterisk
Configuring your Rhino channel bank to work with Asterisk is easy. First you will need
to make sure that you have the proper signaling configured in Asterisk before connecting
and powering on the channel bank.
If you are using an FXS channel bank Asterisk will need to be configured with fxols
(zaptel.conf) and fxo_ls (zapata.conf). If you are using an FXO channel bank your
Asterisk signaling will be fxsks (zaptel.conf) and fxs_ks (zapata.conf).
After confirming this configuration connect the power and the T1 crossover cable to the
channel bank and it will Auto T1 to the signaling provided by Asterisk and configure
itself with LOOP signaling and ESF framing.
Basic Asterisk signaling setup (adjust according to your setup, modular
configuration shown):
zaptel.conf
;Span 1
span=1,0,0,esf,b8zs
;Modular unit, first card is FXO
fxsks=1-4
;Modular unit, 4 FXS cards
fxols=5-20
zapata.conf
;First 4 channels are the FXO modular card
signalling = fxs_ks
channel=>1-4
;Next 16 channels are the 4 modular FXS cards
signalling = fxo_ls
channel=>5-20
Rhino Equipment Corp. • 8240 S. Kyrene Rd. • Suite 107 • Tempe, AZ 85284 • (480) 940-1826
19
4.e Configure the Analog Channels
To configure the Analog channels press the red button under the word “Channel”. You
will then see the following screen:
(FXS Channel Configuration Screen)
(FXO Channel Configuration Screen)
Similar to T1 Config - from here the first red button (the one on the left) will move the
cursor to the Next Field (Nxt Fld). Pressing the second red button will Change the Value
of that field (Chg Val). By using the first and second red buttons you can navigate
between each field and scroll through each available setting.
Once your changes have been made you MUST save them by pressing the third red
button. If you do NOT save them – the changes will NOT go into effect. To exit this
area without saving OR after saving press the fourth red button to go back to the
previous screen.
The following is a description of each field.
Rhino Equipment Corp. • 8240 S. Kyrene Rd. • Suite 107 • Tempe, AZ 85284 • (480) 940-1826
20
Navigation and configuration menu items.
Tx Rx: This is where you set the transmit and receive gain for the
analog channel. In most cases you will not need to change this
setting.
Ring: With the Rhino Channel Bank you can custom configure the
ring cadence for every channel. There are two values for this
setting. Each value is in 100 millisecond increments. Therefore an
"ON" time of 20 is really 20X100 which is 2,000 ms - which is 2
seconds ON. A value of 40 OFF is 4 seconds OFF. This is the
default ring cadence. Some PBXs require a different type of ring
cadence and here is where you would set that.
Function: This references whether you want to use the channel for
analog voice or for data. If you select data you have nothing more
to set in this screen as that is programmed in a different screen. If
you select ANLOG then continue setting up the channel.
PwrDn: This is short for Power Down. This tells the channel to
actually remove voltage from the line when the channel goes onhook (hangs up). Many telecom devices do not disconnect the call
unless power is removed from the line. Here you can set 1, 2, 3 or
4 seconds as the duration of time that power is removed before repowering the channel.
I-Loop: This is how much current is used to drive the analog
channel. In most cases you won't need to change this setting. But
if your installation requires more or less line current for the analog
channel you can set the value here.
Channel: This references the analog "channels" on the analog side
of the Rhino Channel Bank. There are 24 of them. You can
configure ALL of them or you can step through each one and
configure each channel separately. (Keep in mind you are
configuring analog channels - NOT T1 channels in this screen).
Mode: With FXS channels LOOP start is standard for analog line,
GND-T and GND-R are for ground start with TIP taken to ground
to start, and RING taken to ground to start the analog feed.
Rhino Equipment Corp. • 8240 S. Kyrene Rd. • Suite 107 • Tempe, AZ 85284 • (480) 940-1826
21
Navigation and configuration menu items.
Tx Rx: This is where you set the transmit and receive gain for the
analog channel. In most cases you will not need to change this
setting.
Ring: With the Rhino Channel Bank you can custom configure the
ring cadence for every channel. There are two values for this
setting. Each value is in 100 millisecond increments. Therefore an
"ON" time of 20 is really 20X100 which is 2,000 ms - which is 2
seconds ON. A value of 40 OFF is 4 seconds OFF. This is the
default ring cadence. Some PBXs require a different type of ring
cadence and here is where you would set that.
Function: This references whether you want to use the channel for
analog voice or for data. If you select data you have nothing more
to set in this screen as that is programmed in a different screen. If
you select ANLOG then continue setting up the channel.
H: The “H” parameter is a hybrid parameter used for custom
changes in firmware for unique line conditions.
Ctry: Some countries require different termination electrical
characteristics and. Please select your country from the list (USA is
default).
Sprv: Supervision settings are hang-up parameters used when POTs lines
require specific hang-up supervision such as reverse polarity (REVPOL A,
B, C), line collapse (C+B8MS), and battery removal (B8MS).
Rhino Equipment Corp. • 8240 S. Kyrene Rd. • Suite 107 • Tempe, AZ 85284 • (480) 940-1826
22
4.f System Configuration Settings and Status
System: Selecting “System” from the Main Menu screen will bring up the following
screen:
Timers: Selecting “Timers” will bring up the following screen:
Here you will see the amount of current “up time” as well as the amount of “down time”
that the Rhino Channel Bank has experienced since the last Auto T1 configuration or
manual configuration. The “Last Error” and “Reset Flag” provide additional trouble
shooting information that Rhino technical support may ask for when assisting with a
trouble shooting situation. The “Rst” field will show how many times the channel bank
has reset itself and/or powered down.
NOTE: Configuring using AutoT1 will reset the “Rst” counter to 000.
Console: Selecting “Console” will bring up the following screen:
This screen gives the status of the console port – whether it is active or not (showing YES
or NO).
Baud: This is the baud rate for the serial connection between your host
computer and the Rhino Channel Bank. This field is set to 19200 and cannot be
edited.
Active: Use this to turn on and off the serial port data control port.
Rhino Equipment Corp. • 8240 S. Kyrene Rd. • Suite 107 • Tempe, AZ 85284 • (480) 940-1826
23
Data: This allows for the programming the interface specification for the DB25
connector on the back of the Rhino. You MUST have at least one DS0 selected as Data
(d) to make data flow through the data port. Selecting “Data” will bring up the following
screen:
Format: Use the ChgVal button to set the data port to the data protocol required.
Standard V.35 and RS232 are currently available.
Clock: Normal and Invert, find the setting that matched your router
Data: Data rate 56K or 64K
Self Test: Activates self test mode, need a special test shorting plug to make this
feature work.
REMEMBER to “Save” your settings before setting “Back”. Note that the
save button can become inactive if the mode is not “saveable”.
4.g Alarms
Alarms: When you select “Alarms” you will get the following screen:
This information is low level bit information available at the chip level inside the Rhino
Channel Bank. It is used only for Rhino technical support. You may be asked for one of
the code words A-F as they contain low level information useful in rare instances where
this information might be needed.
Rhino Equipment Corp. • 8240 S. Kyrene Rd. • Suite 107 • Tempe, AZ 85284 • (480) 940-1826
24
4.h Tests
Tests: When you select “Tests” you will get the following screen:
Use the Nxt Fld and Chg Val buttons as described in prior sections to navigate between
the fields and to change values as needed.
TAIS: You can manually turn ON and OFF the “Blue Alarm” condition.
This transmits an unframed all 1s condition on the T1. A carrier technical support person
may ask for this as part of testing the T1 installation.
NOTE: The T1 is NOT operational for voice or data if TAIS is left ON!!!
Loop: This gives you the ability to turn on two different loop back conditions.
NONE means that there are no loop back conditions present. The following
describes the loop back conditions you can select:
Local Loop back: This is used for testing purposes. When this is
TM
selected the LIU loopbacks the analog side of the Rhino Channel
Bank. FOR NORMAL OPERATION THIS SWITCH SHOULD BE
LEFT OFF.
Remote Loop back: This is also used for testing purposes. When this is
selected it will cause the T1 signal received from the T1 line (network) to
be transmitted back onto the T1 line. The T1 signal is sent back to the
network exactly as it is received. Since this loop back occurs before the
TM
signal gets to the internal framing circuitry the Rhino Channel Bank
makes no changes to this signal before it is transmitted.
When this is NOT selected (normal operation) the unit will detect a
remotely generated loop back code. The carrier may need to remotely
loop back the T1 for testing purposes. The carrier can also cancel the
remote loop back. To manually cancel the remote loop back momentarily select Remote Loop Back and then turn it off.
FOR NORMAL OPERATION THIS SHOULD BE OFF.
Rhino Equipment Corp. • 8240 S. Kyrene Rd. • Suite 107 • Tempe, AZ 85284 • (480) 940-1826
25
5. The LEDs and what they mean
5.a LED Status and Condition Codes
The Rhino Channel Bank has eight status lights on the front of the unit. These lights
display status and configuration information about the T1 line and the RhinoTM Channel
Bank.
There are four conditions that an LED can be in: OFF, ON, SLOW FLASH, FAST
FLASH.
When power is applied the lights will do a “dance” indicating that the unit is going
through its self test and initialization. Once the sequence is complete each light will
come alive as its representation is assessed.
After the dance and initialization the top right corner of the LCD screen will show the
framing and start protocol. Additional information is available via the LEDs as described
below.
5.b Power LED
This LED is green when the power is on.
5.c LOS (Loss of Signal) Indicator – The first LED in the row of seven.
T1 Carrier (GREEN)
Normally (when T1 carrier is detected) - solid ON
Error Modes:
TAIS is being sent - slow flash
No T1 cable is detected- fast flash
LOS (Loss of signal)- slow flash
OOF (Out of Frame and T1 carrier detected) - ON
Receiving All 1's (TAIS) - ON
BPV (Bipolar Violations) - ON
YA (Yellow Alarm) - ON
Remote Loopback (from carrier) - ON
Rhino Equipment Corp. • 8240 S. Kyrene Rd. • Suite 107 • Tempe, AZ 85284 • (480) 940-1826
26
5.d T1 Network Framing Indicator – The second LED in the row of seven.
This LED is green in color when the Rhino Channel Bank has achieved multi-frame
synchronization.
Framing (GREEN)
Normally (if synchronization is achieved) - solid ON
Error Conditions
TAIS is being sent - slow flash
No T1 cable is detected - fast flash
OOF (Out of Frame) - slow flash
Receiving All 1's (TAIS) - slow flash
BPV (Bipolar violations) - fast flash
YA (Yellow Alarm) - ON
Remote Loopback (from carrier) - ON
5.e Signaling Indicator – The third LED in the row of seven.
This LED reports when all timeslots are configured with the same start protocol
(signaling).
Signaling (GREEN)
Normal - solid ON if all slots are same signaling,
OFF if at least one is different.
Error Conditions:
TAIS is being sent- slow flash
LOS (Loss of Signal) - fast flash
OOF (Out of Frame) - fast flash
Remote Loopback (from carrier) - fast flash
Rhino Equipment Corp. • 8240 S. Kyrene Rd. • Suite 107 • Tempe, AZ 85284 • (480) 940-1826
27
5.f Network Alarm Status Indicator – the fourth LED in the row of seven.
This LED indicates the presence of an alarm condition. If this LED is OFF there is no
alarm condition on the T1. If this LED is red in color there is an incoming alarm
condition on the T1 line.
Alarm Status (RED)
Normal - solid OFF
Error Modes
No T1 cable detected - fast flash
LOS (Loss of Signal) - ON
OOF (Out of Frame) - ON
Receiving All 1's (TAIS) - ON
BPV (Bipolar violations) - ON
YA (Yellow Alarm) - ON
Remote Loopback (from carrier) - fast flash
5.g Loop Back Indicator – the fifth LED in the row of seven.
Loop Back (RED)
Normal - solid OFF
Error Conditions:
Receiving All 1's (TAIS) - slow flash
5.h Console Indicator – the sixth LED in the row of seven.
This LED indicates if the console port is active or not.
Console (YELLOW)
Normal - ON if computer is connected via GUI, OFF if not.
Error Conditions:
YA (Yellow Alarm) - slow flash
5.i Heartbeat Indicator – the seventh LED in the row of seven.
This LED indicates if the unit is operating or not.
Active (YELLOW)
Blinks once per second to depict that the unit is operational.
Rhino Equipment Corp. • 8240 S. Kyrene Rd. • Suite 107 • Tempe, AZ 85284 • (480) 940-1826
28
6. CB24 Remote Control Interface
6.a CB24 RCI Features, Functions, and Firmware Upgrading
The CB24 RCI is the Rhino Channel Bank remote control user interface that allows for
real time monitoring, configuration, and maintenance of the CB24 series.
Upload F/W: To upload the CB24 firmware simply click on this
button and browse to the firmware file. Please note that the upgrade
process is irreversable, once initiated it must be completed. Also
note that all previous settings and adjustments will return to default
values.
Serial Port: This version of the RCI supports remote connection
via the serial port only. Please select the appropriate comm port
from the drop down list to initiate the connection.
Buttons: These buttons behave the same as the front pannel
buttons on the channel bank. All inputs are received in real time.
Remote LCD: When you are connected, this area displays the real
time data exactly as it is shown on the Rhino's LCD display.
Rhino Equipment Corp. • 8240 S. Kyrene Rd. • Suite 107 • Tempe, AZ 85284 • (480) 940-1826
29
6.b CB24 Upgrading firmware
NOTE: You must use Win2000 or newer 32-bit operating system (Win XP preferred) to
complete this upgrade! Do not start otherwise!
WARNING: this is a software patch utility. There is potential for something to go
wrong, and for your channel bank to become inoperable. If you want Rhino to perform
this upgrade, we will send you a loaner unit and you can send in your unit for upgrade.
We will perform the upgrade and test the unit out for you completely. Please contact our
technical support desk for this option at 1-888-619-RHINO (1-888-619-7446).
We will ship back your unit via UPS ground, you will be responsible for shipment to
Rhino.
Rhino Anonymous FTP Site: rhinopub.serveftp.com
NOTE: firmware upgrades for the Rhino can be found in the /Firmware directory
Upgrade Steps:
--- Instructions for Version 87 or higher --NOTE: IF you have V87 or higher, you can start the boot-loader from the keyboard
without powering off the unit, or taking off the cover.
1) Enter the unlock key strokes to allow access to the Rhino menus. (1, 3, 2, 4)
2) Navigate to the Console mode -- System, then Console.
3) You will need to hold all 4 buttons down at the same time, start with the left most
button and work your way across the buttons.
4) Go to step 6 below.
--- Instructions for Version 86 or lower --1) Power off the unit.
2) Open the top of the case by removing 14 screws from block top.
3) Short two metal pins at JP22 labeled BOOTLOAD.
4) Power ON Unit.
5) IMPORTANT: remove the short at JP22 NOW. (or the unit will reset and require
reloading again after reboot)
--- Instructions continued ---NOTE: if any of the next steps fail, you should be able to restart the upgrade back to the
boot-loader by simply cycling power. It is possible that it will also require opening the unit
and placing a short at JP22 again (see above instructions), and the boot-loader screen
data should appear on the display. Be sure to remove the jumper before proceeding with
the next steps!
Rhino Equipment Corp. • 8240 S. Kyrene Rd. • Suite 107 • Tempe, AZ 85284 • (480) 940-1826
30
6) LCD display should read:
Rhino Equipment Corp CB-Ver 5
Ready to upload firmware
XV 7
Rst: 10000000
7) Launch the “CB_Interface.exe” (or RhinoGUI.exe) application on your PC.
8) Connect a straight-wired 9-pin serial connection from the PC (DB9-M) to the DB-9
connector in the rear of the Rhino. (DB9-F)
9) Chose the correct serial port from the Serial Communications selection box. COM1 is
preferable!
10) Press the Connect button.
11) The Status should go to "Connected."
12) Locate and select the file to be downloaded using the Firmware Upload section,
using the ... to the right of the file name.
13) Click the Upload button.
14) The LCD display should start counting lines downloaded; the number of lines
downloaded will match the number in (xxxx) contained in the .hex filename.
15) When completed, the unit will restart and the firmware version should be at the level
downloaded.
16) Close the CB_Interface.exe application.
17) Remove the DB9 programming cable.
18) Power off the unit, and replace the cover and 14 screws (Be careful! Align the front
panel buttons first) install the first screw into the center position below the LCD screen.
19) Power on unit and an AutoT1 MUST be performed to clear all flash memory to a
known state - failure to do this will cause erroneous display characters!
Rhino Equipment Corp. • 8240 S. Kyrene Rd. • Suite 107 • Tempe, AZ 85284 • (480) 940-1826
31
1
1
2
3
2
3 4
5
6
7
8
220V/110V Switch: The CB24 power supply supports both 110 and 220 voltages. The
"Up" position is for 220V and the "Down" position is for 110V only. Do not change the
position of this switch to anything other than your supported voltage. Do not change this
switch while the unit is powered on. Note: This switch is only available on later CB24
models.
AC Terminal: Early Rhino models are dedicated to AC power input at time of assembly;
the later models have a switch on the rear of the chassis to select the input power.
-48V DC Terminal: The CB24 supports -48V DC input, please terminate the positive and
negative leads as marked. Note: -48V DC power can be used for UPS backup during a
power failure.
4
1 Amp Fuse Holder: The CB24 power supply takes a 1 amp fuse. In the case of a power
surge this fuse may blow, do not replace with anything other than a 1 amppage fuse.
5
T1 RJ48 (Female): The RhinoTM Channel Bank T1 (DS1) interface is an industrystandard RJ48C eight pin connector. Use the included T1 cable to connect the unit to the
demarcation point.
6
V.35 Data Port (Female): Data rate 56K or 64K
7
Comm Port (Female): 19200 baud rate
8
RJ21 Amphenol Connector (Female): The RhinoTM Channel Bank has a 25-Pair Female
Telephony Connector. To connect to it, use a 25 pair cable with a Standard "D" Style 50
Pin Telephone Wiring Connector with RJ-21X wiring jack (punch down block with 25 pair
modular female connector in the side.) For your convenience a cable of this type comes
with the RhinoTM Channel Bank.
Rhino Equipment Corp. • 8240 S. Kyrene Rd. • Suite 107 • Tempe, AZ 85284 • (480) 940-1826
32
Rhino Equipment Corp. • 8240 S. Kyrene Rd. • Suite 107 • Tempe, AZ 85284 • (480) 940-1826
33
If you have any other questions regarding the configuration or operation of your
Rhino Equipment please contact our support staff:
Email [email protected]
Phone (480) 940-1826 or (800) 785-7073
Thank you for choosing Rhino Equipment.
Rhino Equipment Corp. • 8240 S. Kyrene Rd. • Suite 107 • Tempe, AZ 85284 • (480) 940-1826
34