1
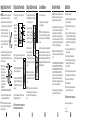
Applying Your Blood Pressure Cuff
Taking Your Blood Pressure Reading
Taking Your Blood Pressure Reading
Care and Maintenance
Limited One-Year Warranty
IMPORTANT: Make sure that the unit is assembled correctly.
Check eartips to make sure they are securely fastened.
1. Insert the eartips into your ears. You can adjust the metal
binaural for comfort.
6. Upon reaching the proper inflation level, SLOWLY
AND STEADILY, turn the air valve counter clockwise
at a rate of 2-3 mmHg per second.
1. Do not wash or moisten the cuff.
Your MABIS Home Blood Pressure Kit is guaranteed to be free of
manufacturing defects for a period of one year from the date of
purchase subject to the following terms and conditions:
1)
2)
Assemble the contents of your kit.
1. This warranty is limited to the accuracy of the manometer gauge
only. It does not include the inflation system (bulb, valves, cuff
and bladder). During the term of the warranty, MABIS
Healthcare will repair or replace (at their option) any gauge
found to be inaccurate due to normal use. This does not include
gauges that have been misused or abused. This warranty does
not include the cost of replacing any broken parts.
3)
Find your brachial artery, which is at the inner aspect of
your elbow.
4)
Remove any constrictive clothing or jewelry that may interfere with the cuff placement. Wrap the cuff snugly around
your left arm with the cuff’s bottom edge approximately 1/2”
above your elbow joint with the chestpiece positioned over
the brachial artery.
5)
Rest your elbow on a table making sure the cuff is at the
same level as your heart.
6)
7)
Position the gauge in a stable, readable location.
1. Sit upright but relaxed in a chair with a back. Keep your feet flat
on the floor. Remove any constrictive clothing from your left arm.
2. Extend your left arm.* Find your brachial
artery, which is at the inner aspect of your
elbow. You may or may not feel your pulse.
3. Open the cuff so that you can slide your arm
into it. Do not extend the cuff beyond the
metal bar.
4. Insert your left arm into the cuff. Position the bottom edge of the
cuff approximately one-half inch ABOVE your elbow. The
chestpiece must directly touch the inside of your arm, over your
brachial artery (see step 2).
5. With your arm extended,
palm facing upward and
tubes positioned down the
center of your arm, use
your right hand to pull the
end of the cuff and secure
the hook and loop material.
MAKE SURE THE
CHESTPIECE REMAINS OVER THE BRACHIAL ARTERY.
6. The cuff should fit comfortably, yet snugly around your arm.
Check for any gaps between the arm and the cuff.
NOTE: *The left arm should be used unless you are unable to or
should not use your left arm. Consult with your physician to assess
which arm is best for you to use.
7
2. Rest your elbow on a
table with your arm
facing upward.
Elevate your hand so
that the cuff is at the
same level as your
heart. Relax your left
hand.
7. As the pressure begins to drop,
carefully listen for your pulse
beat. Note and record the first
thumping sound you hear. This
is your SYSTOLIC pressure.
3. Position the gauge so it can be read without being moved. It can
be clipped to something such as a kitchen towel for
stability.
4. Hold the inflation bulb with your right hand and turn
the air release valve clockwise to close.
5. Begin inflating the cuff, SLOWLY AND STEADILY,
by pumping the inflation bulb until the gauge reads
30 mmHG ABOVE your last known SYSTOLIC
measurement.
If you do not know your last known SYSTOLIC measurement,
inflate to approximately 180-200 mmHg.
Note Reading
at First Sound
8. Allow the cuff to continue to
deflate. You will hear changes in
the sounds and then no sound
at all. When you hear the last sound, note the
reading and record. This is your DIASTOLIC
pressure.
2. Avoid dropping or hitting the surface of the gauge or
stethoscope chestpiece.
NOTE: When the cuff is fully deflated, make sure the gauge
needle is at zero (within the zero square). A needle outside the
square means the gauge needs to be recalibrated by a qualified
technician.
Note Reading
at Last Sound
As with any other sensitive instrument, the quality and reliability
should be checked annually. In other cases, a gauge will need
maintenance if the needle falls outside the “zero square” on a fully
deflated cuff. Ship your gauge, prepaid along with $5.00 for return
shipping and insurance, to MABIS Healthcare, 1931 Norman Drive
South, Waukegan, IL 60085.
9. Rapidly turn the valve counter clockwise to
deflate the remaining air. Remove the cuff and
record your measurement on your recording
chart.
NOTE: If you need to take another measurement, wait a minimum
of 15 minutes between readings to allow for the blood vessels to
return to normal. The wait time may vary depending on your
health.
2. MABIS Healthcare shall incur no liability under this Warranty for
any damage from any cause other than inherent manufacturing
defects.
3. ALL IMPLIED WARRANTIES, INCLUDING MERCHANTABILITY
AND FITNESS ARE LIMITED TO THE DURATION OF THIS
WARRANTY. THIS WARRANTY DOES NOT INCLUDE ANY
LIABILITY FOR INCIDENTAL OR CONSEQUENTIAL
DAMAGES. Some states do not allow limitations on how long
an implied warranty lasts or do not allow the exclusion or
limitation of incidental or consequential damages, so the above
limitations or exclusions may not apply to you.
4. This warranty gives you specific legal rights and you may also
have other rights, which vary from state to state.
Quick Start Guide
8)
9)
10)
11)
12)
A 15-minute resting period is recommended to stabilize the
body prior to taking a reading.
Slowly and steadily, inflate the cuff 30 mmHg above your
last known SYSTOLIC reading. If not known, inflate
between180-200 mmHg.
At a rate of 2-3 mmHg per second, begin to deflate the cuff.
The first “thumping” sound heard is your SYSTOLIC rate.
The last sound heard is your DIASTOLIC rate.
Record your measurements.
A 15-minute rest period is needed between readings to
allow the blood vessels to return to normal.
CAUTION: NEVER INFLATE THE CUFF ABOVE 280 mmHg.
CAUTION: TO PREVENT INJURY TO YOURSELF AND/OR THE
Specifications are subject to change without notice.
UNIT, NEVER INFLATE THE CUFF ABOVE 280 mmHg.
#91-174-000 12/06
© 2006 MABIS Healthcare
8
9
10
11
12