1
com www.ilc-usa.com www.ilc-usa.com www.ilc-usa.com www.ilc-usa.com www.ilc-usa.com www.ilc-usa.com www.ilc-usa.com www.ilc-usa.com www.ilc-usa.com www.ilc-usa.com www.ilc-usa.com www.ilc-usa.com www.ilc-usa.com www.ilc-usa.com
ENERGY SAVING LIGHTING CONTROLS
Intelligent Lighting Controls, Inc.
Lighting Control Software
for LightMaster Panels in
Stand Alone Applications
P ro
S O F T WA R E
USER
GUIDE
For more information , please contact:
Includes setup, installation and programming
LightMaster Pro software for the ILC
LightMaster lighting controller in
stand alone applications
INTELLIGENT LIGHTING CONTROLS, INC.
Energy Saving Lighting Controls
5229 Edina Industrial Boulevard
Minneapolis. Minnesota 55439
Phone 952 829 1900
FAX 952 829 1901
1-800-922-8004
www.ilc-usa.com
PM-I-910
www.ilc-usa.com
com www.ilc-usa.com www.ilc-usa.com www.ilc-usa.com www.ilc-usa.com www.ilc-usa.com www.ilc-usa.com www.ilc-usa.com www.ilc-usa.com www.ilc-usa.com www.ilc-usa.com
Lighting Control Software
for LightMaster Panels in
Stand Alone Applications
Pro
USER
S O F T WA R E
GUIDE
S TA N D A L O N E
Version 1C
1/1/05
INTELLIGENT LIGHTING CONTROLS, INC.
PM-I-910
5229 Edina Industrial Boulevard
Minneapolis. Minnesota 55439
Phone 952 829 1900
FAX 952 829 1901
1-800-922-8004
Table of Contents
Pro
Section 1 Program Description and Installation
1.0 Overview ........................................................................................
1.1 Installation.......................................................................................
1.2 Starting LightMaster Pro ................................................................
1.3 Menu Bar Options ..........................................................................
1.4 Edit Options ....................................................................................
1-1
1-1
1-1
1-1
1-2
Section 2 Communications
2.1 Comminication Methods ...........................................................
2.2 Comminication Features ............................................................
2.3 Sample Procedures .....................................................................
2.4 Virtual Keypad Feature...............................................................
2-1
2-1
2-3
2-3
Section 3 Getting Started
3.1 Introduction ...................................................................................
3.2 Project Description ........................................................................
3.3 Enter the Settings Off Line.............................................................
3.4 Save the Settings to a File.............................................................
3.5 Connect with the Controller and Download Settings ..............
3-1
3-1
3-2
3-15
3-17
Section 4 Appendix
A Installing LightMaster Pro .................................................................
A.1 Introduction .............................................................................
A.2 Minimum Computer Requirements.......................................
A.3 Recommended Installation Procedure................................
A-1
A-1
A-1
A-1
LightMaster Pro User Manual
Version 1C 1/1/05
Pro
Section 1–
Program Description and Installation
LightMaster Pro User Manual
Version 1C 1/1/05
Section 1– Table of Contents
Pro
Section 1 Program Description and Installation
1.0 Overview ........................................................................................
1.1 Installation.......................................................................................
1.2 Starting LightMaster Pro ................................................................
1.3 Menu Bar Options ..........................................................................
1.4 Edit Options ....................................................................................
LightMaster Pro User Manual
Version 1C 1/1/05
1-1
1-1
1-1
1-1
1-2
Program Description and Installation
1.0 Overview
LightMaster Pro is a windows based lighting
control software package designed for a
stand alone LightMaster lighting control panel.
Using point and click commands you can
quickly and easily program LightMaster lighting controllers for any required application,
obtain current I/O status and upload /download operating parameters between the controller and your personal computer (PC).
You can program a single controller
from your PC via RS232 connection to the
controller serial port. You can also program
offsite via standard phone lines and modem
(if the LightMaster is equipped with an
onboard modem – requires a direct analog
telephone line.)
1.1 Installation
This section explaind how to install
LightMaster Pro on your computer and
outlines what you should and can do after
the installation is complete. Most customers
have LightMaster Pro installed on their computer at the factory or by an ILC field service
technician during the system start-up. If you
have elected to install the software yourself,
follow these instructions.
Minimum System Requirements
• IBM compatible PC
• Pentium 4, 1.6GHz or greater
• 1 RS232 serial port
• CD-R drive
• Windows 2000, XP
• 100 MB Free Space
• 512 MB RAM
• SVGA monitor- 1024 x 768 recommended
• Mouse & keyboard
Performing the Installation
NOTE: You may need Administrator’s privilages to install the software. Load the CD disk
containing LightMaster Pro into your computer’s CD drive. Exit any open applications and
temporarily disable virus protection software.
LightMaster Pro User Manual
Version 1C 1/1/05
Pro
1. Go to RUN from the START menu on your
computer. Click BROWSE, navigate to
your CD drive and select Setup for
LightMaster Pro.
2. Follow the directions on the screen to
complete the installation.
3. Proceed to Starting LightMaster Pro.
Troubleshooting
If LightMaster Pro installation fails, reboot
and re-install the software. Call ILC
Technical Support for further assistance
(1-952-829-1900). Please have your system
information ready.
1.2 Starting LightMaster Pro
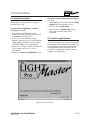
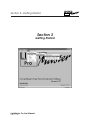
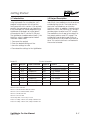
To Start LightMaster Pro, “double click” on
the ILC LightMaster Icon. The home screen
shown in Figure 1-1 will appear.
1.3 Home Screen Menu Bar Options
The menu bar across the top of the screen,
offers the following options (point & click on
the option you want to invoke):
• File - Use FILE to create a new file, open,
save current system entries/parameters to
your hard drive, and to exit the program.
• Connect – Use to connect your PC to the
lighting controller. You can set the system
clock, retrieve data, issue commands and
program parameters on-line via Connect.
• Setup – permits you to define the number
of I/O cards and types of optional
add-on modules the LightMaster is
equipped with.
• Edit – enter LightMaster’s operational
parameters
• Document - This feature allows you to
organize and manipulate data for
importing into other data based and
spreadsheet programs.
• About – displays the Home screen and
the software revision level and the ILC
Corp. 800 number.
1-1
Program Description and Installation
Pro
1.4 Edit Options
The edit options offered on the home
screen are:
• Relay Outputs - use this option to check
relay/relay group status, control
relay/relay groups from your PC and
define certain relay parameters: for
example, whether a relay is to be subject
to a blink alert.
• Switch Inputs – use this option to check
local and LightSync input status and
define local and LightSync switch
characteristics, select relay(s)/relay
groups to be controlled by an input, and
define how those relay(s)/relay groups
are to respond.
• Switch Pilots – use this option to program
local and LightSync switch pilots.
• Timers- use this option to define normal,
astro, and open/close timers. Then map
each timer to the relay(s)/relay group it
controls and define its response.
• Set Times - use this option to enable/disable daylight savings and define astro
clock, open/close, OFF sweep, input
active parameters. There is also a feature
allowing you to force a selected timer to
execute.
• Presets – use this option to capture, edit,
and trigger presets from your PC.
• Add-on Module – use this option to enter
parameters associated with optional
DMX, DTMF, N2 and MODBUS control
features.
• Special Functions- use this option to
customize names of the LightMaster
controller, relay/relay groups, inputs and
presets. You can also change the relay
drive parameters and LightSync photocell
scan rate with this option.
LightMaster Pro User Manual
Version 1C 1/1/05
1-2
Program Description and Installation
Pro
Figure 1-1 LightMaster Pro Home Screen
LightMaster Pro User Manual
Version 1C 1/1/05
1-3
Program Description and Installation
LightMaster Pro User Manual
Version 1C 1/1/05
Pro
1-4
Pro
Section 2
Communications
LightMaster Pro User Manual
Version 1C 1/1/05
Section 2– Communications
Pro
Section 2 Communications
2.1 Comminication Methods ...........................................................
2.2 Communication Features...........................................................
2.3 Sample Procedures .....................................................................
2.4 Virtual Keypad Feature...............................................................
LightMaster Pro User Manual
Version 1C 1/1/05
2-1
2-1
2-3
2-3
Communications
Pro
2.1 Communication Methods
2.2 Communication Features
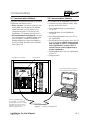
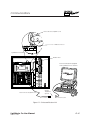
There are two possible methods for linking a
LightMaster controller to a PC:
• Direct Connect- connect the factory supplied cable (consult factory for alterate
cable) between a COM port on your
computer and the RS 232 port on the
LightMaster CPU board. (See Figure 2.1)
• On-board Modem (if equipped)- connect
the LightMaster’s on-board modem and
your computer’s modem via a direct
analog telephone system (no digital systems) to enable remote communication.
(See Figure 2.2)
Once linked with a LightMaster, you can:
• Check the current status of relays, relay
groups, and switch inputs
• Turn individual relays or relay groups
ON or OFF
• Sweep all relays in the LightMaster
ON or OFF
• Download parameters from your PC to
the LightMaster
• Download the clock settings from your PC
to the LightMaster (NOTE: make sure the
time and date on your PC is appropriate
for the LightMaster’s location. This is a
special concern when programming a
remote LightMaster.)
• Upload parameters from the LightMaster
to your PC
• Trigger presets
RS 232 Port
LightMaster Controller
OUT ADDRESS
IN
I
M
R
MODEM
Personal Computer equipped
with LightMaster Pro software
77013427 REV B
97013427 REV
J9
12VAC
CT
12VAC
ON
1
OFF ON
2
PLT
2
OFF ON
3
PLT
3
OFF ON
4
PLT
4
OFF ON
5
PLT
5
OFF ON
6
PLT
6
OFF ON
7
PLT
7
OFF
3
4
5
6
7
8
77013426 REV B
97013426 REV
COM
J2
Factory Supplied Cable
(6’ standard, 50’ maximum.
For distances over 50’, a PAK
(Programming Access Kit) is
required. Consult factory for
specific requirements.)
LightMaster Pro User Manual
Version 1C 1/1/05
1
2
3
4
5
6
7
8
12VAC
OFF ON
2
ON
12VAC
8
1
8
OFF ON
8
PLT
7
ON
COM
OFF
12VAC
12VAC
OFF
J1
1
PLT
Figure 2.1 – Direct Connect Link
2-1
Communications
Pro
FCC Code 68 compliant cord
RJ 11 Male Connector
I
M
R
MODEM
LightMaster Controller
Modem Port
OUT ADDRESS
IN
I
M
R
MODEM
Personal Computer equipped
with LightMaster Pro software
77013427 REV B
97013427 REV
J9
12VAC
CT
12VAC
ON
1
OFF ON
2
PLT
2
OFF ON
3
PLT
3
OFF ON
4
PLT
4
OFF ON
5
PLT
5
OFF ON
6
PLT
6
OFF ON
7
PLT
7
OFF
2
3
4
5
6
7
8
77013426 REV B
97013426 REV
2
3
4
5
6
7
8
ON
COM
J2
1
12VAC
OFF ON
12VAC
8
1
8
OFF ON
8
PLT
7
ON
COM
OFF
12VAC
12VAC
OFF
J1
1
PLT
FCC Part 68 compliant cord
Analog
Telephone
System
RJ11 Phone Jack
RJ11 Phone Jack
Figure 2.2 – On-board Modem Link
LightMaster Pro User Manual
Version 1C 1/1/05
2-2
Communications
Pro
2.3 Sample Procedures
Connect with a LightMaster and Sweep
ON all relays. The physical link is a direct
connect via RS 232.
Connect with the LightMaster controller
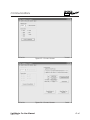
(See Figures 2-4, 5, 6)
1. After starting LightMaster Pro and
powering up the controller, point & click
on Connect. (See Figure 2-1.)
2. When the Communications screen
appears, point & click on the LightMaster
node address pull down menu to select
the Node Address of the LightMaster.
3. Select the COM port used to connect the
RS 232 cable from your PC to the
LightMaster.
4. Select the Connect to LightMaster button.
Sweep all controller Relays ON (See Figures
2-7, 8, 9)
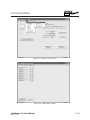
1. Select EDIT from the menu bar, then Relay
Outputs from the pull down menu
2. Point & click on Relay Status.
3. Point & click on All Relays On button.
Verify that the relay states have
changed.
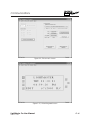
2.4 Virtual Keypad Feature
While you are connected to the controller,
you have the option of using the virtual keypad feature of the software to program the
controller. Pressing the Virtual Keypad button will display a software version of the
controller’s keypad that can be used to
program the LightMaster.
Figure 2.4 – Home Screen
LightMaster Pro User Manual
Version 1C 1/1/05
2-3
Communications
Pro
Figure 2.5 – Connect Screen
Figure 2.6 – Connect Screen
LightMaster Pro User Manual
Version 1C 1/1/05
2-4
Communications
Pro
Figure 2.7 – Relay Controls Screen
Figure 2-8, Relay Status Screen
LightMaster Pro User Manual
Version 1C 1/1/05
2-5
Communications
Pro
Figure 2-9, Disconnect Screen
Figure 2-10, Virtual Keypad Screen
LightMaster Pro User Manual
Version 1C 1/1/05
2-6
Section 3– Getting Started
Section 3
Getting Started
LightMaster Pro User Manual
Version 1C 1/1/05
Pro
Getting Started– Table of Contents
Pro
Section 3 Getting Started
3.1 Introduction ...................................................................................
3.2 Project Description ........................................................................
3.3 Enter the Settings Off Line.............................................................
3.4 Save the Settings to a File.............................................................
3.5 Connect with the Controller and Download Settings ..............
LightMaster Pro User Manual
Version 1C 1/1/05
3-1
3-1
3-2
3-15
3-17
Getting Started
Pro
3.1 Introduction
3.2 Project Description
The easiest way to develop proficiency
using Lightmaster Pro is to practice. Let’s
program a Lightmaster. You will get the
most good out of this section if you actually
perform the procedures as you read them.
In this example you will be programming a
LightMaster 8 located in a school, direct
connected to the PC via the RS 232 port.
The LightMaster is addressed as Node 1, the
LightSync switch is addressed as Node 2.
There are 4 basic tasks:
1. Document the project
2. Enter the desired settings off line
3. Save the settings to a file
4. Download the settings to the LightMaster
The LightMaster is to control 8 circuits. Two
hall circuits, four auditorium circuits and two
outside lighting circuits. The inside circuits
are to be controlled from a six button
LightSync switch. In addition, the hall circuits
are to turn ON in the morning, OFF at night,
and be subject to after hours OFF sweeps.
The auditorium circuits are to be subject to
two preset patterns and OFF sweeps. The
outside lights are to be turned ON by an
Astro timer and OFF by a late night normal
timer. This control scheme is summarized in
the control schedule.
Node: 01
Control Schedule
Relay#
1
2
3
4
5
6
Circuit#
H1-1
H1-2
H1-3
H1-4
H1-5
H1-6
7
8
H1-7
H1-8
Area Controlled
Hall
Hall
Auditorium
Auditorium
Auditorium
Auditorium
Outside Lights
Outside Lights
Switch #
02.1
02.2
02.3
02.4
02.5
02.6
Timer #
5, 6 and OFF sweeps
5, 6 and OFF sweeps
OFF sweeps
OFF sweeps
OFF sweeps
OFF sweeps
Preset#
1,
1,
1,
1,
2
2
2
2
1, 2, 3, 4
1, 2, 3, 4
Timer 1= ON 10 minutes before sunset
Timer 2= OFF 11:45 PM
Timer 3= ON 45 minutes before sunrise
Timer 4= OFF 10 minutes after sunrise
Timer 5= ON at 6:45 AM
Timer 6= OFF 7:30 PM
Off sweeps are once every 3 hours
Preset 1= relays 1 and 3 ON, relays 2 and 4 OFF
Preset 2= relays 1 and 3 OFF, relays 2 and 4 ON
LightMaster Pro User Manual
Version 1C 1/1/05
3 -1
Getting Started
Pro
3.3 Enter the Settings Off Line
Start LightMaster Pro
1. Power up your computer.
2. Double click on the LightMaster Pro icon
on your desktop to bring up the
LightMaster Pro Home screen.
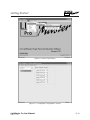
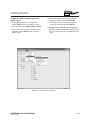
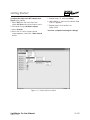
Setup LightMaster (See Figure 3-1)
1. Point & click on Setup
2. When the Setup screen appears, point &
click on 8 input/8 Relay Card (Total 8)
button.
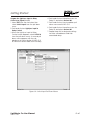
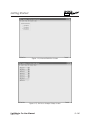
Configure the Switches (See Figures 3-2, 3)
1. Select EDIT from the menu bar, then
select Switch Inputs from the pull down
menu.
2. Point and click on LightSync Devices.
3. Point and click on Configure LightSync
Devices to access the configuration
screen.
4. Point and click on Select Device; then
click on LSYNC 02.
5. Point and click on the device type pull
down menu and select 6 button.
6. Ensure that the resulting display shows
that all 6 inputs are Momentary P.B.
Figure 3.1 – Home Screen
LightMaster Pro User Manual
Version 1C 1/1/05
3-2
Getting Started
Pro
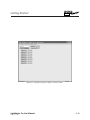
Figure 3-2, Switch Input Menu
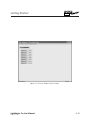
Figure 3-3, Completed Configuration Screen
LightMaster Pro User Manual
Version 1C 1/1/05
3-3
Getting Started
Pro
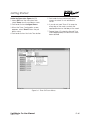
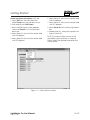
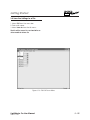
Program the LightSync Input to Relay
Control (See Figures 3-4, 5)
1. Select EDIT from the menu bar, then
select Switch Inputs from the pull down
menu
2. Point and click on LightSync Input to
Relay Control.
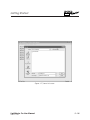
3. When the LightSync Input to Relay
Control screen appears, select LSYNC 02
from the pull down menu. A second pull
down menu appears with the sub
addresses of the first button (LSYNC 02.1)
as well as an action table for the 8 relays.
4. Point and click on the action menu for
Relay 01 and select On And Off.
5. Point and click on the sub address pull
down menu and LSYNC 02.2
6. Point and click on the action menu for
Relay 02 and select On And Off
7. Repeat steps 4-6 to designate settings
for other sub addresses and their
associated relays
Figure 3.4 – Switch Input Pull Down Menus
LightMaster Pro User Manual
Version 1C 1/1/05
3-4
Getting Started
Pro
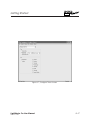
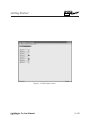
Figure 3-5, LightSync Input to Relay Control Screen
LightMaster Pro User Manual
Version 1C 1/1/05
3-5
Getting Started
Pro
Define the Timers (See Figures 3-6, 7)
1. Select EDIT from the menu bar, then
select Timers from the pull down menu
2. Point and click on Configure Timers.
3. When the Timer Configuration screen
appears, select Timer 01 from the pull
down menu.
4. Point and click on the Astro Time button
5. Point and click on the time pull down
screens to select 10 min and Before
Sunset
6. If you do not want Timer 01 to execute
every day of the week, uncheck the
appropriate box for that day of the week
7. Repeat steps 3-5 (selecting Normal Time
where appropriate) until all 6 timers have
been defined
Figure 3.6 – Timer Pull Down Menus
LightMaster Pro User Manual
Version 1C 1/1/05
3-6
Getting Started
Pro
Figure 3-7, Configure Timers Screen
LightMaster Pro User Manual
Version 1C 1/1/05
3-7
Getting Started
Pro
Program the Timer to Relay Control (See
Figures 3-8, 9)
1. Select EDIT from the menu bar, then
select Timers from the pull down menu
2. Point and click on Timer to Relay Control.
3. When the Timer to Relay Control screen
appears, select Timer 01 from the pull
down menu.
4. Point and click on the action pull down
screen for Relay 7 and click Turn On
5. Point and click on the action pull down
screen for Relay 8 and click Turn On
6. Repeat steps 3-5 (entering the appropriate timer, relay, and action settings) until
Timer to Relay Control is complete for all
timers
Figure 3.8 – Timer Pull Down Menus
LightMaster Pro User Manual
Version 1C 1/1/05
3-8
Getting Started
Pro
Figure 3-9, Timer to Relay Control Screen
LightMaster Pro User Manual
Version 1C 1/1/05
3-9
Getting Started
Pro
Enter the Astro Clock Settings
1. Select EDIT from the menu bar, then
select Set Times from the pull down menu
2. Point and click on Astro Clock Settings.
NOTE: You may also click the Find
Latitude/Longitude by City button, scroll
and select the proper city (if available) and
the proper coordinates will be entered in
the appropriate fields.
3. When the Astro Clock Settings screen
appears, point and click on the pull down
screens and select the proper coordinates for the location of the LightMaster
Figure 3.10 – Astro Clock Screen
LightMaster Pro User Manual
Version 1C 1/1/05
3 - 10
Getting Started
Pro
Define the Presets (See Figures 3-11, 12)
1. Select EDIT from the menu bar, then
select Presets from the pull down menu
2. Point and click on Edit Presets.
6. Select Relay 05, then click the action field
until ON appears
3. When the Edit Presets screen appears,
verify that Preset 01 is in the Preset pull
down box
8. Select Preset 02 from the Preset pull down
box
4. Select Relay 03, then click the action field
until ON appears
5. Select Relay 04, then click the action field
until OFF appears
7. Select Relay 06, then click the action field
until OFF appears
9. Repeat steps 4-7, entering the proper settings for Preset 02.
NOTE: To invoke a Preset connect to the
LightMaster, point and click on Capture
Presets, select the desired Preset and click
the Set button.
Figure 3.11 – Presets Pull Down Menu
LightMaster Pro User Manual
Version 1C 1/1/05
3 - 11
Getting Started
Pro
Figure 3-12, Edit Presets Screen
LightMaster Pro User Manual
Version 1C 1/1/05
3 - 12
Getting Started
Pro
Configure the After Hours OFF Sweeps (See
Figures 3-13, 14, 15)
1. Select EDIT from the menu bar, then
select Set Times from the pull down menu
2. Point and click on Off Hours Sweeps.
3. Select Interval.
5. Repeat steps 1-2, selecting Relays
6. Select Relay 01, then click the action field
until OFF appears
7. Repeat step 6 to set actions for
Relays 02-06.
You have completed entering the settings!
4. When the Off Hours Sweep Interval
screen appears, select the 3 Hour Interval
button
Figure 3.13 – Presets Pull Down Menu
LightMaster Pro User Manual
Version 1C 1/1/05
3 - 13
Getting Started
Pro
Figure 3-14, Interval Definition Screen
Figure 3-15, Off Hours Sweeps Relays Screen
LightMaster Pro User Manual
Version 1C 1/1/05
3 - 14
Getting Started
Pro
3.4 Save the Settings to a File
1. Select FILE from the menu bar
2. Enter a file name
3. Select Save As from the file menu
The file will be saved to your hard drive or
other media for future use
Figure 3.16 – File Pull Down Menu
LightMaster Pro User Manual
Version 1C 1/1/05
3 - 15
Getting Started
Pro
Figure 3-17, Save As Screen
LightMaster Pro User Manual
Version 1C 1/1/05
3 - 16
Getting Started
Pro
3.5 Connect with the Controller and
Download the Settings
1. From the Home screen, point & click on
Connect.
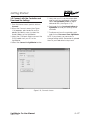
2. When the Connect screen (See Figure
3-18) appears, point and click on the
address pull down menu to select the
Node Address of the LightMaster.
3. Select the COM port used to connect the
RS 232 cable from your PC to the
LightMaster.
4. Select the Connect to LightMaster button.
5. Verify that your PC has the proper date
and time for the LightMaster’s location.
Select Set LightMaster Clock to adjust
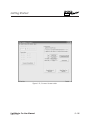
date and time. (See Figure 3-19)
6. Point and click on Download Settings to
LightMaster to send your settings to the
controller
7. To disconnect from the controller, point
and click on Disconnect From LightMaster
NOTE: If you choose, you can enter or
change settings online. Remember to upload
them to your hard drive to stay curent.
Figure 3-18, Connect Screen
LightMaster Pro User Manual
Version 1C 1/1/05
3 - 17
Getting Started
Pro
Figure 3-19, Connect Screen after
LightMaster Pro User Manual
Version 1C 1/1/05
3 - 18