1
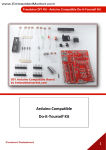
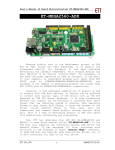
www.EmbeddedMarket.com
Freeduino-Mega2560 ADK
This product is
ATmega2560 based Freeduino-Mega
with USB Host Interface
to Communicate with
Android Powered Devices*
like Android Phone or Tab
using
Android Open Accessory API and Development Kit (ADK)
Board also Supports MicroBridge
While using this product, there are possibilities of software and / or hardware damage /
malfunctioning / crashing of the Mobile Phone / Tabs / Devices connected to it. In such event
user of this product will be solely responsible the same. Embedded Market, it’s staff or the
distributor cannot be held responsible for damages in any form including but not limited to
digital data loss, loss of hardware, loss of time etc.
Product Datasheet
* Read system requirements for details
1
www.EmbeddedMarket.com
Freeduino-Mega2560 ADK
Sr. Num.
Topics
Page
1
About Android, ADK, MicroBridge & Freeduino-Mega2560 ADK
3
2
Board & Port I/O Details
5
3
System Requirements & App Development Setup
6
4
Sample Android App Development
8
5
Important information
11
Product Datasheet
2
www.EmbeddedMarket.com
Freeduino-Mega2560 ADK
1.
About Android, ADK, MicroBridge &
Freeduino-Mega2560 ADK
Android:
Android is a software stack for mobile devices that includes an operating system, middleware and
key applications. The Android SDK provides the tools and APIs necessary to begin developing
applications on the Android platform using the Java programming language.
ADK:
The Android Open Accessory Development Kit (ADK), is part of latest Android 3.1 platform and also
back ported to Android 2.3.4
ADK allows Android Phone to act as USB Device where as the “Freeduino-Mega2560 ADK” will act
as USB Host.
This allows communication between Android Powered Devices (like phones) and external Hardware
like industrial controls.
MicroBridge:
MicroBridge is an Android Debug Bridge (ADB) implementation for microcontrollers.
MicroBridge allows stock, unrooted Android devices to talk directly to USB host enabled MCUs,
thereby enabling phones to actuate servos, drive DC motors, talk to I2C and SPI devices, read
ADCs, and so forth. MicroBridge works on Android 1.5 and upwards.
In other words, there are two ways to communicate between Android powered device and the
External Hardware;
1. Using ADK - Android Accessory Protocol
a. This requires Android 2.3.4 platform with Google 2.3.3 API loaded
b. Rooted device (in other words, device which allows to attain privileged access to
Android's Linux subsystem)
2. Using MicroBridge - Debug Bridge (ADB) implementation for microcontrollers
a. This works with Android 1.5 & higher
b. No rooting required
Product Datasheet
3
www.EmbeddedMarket.com
Freeduino-Mega2560 ADK
This is graphical representation of the whole concept:
Android
Mobile Phone
Arduino Compatible board
loaded with Arduino Sketch
(program) based on either
Android Accessory Protocol
or
MicroBridge
USB
Freeduino-Mega2560 ADK Board
Android Mobile Phone
with your Android App
installed. This app is based
on either
Android Accessory Protocol
or
MicroBridge
Sensors / Switches / LEDs / Motor Drivers /
Modules connected to the Port pins of
Freeduino-Mega2560 ADK Board. This
board is compatible to Arduino.
This setup allows control of hardware devices from Android Phone
Section “System Requirements & App Development Setup” from this user manual explains process
of :
1. Android App Development
2. Arduino Sketch Development
Product Datasheet
4
www.EmbeddedMarket.com
Freeduino-Mega2560 ADK
2. Board & Port I/O Details
The “Freeduino-Mega2560 ADK” board is based on Arduino-Mega design with added USB
Host Controller. Refer below picture for board details:
LED connected to Digital Pin 13
USB B Connector:
For Arduino Sketch
download and power
supply from computer
Port Pins
P
o
r
t
P
i
n
s
USB A Connector:
for connection
with Android
Phone / Device
Power &
Reset Pins
Port Pins
ATmega2560
Power Source
Selection Jumper
9VDC Power in
(Optional use)
1. Board comes loaded with Boot loader for “Arduino Mega 2560”
2. Also a sketch based on Microbridge is loaded by default.
Section “System Requirements & App Development Setup” from this user manual explains usage
and configuration for board & Android device.
Product Datasheet
5
www.EmbeddedMarket.com
Freeduino-Mega2560 ADK
3. System Requirements & App Development Setup
A. On Android Device - Setup of Android Device (e.g. Android Phone):
a. Using ADK - Android Accessory Protocol
i. This requires Android 2.3.4 platform with Google 2.3.3 API loaded
ii. Rooted device (in other words, device which allows attain privileged access to
Android's Linux subsystem)
b. Using MicroBridge - Debug Bridge (ADB) implementation for microcontrollers
i. This works with Android 1.5 & higher
ii. No rooting required
In either case enable “USB Debugging” option on Device (e.g. Android Phone).
On the Android Device, this option is available under
Setting -> Applications -> Development -> USB Debugging
B. On Computer - Setup of Arduino IDE to Develop Microbridge based Sketches:
a. Download latest Arduino IDE from: http://arduino.cc/en/Main/Software
b. Unzip the downloaded zip file. Remember the Arduino IDE location.
c. Download Microbridge For Arduino from:
http://microbridge.googlecode.com/files/MicroBridge-Arduino.zip
d. Unzip the downloaded zip
e. Copy the subfolder named “ADB” from the unzipped folder
f. Paste it to “libraries” folder inside Arduino IDE Folder (Ref step “B.b” above)
C. On Computer – Setup Android Development Environment:
a. Download & install latest JDK from:
http://www.oracle.com/technetwork/java/javase/downloads/index.html
Note down the installation path of JDK.
b. Set PATH variable
Do it only if you know what you are doing else take someone’s help
i. Locate Environment Variables under System Properties
ii. Under System variables, edit path variable and add JDK path
e.g. C:\Program Files\Java\jdk1.7.0\bin;
iii. Computer may need restart if updated path is not reflecting in path command on
command prompt.
Product Datasheet
6
www.EmbeddedMarket.com
Freeduino-Mega2560 ADK
c. Download & Install “Android SDK” from http://developer.android.com/sdk/index.html
Using this Android SDK and AVD Manager, Install –
1. Android 2.3.3 API 10
2. Google API Android API
d. Eclipse is IDE for Java development. This is required to write Android Projects.
Download Eclipse Classic from: http://www.eclipse.org/downloads/
Unzip the downloaded File. No separate installation required.
e. Download Android Development Tools (ADT) plugin for the Eclipse IDE as explaind
here: http://developer.android.com/sdk/eclipse-adt.html#installing
In case of difficulty installing this read section “Troubleshooting ADT Installation” on the
same web page http://developer.android.com/sdk/eclipse-adt.html#installing
f. In Eclipse, configure Android SDK Location & ADT for Eclipse with DOS like paths.
Long paths are not accepted.
g. Your computer is ready for Android Development using:
i. JDK + JRE
ii. Android SDK (Android 2.3.3 & Google API 2.3.3)
iii. Eclipse IDE
iv. ADT for Eclipse
h. On Computer, install drivers for your Android device (e.g. Android Phone) so that the
computer detected the Android Device and allows the Android Apps to be installed on
the Android Phone.
D. On Freeduino-Mega2560 ADK Board:
a. Arduino Mega2560 Boot loader installed (This is pre-installed by us. You need not to
do it)
b. Keep the compatible USB cable for your Android Device (e.g. Android Phone) ready.
This cable is not included with this product as such cables are provided along with the
Phones. One end of this cable will be attached to your phone and other will go in to
USB-A female connector marked as “Phone” on “Freeduino-Mega2560 ADK” board.
We have tried our best to document above steps with all possible minor details to make your
life simple. Follow above steps carefully. Your installation may or may not be as easy as
described above. We cannot help you in above installation process, thus kindly do not raise
support requests or email regarding installation process. Please understand that every
computer has unique configurations and problems w.r.t. RAM, pre-installed software, hard
drive space, operating system, operating system’s patches / service packs etc. Thus it is
impossible for us to help anyone regarding above installation process.
Product Datasheet
7
www.EmbeddedMarket.com
Freeduino-Mega2560 ADK
4.
Sample Android App Development
By now it is clear that there are two separate programs to be developed:
1. Android App development using Eclipse IDE with the help of Java
a. After successful building of this program, this App will be downloaded to the Android
Device (e.g. Android Mobile) via USB
b. Do note that extensive JAVA Programming knowledge is required to modify and
manage source code.
2. Arduino Sketch development using Arduino IDE with the help of C Programming
a. After successful compiling of Arduino Sketch, it will be downloaded to the “FreeduinoMega 2560 ADK” board via USB
b. Do note that good knowledge of C Programming is required to modify and manage
Arduino source code.
Thus to use “Freeduino-Mega2560 ADK” board effectively one should be good at:
1. Java Programming
2. C Programming
3. Setting up system with multiple installations and configuration
We have made your life simple by investing good amount of time to provide simplified application so
that you can use this product in shortest possible time. Ensure that you finish with installation
steps described in Section 3 of this user manual before using this board.
The Final Hardware Setup is:
1. “Freeduino-Mega2560 ADK” board powered via USB B connector from Computer
2. Android Phone Connected to “Freeduino-Mega2560 ADK” board via USB A Connector
3. “Digital and Analog IO Interfacing All Purpose Board” –
a. 5V & GND from this board is connected to 5V & GND pins of “Freeduino Mega2560 ADK” board
b. Pin marked as “POT 1” from this I/O board is connected to pin marked as A0 on
“Freeduino-Mega2560 ADK” board
c. Details of the I/O Board can be found here:
http://embeddedmarket.com/products/Digital-and-Analog-IO-Interfacing-AllPurpose-Board/
Product Datasheet
8
www.EmbeddedMarket.com
Freeduino-Mega2560 ADK
Part 1: Android App Development based on Microbridge
1. Visit web page for this product at www.EmbeddedMarket.com and download the sample
Android App Project. This is a zip file. Unzip it and note the unzipped location.
2. Start Eclipse on Computer
3. Click File -> New -> Project …. Then select Android -> Android Project
4. In the Project name …. field type : DemoADK
…. (do not change name or case)
5. Choose Create Project from existing source, click Browse, select path of the sample App
as noted in step 1 above and then click Finish.
6. For build target, select Google API (Platform 2.3.3, API Level 10)
Note- Don’t select Android 2.3.3, it should be Google API as mentioned above
7. Click Finish
8. Connect Android Device (e.g. Android Phone) to the computer. Ensure that setup for the
device is done as mentioned in System Requirements section above. Switch ON the
device if it is not.
9. From Eclipse Click Run -> Run to install the App to your Android Device.
10. Once the App is installed on your device (phone), from phone - try running the App
DemoADK
11. The DemoADK App on the phone device looks like this:
LED Off Button
LED ON Button
Reading from Preset.
Shows #### when
Phone is not connected
to Freeduino-Mega2560
ADK Board.
Also seekbar’s pointer
moves along with the
change in preset’s value
Product Datasheet
9
www.EmbeddedMarket.com
Freeduino-Mega2560 ADK
Part 2: Now it’s time to prepare the “Freeduino-Mega2560 ADK Board”
1. Visit web page for this product at www.EmbeddedMarket.com and download the sample
Arduino App Project. This is a zip file. Unzip it and note the unzipped location.
2. Start Arduino IDE on computer
3. Click File -> Open -> Select location noted in step 1 above
4. Select Board from Menu: Tools -> Board -> Arduino Mega 2560
5. Select Serial Port from Menu: Tools -> Serial Port -> COMn
Here COMn is the COM Port Number, this where the “Freeduino-Mega2560 ADK” board
gets detected to.
6. To upload this program (Sketch) to the Freeduino-Mega2560 ADK”, Click menu File ->
Upload to I/O Board OR click Toolbar button marked as =|>
7. Observe the response and wait till Arduino IDE says “Done”
Now both the hardware devices are ready. The Final Hardware Setup is described above.
Do follow the connections as described in “Final Hardware Setup” section.
1. From Android Device, start the App and click LED ON and LED OFF Buttons
2. This will switch ON & OFF the LED from “Freeduino-Mega2560 ADK” board
3. Now, with the help of small tip screw driver, change value of the Preset 1 from the
“Analog IO Interfacing All Purpose Board”.
4. This will change the text value as well as Seek bar’s position on Android App on the
device.
Visit web page of this product at www.EmbeddedMarket.com and view the video which shows
this hardware setup in action.
Product Datasheet
10
www.EmbeddedMarket.com
Freeduino-Mega2560 ADK
5. Important Information
1. “Freeduino-Mega2560 ADK” is designed for experiments and is not suitable to be used in life
support and mission critical products.
2. Always request support via your account login at EmbeddedMarket.com as it allows the
technical team to answer it in more detail which is not possible over phone.
3. “Freeduino-Mega2560 ADK” requires extensive Java & C Programming skills as well as
good exposure to managing computer’s settings like PATH & installations. Ensure you are
aware of this or you have someone ready at your end to do this as our support team
cannot solve installation related issued. Installation procedure is well document in this
user manual and is sufficient to complete the installation task.
4. Do not Connect Both Power sources at same time (USB & 9V External).
5. This product depends on various software packages like Eclipse, JDK, JRE, ADK, ADT,
Arduino IDE, USB Drivers of the Android Phone etc. Thus you have to ensure that your
computer and Android Device is compatible with the system requirements specified by
all required software packages.
6. Manufactured by:
Embedded Market
205 Decision Tower
Next To CityPride
Satara Road
Pune 411037 India
Ph: +91 20 24228818
Email for Sales – [email protected]
Website – www.EmbeddedMarket.com
Trademarks – Android is trademark of Google.
Product Datasheet
11